
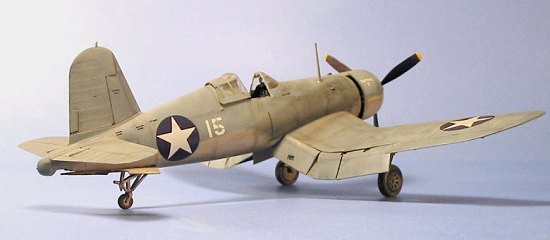
Tamiya 1/48 F4U-1 Corsair
|
KIT # |
61046 |
|
PRICE: |
$26.00 MSRP |
|
DECALS: |
See review |
|
REVIEWER: |
|
|
NOTES: |
|
HISTORY |
The Chance-Vought Corsair was supposed to be the U.S. Navy's standard fleet defense fighter for the war everyone in the Navy knew was coming sooner or later. When it first flew in 1940, it was the first American fighter capable of speeds in excess of 400 mph, and might have been the first fighter anywhere to accomplish that. It was the first carrier-based fighter to have a performance that at least equalled any of its potential land-based opponents.
Unfortunately, due to such problems as the relocation of the cockpit even further aft than it had been in the prototype to allow more fuel in the main tank, which severely restricted the pilot's view during the all-important maneuver of landing aboard a carrier, coupled with overly-stiff landing gear that had a propensity to bounce severely when landed aboard by less than an expert pilot, the Navy decided that as good as the airplane was, it was too much of a handful for the average wartime-trained Navy fighter pilot to safely and consistently operate from the restricted deck of an aircraft carrier. The U.S. Marines - who have traditionally been given the equipment the Navy didn't care to use - felt like B'rer Rabbit in the briar patch when the Navy "cast off" the Corsair and consigned it to land-based operation by the Marines.
 When the Corsair
arrived at Guadalcanal in the Spring of 1943, it was "just what the doctor
ordered" for the military campaign being waged in the Solomons. Flown with
the correct tactics - maintain speed and fight in the vertical, rather than
the horizontal, plane - the Corsair was superior to any Japanese fighter it
would meet in combat, and the Marines were soon mowing down the enemy as fast
as squadrons could be re-equipped with the airplane. So great was the need
throughout the great air battles of the summer, fall and winter of 1943, no
Marine squadron was able to keep its own airplanes. When a squadron rotated
into the theater for a combat tour, they took over the airplanes of the unit
they were replacing. By the time the Japanese removed their carrier units from
Rabaul on January 25, 1944, the Corsairs had completed the destruction of
trained aircrew that had begun at Midway. After the losses of the Solomons,
the Japanese Navy was a shadow of its former self.
When the Corsair
arrived at Guadalcanal in the Spring of 1943, it was "just what the doctor
ordered" for the military campaign being waged in the Solomons. Flown with
the correct tactics - maintain speed and fight in the vertical, rather than
the horizontal, plane - the Corsair was superior to any Japanese fighter it
would meet in combat, and the Marines were soon mowing down the enemy as fast
as squadrons could be re-equipped with the airplane. So great was the need
throughout the great air battles of the summer, fall and winter of 1943, no
Marine squadron was able to keep its own airplanes. When a squadron rotated
into the theater for a combat tour, they took over the airplanes of the unit
they were replacing. By the time the Japanese removed their carrier units from
Rabaul on January 25, 1944, the Corsairs had completed the destruction of
trained aircrew that had begun at Midway. After the losses of the Solomons,
the Japanese Navy was a shadow of its former self.
Building a Solomons-Based Corsair:
As far as individual airplanes belonging to a specific pilot was concerned, while a man might be assigned an airplane, and while his fighting score might be maintained on that airplane by its crew, the reality was that pilots flew whatever airplane was "in service" at the time the mission was scheduled to take off. Maintenance in the field on the island airfields was limited to what was necessary to allow the airplane to fly and fight.
 Paint faded rapidly
under the hot tropic sun, while the "sandblast effect" of operating from a
crushed-coral or dirt runway did nothing to improve the appearance of the
fighters, not to mention the "dings" that happened as crewmen climbed over the
airplane to service it; exhaust stains and gunfire stains were not washed off
at the conclusion of a mission, while the fact that the gas tank leaked meant
that the airplane's painted surface became even more corroded from the effects
of high-octane gasoline on it.
Paint faded rapidly
under the hot tropic sun, while the "sandblast effect" of operating from a
crushed-coral or dirt runway did nothing to improve the appearance of the
fighters, not to mention the "dings" that happened as crewmen climbed over the
airplane to service it; exhaust stains and gunfire stains were not washed off
at the conclusion of a mission, while the fact that the gas tank leaked meant
that the airplane's painted surface became even more corroded from the effects
of high-octane gasoline on it.
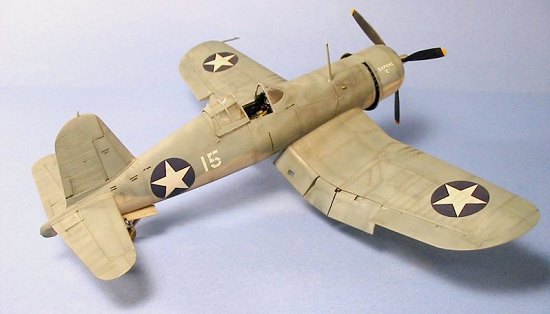
The result, as can be seen by even the quickest perusal of contemporary photos of Corsairs in the Solomons is that creating an accurate representation of one of these airplanes is one of the few times when "weathering" a model that "too much is not enough" is the rule to follow, rather than the more usual "less is more."
|
THE KIT |
What can be said about the Tamiya Corsairs that hasn't already been said? This is one of the best model kits ever released in terms of overall accuracy, fidelity of detail, and good production design that leads to ease of assembly, allowing the modeler to concentrate on the ultimate result, rather than merely slogging through the construction phase. While there are resin cockpits available for this kit, the truth is that the kit-supplied cockpit is more than sufficient for all but the most demanding modeler. The only real complaint anyone has been able to level at the kit is the fact it should not have the cutout step in the right-wing flap, which was apparently an entirely post-war phenomenon. For those who are sticklers for accuracy, fixing this is very easy.
|
CONSTRUCTION |
Due to the excellent production design of the kit, construction of the model presents no difficulties. One thing I have discovered in making several of these kits is that - if one wishes to assemble the wing in the unfolded position, it is a good idea to glue in some Evergreen strip inside the wing joint, to provide additional surface for the joint and thereby strengthen it.
|
CAMOUFLAGE & MARKINGS |
 The main thing to
be concerned about in construction of an F4U-1 is getting the cockpit colors
right. While acknowledging that there is likely no one "completely right" way
to paint the cockpit, the modeler who paints it this way can rest easy in the
thought that it is most likely that most F4U-1 were painted this way:
The main thing to
be concerned about in construction of an F4U-1 is getting the cockpit colors
right. While acknowledging that there is likely no one "completely right" way
to paint the cockpit, the modeler who paints it this way can rest easy in the
thought that it is most likely that most F4U-1 were painted this way:
The "hellhole" - that area of the lower fuselage beneath the pilot's seat and side consoles, should be painted Yellow Zinc Chromate; this includes the foot guides for the rudder pedals, the pedals themselves, and the area immediately under the instrument panel, as well as the forward cockpit bulkhead. One can also paint the rear cockpit bulkhead this color, or it can be painted Interior Green, along with the rest of the cockpit - there is precedent for both. This is also true for the seat.
The side consoles, the control stick, and the sides of the fuselage above the consoles, should be painted Interior Green. The various instrument panels should be painted Semi-gloss Black, with the various buttons and switches on the side consoles drybrushed with aluminum to make them more visible.
The interior of the windscreen, and the area of the fuselage immediately below it, should be Flat Black. The interior of the sliding canopy can be either Flat Black or interior green.
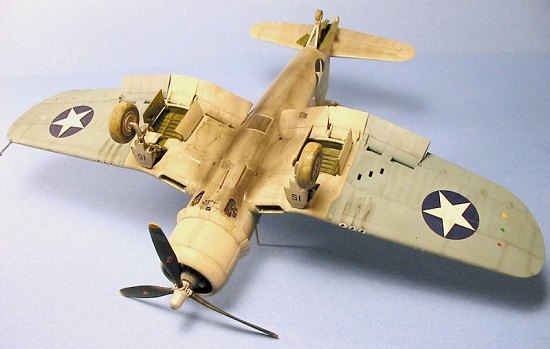
Other areas of painting to do during construction are the interior of the engine cowling, which should be Yellow Zinc Chromate, and the wheel wells - which can be either Yellow Zinc Chromate or the lower camouflage color; it would appear that the airplanes came out of the factory with the wheel wells and interiors of the gear doors in Yellow Zinc Chromate, and may have been later painted the lower color in the field as repairs were done there. There are also reports of Corsairs with the wheel wells in "Salmon." This is a primer that goes on before the Yellow Zinc Chromate, and is exactly that: the color of cooked salmon. I have seen it on F4U-1D and F4U-4 aircraft that were undergoing restoration and having their paint taken down to bare metal for the first time since original production. A modeler could do their F4U-1 with Salmon gear wells and Yellow Zinc Chromate gear door interiors, and no member of the Kolourpolitzei could prove you wrong.
Exterior Painting:
 Once the model is
assembled, it is time to paint the exterior. If you are going for a
weathered-out Solomons veteran, here's what I did:
Once the model is
assembled, it is time to paint the exterior. If you are going for a
weathered-out Solomons veteran, here's what I did:
First, I "pre-shaded" the model by airbrushing flat black over all the panel lines. I used Gunze-Sangyo "Light Gull Grey" for the lower color, and lightened it with white to go back over the panels. The fabric of the elevators was lightened even more. For the upper surface, I started with Gunze-Sangyo "Blue Grey," but the original coat was lightened with some Gunze-Sangyo "Grayish Blue" to begin with. When that was done, I lightened it a bit with more "Grayish Blue" and went over the fabric-covered outer areas of the lower wing and the fabric area of the outer flaps; remember, this wasn't exposed to the sun that much, so the lower wing will be the darkest color of all. I then put some of the "Light Gull Grey" in the paint cup, and went over the upper surfaces overall, panel by panel. I then started using Flat White in the paint cup to progressively lighten the color as I applied it to the upper wings, horizontal stabilizer and upper fuselage - the areas most exposed to the sun. A bit more white went in (we're talking a brushfull at a time with the lightening process), and then the fabric-covered areas were painted.
I then went over the model with thinned Tamiya "Smoke," staining areas, going over panel lines, ribs in fabric areas, etc. I also used the "Smoke" to begin the process of the exhaust stains under the fuselage and center wing, as well as the upper fuselage sides and upper wing. I then added in some Gunze-Sangyo "Dark Earth" and went back over the exhaust-stained areas. After that, I mixed "Smoke" with some Tamiya "Sky Grey" and went over the exhaust stains yet again. When all this was done, I gave the model a coat of Future.
Decals:
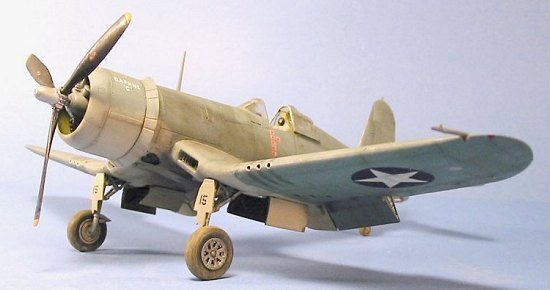
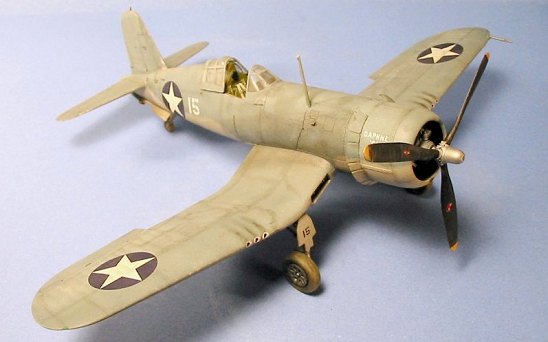
I used the kit decals to make "Daphne C," a Corsair flown by 6-victory ace Capt. James N. Cupp of VMF-213 during the summer of 1943.
Once the decals had set, I went over the national insignias on the upper wings and fuselage with an artists rubber eraser, which wore down the blue color sufficiently to look like it was "weathered" by the sun.
Final Finish:
 After the overall
sealer coat of Future had dried, I applied several thinned coats of Testor's
Dullcote, until the model had a very "flat" finish, associated with sun-faded
paint. Then I airbrushed some Testor's Metalizer Sealer very lightly over the
exhaust stains, to give them the slightly-shinier finish associated with oil,
this was also done to the area of the fuselage around the fuel tank to
simulate the surface with a layer of avgas in the paint.
After the overall
sealer coat of Future had dried, I applied several thinned coats of Testor's
Dullcote, until the model had a very "flat" finish, associated with sun-faded
paint. Then I airbrushed some Testor's Metalizer Sealer very lightly over the
exhaust stains, to give them the slightly-shinier finish associated with oil,
this was also done to the area of the fuselage around the fuel tank to
simulate the surface with a layer of avgas in the paint.
I also "muddied" the wheels, and drybrushed "mud spray" in the gear well and on the lower wing and flap immediately behind the wheels.
|
CONCLUSIONS |
I think my "dirty bird" is likely as good a representation of a Solomons Corsair as you can get. Like I said before, this is one case where "too much is not enough" is the rule to follow for accuracy's sake.
March 2003
Copyright ModelingMadness.com. All rights reserved. No reproduction in part or in whole without express permission.
Kit courtesy of my wallet!
If you would like your product reviewed fairly and fairly quickly, please contact the editor or see other details in the Note to Contributors.