Monogram 1/48 B-25J Mitchell 'Gunship'
|
KIT # |
5507 |
|
PRICE: |
Currently OOP but $15-20 at swap meets |
|
DECALS: |
one option |
|
REVIEWER: |
Tom Cleaver |
|
NOTES: |
|
HISTORY |
The dawn sky over Kyushu, southernmost island of the Japanese Home Islands, was clear on August 19, 1945, as Major Jack McClure of the 498th "Falcons" Bomb Squadron and Major Wendell Decker of the 499th "Bats Outta Hell" Bomb Squadron in "Betty's Dream," orbited their B-25J Mitchell gunships. The Pacific War had ended four days earlier, but the crews were on the alert for possible attacks by Japanese who did not heed their Emperor's decision to surrender. This was perhaps the most important rendezvous of the Pacific War as the two bombers from the 345th "Air Apaches" Bomb Group waited to sight the aircraft carrying the official Japanese surrender delegation. Finally, Decker's top turret gunner spotted the white dots to the north. The white dots soon resolved themselves as two G4M1 "Betty" bombers, their camouflaged airframes quickly overpainted in white, the well-known Hinomaru national insignia replaced with green crosses, and four Zeros in similar markings. As the B-25s swung in to escort the Bettys, the Zeros turned away. It was an acknowledgment of their contribution to victory in the Pacific that aircraft of the Air Apaches had been chosen to escort the surrender delegation to the island of Ie Shima, near Okinawa.
 At the field,
aircrews and ground crews of the resident USAAF units, and any other
Americans who could arrange to get there waited for the arrival of the
four aircraft. As if putting on a show for the victors, the two Betty
bombers made a low pass over the runway before landing. Once on the
ground, American military policy quickly established a perimeter around
the aircraft and the Japanese government representatives were quickly
escorted to a waiting C-54 transport for the flight to Manila where they
would meet with General Douglas MacArthur and the other representatives
of the victorious allies to work out the concrete details of the
surrender of the Empire of Japan.
At the field,
aircrews and ground crews of the resident USAAF units, and any other
Americans who could arrange to get there waited for the arrival of the
four aircraft. As if putting on a show for the victors, the two Betty
bombers made a low pass over the runway before landing. Once on the
ground, American military policy quickly established a perimeter around
the aircraft and the Japanese government representatives were quickly
escorted to a waiting C-54 transport for the flight to Manila where they
would meet with General Douglas MacArthur and the other representatives
of the victorious allies to work out the concrete details of the
surrender of the Empire of Japan.
Once the C-54 was on its way, the MPs allowed the Americans on the field to surround the bombers, taking photographs of the planes and their crews, who seemed overwhelmed by the friendly response they received from those who they had been told would eat them if an invasion of the home islands had been necessary. As Major Vic Tatelman, pilot of “Dirty Dora II” remembered, “It was certainly the biggest celebration I had ever been to.”
 The C-54
returned on August 20, with two complete sets of original surrender
documents, to be conveyed back to Tokyo in the Bettys. While the
surrender delegation had been in Manila, it had been discovered at Ie
Shima that there was no fuel available of low enough octane for the
Japanese aircraft to use for refueling. It was suggested that the
higher-octane American fuel be mixed with the low octane fuel remaining
in the aircraft, but this was at first rejected. Late that afternoon,
the first Betty took off for the return flight to Tokyo, escorted again
by two Mitchells from the 345th. Rather than land on Kyushu,
which was the nearest of the Japanese home islands, the Betty flew on for
Tokyo, despite the low fuel reserves. The bomber flew out over the
Inland Sea, taking the most direct route to Tokyo. Over the water, the
Betty finally ran out of fuel. The pilot attempted an emergency landing
ashore, but the plane ended up short, going into the water and breaking
up on impact.
The C-54
returned on August 20, with two complete sets of original surrender
documents, to be conveyed back to Tokyo in the Bettys. While the
surrender delegation had been in Manila, it had been discovered at Ie
Shima that there was no fuel available of low enough octane for the
Japanese aircraft to use for refueling. It was suggested that the
higher-octane American fuel be mixed with the low octane fuel remaining
in the aircraft, but this was at first rejected. Late that afternoon,
the first Betty took off for the return flight to Tokyo, escorted again
by two Mitchells from the 345th. Rather than land on Kyushu,
which was the nearest of the Japanese home islands, the Betty flew on for
Tokyo, despite the low fuel reserves. The bomber flew out over the
Inland Sea, taking the most direct route to Tokyo. Over the water, the
Betty finally ran out of fuel. The pilot attempted an emergency landing
ashore, but the plane ended up short, going into the water and breaking
up on impact.
There was now only one set of surrender documents in existence. The successful return of the second Betty to Japan had just become crucially important.
Next morning,
with the fate of the first bomber known, the Japanese agreed to have
American 100 octane fuel mixed with their 87 octane fuel in the remaining
Betty. Once again, “Betty’s Dream” was the lead escort. This time,
Major Tatelman, the 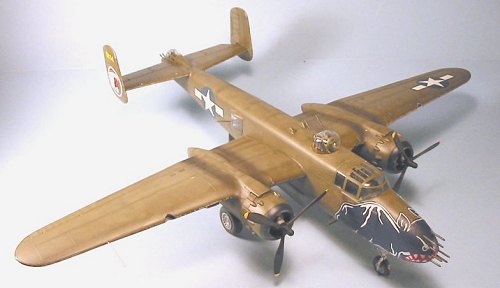 top-ranking
pilot in the group in terms of missions flown in two complete combat
tours, managed to get himself assigned as copilot to his friend Wendell
Decker. “After everything I had gone through in the Pacific, there was no
way I was going to miss this,” he later recalled.
top-ranking
pilot in the group in terms of missions flown in two complete combat
tours, managed to get himself assigned as copilot to his friend Wendell
Decker. “After everything I had gone through in the Pacific, there was no
way I was going to miss this,” he later recalled.
The two Mitchells and the Betty droned north-northeast toward the Home Islands. Decker and Tatelman had already determined that once they got over the islands, they would not allow the Japanese to fly over water until they reached Tokyo, and that if anything mechanical went wrong with the Betty, they would force it down at the first airfield they came across, to guarantee successful delivery of the precious cargo aboard.
As it turned out, the Betty had enough fuel to make the full return flight to Atsugi air base outside Tokyo. The Americans stayed with the plane until it touched down, at which point they applied power and climbed back to altitude for the journey home.
For the crews of the 345th Bomb Group, World War II was finally over.
|
THE KIT |
Monogram’s B-25
series first appeared in 1976 with the release of the B-25H. The glass
nose B-25J was released in 1981, and the “gun nose” B-25J was released
around 1987-88, if memory serves correctly. Monogram has had a long
connection to the late Mitchell bombers. In the 1950s, they released a
SpeeDee-Bilt kit of the B-25J, that was the first “multi-media” kit, with
the fuselage and wings built of balsa wood over a frame, with plastic
details for such items as canopies, turrets, windows, gun packages,
landing gear, props and cowl fronts. As I recall, it made up into a good
model from what was a
 pretty
challenging build. In 1955, Monogram released its first three fully
injection-molded kits, which included a B-25H. Done in “box scale” it
was pretty close to 1/72, and (as Roger Jackson’s recent full build
review demonstrates) could be turned into a good looking model. My
memory is that my friends and I didn’t put that level of work in our many
B-25s, with which we had a great deal of fun recreating such events as
the Doolittle Raid.
pretty
challenging build. In 1955, Monogram released its first three fully
injection-molded kits, which included a B-25H. Done in “box scale” it
was pretty close to 1/72, and (as Roger Jackson’s recent full build
review demonstrates) could be turned into a good looking model. My
memory is that my friends and I didn’t put that level of work in our many
B-25s, with which we had a great deal of fun recreating such events as
the Doolittle Raid.
Aurora was the first to come up with an approximately-1/48 scale B-25 a couple years after the Monogram kit, but the Monogram B-25H of the mid-70s was the first time any kit of this well-known bomber was released with good detail. As it turns out, the Monogram kits are - nearly 30 years later - still the only accurate 1/48 scale models available of the late-series B-25s. The kit has come in and out of production over the years, primarily as the glass-nose version; I do not remember seeing the gunship B-25 released a second time.
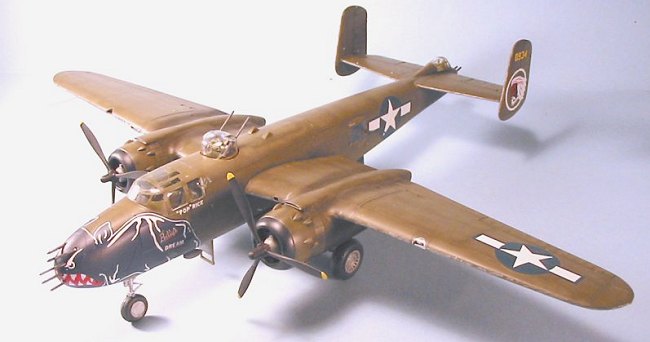
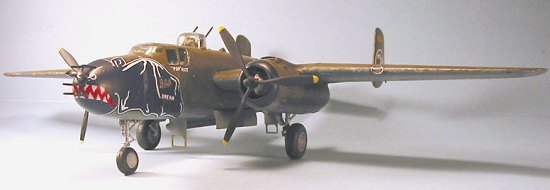
The gunship kit differs from the glass-nose version by the addition of the factory-developed 8-gun metal nose, created specifically for the B-25J by North American in response to requests from the Fifth Air Force, where the B-25 had become the foremost ground-attack aircraft of the war when armed with up to 8 forward-firing .50 caliber machine guns. With the two 2-gun packs attached below the cockpit, the B-25J gunship had no less than 12 forward-firing machine guns (14 if the top turret gunner rotated his turret to fire forward), which gave the airplane sufficient hitting power to literally dissolve the target with bullets in a low level pass.
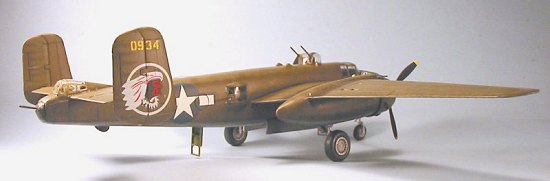
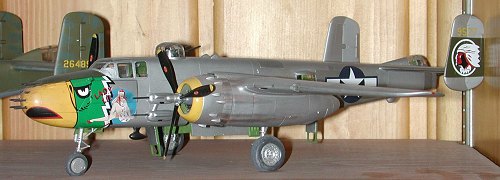 The
kit has decals for one aircraft of the 498th “Falcons” Bomb
Squadron of the 345th Bomb Group, with the airplane in natural
metal finish. These are the cheap decals Monogram began providing in the
late 1970s, and really are seriously worthless as regards both the
quality of the artwork and the ability to use the decals successfully.
(Your editor must have lucked out big time as he doesn't recall having
any trouble with the kit decals when he built his 25J gunship about 7
years ago. See Photo to left. Ed) As regards aftermarket decals,
there are not too many sheets out there for the B-25J gunship, though
“Betty’s Dream” appears on two - one each from SuperScale and Aeromaster.
While the Aeromaster sheet is easier to find, the SuperScale sheet -
which I believe is out of production - is the more accurate in terms of
the outline and colors of the “Bats Outta Hell” nose art. A modeler
should note that either of these decals is difficult to apply, with a
good chance of tearing the decal during application - particularly if one
attached the 8 machine guns into the gun nose during prior assembly.
The
kit has decals for one aircraft of the 498th “Falcons” Bomb
Squadron of the 345th Bomb Group, with the airplane in natural
metal finish. These are the cheap decals Monogram began providing in the
late 1970s, and really are seriously worthless as regards both the
quality of the artwork and the ability to use the decals successfully.
(Your editor must have lucked out big time as he doesn't recall having
any trouble with the kit decals when he built his 25J gunship about 7
years ago. See Photo to left. Ed) As regards aftermarket decals,
there are not too many sheets out there for the B-25J gunship, though
“Betty’s Dream” appears on two - one each from SuperScale and Aeromaster.
While the Aeromaster sheet is easier to find, the SuperScale sheet -
which I believe is out of production - is the more accurate in terms of
the outline and colors of the “Bats Outta Hell” nose art. A modeler
should note that either of these decals is difficult to apply, with a
good chance of tearing the decal during application - particularly if one
attached the 8 machine guns into the gun nose during prior assembly.
|
CONSTRUCTION |
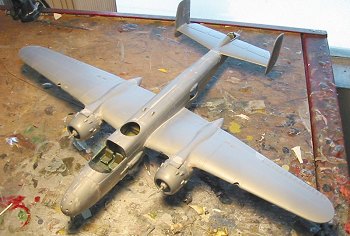
 As with any
Monogram kit from this period, fit problems exist to a degree one does
not find in contemporary kits. However, with a bit of effort as regards
test fitting and careful alignment of the parts during assembly, one can
get away with a minimum of putty use in assembly of the B-25. I only had
to use putty to fill in the gaps between the engine nacelle and the lower
wing surfaces on this kit.
As with any
Monogram kit from this period, fit problems exist to a degree one does
not find in contemporary kits. However, with a bit of effort as regards
test fitting and careful alignment of the parts during assembly, one can
get away with a minimum of putty use in assembly of the B-25. I only had
to use putty to fill in the gaps between the engine nacelle and the lower
wing surfaces on this kit.
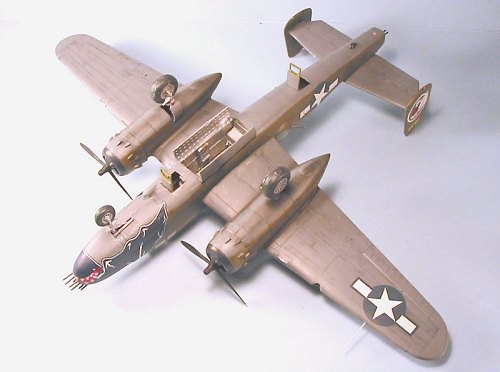
Assembly of the gun nose is tricky, and I first decided to use a resin nose that Mark Gran was nice enough to cast for me. However, I discovered I needed a hollow nose in order to get sufficient weight ahead of the main gear to insure a nose sit, so I used the kit nose, reinforced from inside with both some Evergreen strips along the joints, with CA glue applied over that. It was impossible to assemble the machine guns into the nose at this time, as every available internal square millimeter was needed for weights. Fortunately, it is not difficult to cut off the machine gun barrels and attach them from the outside during final assembly. This also considerably eases the problems associated with application of the nose art decal.
One special
note should be made about “Betty’s Dream” - this airplane did not carry
the twin “package” guns. I asked Vic Tatelman about this, and he told me
that most of the 345th B-25Js with the f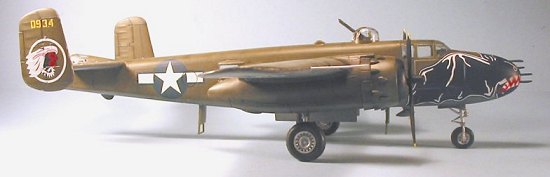 actory
gun nose didn’t carry them, due to the fact that repeated use of the
package guns led to cracking the fuselage frames in that area, thus
shortening the operational life of the airplanes, and besides, as he
pointed out, “the eight guns in the nose gave you plenty of firepower.”
I, however, did not discover this until after the model was assembled,
painted and decaled, which made for a difficult correction; fortunately,
I don’t make a heavy application of glue in these assemblies, so knocking
off the package guns wasn’t that difficult, and careful use of Mr.
Surfacer 500 and sanding sticks, with a careful application of paint,
allowed me to fix the mistake. Once again, “failure to do proper
research” made the project more difficult.
actory
gun nose didn’t carry them, due to the fact that repeated use of the
package guns led to cracking the fuselage frames in that area, thus
shortening the operational life of the airplanes, and besides, as he
pointed out, “the eight guns in the nose gave you plenty of firepower.”
I, however, did not discover this until after the model was assembled,
painted and decaled, which made for a difficult correction; fortunately,
I don’t make a heavy application of glue in these assemblies, so knocking
off the package guns wasn’t that difficult, and careful use of Mr.
Surfacer 500 and sanding sticks, with a careful application of paint,
allowed me to fix the mistake. Once again, “failure to do proper
research” made the project more difficult.
As regards assembly overall, the model has no glitches other than that the modeler needs to test-fit everything and apply some intelligence to solving assembly alignment to defeat the built-in design faults of the kit.
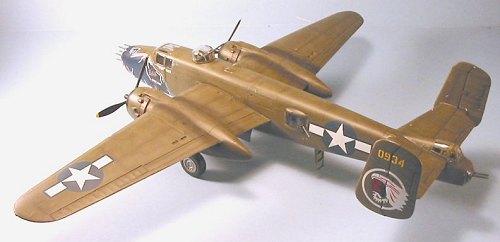
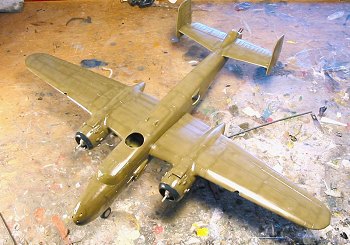
 I painted the pilots cockpit dull dark green, the rear fuselage yellow
zinc chromate, and the bomb bay aluminum. As with my other B-25s, I did
not install most of the rear fuselage internal detail, other than those
items immediately next to the large waist windows, since it cannot be
seen and saves weight to insure nose-sitting by the completed model.
I painted the pilots cockpit dull dark green, the rear fuselage yellow
zinc chromate, and the bomb bay aluminum. As with my other B-25s, I did
not install most of the rear fuselage internal detail, other than those
items immediately next to the large waist windows, since it cannot be
seen and saves weight to insure nose-sitting by the completed model.
In this case I assembled the whole model, which led when I painted it to difficulty in covering the area between the inner engine nacelles and the fuselage. After this, I decided to paint my B-25s and then attach the wings to the fuselage.
I Futured all the glass, and attached the cockpit canopy and tail gun canopy. I left off the waist windows and did not attach the top turret until later.
Once the model was assembled, I rescribed the panel lines with a sharp #11 X-acto blade. In fact, much of the surface on a 1:1 Mitchell (we have three out at Chino, including the rebuilds over at Aero Trader, to look at) is covered with lapped panels, so the raised panel line of this kit is actually much more accurate in final look than the “state of the art” recessed panel lines so many modelers think a model must have if it is to be worth bothering with. The result with the X-acto left panel lines that looked close to the original ones.
|
COLORS AND MARKINGS |
Painting:
 After
pre-shading the panel lines with flat black, I used Tamiya Neutral Grey
for the lower surfaces and Gunze Sangyo “Olive Drab 2" for the upper
surfaces, post shading both areas with lightened paint to simulate
sun-fading. I used Tamiya “Smoke” for the exhaust stains.
After
pre-shading the panel lines with flat black, I used Tamiya Neutral Grey
for the lower surfaces and Gunze Sangyo “Olive Drab 2" for the upper
surfaces, post shading both areas with lightened paint to simulate
sun-fading. I used Tamiya “Smoke” for the exhaust stains.
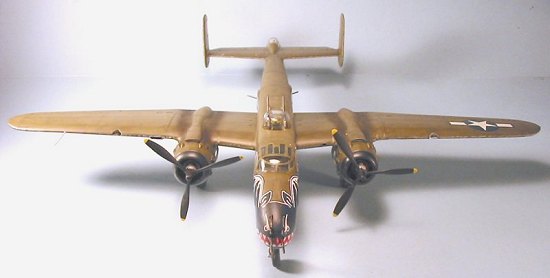
Decals:
The nose art decal provided plenty of problems. Once on the model, each half required that I slice the decal in numerous locations to allow it to settle right, and a lot of “fiddling” to get the two halves to fit together properly. The blue of this nose marking is much darker than the “Bats Outta Hell” nose art of the earlier airplanes. Vic Tatelman has told me that this is due to the fact the B-25Js were painted with Insignia Blue, while the earlier airplanes were painted with a lighter blue that was also more subject to sun fading in the harsh climate of New Guinea. The nose art decals went down under repeated applications of Micro-Sol. Once I was sure they were going to work and that I was indeed going to make “Betty’s Dream,” I applied the rest of the decals, which went down without problems.
|
FINAL CONSTRUCTION |
I applied several coats of thinned Dullcote varnish to get the final surface finish. I then attached the wheels to the landing gear, attached the access hatches and bomb bay doors, the props and the waist windows with their machine guns.
It should be noted that the turret does not have paint over the seams of the clear plexiglass. We have several World War II turrets out at Planes of Fame, and they are assembled from multiple parts of plexiglass, glued together - the “crazing” of the plexiglass has been mistaken over the years for metal frames on these turrets, but it was not the case. Once I had the turret assembled, I filled in the gun slots with Elmer’s Glue. Once this was dried, I painted it Olive Drab. If you look at the real thing, these slots were filled in with big zippers that were attached to the gun barrels so they zipped and unzipped as the guns were raised and lowered.
|
CONCLUSIONS |
 To me, the final
product is what is important. The Monogram B-25 looks very good when
finished, even when displayed next to the “state of the art” Accurate
Miniatures kit. Its fit problems are overblown - or at least not
insurmountable with a modicum of patience and skill in assembly and
alignment of parts. Even at out of production “collector’s prices” (I
paid $20 for this one from my friend David O. Garcia), they represent
excellent value for the money, and anyone waiting for a “state of the
art” replacement of this venerable kit had best not be holding their
breath for that event - you’re going to turn blue and die before that
happens. In the meantime, for those who pick up any one of the three
Monogram B-25s, you’ll be rewarded with a great addition to the
collection, and the discovery that the “conventional knowledge” about the
Monogram B-25 kits is neither conventional nor knowledgeable.
To me, the final
product is what is important. The Monogram B-25 looks very good when
finished, even when displayed next to the “state of the art” Accurate
Miniatures kit. Its fit problems are overblown - or at least not
insurmountable with a modicum of patience and skill in assembly and
alignment of parts. Even at out of production “collector’s prices” (I
paid $20 for this one from my friend David O. Garcia), they represent
excellent value for the money, and anyone waiting for a “state of the
art” replacement of this venerable kit had best not be holding their
breath for that event - you’re going to turn blue and die before that
happens. In the meantime, for those who pick up any one of the three
Monogram B-25s, you’ll be rewarded with a great addition to the
collection, and the discovery that the “conventional knowledge” about the
Monogram B-25 kits is neither conventional nor knowledgeable.
February 2004
Kit courtesy of my wallet.
If you would like your product reviewed fairly and fairly quickly, please contact the editor or see other details in the Note to Contributors.