
Ki-Tech 1/48 J-3/L-4 Cub
| KIT #: | ? |
| PRICE: | AUD $8.00 |
| DECALS: | Three options |
| REVIEWER: | Alwin Broeckelmann |
| NOTES: |
| HISTORY |
The Piper Cub has its origins with
the work of C. Gilbert Taylor, an Englishman who had moved to the US. William
Piper acquired Taylor's company but kept him on as President and Chief Engineer
until they parted company in 1935. The J-2 Cub of 1936 was a modified Taylor
design using a 40hp Continental A-40-4. In 1938 the J-3 appeared which was a
refined (noticeably the cowlings and windscreen) up-powered (50hp Continental,
Franklin, or Lycoming) version of the J-2. In 1940, the J-3C-65 utilising a 65hp
Continental engine was developed. This model gave rise to the L-4, of which
5,673 were built on military contract. An alternate military development was the
HE-1 version of the J-5. The J-5A Cruiser was a 3 seat development of the J-3
utilising a 75hp engine.  First built in 1939, 495 were produced. This was
followed in February 1941 by the J-5B using a 75hp geared Lycoming engine, and
then the 100hp Lycoming powered J-5C. About 35 of the J-5C had been sold
privately when production was altered to the HE-1 military variant for the USN.
First built in 1939, 495 were produced. This was
followed in February 1941 by the J-5B using a 75hp geared Lycoming engine, and
then the 100hp Lycoming powered J-5C. About 35 of the J-5C had been sold
privately when production was altered to the HE-1 military variant for the USN.
The focus of my build is an unknown Piper Cub that was trailed by the RAAF. An aircraft status card shows that one was loaned to the RAAF from the USAAC starting 30/05/44, www.adf-serials.com I found an image with details as follows; Piper J3/l4 Cub aircraft used by the officers of the 7th Australian division for reconnaissance work and for visiting forward units in the valley. Identified from the left: VX53 Major I H Lowen and Flight Sergeant A J Hunter, Royal Australian Air Force. Location: Dumpu, Huon Peninsula, PNG. AWM Neg 061250.
| THE KIT |
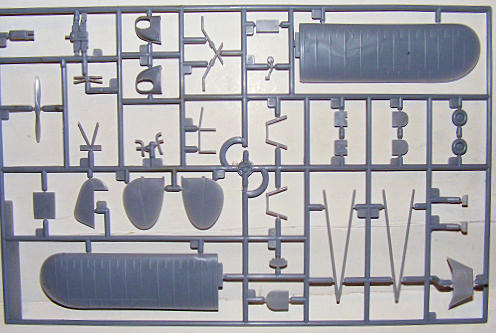
 This kit is a very
basic set up as was the aircraft itself. We have 2 sprues 1st with
major and minor components moulded in light grey and the 2nd with the
fuselage, windscreen and roof window. Unusually in this kit the entire fuselage
is transparent, having a separate rudder moulded in grey. I found no flashing to
speak of a tiny amount on the wing leading edges but this is found on most kits.
Instructions are over both side of 3 A4 size page and need careful study before
you mount each part. Cover page is aircraft description, pages 2 and 3 are build
directions in 4 major step with pictures and arrows pointing to location of part
on kit, the final 3 pages are painting directions for 3 aircraft, 0-59 Cub,
USAAF, Fall 1941, Piper L-4 ISREAL 1948, Piper J-2 Cub Poland Civilian version.
This kit is a very
basic set up as was the aircraft itself. We have 2 sprues 1st with
major and minor components moulded in light grey and the 2nd with the
fuselage, windscreen and roof window. Unusually in this kit the entire fuselage
is transparent, having a separate rudder moulded in grey. I found no flashing to
speak of a tiny amount on the wing leading edges but this is found on most kits.
Instructions are over both side of 3 A4 size page and need careful study before
you mount each part. Cover page is aircraft description, pages 2 and 3 are build
directions in 4 major step with pictures and arrows pointing to location of part
on kit, the final 3 pages are painting directions for 3 aircraft, 0-59 Cub,
USAAF, Fall 1941, Piper L-4 ISREAL 1948, Piper J-2 Cub Poland Civilian version.
| CONSTRUCTION |
This was a
relatively straight from the box build with some minor trimming of parts to get
the fit. Starting with the seats which I painted leather using Humbrol 62, the
control columns are glued to the bottom of both seats easily place as the seats
have a r ecess in the centre to accommodate them. While these dried I pre painted
the engine XF-1 black over all, exhaust rust and inside of the cowling in bare
metal. We then glue the instrument panel; seats and forward cross brace to the
left half of the fuselage. Once this has set we glue the fuselage halves
together they are a perfect fit with no filing or sanding needed (in my kit
anyway.)
ecess in the centre to accommodate them. While these dried I pre painted
the engine XF-1 black over all, exhaust rust and inside of the cowling in bare
metal. We then glue the instrument panel; seats and forward cross brace to the
left half of the fuselage. Once this has set we glue the fuselage halves
together they are a perfect fit with no filing or sanding needed (in my kit
anyway.)
Now for the tricky bit of mounting the engine, firstly glue
one half of the cowling in place and allow to dry next place a small amount of
glue onto the rear mounting points and top of the engine slip into place then
mount the remaining cowling so you can then centre the engine better, I waited
till the glue was dry before mounting the other cowling half and found the
engine off line slightly. Don’t forget parts 32 and 33. I almost did as they are
the cooling cover s I think,
they are mounted on top of the cylinders and angled down to direct air flow.
Then mount the exhaust to the engine followed by the prop.
s I think,
they are mounted on top of the cylinders and angled down to direct air flow.
Then mount the exhaust to the engine followed by the prop.
Now in the next step I found some major redesigning of the top mounting points on the windscreen was need to get it to fit, this was done with gentle use of a modelers round file until the fit was achieved, you now place the roof window in I didn’t and left this until I had completed painting to avoid the inevitable mess up.
The next job is fitting the wings, tail plane and rudder; no drama here nice tidy fit all round. We the mount part B 34 the wheel centre mount and the wing braces, making sure that the mid braces (19,20) are vertical and not angled over. I checked this with photos and 3 view plans. Lastly are the main wheel supports and wheels the wheel mounting points need to be trimmed shorter to get them closer to the body, tail wheel dry fit it first to make sure you are putting it in properly, it is almost vertical again I made the error of mounting it wrong and found it just collapsed under the weight of the tail.
| COLORS & MARKINGS |
 There are 3 paint
schemes available to the builder in the instruction sheet as described above. My
kit has been painted in overall Olive Drab Tamiya XF-62and the tail and rudder
in XF-2 Flat White as for pacific theatre identification in RAAF aircraft. Give
it a coat of Tamiya X-22 clear where the decals are to be positioned. All black
parts XF-1
There are 3 paint
schemes available to the builder in the instruction sheet as described above. My
kit has been painted in overall Olive Drab Tamiya XF-62and the tail and rudder
in XF-2 Flat White as for pacific theatre identification in RAAF aircraft. Give
it a coat of Tamiya X-22 clear where the decals are to be positioned. All black
parts XF-1
I did not use those decals supplied with the kit so don’t know how good they are although they appear to be nice decals. I went through my collection of decals and sourced the appropriate ones to use for my build, they were all good bar the Q letter that is a little yellowed with age but it doesn’t show through the Olive Drab. Give it a coat of Tamiya X-22 clear, all done time for final pics.
| CONCLUSIONS |
This is my second Ki-Tech the 1st being their Caribou, a nice kit to work on. Study the plans carefully and dry fit, over all though a pleasant kit to work on Needs a bit of trimming on a couple of parts as stated above. But has come up very nicely and is a good addition to my rarer and not so well known RAAF bird collection.
| FINAL CONSTRUCTION |
 I have checked to
make sure all the links lead you to the correct sites, so all is good. Any
questions don’t hesitate to ask, as the only silly question is the one you never
ask as my Father always told me.
I have checked to
make sure all the links lead you to the correct sites, so all is good. Any
questions don’t hesitate to ask, as the only silly question is the one you never
ask as my Father always told me.
www.awm.gov.au Then click collections, collection search, follow on screen prompts.
www.adf-serials.com Enter the aircraft you are looking for in search site panel.
www.aviastar.org/index2.html Choose the country you want and go from there.
March 2008
If you would like your product reviewed fairly and quickly, please contact the editor or see other details in the Note to Contributors.