By Robert Shockley
I'd like to begin by thanking Scott for allowing myself and others to contribute to his model review site. I've been a modeler since I was a little kid and this site has reviews of just about every popular kit ever made, plus some stuff that you won't see very often.
On to the review! I've decided to showcase Monograms' excellent 1/48 scale B-17G Flying Fortress. First, I'd like to share a little history behind this particular kit. It was built back in 1987, while I was assigned to Ft. Lewis, Wa., as an MP. Soldiering left me w/ little time to build models, but when the PX had a sale on Dremel tools, I knew I had to have one. The B-17 was a natural, considering that it had a ton of interior stuff that I could show off w/ the Dremel tool! After it was finished, I was left w/ the dilemma of deciding what to do with it. I had been reassigned to Germany, and there was no way I was going to hand carry this thing for a 20 plus hour trip to Europe. It's Big!
Packing it into storage wasn't a very good option either, since I didn't want to get it 3 months later, broken into a million pieces. I finally decided to leave it with a hobby shop there in Tacoma that had a nice display case, and models hanging from the ceiling. (Since I built it to be hung, this was perfect...) I left my name with the lady, and sadly departed for Europe, never expecting to see it again. Fast-Forward now 10 years later. My new brother-in-law states one day that he is going to Seattle to visit his uncle. After about 15 minutes of calling long distance information, I finally located that hobby shop, and sure enough, the lady tells me "yep, got it hanging right above my head...you want it back? I've had lots of comments about it.." Are you kidding me??? Well, it made it back to Bakersfield in one piece, more or less, and we're happily reunited once again!!!
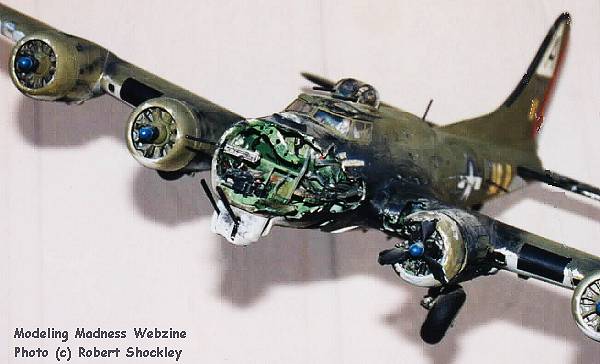
This is an excellent kit, having nice interior work thru much of the fuselage. You should take care when putting the 2 halves together though, as problems can develope with the fit around the turrets and the cockpit area (the windscreen especially). The only areas that I found to be lacking in detail were the wheel wells, and the tail gunners position. The cockpit is somewhat scarce also, considering it's a 4-engined bomber. Wanting to put my Dremel Tool to work, I had to decide where to cut it up. I didn't want to make a Diorama out of it (too big, plus it's been done a whole lotta times), so I decided to do a hanging mid-air collision display. I test-fitted the halves together first, marked the cut lines with a pencil, took the halves apart and then made my cuts. Once I had the desired areas cut out, I began filling in the open areas with damaged material made out of sheet styrene, bits of wire and pieces of plastic I-Beams.
Lots of test-fits were required during this phase. (Note: regarding the interior damage, I'm not a total detail freak, so it's not accurate if you're looking for the correct beams, wiring, etc. I just try to "make it look right" and go for it). The last thing done before the halves were joined was to thin out the plastic where I wanted flak damage, and to cut out the hatches. Very little putty was needed to conceal the split down the middle. The left wing received the same damage treatment as the nose at this time. I thought the cowling came out very good on the left in-board engine. I mangled the engine a little, and dropped the tire(after taking a flak chunk out of it!), then it was time to put on the wings and paint the whole thing. This was painted in pre-air brush days for me, but since it's such a huge kit, it was no problem. First the bottom was done in light grey, then a stencil was used to get the grey/green split line when the top halve was done in O.D. green. This worked out pretty well. You could also mask it and achieve the same result, but this leaves a sharp separation line between the colors, and the fuzzy separation line looks better and is more accurate.
The plane was then heavily weathered around the damaged areas with mostly just flat black and highlights of silver. 2 crewmen were then placed in the hatches, preparing to bail out. (Note: the kits figures are molded w/ their ground uniforms, so the lack of flight suits stands out). Parachutes were made from Green Putty. I also included a pilot in the cockpit, and a wounded bombardier in the remains of the nose. Most of the machine gun barrels had all broken off during the trip down from Tacoma, so I replaced them w/ thin reinforced wire (the white kind w/ the metal down the middle). It's almost perfectly to scale, holds paint well, and glues to the model very well (they're stronger than the original kit barrels).
That's pretty much it for this review. Monograms' B-17G is a fun kit to build that shouldn't pose any problems to modelers w/ beginner to intermediate skills. It is big though, so make sure you have the room for it. Mine will soon be proudly displayed at my VFW hall, as a tribute to the tens of thousands of airmen that gave their lives during WWII.
Copyright ModelingMadness.com. All rights reserved.