Pavla 1/72 Cessna UC-67 Bobcat/Crane
| KIT #: | ? |
| PRICE: | $ |
| DECALS: | See Review |
| REVIEWER: | Carmel J. Attard |
| NOTES: | Short run with resin and etched parts |
| HISTORY |
The Cessna Bobcat T-50 was a 5 seat twin-engine aircraft intended as a commercial transport and produced by Cessna Company in 1939. It is regarded as one of the prettiest American aircraft of the early 40s and is the American parallel to the British Oxford and Anson, in many cases also used with a crew of four for radio training.
 It has
a fuselage made of a fabric and wood covered steel tube with a tail-wheel and a
retractable gear fitted to a plywood covered wooden wings and fabric covered
wooden tail surfaces. It was soon discovered in both USA and Canada that the
T-50 had the qualities as a twin-engine type that can be adopted as a conversion
trainer and soon ordered into service as Crane Mk1 and AT-8 with delivery
reaching a total of 673 of the two types. 550 machines were passed to Canada
designated as Crane Mk1A to serve as multi engine trainers. Also the USAAC
showed interest in 33 machines marked AT-8. The USAAF soon ordered 1330 AT-17
and sub variants, these being powered by Jacobs R-775-9 engines. Bobcats began
to be used near-battle line transport. The T-50 as was by then more commonly
known served in transport role with the USAAF with the new Bobcat designation
C-78. In January 1943 these were designated UC-78 and these only differed
internally. 67 were also delivered to the US Navy referred to as JRC-1. A total
of 5360 Bobcats were built of all types and sub variants with varied equipment.
It has
a fuselage made of a fabric and wood covered steel tube with a tail-wheel and a
retractable gear fitted to a plywood covered wooden wings and fabric covered
wooden tail surfaces. It was soon discovered in both USA and Canada that the
T-50 had the qualities as a twin-engine type that can be adopted as a conversion
trainer and soon ordered into service as Crane Mk1 and AT-8 with delivery
reaching a total of 673 of the two types. 550 machines were passed to Canada
designated as Crane Mk1A to serve as multi engine trainers. Also the USAAC
showed interest in 33 machines marked AT-8. The USAAF soon ordered 1330 AT-17
and sub variants, these being powered by Jacobs R-775-9 engines. Bobcats began
to be used near-battle line transport. The T-50 as was by then more commonly
known served in transport role with the USAAF with the new Bobcat designation
C-78. In January 1943 these were designated UC-78 and these only differed
internally. 67 were also delivered to the US Navy referred to as JRC-1. A total
of 5360 Bobcats were built of all types and sub variants with varied equipment.
The Cessna T-50 Bobcat/Crane Mk1 had a wingspan of 41’11”, a length of 32’9” and a height of 9’11”. It weighed 5,000lbs when fully loaded and 3,500 unloaded. The AT-8 version was slightly faster than the AT17 at a maximum of 200 MPH. The aircraft carried no armament.
| THE KIT |
The Pavla kit of the Bobcat is the first of its type to come out as an injection moulded form in plastic. Previous to this, Forma Plane released a vac-form kit circa 1978 via the then distributors BMW models of UK. Pavla, the Czech Rep based company made the better of the two Bobcat offering in both simplicity to build as well as detail that comes with the model and is also complete with a variety of decal options.
 The Pavla box top has the familiar
coloured side views of the kit, featured one in RCAF and another in USAAF
different colours, the first one being overall yellow in Canadian markings,
which obviously attracts the attention. The kit is moulded in light grey plastic
consisting of 35 injection moulded parts. There are clear vacuform acetate parts
for the cockpit canopy and side windows. The radial engines come in two detailed
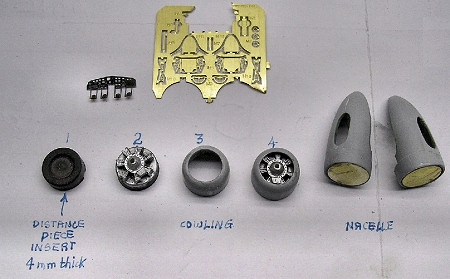
resin parts, cream colour. There are also 18 brass etch parts for the cockpit
interior, undercarriage detail, aerials for the fuselage, instrument panel,
seats, etc besides others. Detail of plastic parts is carefully reproduced to
represent fabric-covered areas on main planes, tail planes and tail unit. Sprue
runners are on the thick side and parts should therefore be carefully parted
using a fine hack saw in order to avoid damage. There is an instruction booklet,
which is easy to follow and contains sprue parts plan and six assembly steps
with exploded views format along with profile sketches with plan views for three
different colour schemes, i.e., besides the two views shown on the box cover
there is another colour scheme offering of a Bobcat in anodized silver overall
with yellow cowling and fuselage cross trim, representing the type that was
based at Pensacola. Some reference suggests that the yellow colour should in
fact be willow green to conform to those carried on a recently restored aircraft
attached to NAS Pensacola.
The Pavla box top has the familiar
coloured side views of the kit, featured one in RCAF and another in USAAF
different colours, the first one being overall yellow in Canadian markings,
which obviously attracts the attention. The kit is moulded in light grey plastic
consisting of 35 injection moulded parts. There are clear vacuform acetate parts
for the cockpit canopy and side windows. The radial engines come in two detailed
resin parts, cream colour. There are also 18 brass etch parts for the cockpit
interior, undercarriage detail, aerials for the fuselage, instrument panel,
seats, etc besides others. Detail of plastic parts is carefully reproduced to
represent fabric-covered areas on main planes, tail planes and tail unit. Sprue
runners are on the thick side and parts should therefore be carefully parted
using a fine hack saw in order to avoid damage. There is an instruction booklet,
which is easy to follow and contains sprue parts plan and six assembly steps
with exploded views format along with profile sketches with plan views for three
different colour schemes, i.e., besides the two views shown on the box cover
there is another colour scheme offering of a Bobcat in anodized silver overall
with yellow cowling and fuselage cross trim, representing the type that was
based at Pensacola. Some reference suggests that the yellow colour should in
fact be willow green to conform to those carried on a recently restored aircraft
attached to NAS Pensacola.
| CONSTRUCTION |
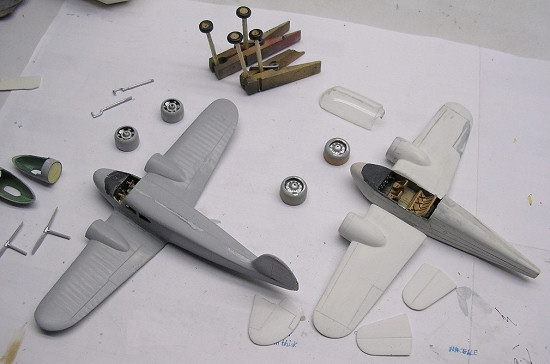 After having a general examination
of the parts, I started the construction with fixing the tiny interior detailing
in brass etch parts. The parts I find easy to cut from the fret using a pair of
scissors, understanding that the brass is of the 70/30 Alpha structure type,
which renders it very ductile and soft. The items are fixed in their proper
places using a tiny drop of super glue. The interior of cockpit and cabin was
given a coat of cockpit green while the seats were given a coat of leather
brown. One or two tries brought all the correct parts fitting nicely. This was
not without a little effort as the fuselage halves had no lugs and locating
holes as found in most kits. But now I have got used to the Pavla style of kits
and as the saying goes practice makes perfect. One should note here that I did
not use the vacform side Perspex since the windows are of such size that I could
use Kristal Kleer in place of the perspex given. The cockpit canopy was cut to
fitting size and assembled in place using tiny spots of white glue. This and
side window openings were masked off with masking tape to protect any dust from
entering or damage to the cockpit canopy. Cockpit frame painting will be left to
a later stage.
After having a general examination
of the parts, I started the construction with fixing the tiny interior detailing
in brass etch parts. The parts I find easy to cut from the fret using a pair of
scissors, understanding that the brass is of the 70/30 Alpha structure type,
which renders it very ductile and soft. The items are fixed in their proper
places using a tiny drop of super glue. The interior of cockpit and cabin was
given a coat of cockpit green while the seats were given a coat of leather
brown. One or two tries brought all the correct parts fitting nicely. This was
not without a little effort as the fuselage halves had no lugs and locating
holes as found in most kits. But now I have got used to the Pavla style of kits
and as the saying goes practice makes perfect. One should note here that I did
not use the vacform side Perspex since the windows are of such size that I could
use Kristal Kleer in place of the perspex given. The cockpit canopy was cut to
fitting size and assembled in place using tiny spots of white glue. This and
side window openings were masked off with masking tape to protect any dust from
entering or damage to the cockpit canopy. Cockpit frame painting will be left to
a later stage.
 The main wing parts have some
excess plastic that needs to remove from the inside face, before the wing parts
could be brought together. Each of the pair of engines painted in silver and
touches of grey had to fit inside the cowlings, which were painted in zinc
chromate on the inside. I inserted a distance piece to fit inside the cowling
and behind the resin engine. This will prevent the resin part from moving back
which will spoil its relative position with the front of the cowling. The
complete cowlings are then brought to the wings and if any gap remained this
were easily remedied with a tiny quantity of putty. The undercarriage legs are
The main wing parts have some
excess plastic that needs to remove from the inside face, before the wing parts
could be brought together. Each of the pair of engines painted in silver and
touches of grey had to fit inside the cowlings, which were painted in zinc
chromate on the inside. I inserted a distance piece to fit inside the cowling
and behind the resin engine. This will prevent the resin part from moving back
which will spoil its relative position with the front of the cowling. The
complete cowlings are then brought to the wings and if any gap remained this
were easily remedied with a tiny quantity of putty. The undercarriage legs are
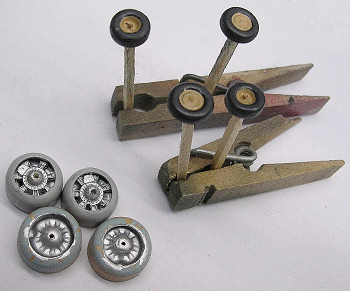 also fixed in place but the wheels were left to a later stage. The butt-jointed
wings were glued in place and care was made to align these as best one could.
Other external items as engine intakes, aerials; engine exhaust pipes, tail
wheel and propeller blades that also come in separate items were all assembled
at this stage. Incidentally the prop blades and aerials needed drilling holes at
the joining place and also at the engine center to take the prop shaft. One
should also ensure to place the blades to give the proper pitch when fixing
these in place. I found it needless to emphasize on the exact positioning of the
instrument panel and all the tiny detail that goes with it since all this will
be hidden in the end and one should do the best when f
also fixed in place but the wheels were left to a later stage. The butt-jointed
wings were glued in place and care was made to align these as best one could.
Other external items as engine intakes, aerials; engine exhaust pipes, tail
wheel and propeller blades that also come in separate items were all assembled
at this stage. Incidentally the prop blades and aerials needed drilling holes at
the joining place and also at the engine center to take the prop shaft. One
should also ensure to place the blades to give the proper pitch when fixing
these in place. I found it needless to emphasize on the exact positioning of the
instrument panel and all the tiny detail that goes with it since all this will
be hidden in the end and one should do the best when f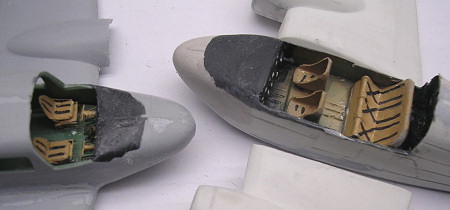 itting these interior
details. One other item worth mentioning is that I trimmed slightly all the wing
trailing edges as well as the end of the rudder as these were on the thick side,
not a big job to do but the end result is quite effective. Having all the items
glued in one piece I allowed the assembly to dry overnight. Next thing was
applying some putty to wing root to blend it to the fuselage. The kit is so
small that it did not render any interior stiffening of the wing to root joint
and the only thing I reiterate is to get a good alignment of the wings when kit
is viewed from front.
itting these interior
details. One other item worth mentioning is that I trimmed slightly all the wing
trailing edges as well as the end of the rudder as these were on the thick side,
not a big job to do but the end result is quite effective. Having all the items
glued in one piece I allowed the assembly to dry overnight. Next thing was
applying some putty to wing root to blend it to the fuselage. The kit is so
small that it did not render any interior stiffening of the wing to root joint
and the only thing I reiterate is to get a good alignment of the wings when kit
is viewed from front.
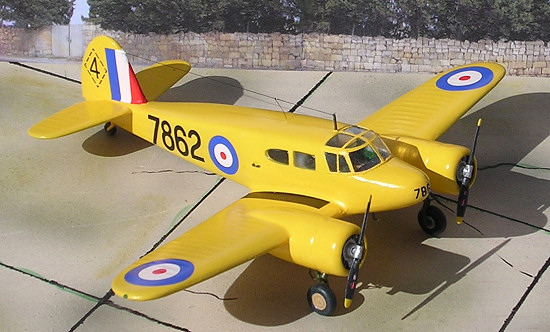
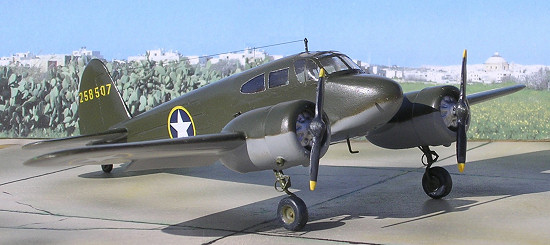
| COLORS & MARKINGS |
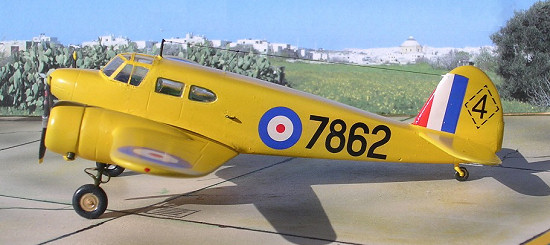 The kit was then given a smooth
wet and dry sanding overall and washed. The cockpit clear area was then
re-masked using Maskol and the kit was given a coat of semi-matt white, allowing
it to dry and then given a coat of ID yellow using a Compucolour brand. The kit
was afterwards given a smooth wet and dry sanding once more, allowed to dry and
given another coat in yellow slightly richer in thinner than previous coat.
Cockpit was carefully done at this stage using a thin brush, this was allowed to
dry and re-masked. Finally the completed kit was given a coat of Liu floor
polish. This gave me the desired sheen prior to applying the Canadian roundels
and markings. Wing walkways were added using black decal sheet cut to size.
The kit was then given a smooth
wet and dry sanding overall and washed. The cockpit clear area was then
re-masked using Maskol and the kit was given a coat of semi-matt white, allowing
it to dry and then given a coat of ID yellow using a Compucolour brand. The kit
was afterwards given a smooth wet and dry sanding once more, allowed to dry and
given another coat in yellow slightly richer in thinner than previous coat.
Cockpit was carefully done at this stage using a thin brush, this was allowed to
dry and re-masked. Finally the completed kit was given a coat of Liu floor
polish. This gave me the desired sheen prior to applying the Canadian roundels
and markings. Wing walkways were added using black decal sheet cut to size.
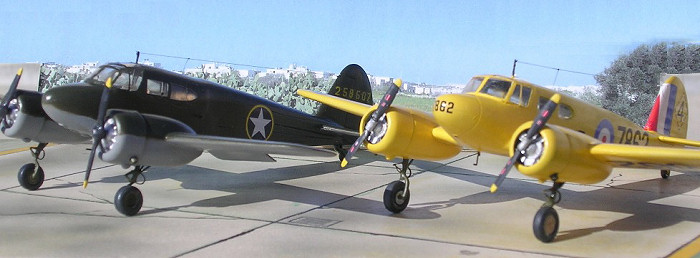
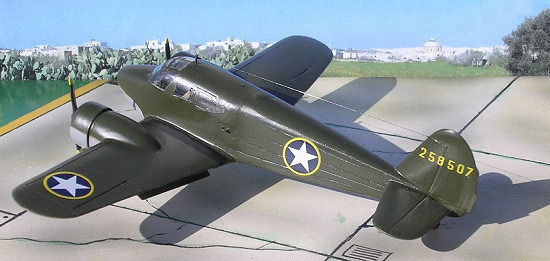
A Formaplane vacuform kit
 My other model that I built of the
Bobcat is one I referred to earlier. This I bought some time ago and having the
faculty of a good supply of extra decals that came with the Pavla model I have
taken the liberty to assemble the Forma Plane offering as well. This needed much
more work than the Pavla kit and the 20 odd vacform parts that came with the
model needed careful sanding, using the Pavla kit as a reference to kit parts.
The only drawback with this kit was that the rear fuselage section was on the
narrow side and the large Perspex intended to incorporate the cockpit and side
windows would have been better if left without the windows unmarked as these
were incorrectly engraved. In spite of this I managed to finish the kit in the
USAAF olive drab upper and medium grey lower and using the Pavla decals to
decorate the completed kit.
My other model that I built of the
Bobcat is one I referred to earlier. This I bought some time ago and having the
faculty of a good supply of extra decals that came with the Pavla model I have
taken the liberty to assemble the Forma Plane offering as well. This needed much
more work than the Pavla kit and the 20 odd vacform parts that came with the
model needed careful sanding, using the Pavla kit as a reference to kit parts.
The only drawback with this kit was that the rear fuselage section was on the
narrow side and the large Perspex intended to incorporate the cockpit and side
windows would have been better if left without the windows unmarked as these
were incorrectly engraved. In spite of this I managed to finish the kit in the
USAAF olive drab upper and medium grey lower and using the Pavla decals to
decorate the completed kit.
It was a good effort to make the two models and having tried my hands on two different kit makes I definitely would go for the Pavla model which was a pleasure to build and add to my ever growing 1/72 scale model collection.
May 2006
Copyright ModelingMadness.com
If you would like your product reviewed fairly and fairly quickly, please contact the editor or see other details in the Note to Contributors.