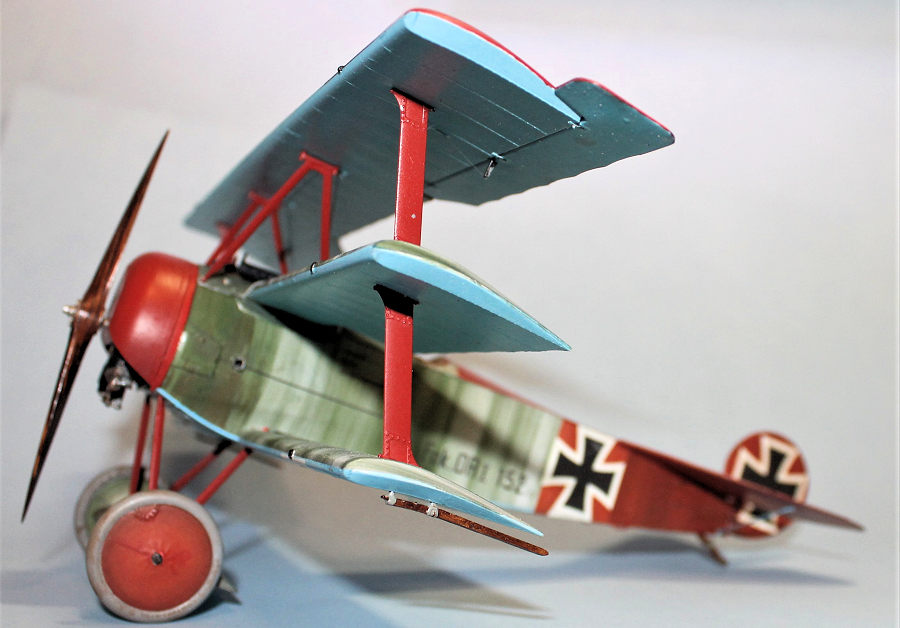
Meng 1/48 Fokker Dr.I
| KIT #: | QS-003 |
| PRICE: | $85-125.00 |
| DECALS: | Four options |
| REVIEWER: | Otis Goodin |
| NOTES: | Great kit and decals. All around very good model. |

| HISTORY |
The Fokker Dr I Triplane is probably the most iconic airplane of WWI. Immediately upon seeing it you are transported to a time of dogfights, innovations in aviation, famous aces….even Snoopy and his imaginary fights against the Red Baron. The Fokker Triplane was developed in early 1917 after Anthony Fokker viewed a captured Sopwith Triplane. Seeing three wings as a way to get more lift for an airplane, Fokker instructed his chief designer Reinhold Platz to develop one. Following the usual developmental difficulties, Fokker was able to produce a prototype suitable for evaluation by the Idflieg. They ordered an initial run of twenty aircraft. The first two pre-production aircraft were designated F.I and given serial numbers 102/17 and 103/17. Aircraft 102 was given to Manfred von Richthofen on September 1, who promptly shot down two enemy aircraft and recommended that fighter squadrons be equipped with the Triplane as soon as possible. F.I number 103/17 was given to German ace Werner Voss who had success with it as well; however, he was shot down and killed following a dogfight against eight British aces, managing to put bullets in every opponent’s airplane before succumbing to overwhelming odds. Voss’ performance was legendary, and his final total was 48 downed aircraft.
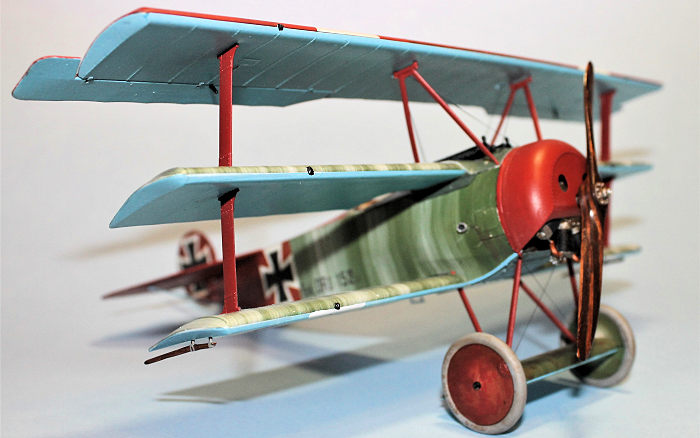
Richthofen flew the Triplane for the remainder of the war, flying several different Triplanes in varying colors, beginning with 102/17 which was finished in greenish brown streaking applied over a light blue surface. Other Triplanes flown by him included numbers 122/17, 127/17, 152/17, 154/17, 477/17, all painted in varying amounts of red, and finally 425/17, the all-red Triplane in which Richthofen was killed on April 21, 1918, after achieving 80 victories.
 Eventually 320 Triplanes
would be manufactured and delivered to German fighter squadrons. As a fighter
aircraft its primary feature was its maneuverability. It climbed fast and turned
fast and did well in a dive. However, it was slow due to the weakness of the
Oberursel engine. As the war progressed chronic shortages of castor oil made
rotary engine operation difficult, leading to engine failures and
underperformance. In addition, poor workmanship at Fokker factories led to wing
failures, resulting in the deaths of several pilots. The Triplane was taken out
of service for a time as the cause of the wing failures was investigated. The
primary cause was determined to be poor workmanship and lack of waterproofing
that caused moisture to damage the wing structure, resulting in disintegration
of the wing ribs. Fokker was required to improve quality control, varnishing the
wing spars and ribs, and to attach additional spars to the ribs, all at Fokker’s
expense. The Triplanes were returned to service in December of 1917, but wing
failures continued to occur. It was later determined after the war that the
upper wing carried a much higher lift coefficient than the lower wing, leading
to the upper wing failures.
Flown at some point by most of the leading German aces, the Triplane continued in service until the summer of 1918. Chronic design problems, supply shortages and slow speeds eventually doomed the Triplane, with production ending in May 1918. As the Fokker DVII became more widely available, there was no need to rely on the Triplane anymore. After the war three Triplanes were known to have survived. Number 528/17 was held by the German Aviation Research Institute for testing, and later was used in the filming of two movies before crashing sometime in the 1930s. Triplane 152/17 was displayed at the Zeughaus museum in Berlin until it was destroyed in an Allied bombing raid during World War II. Fokker assembled a Triplane from existing components in 1932. It, too, was displayed in a Berlin museum where it was later destroyed in another Allied bombing raid in 1943.
In the past decades several replicas have been built, flown and displayed at various locations around the world. Appearances at air shows always attract a lot of attention. Over the years the Fokker Triplane has left an indelible mark on history.
| THE KIT |
TMeng first released a 1/32 version of the Fokker Triplane a few months following the unexpected closure of Wingnut Wings in 2020. Apparently, Wingnut used Meng to produce at least some of the molds and plastic components of its kits, so Meng took over the Triplane kit that Wingnut was developing for release and released it on their own. The kit had generally good reviews although there were instances of warped wings and a few fit problems. Approximately a year later Meng released its own 1/24th version, a much-improved kit over the 1/32 version. There is some indication that at least Wingnut Wings thinking is involved in the development of the Meng kit, as the appearance and layout of the sprues is very much like that of the Wingnut kits.
 The 170 plus parts are laid
out on eight sprues molded in medium gray. There is a photo etch “fret” with
eighteen parts for both the seatbelts and machine guns. The parts are precut and
placed on a clear sheet so there is no snipping and cleaning required. The
machine gun cooling jackets are held in a foam padding to protect the jackets
from damage. There is a clear fret containing some optional windshields and
gunsights. There is also an extensive decal sheet covering the four options
available to be built from the kit. The decals have a matte finish and seem a
little thick but workable; however, there are/will be decals available from
aftermarket sources that should provide plenty of options to build. Aviattic and
Eduard both have decals available, with surely more to come. Instructions are
covered in a small colored booklet that lists color references in the back.
Along with the instruction booklet, Meng includes some letter size cards with
some historical information about the aircraft along with a few black and white
photos. While not up to Wingnut standards, it’s still a nicely done functional
set.
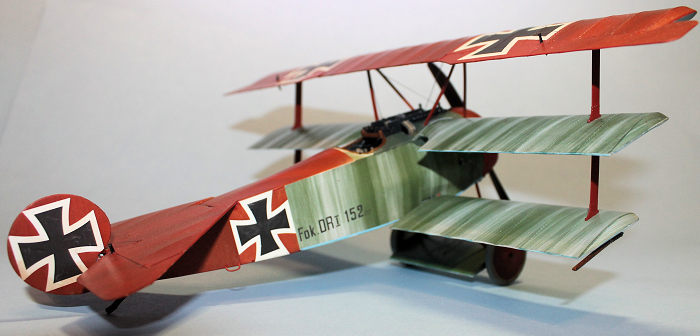
The kit provides the option to build one of four possible Triplanes: (1) Ltn. Ernst Udet’s aircraft 586/17 with black and white stripes and his personal “Lo!” markings, June 1918; (2) Manfred von Richthofen’s 152/17 in streaked finish with red top wing, cowling, fuselage spine, tail section, struts and outer wheel covers, March 1918; (3) Rudolph Klimke’s 577/17 with yellow highlights and his personal anchor symbol, May 1918, and (4) Ltn. Fritz Kempf’s 213/17 in Jasta 2 colors of black and white along with his personal markings of large “K’s” on the side, his name “Kempf” in large letters on the top wing, plus his personal saying of “kennscht mi noch” on the mid wings.
| CONSTRUCTION |
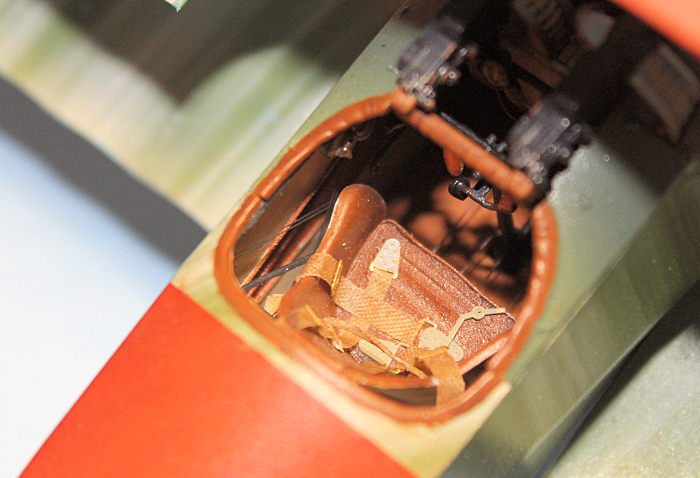
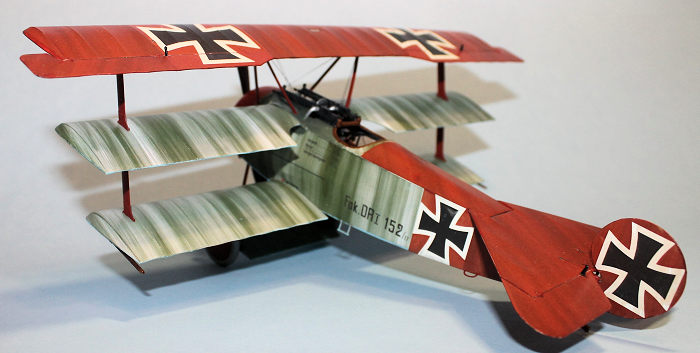
I decided to build Richthofen’s 152/17, as I had a set of Aviattic decals for this option and was looking forward to trying them out. Construction begins, oddly enough, with the excellent set of seatbelts provided in the kit. The larger 1/24 scale makes it easier to assemble and attach them as instructed. The shoulder harness belts slide through two openings in the back panel and are attached to a horizontal rod on the hidden back side of the panel. Following this, the fuel tank is assembled to which is attached the ammo box, separately molded fuel lines, exhaust pipe, and rudder pedals. Next up is the floorboard to which are attached the control stick assembly (2 options), and the compass. You may want to add some rigging to the rudder pedals and control stick continuing under the seat through the back panel, plus some “X” rigging to the cockpit frames. The seat assembly, floorboard and fuel tank assembly are attached to the right-side cockpit framing. Once secure attach the left-side framing to trap these assemblies in between the framing. Once this is done then attach the lap belts to the lower part of the cockpit framing and gently lay the belts over the seat. The fabric belts are easy to work with. I used a small bit of white Elmer’s glue to position the belts as I wanted them.
Next up are the fuselage halves. First paint the interior fabric in a Clear Doped Linen color, and the triangular wooden portion in a wood tone shade. There are a few small holes to be drilled out for the lifting handles and the tail rigging. The cockpit assembly is then fitted in between the two fuselage halves. There are two circular components on the fuselage halves which fit neatly into openings on each side of the cockpit frame, making fit of the whole assembly foolproof. Like the Wingnut Fokker kits, there is a separate seam piece for the bottom of the fuselage that is glued in place. Add the firewall to the front of the fuselage, then instructions next call for the addition of the horizontal stabilizer and rudder. I left the rudder off for later until after the decal for it was applied. The stabilizer has the control horns already molded on. I broke one of mine off during construction and had to make a replacement out of spare plastic. The control horns are nice, and they even have a slight indentation at each end for the rigging to sit in, making it easier to attach.
 At this stage I turned my
attention to the wings. Unlike the 1/32 kit, these wings are each made of a top
and bottom half, ensuring a sturdy and warp free fit. The only downside is the
wings must be glued, puttied and sanded a little, but the result is worth the
extra effort. Meng provides two different sets of stacking pads that are
inserted into holes drilled out on the front edge of the wings depending on
which version you are building. Instructions mark the locations clearly. Before
attaching the mid wing, the “turtle deck” is added prior to attaching it to the
fuselage. I would leave off the windshield for now until finished with
construction and painting. It’s easy to add later. Once the mid wing is added
affix the lower wing to the bottom of the fuselage. There’s a small gap between
the wing and the fuselage, and at first, I thought it wasn’t fitting right, but
after several attempts I determined it was, so I went ahead with it.
Instructions call for you to install the interplane struts prior to attaching
the bottom wing. Before doing so check the fit into the wings. I needed to do a
little widening of the slot the struts fit into as well as trim down the ends of
the struts so they would go into place well. The struts sit deeply into the wing
slots, and once in place it’s a secure fit. As WWI aircraft go, all the wing
struts for the Triplane are easy to fit.
Instructions next call for installation of the Spandau machine guns, ammo belts and spent ammo chutes. The kit provides a great set of machine guns, including pre-rolled metal cooling jackets and some photo etch details. Unfortunately, I lost the front circular photo etch piece that contained the gunsight on one of mine. Rather than trying to order a replacement from Meng, I ordered a set of 1/24 Spandaus from Gaspatch and used them instead. They’re not exactly like the kit guns, but they are close enough and I was able to make them work. But next time I’ll be more careful. After installing the machine guns, instructions call for you to add two additional instrument dials and decals to a horizontal bar attached to the ammo box. Next time I’ll add the instruments first, then the machine guns.
Prior to adding the top wing, first complete it by adding the ailerons, control horns and rigging. The ailerons have tabs that are inserted into the top wing giving them a secure fit. Even so, you can still reposition them as needed in and up or down position. Wait until painting or decaling the wing before rigging it. The upper wing fits atop two cabane struts and two interplane struts. Test fit, widen and deepen the slots for the interplane struts as needed. The cabane struts fit onto the turtle deck of the mid wing. Once set, I simply laid the top wing upside down on the table, put a small amount of glue into the various locations, and inserted the struts into bottom side of the top wing. Very carefully I then turned the airplane over so the weight of the top wing would keep the struts in place while they set. At this point, there were no landing gear or tail skid attached yet, so the aircraft sat flat on the table surface as the struts set up. I let the wings dry overnight and resumed work in the morning.
I began work on the landing gear next. The kit gives you two versions of the axle wing, the earlier “wide” style or a narrower one depending on the airplane you are building. Since I was building Triplane 152/17 I went with the wider version. The axle wing consists of a top and bottom half which must be glued and sanded as needed. The landing gear struts consist of four separate legs that each fit securely into their respective locations. As the struts were drying in place I began work on the wheels. Again, two options are given, my aircraft calling for the slightly larger version. The wheels are made like the Wingnut Wings wheels except that the removable wheel covers fit on the inside of the wheel next to the axle wing instead of on the outside like I was used to. Either way seems to work just fine, except that having the removable cover on the outside gave you the chance for a sharper, cleaner line visible between hub and tire. Since I used decals for the covers instead of painting them, it was not a problem anyway. The wheels attach to the axle by first attaching the inner cover using a plastic clip to secure the cover to the axle, then gluing the wheel to the inner cover. I ran a thin bead of glue around the inside of the inner cover then carefully attached the outer wheel to the cover. This way there was no glue oozing out around the cover, giving a neat finish. The plastic clip allows the wheels to turn on the axle.
 With the airplane turned
upside down on the worktable, I attached the landing gear assembly to the bottom
of the fuselage. The only problem was that the rear struts fit between the
bottom wing and the fuselage so it’s difficult to get a clear view of the
attachment points. I carefully wedged the thin blade of my putty spreader
between the wing and the landing gear strut on each side to make sure it was
firmly attached. The landing gear fit securely, with no wobble like some of the
Wingnut kits. Following this, I attached the rectangular panel to the bottom of
the fuselage after first painting it to match the rest of the fuselage bottom.
Finally, I installed the landing skid to the rear of the fuselage.
At this point I was ready to do a little rigging, so I rigged the landing gear using EZ Line then turned my attention to the cabane struts. The cabane struts have rigging in three locations, an “X” in front of the machine guns, and two double lines that go from the back of the turtle deck up to the bottom of the top wing. None of it was difficult, and I finished it in about 30 minutes, taking my time. I turned the model over and attached the rudder after first installing the control horns at the bottom. I then rigged the rudder and stabilizer, again not difficult.
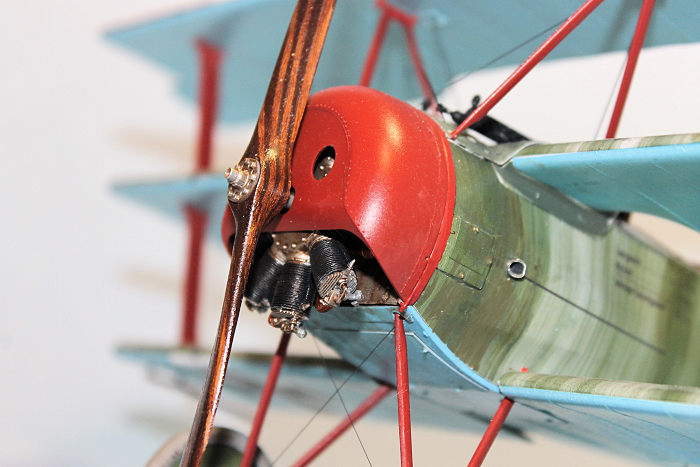
At this point I was ready to add the engine which consists of about 22 separate parts. Really the only thing missing is the wiring for the spark plugs which can be easily added with stretched sprue, EZ Line, or fine wire. Everything fit together well, and I installed it on the front of the aircraft against the firewall. Following this I attached the distinctive cowling by putting a thin line of glue on the inside edge of the back of the cowling so it wouldn’t ooze out the sides. Once this was secure, I added the Heine propeller to the shaft. Next, I added the wing skids under each lower wing, the lifting handles and the step on the left side of the aircraft fuselage. Finally, I installed the windshield using a little bit of Elmer’s glue.
| COLORS AND MARKINGS |
I began by painting the aircraft interior with Misterkit German Clear Doped Linen, including the back panel to which the pilot’s seat is attached. I then painted the interior wooden section at the front of the cockpit with Model Master Wood Tan, followed by a wash of thinned Griffin’s Alkyd Burnt Umber to give it a wood grain look. The Griffin’s dries in about a day so I prefer it over traditional oils. The floorboard was also given the wood grain treatment using Tan and Burnt Umber. I painted the pilot’s seat Leather with a thin wash of Burnt Umber. The seat belts were also given a thin wash of Burnt Umber, but in the future, I will probably just use some dirty thinner to give them a little color.
The cockpit framing, control stick, compass and various details are painted Model Master Gloss Black. Control stick handles are painted Wood with Burnt Umber staining. The fuel tank and ammo box are painted Model Master Aluminum, with the fuel spouts painted Brass. A couple of small details along the cockpit frame are also painted Brass. The turtle deck is painted Misterkit Albatros Green. The machine guns are painted Gun Metal, the ammo chutes are Aluminum with the bullets painted Brass and the cloth holding them in place painted Gunze Sail Color. The spent ammo chutes are also painted Aluminum. The leather padding at the rear of the guns is painted Leather with a thinned Burnt Umber wash.
The engine is painted Model Master Steel with the nine cylinders painted Gun Metal. Details on the engine are also painted Steel with highlights drybrushed with Aluminum. The spark plugs are painted Gloss White, and the whole engine, firewall and cowling interior are given a thinned wash of Griffin’s Burnt Umber to simulate burnt castor oil. The exterior of the cowling is painted Model Master Insignia Red, as are the wing and landing gear struts.
 The propeller was first
painted with Model Master Tan. When dry I taped off the laminations and painted
the propeller again with Leather. Once dry I removed the tape giving me two
distinct shades of tan and brown to represent the laminated propeller. I then
gave the whole prop a wash of Griffin’s Burnt Umber to unify the two shades.
Once dry I applied some Future to give it a bit of gloss.
The tail skid was given the wood grain treatment; the metal parts painted in Model Master RLM Gray and the base plate on the bottom of the tail skid painted Steel. The wing skids were also painted in wood grain and RLM Gray.
The wings, axle wing, wheel hub covers, fuselage, stabilizer, and rudder are all covered with Aviattic Decals set ATT24023 for Richthofen’s Fokker Triplane 152/17. I decided to go with these because the red portion reveals the original green over light blue streaking underneath the red color, and I didn’t feel I could replicate it myself. Plus, although I’ve used Aviattic decals in the past for lozenge covered wings, I’ve never covered essentially the entire airframe with it. Aviattic directs you to apply the decals over a gloss coat of white or very light paint. I used Tamiya Gloss White for the undercoat, lightly sanding the first coat once dry and then applying another light coat of White. Once dry I gave it a coat of Future to ensure a gloss finish. I began applying the light blue undersides first. Aviattic decals are different from “normal” decals. One, they are somewhat translucent allowing the undercoat to show through, making the finished color accurate. (I have no idea how they do that). Secondly, the decals remain workable for some time, allowing you the opportunity to position and reposition as necessary to get a correct fit. You only need to dip them in water for a few seconds, wait about 30 seconds and then slide them off the backing paper onto the model. After a while, apply a little decal softener as needed to make them conform to bumpy or difficult surfaces. After they set up overnight, go back and continue to prick pinholes and apply softener as needed. One word of caution, don’t rub the surface of the decals too much or some of the color will come off. I made that mistake on the red portion of the bottom near the tail skid. Fortunately, the Model Master Insignia Red was a perfect match for it, so I was able to correct it.
Once the blue areas were covered, I then applied the upper surfaces. The ailerons were covered separately, then attached to the wings. On the outer wheel covers, I first sprayed them Gloss White, then covered them in masking tape. Then I painted the tires a light gray matte. Once dry, I removed the tape and applied the red decals over the outer covers. The fuselage had a couple of tricky areas around the side panels near the engine cowling. I used a lot of MicroSol here and damaged the green streaking a bit. But I touched it up by drybrushing some Albatros Green and RLM 62 Green over it and it turned out fine. I lightly weathered the airframe by applying thinned Burnt Umber to areas that would have received castor oil overspray from the engine, plus general dirt, wear and tear, and oil.
When I initially finished with the decals, I was not totally pleased with the appearance. They seemed a little uneven in spots. But after about a week they had settled down even more on the surface, and now I am quite happy with them. I know I achieved a finish that I could not have done on my own with paint. After I was finished with the decals, I gave the whole model a shot of Model Master Satin, and called the Triplane done.
| CONCLUSIONS |
Over my lifetime I have completed 25-30 models of the Fokker Triplane done by numerous modeling companies: Aurora, Revell, Airfix, Renwal, DML, K&B, Meng and others in all scales from 1/72 to 1/28. I can say without a doubt that this Meng 1/24 scale Triplane is the best model of one ever done in plastic. It’s accurate, easy to assemble, detailed, and reasonably priced. The instructions are good, could be a little more detailed, but there’s plenty of information available about this iconic aircraft for anyone to complete a thoroughly detailed model with the material provided. Very highly recommended.
| REFERENCES |
Wikipedia, Fokker Triplane and Manfred von Richthofen
Windsock Datafile, Fokker Triplane
Meng kit instructions
13 February 2023
Copyright ModelingMadness.com. All rights reserved. No reproduction in part or in whole without express permission.
If you would like your product reviewed fairly and fairly quickly, please contact the editor or see other details in the Note to Contributors.