| KIT #: | 03932 |
| PRICE: | Around €45.00 |
| DECALS: | Two options |
| REVIEWER: | Spiros Pendedekas |
| NOTES: | Reboxed Accurate Miniatures kit |
The Ilyushin Il-2 Stormovik was a ground attack aircraft produced by the Soviet Union in large numbers during the Second World War. Never given an official name, with “Stormovik” (or “Sturmovik”, or “Shturmovik”) being the generic Russian word for “Ground Attack Aircraft”, it played a crucial role on the Eastern Front, but with very heavy losses.
Though designed as a dual seater, the rear gunner was altogether deleted at first production machines in order to save crucial weight, to boost the performance of underpowered and overweight design, only to be hastily re-introduced, as it was bitterly and quickly discovered in service that the type was too vulnerable when attacked from behind.
Together with its IL-10 successor, a grand total of 42,330 examples were built, deeming it the single most produced military aircraft design in aviation history, as well as one of the most produced piloted aircraft in general
Accurate Miniatures made the modeling world happy back in 1997 by introducing their series of state of the art quarter scale Il-2 kits, including the single seater, dual seater and even a ski version. Upon AM’s demise, versions of the kit were successively reboxed by Eduard (with their usual “goodies”), Italeri, Academy and lately (2017) by Revell, the latter being the early single seater version, which is the subject of this preview.
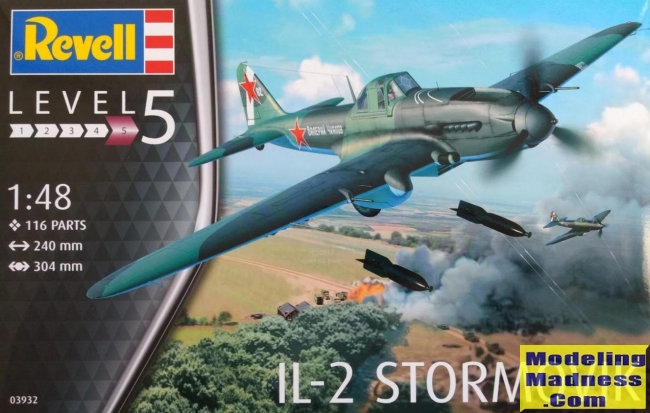
 The kit comes in a “new era” (ie black and not blue) Revell side opening
box, with a very attractive box art depicting a Stormovik having just
released its two bombs. Inside the box there is a bag containing 118 light
gray styrene parts arranged in 5 sprues, seemingly molded in Korea. Molding
is nice and crisp with minimal (if any) flash, indicating that the molds are
still in excellent condition.
The kit comes in a “new era” (ie black and not blue) Revell side opening
box, with a very attractive box art depicting a Stormovik having just
released its two bombs. Inside the box there is a bag containing 118 light
gray styrene parts arranged in 5 sprues, seemingly molded in Korea. Molding
is nice and crisp with minimal (if any) flash, indicating that the molds are
still in excellent condition.The sprues layout is very similar to the dual seater version with external detail being nice featuring finely recessed panel lines. The front fuselage part (which essentially is the engine cowling) is separate, something that, together with the wing parts layout, will increase the complexity of construction.
Cockpit is well detailed, with a decal containing the instrument faces to be affixed behind the instrument panel, which is nicely molded in clear. Seat belts are also provided as decals. Landing gear is realistically represented, the bays are boxed with busy looking sidewalls and the main wheels are provided both as “weighted” or “unweighted”. Exhausts and prop look good, as well.
Transparencies are equally well molded and crystal clear, however, to my surprise and unlikely for modern Revell, they were bagged unsealed together with the main sprues, totally unprotected: a definite step back from the superb original AM packing.
Instructions are “new era” Revell style and are really superb, coming to the form of a 16 page color booklet, containing a nice photo of a completed model, a parts list, with the construction effectively spread in 38 uncomplicated and followable steps. Color callouts are thoroughly provided throughout in Revell codes and in generic form. Whereas the much praised, extensive and explanatory texts found at the original AM instructions may not be present any more (including, among others, their so nice painting and weathering suggestions), neither are the fewer, “busier”, small in size and not that easy to follow original construction drawings. In any case, we live in the Net days, meaning you can download the original AM instructions at a snap, should you feel the need to complement the already excellent Revell ones.
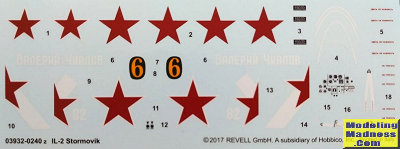 Two very nice schemes are provided, for “White 82”, done in the classic
Russian camo of green/black over light blue with a patriotic writing at the
fuselage sides and “Yellow 6” in “winter” camo, which is basically a normal
camoed bird with washable white paint applied over a good portion of the top
area. Decals are superbly printed by Cartograf.
Two very nice schemes are provided, for “White 82”, done in the classic
Russian camo of green/black over light blue with a patriotic writing at the
fuselage sides and “Yellow 6” in “winter” camo, which is basically a normal
camoed bird with washable white paint applied over a good portion of the top
area. Decals are superbly printed by Cartograf.Instructions want you to first assemble the cockpit and sidewalls, then join the fuselage halves with the rear wheel trapped in between. Assembly of the front cowling is next, followed by assembly and attachment of the vertical stabilizers. Continuing construction, the bay walls and oil cooler are to be attached onto the lower central wing half, with the cockpit affixed on top. After attaching the assembled cowling to the main fuselage, the aforementioned lower wing half has to be glued underneath, followed by assembly and attachment of the main wings and wheel bays. The latter process is clearly the most challenging construction phase of the build.
The upcoming steps include assembly and installation of main landing gear, attachment of bomb sway braces, rocket pylons, bombs and rockets themselves, the distinctive Flettner rods and various other small stuff. The propeller comes next and has to be affixed onto a circular base which in turn is attached to the nose, so the prop can rotate. Transparencies, antenna mast, pitot, the aiming foresight and the “gear down” pin indicators are finally to be attached, ending a build that possesses a certain degree of complexity.
Though you may be tempted to follow the instructions to the letter (as is the “norm” with any AM kit), take Tom Cleaver’s word and attach the top wing halves at the fuselage halves before joining them and attach the main wing under them only after joining the fuselage halves: this way, chances of nasty root gaps will be minimal, if any and everything will fit nicely.
Though recently Tamiya and even more recently Zvezda have come with their Latest and Greatest quarter scale Stormoviks, the venerable AM molds are still very fine kits with correct general shapes, great details at all key areas and nice transparencies. In the case of this Revell reboxing, instructions are revised and superb and decals are excellent (continuing the tradition of the equally excellent Microscale ones that original AM boxings were supplied with).
In fact, it is really amazing that this 25 year old mold can yield a detailed and accurate Stormovik, easily compared heads-on with the newer kits, the only real (and, truth be told, not that negligible) drawback being the complexity of construction at the wing/cowling and main fuselage area, something that can be overcome quite unpainfully, though, if you follow Tom’s advice.
September 2022
Copyright ModelingMadness.com. All rights reserved. No reproduction in part or in whole without express permission.
If you would like your product reviewed fairly and fairly quickly, please contact the editor or see other details in the Note to Contributors.