| KIT #: | ? |
| PRICE: | $3.50 at an estate sale |
| DECALS: | Two options |
| REVIEWER: | Ralph Koziarski |
| NOTES: | OOP at the moment |
| HISTORY |
The PZL. P-23 Karas (with the s
pronounced like the soft sh sound in she or shield) was a light
bomber/reconnaissance aircraft developed by the PZL company in Warsaw during the
early 1930s. The first 3 prototypes were built and tested in 1934, and by 1938
when production ceased over 250 aircraft were in service with the Polish
Airforce. The all metal bomber carried a crew of three
 (pilot,
bombardier/navigator/gunner, and gunner/wireless operator), could carry up to
about 1500 pounds of bombs and was armed with three machine guns; a fixed
forward-firing 7.9mm PWU wz.33 and two flexible mounted 7.7mm Vikers Fs, one
mounted in the gondola and in the dorsal position. Performance specs include 782
mile service range, 24000 foot service ceiling, 198MPH maximum speed, and an
abysmal 168 MPH cruising speed.
(pilot,
bombardier/navigator/gunner, and gunner/wireless operator), could carry up to
about 1500 pounds of bombs and was armed with three machine guns; a fixed
forward-firing 7.9mm PWU wz.33 and two flexible mounted 7.7mm Vikers Fs, one
mounted in the gondola and in the dorsal position. Performance specs include 782
mile service range, 24000 foot service ceiling, 198MPH maximum speed, and an
abysmal 168 MPH cruising speed.
When war broke out on September first, 1939, close to 120 Karas bombers were in service with five bomber squadrons and seven army reconnaissance units, with an additional 50 under repair or in training units. On September second, one P-23 from the "21 Eskadra Liniowa" performed the first allied bombing attack of Germany when it hit a factory in Olawa. However the primary duty of most of the Karas bombers was attacking German troop and armor convoys, and reporting German troop movements. Losses were atrociously high, with more than 90% of the slow moving and lightly armored aircraft being shot down by German fighters and ground fire before the Polish campaign ended. Despite the high loss rate, the Karas units were able to deliver an estimated 52-60 tons of bombs before the remaining 31 aircraft withdrew to Romania, where the Romanians later used the aircraft againts Soviet forces in 1941, with similarly high losses.
| THE KIT |
I love older 1/72 kits, especially when upon opening the box I see a level of detail I wasn't expecting. The P-23, like most other Heller kits is just like that. You get three light grey sprues of semi-soft and very workable plastic with delicately raised panel lines on the fuselage, and slightly heavier raised lines on the wings. A small sprue of clear parts features crisply molded canopy and gondola elements with a level of quality rarely seen even in more contemporary kits. Details include a nice two part representation of the Bristol Pegasus engine, nicely molded exhausts and venturi tubes, passable machine guns and cockpit elements that are more than adequate for this scale. The decals will be discussed further below. Fit of the major components was good and required only some filler on the horizontal stabilizers, and just a hint of Mr.Surfacer on the fuselage spine. I was especially impressed with how well the clear parts fit to the fuselage and gondola. Not all Heller kits were as nice as this P-23, but those that were prove the point that an older kit from the 70s or 80s, when done right can teach a modern Hasegawa kit a lesson or two.
| CONSTRUCTION |
I began building by first doing the
things I hate most; masking the canopy and painting the wheels. As I had
mentioned above, the clear parts in this model are beautifully crisp and clear.
I did dip them in Future out of habit, but the step may not have been necessary.
Masking these elements is especially trying, since there is a goodly number of
tiny windows that make up the glazing on the gondola parts and on the
peripheries of the main canopy. I devoted two 30 minute modeling sessions to
masking the clear bits, but I very often mask at the speed of an advancing
glacier so it may just be me. The wheels were painted without a hitch and
 installed into the wheel pants
which were then glued together. I then proceeded to glue together the four wing
halves (2 uppers, 2 lowers), painted the machine guns and venuri tubes matte
black and the exhausts with Humbroll copper (not GOLD as the instructions
suggest).
installed into the wheel pants
which were then glued together. I then proceeded to glue together the four wing
halves (2 uppers, 2 lowers), painted the machine guns and venuri tubes matte
black and the exhausts with Humbroll copper (not GOLD as the instructions
suggest).
Having finished the boring parts I moved onto the cockpit. The cockpit consists of a floor with a molded in radio (which should actually be more on the right and not centered) represented by a block of plastic, a rather basic but adequate pilot's seat, a nice representation of the unique control stick, a two piece hydraulic mount for the dorsal gun (legs and basket), and an instrument panel. There are also extensive sidewall details molded into the fuselage halves. I began by gluing the seat and stick to the floor and then painting this along with the sidewalls in a light grey and then washing them with dark brown acrylics. Heller suggests using white for the cockpit, but I later found this to be wrong, as the actual color is a shade of medium grey. Once this was done, I applied masking tape belts to the pilot's seat, added a small square of styrene near the floor opening to represent the wireless operator's seat, painted the mountings for the dorsal gun and glued them to the floor and then installed the whole assembly into the right fuselage half. This proved somewhat problematic as the mounting tabs are small, but a dose of super-glue did the trick.
Then came the instrument panel. This is one of those where the whole instrument face, not just the bezel, is raised. This style of panel does not facilitate the dry-brushing approach which works so well in 1/72. To counter this I simply drilled out all the instrument faces and applied a piece of clear acetate clear coated red and blue in the appropriate areas behind the panel. This proved to be a waste of effort since you can't really tell on the finished model. I had some issues installing the IP without it comming out all lopsided in one direction or the other, but a few bottles of beer and dollop of superglue later I had the stupid thing in and I was able to close the fuselage.
 The two halves of the fuselage
mated well, and I only needed to apply a little bit of Gunze Mr.Surfacer 500 to
the top between the main cockpit and gunner's position. Two horizontal spars
were then installed into the top of the cockpit opening and the previously
masked canopy and gondola windscreens were installed. Perfect Fit! As I said
before the cockpit is nice, but the details inside all look to be slightly too
small. If you're a stickler for cockpit detail I believe there are detail sets
available, but this was good enough for me.
The two halves of the fuselage
mated well, and I only needed to apply a little bit of Gunze Mr.Surfacer 500 to
the top between the main cockpit and gunner's position. Two horizontal spars
were then installed into the top of the cockpit opening and the previously
masked canopy and gondola windscreens were installed. Perfect Fit! As I said
before the cockpit is nice, but the details inside all look to be slightly too
small. If you're a stickler for cockpit detail I believe there are detail sets
available, but this was good enough for me.
While the fuselage halves were drying I put together the Pegasus engine painted it flat aluminum and then gave it a wash of lightly diluted black and dark brown watercolors, followed with a light dry-brushing of silver. There are three pegs on the cylinder heads which should fit into corresponding holes on the cowl halves, but the engine would not fit on my example so I ended up sanding down the cylinders and then just super-gluing the engine into the lower cowl, test fitting to the fuselage to make sure it was all lined up right. Once I was happy with the results I glued on the upper cowl, set the whole thing aside and went to glue on the wings to the fuselage. The wings went on with no resulting gaps and I was ready to paint.
| COLORS & MARKINGS |
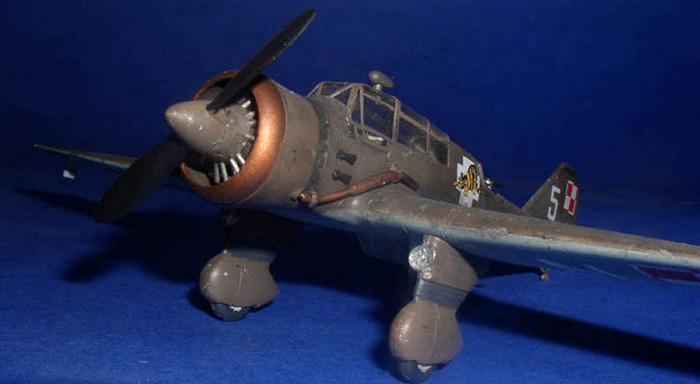
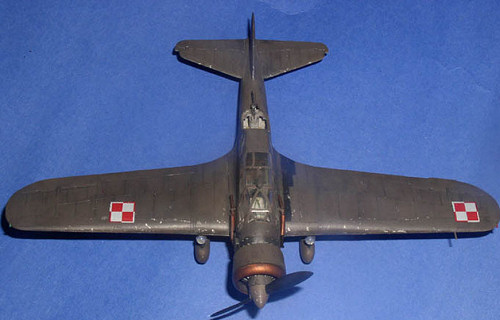
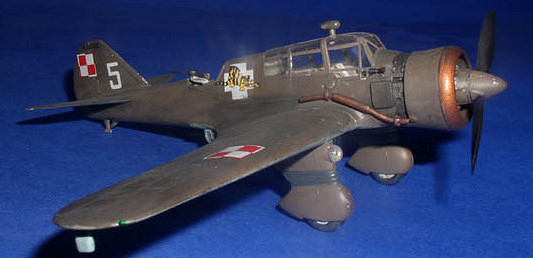
The Heller instructions don't do a great job of showing which parts of the aircraft are khaki and which in light blue. Luckily I had some folks at a Polish modeling forum provide me with the pattern. The entire aircraft should be khaki, even on the bottom, with the exception of the vertical stabilizers, wings and fuselage from just behind the cowl ring to just behind the gondola.
 Polish Khaki is a tricky color
to pin down. Heller provides a humbrol number which is close, but not quite what
I wanted. I had read in a few of my sources that with the exception of the P-37
bombers which were relatively new during the 1939 campaigns, the khaki on the
older aircraft had faded under the sun of the baking hot Polish summers to a
color close to dark earth. This argument makes sense to me so I decided to
compromise the two shades and concocted a mix of Tamiya XF-51 Khaki Drab and
XF-52 Dark Earth in a 3:1 ratio to make a faded khaki. The color matches that of
the khaki on photos I have of a PWS-26 biplane trainer from the aviation museum
in Krakow, so I'm sticking to my story so to say. I sprayed the entire model
with this color, and also painted the engine cowl, horizontal stabs and wheel
pants at this time. Once the Khaki dried I masked off the appropriate areas and
sprayed Polly Scale's RLM 65, which I now think may be a little too blue. I
think MM acryl's helblau would work better.
Polish Khaki is a tricky color
to pin down. Heller provides a humbrol number which is close, but not quite what
I wanted. I had read in a few of my sources that with the exception of the P-37
bombers which were relatively new during the 1939 campaigns, the khaki on the
older aircraft had faded under the sun of the baking hot Polish summers to a
color close to dark earth. This argument makes sense to me so I decided to
compromise the two shades and concocted a mix of Tamiya XF-51 Khaki Drab and
XF-52 Dark Earth in a 3:1 ratio to make a faded khaki. The color matches that of
the khaki on photos I have of a PWS-26 biplane trainer from the aviation museum
in Krakow, so I'm sticking to my story so to say. I sprayed the entire model
with this color, and also painted the engine cowl, horizontal stabs and wheel
pants at this time. Once the Khaki dried I masked off the appropriate areas and
sprayed Polly Scale's RLM 65, which I now think may be a little too blue. I
think MM acryl's helblau would work better.
The step was followed by my typical weathering regime which consists of using tamiya flat aluminum to apply paint chips and then applying black and brown pastels in wash form, letting them dry for a minute or two and then rubbing the centers of panels with a finger dampened with saliva, (Yes, saliva! It gives the pastel some adhesive qualities and I found that running my thumb across my tongue just once gives me better "dampness control" than dipping my finger in water) and then streaking the wet panels back by pulling across them from front to back with a bit of denim cloth. The final look should be a very subtle streaking and shading that is much more random than a regular wash. It is difficult to explain this, and if it isn't done just right and too much pastel is in one area, the following clear coat step will cause the pastels to clump into very obvious patches of dark color.
After the pastel "wash" had dried I
brushed on a coat of Future with a small brush. I find that a small brush lets
me better control the amount of clear-coat that gets applied and I never have
the problems with streaking and pooling that I get when I try a large flat brush
as is commonly recommended. I let the Future dry for an hour an began to apply
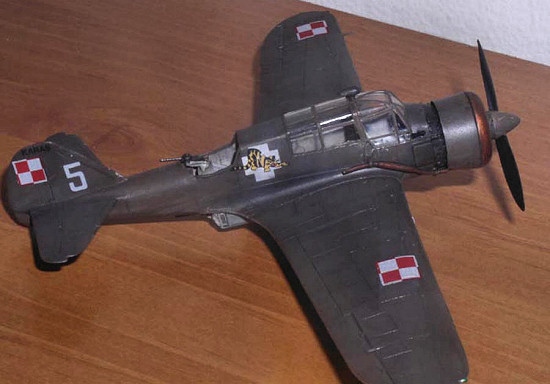
the decals.\par \par The decals in this kit are very matte and snuggle down over
the raised lines with no problems at all. On the down side, they are somewhat
opaque and the Polish national insignia (szachownica) are off register and need
their edges trimmed. Neither is a large problem and the decals
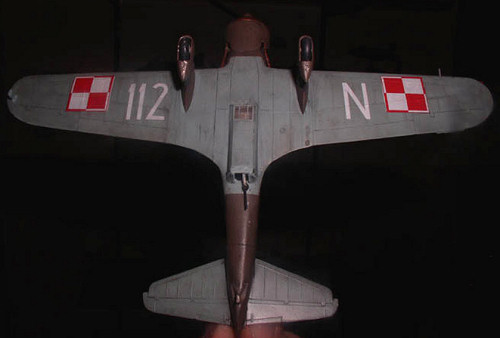 went on with minimal fuss. A
much more serious issue with the decals involves the squadron codes that go on
the bottom of the wing. You are provided with 112-N, which is the 12 Eskadra,
but the squadron symbol with the tiger over the white cross is from the 51
eskadra. I didn't realize this until the reference book I had ordered arrived in
the mail almost a week after I had finished the model. What was that old adage
about patience skill and Humbroll? Yes, patience....right... One of these days
I'll learn, but in the meantime I'll deal with the mismatched squadron code and
symbols and hope that people who come see my model are none-the-wiser about it.
went on with minimal fuss. A
much more serious issue with the decals involves the squadron codes that go on
the bottom of the wing. You are provided with 112-N, which is the 12 Eskadra,
but the squadron symbol with the tiger over the white cross is from the 51
eskadra. I didn't realize this until the reference book I had ordered arrived in
the mail almost a week after I had finished the model. What was that old adage
about patience skill and Humbroll? Yes, patience....right... One of these days
I'll learn, but in the meantime I'll deal with the mismatched squadron code and
symbols and hope that people who come see my model are none-the-wiser about it.
Once the decals were on I airbrushed on a coat of my favorite clear flat. Model Master Acrylic flat coat. Its the only MM acryl paint I'll use these days, and I like it far more than the Polly Scale flat since it costs less per ounce. After the flat clear dried I dabbed on some silver chrome paint to the wingtip lights and followed with red and green from a set of children’s' tempera paints. Sufficiently thinned with water, they work the same way as the much more expensive clear colors by Tamiya or Testors. Then it was back to the shop to glue on the remaining parts.
| FINAL CONSTRUCTION |
I often leave of the horizontal stabilizers until after painting. I also often check their fit before doing so in case there are problems. I didn't do that this time much to my chagrin. The fit here was pretty lousy and I had to use putty, sand and then repaint the area. The undercarriage elements and engine cowl went on without a problem, as did the machine guns. I then glued on the venturi tubes and other assorted odds and end, painted the cowl ring copper, washed it with brown watercolors and was just about ready to finish when the last obstacle came up. The exhausts don't fit! I tried this way and that but I could not get them to go under the engine cowling and still sit against the fuselage, they just aren't shaped right. I got it as close as I could, and in the process broke off some neighboring bits which I then spent a long time looking for in the carpet. I finally got the pipes to be "close enough for government work", painted the prop blades black (yes they were wooden but coated in flat black paint), glued the prop to the plane and ta-da!
| CONCLUSIONS |
 Despite some fit problems, some
of which could have been avoided had I been more careful and used a different
build strategy, this plane was a pleasure to build and I have a handsome
addition to my 1/72 history of the Polish Airforce collection. After a string of
Hasegawa and Academy shake and bakes I needed something different, and I knew I
could count on a Heller kit to provide me with a challenging yet enjoyable time
that resulted in a very pleasing model. I'll always appreciate my old models
from the three wise-men as I call them: Heller, Airfix and Matchbox. If you have
no hang-ups about raised panels or rivets then you can build a nice collection
of aircraft which the modern manufacturers will probably never cover because
they're too busy rehashing yet another FW-190 or Mustang. I wouldn't recommend
this kit to somebody who has never built an airplane in 1/72 before, but if
you've dealt with minor fit problems and don't mind masking canopies too much
you should find it utterly enjoyable.
Despite some fit problems, some
of which could have been avoided had I been more careful and used a different
build strategy, this plane was a pleasure to build and I have a handsome
addition to my 1/72 history of the Polish Airforce collection. After a string of
Hasegawa and Academy shake and bakes I needed something different, and I knew I
could count on a Heller kit to provide me with a challenging yet enjoyable time
that resulted in a very pleasing model. I'll always appreciate my old models
from the three wise-men as I call them: Heller, Airfix and Matchbox. If you have
no hang-ups about raised panels or rivets then you can build a nice collection
of aircraft which the modern manufacturers will probably never cover because
they're too busy rehashing yet another FW-190 or Mustang. I wouldn't recommend
this kit to somebody who has never built an airplane in 1/72 before, but if
you've dealt with minor fit problems and don't mind masking canopies too much
you should find it utterly enjoyable.
Kit Courtesy of me and some dead guy
March 2006
If you would like your product reviewed fairly and quickly, please contact the editor or see other details in the Note to Contributors.