|
KIT: |
LTD 1/48 CAC CA 13Boomerang |
|
KIT # |
9805 |
|
PRICE: |
$5.00 or so (a gift) |
|
DECALS: |
Three Aircraft |
|
REVIEWER: |
|
|
NOTES: |
Very straight-forward for a short run kit. |

|
HISTORY |
After Japan's attack on Pearl Harbour, Australia found itself ill prepared. The only real fighters the RAAF had were a small number of the Brewster Buffalo, which were later found to be no match for the Japanese Zero fighter when flown by the RAF defending Singapore. To overcome this shortfall and the possibility that Australia could not get fighters from overseas, design work was started on the CA-12 Boomerang. Using parts from the CA Wirraway, the Boomerang was designed and built in only three months. 105 airframes were built during 1942-3.
In 1943 a second batch of 95 improved CA-13 Boomerang mk II's were built. The most obvious change was the addition of two 20mm cannon. Later versions had the CA-14 had a turbocharger to improve high altitude performance and the CA-14A had square tail feathers. Neither were produced in quantity because of the availability of the Spitfire mk VIII. The final version was the CA-19 Boomerang mk II with minor modifications over the CA-13. Only 49 CA-19's were built.
Once again, my friend Mike from Los Angeles came across this kit at one of those great model conventions only the yanks seem to have. I was very happy to get the kit but was scared off by the dreaded word “Limited Run”. Mike was keen to see it built as he thought it was “funky” and made a most appealing deal with me, so away I went!
|
THE KIT |
The box is a rather plain but sturdy white and blue affair with black and white artwork of the subject.
 The plastic parts
are moulded in light grey plastic. Typical of the "limited run" injection
process is the large amounts of flash present, with the surface of the
plastic being a pebbly, sandpaper texture and not the shiny smooth
quality we have come to expect from major manufacturers. The mating
surfaces are rough and uneven with no positive locating points for
joining the parts and the sprue gates are a little heavy. The gun sight
reflector was heavily moulded and now with hindsight I should have
replaced it with a scratch built item or one from the spares box.
The cockpit canopy and rear armoured glass are good quality vac forms. Included in the kit is a duplicate set, this is a real plus, as I had never worked with vac form canopies before. The vac forms are protected within a separate plastic bag.
The hedgehog type exhaust stack, comprising of dozens of porcupine-like bristles, is a lovely resin casting, with no discernable bubbles or flaws. However is no mention whatsoever in the instructions to where this goes. This is also supplied in a separate bag.
The instructions were simple and well illustrated and the Scalemaster decals looked great on the sheet, with each image dense, sharp and in register.
|
CONSTRUCTION |
For this limited run kit, parts cleanup is essential. I spent the better half of 2 evenings carefully removing all the parts from the sprues and cleaning up the sprue gates. I used side cutters and a razor saw, followed by some careful scalpel work and wet and dry. All mating surfaces were carefully inspected and sanded smooth if necessary. I spend some time cleaning up the rough surfaces of the fuselage, wing and tail parts, sanding down with wet and dry followed up by some Novus Polish. This resulted in a nice smooth surface without damaging the subtle engraved panel lines, which were cleaned of sanding and polishing dust with a soft brush.
 A
quick dry fit ensured all parts fit well so now construction could start
in earnest.
Construction (as always) started in the cockpit. Research indicated that the cockpit of the Boomerang was a tubular steel frame with no floor as such. This is represented in the kit in a fairly simplified way with the tube steel represented by moulded framework on the inner surface of each fuselage half. A rudimentary floor, rudder pedals, joystick and instrument panel are included. The seat and its associated bulkheads are well moulded and look good.
I painted the instrument panel flat black and dry brushed the detail in light grey. The instrument dials were then filled in with future to represent glass. Sidewalls, seat, floor and bulkheads were painted Humbrol Interior Green, washed with oil paints and dry brushed light grey to give a worn effect. I added a set of Eduard USAF harnesses to busy up the cockpit a bit more.
The engine consists of two parts plus a rear firewall. I fitted the floor of the carburettor intake to the cowling ring cementing one side in place and adjusting fit and level until happy while the fuselage halves were taped together. (Later, once the fuselage halves had been assembled, filler was carefully applied to smooth the floor into the cowling ring). Do this stage now and you will save a whole lot of trouble, as it would be virtually impossible to do when the engine is in place.
I painted the engine assembly flat black, washed with an oil wash and dry brushed various shades of Testors metallisers. The engine looks a little gem when painted, although dry fitting inside the taped together fuselage halves proved that to fit inside the cowling ring, the tops of the cylinders needed to be trimmed carefully with a scalpel. I sprayed the engine firewall with AS12 Natural Metal.
 Dry fitting had proved the need
to avoid gluing the wheel well roof to the engine firewall, as there is
no room for adjusting fit and level of the installed cockpit if the
instructions are followed.
Now the fun part begins, I attached the armoured covers to each fuselage side and then added the cockpit and radial engine assemblies. This all fitted together well, with only careful minor adjustment needed before glue was applied. I then cemented the fuselage halves together, which went together very well, with some filling, and sanding required to smooth over the joins.
The lower wing half was offered up to the completed fuselage and a small amount of filler was needed to smooth over the joins fore and aft. Fit of the wing at the wing roots was great with just a small amount of remedial work needed to remove a small step. At the same time I added the horizontal stabilisers, cleaning up the resultant joints as well.
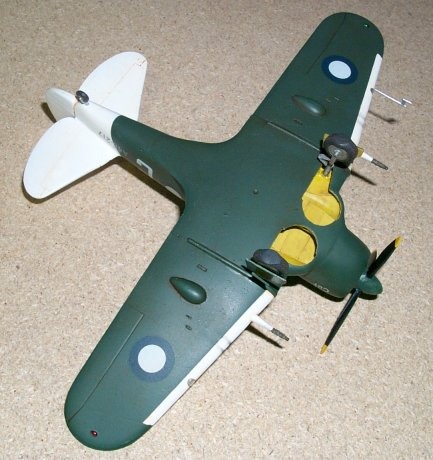
The undercarriage legs cleaned up well and certainly look the part once added to the bulged tyres. Cleanup of the seam along the centre of the bulged tyres was tricky and extra care was needed so as not to remove the moulded in tread detail, although I still had to carefully re-scribe anyway. The undercarriage legs were painted Tamiya AS12 Natural Metal and Testors Chrome Silver. Tyres were painted Aeromaster Tyre Black and weathered with a little Citadel Shadow Grey.
The undercarriage bay was painted with Aeromaster Zinc Chromate Yellow and when cured, washed with my favourite oil paint weathering mix, then dry brushed with Zinc Chromate yellow lightened with a little white. This is the point where I noticed something awry with the undercarriage location points. More on that later…
I then carefully cut out the vac form transparencies and attached them to the fuselage. Small amounts of Testors clear parts cement was used to fill any glaring gaps. For my first vac form experience, it was pleasing to see that I only stuffed up one of the rear clear panels. All transparencies were then masked with interior framing pre-painted in interior green. Now the kit was ready for painting.
|
CAMOUFLAGE & MARKINGS |
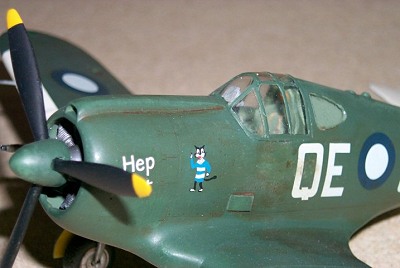
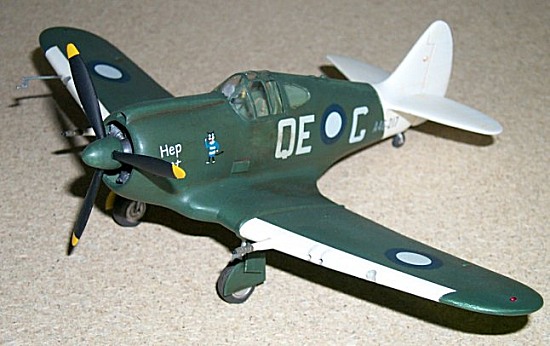
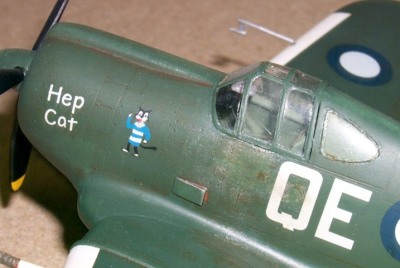
Decal options are provided for three aircraft – two, overall foliage green and one disruptive green/brown/sky blue. I chose an overall foliage green aircraft with “Hep Cat” nose art, white wing leading edges and a white tail and rear fuselage.
First step was to paint the
white areas, for this I used Aeromaster White. Once this had dried I
masked the white off and applied the foliage green. For this I used an
appropriate shade of green from the Gunze Sangyo range (H302 Dark Green).
Now why didn’t anyone tell me that Aeromaster paints should NEVER be used
under Gunze paints? I found this out when the Gunze green crazed slightly
near rhe masking. Next time I mix these paints together I will apply a
future barrier coat or perhaps sacrifice another chicken to the modelling
God?
At this stage I also sprayed the spinner cover dark green as well.
Once all the paint had cured, I applied several coats of Johnsons Future with a wide flat brush, kept especially for this purpose, to seal everything in and preparing the surface for the decals.
The decals looked pretty excellent on the sheet and went on superbly, being wonderfully thin and dense. There was no silvering at all. Once the decals had dried, the fuselage was washed with a damp cloth to remove any glue and solvent residue and the decals where then sealed in with yet another coat of Future.
I then added the resin “hedgehog” exhaust, which had been pre-painted Testors Burnt Iron into the exhaust recess on the starboard fuselage side.
My favourite part of building a model kit would have to be weathering! I then used a raw umber/burnt sienna oil wash to enhance the recessed panel lines. This looks absolutely atrocious until the excess is wiped away with a cotton bud moistened in white spirits. The Future protects the paintwork and decals from any damage by the washing procedure.
As these aircraft served in the hot tropical sun, I “bleached” the high points of the upper surface paintwork with a lightened shade of the overall green. I then mixed a combination of Humbrol matt aluminium and raw umber/burnt sienna oil paints together. This was then dry brushed over the “wear” areas of the fuselage side under the cockpit and the wing root.
Once again the model was put aside to cure and finally sprayed with Aeromaster flat, to give a matt appearance.
|
FINAL CONSTRUCTION |
 The undercarriage attachment
proved troublesome. The location points for the undercarriage legs are
not deep enough to keep the undercarriage legs firmly in position, plus
the location points are not symmetrical, one being too far forward
compared to the other. In the end I had to build a new location lug in
the correct position with plasticard. It took some time to clean up the
undercarriage bay after this corrective surgery. The undercarriage was
then added using CA glue to provide extra strength. Finally I added the
assembled propeller, landing lights and the Pitot tube.
Careful applications of powdered pastel around the engine exhaust and gun barrels were then applied! All masking was then removed and my Boomerang was complete!!
|
CONCLUSIONS |
Well, to quote Mike, this is a funky aircraft! It was fun building this kit, which actually went together with fewer problems than some of the “mainstream” manufacturers kits I have built in the recent past. Best of all, my Boomerang looks great in the cabinet!
I had some problems finding an good match for Foliage Green. The exact shade seems to be a hotly debated topic amongst RAAF modellers and I eventually settled on the Gunze Sangyo H302 Dark Green as recommended by a fellow modeller. According an article on Hyperscale the colour resides within the FS 34092 - FS 34096 region, which certainly provides plenty of scope for choice.
I would recommend this kit to any experienced modeller mainly due to its “limited run” and multi media nature. At one point in time, there was also an all resin quarter scale Boomerang produced and a still available limited run multimedia release by Tasman Models. For those who build 1:72 scale aircraft, the only offering in town is the geriatric Airfix kit dating from the early 70’s and due for re-issue sometime this year. There are also plenty of alternative schemes available from after market decal manufacturers such as Aeromaster available for those who wish to build something different to what is offered out of the box.
|
REFERENCES |
World Aircraft Files
“Foliage Green - A Brief Discussion by Gary Byk and Peter Malone”
If you would like your product reviewed fairly and quickly by a site that has over 200,000 visitors a month, please contact me or see other details in the Note to Contributors.