| KIT #: | 48062 |
| PRICE: | $23.00 MSRP |
| DECALS: | Two options |
| REVIEWER: | Blair Stewart |
| NOTES: |
| HISTORY |
Your editor has already provided a brief history and preview of what comes in the box for this kit. Some added facts: the pressurized Mk VII was the first Spitfire variant with a pair of similar rectangular air intakes under the wings, which changed the Spitfire’s distinct asymmetrical head-on appearance; both of these air scoops had radiators – one for the supercharger intercooler and one for the oil cooler; and the high altitude version was powered by a 1250 HP Merlin 71 engine.
| THE KIT |
As pointed out in Scott’s preview, you get a bunch of parts from which you can make several variants (VII, VIII, and IX) although you will have to guess on which parts go with which version if you opt to build anything other than the Mk VII. You also get a complete, well detailed engine, although this can present some problems if you try to button up the airplane instead of displaying the model with its engine panels removed. Basically, my first impression of this kit was excellent detail and very little flash on individual parts. The scribing is very petite and appropriate for the scale.
| CONSTRUCTION |
 As this was my first ICM kit ever, I
was anxious to get started, so I dove into the construction. I noticed the kit
instructions had a lot of detail, but I did found myself a little confused at
times My advice: study the instructions before diving in (but hey, us 60
year-old modelers don’t need no stinking instructions!! …right?). Since
the first step in the construction process was the engine, I assembled it, even
though I knew I was going to close it up. Don’t ask me why I did this…I’m not
real sure. Guess it’s just habit of building everything in a kit.
As this was my first ICM kit ever, I
was anxious to get started, so I dove into the construction. I noticed the kit
instructions had a lot of detail, but I did found myself a little confused at
times My advice: study the instructions before diving in (but hey, us 60
year-old modelers don’t need no stinking instructions!! …right?). Since
the first step in the construction process was the engine, I assembled it, even
though I knew I was going to close it up. Don’t ask me why I did this…I’m not
real sure. Guess it’s just habit of building everything in a kit.
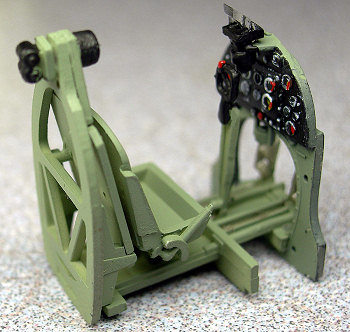
Once completed, I set the engine aside and moved to the cockpit. After assembly, I painted the cockpit British Interior (or European) Green, then painted the instrumental panel flat black. I picked out the instruments by dry brushing white over the panel, and then added some flat red and yellow to further highlight some of the instruments. The kit cockpit is not overly detailed, but since I was trying to build this kit OOB, I opted not to add any details. I also decided I would build it with the canopy closed, just to give myself a little variation from the way I normally display aircraft models.
The nice thing about this kit’s
design is that you insert the cockpit from the bottom of the glued together
fuselage. The bad thing is that the engine must be sandwiched between the
fuselage halves as you glue them together. Right away, I knew there was trouble
ahead. The engine did not fit very well, and I could tell there would be
additional trouble if I attempted to close up the various engine panels. At this
point, rational thought returned to my mind, and I quickly opted to not place
the engine in the model (duh!!!). This does require a little creative thought
regarding how one glues the prop to the airplane, but after popping off the
front cover of the engine (A21-22), which contains the prop shaft, I was able to
figure out a way to support the prop by gluing A21-22 to
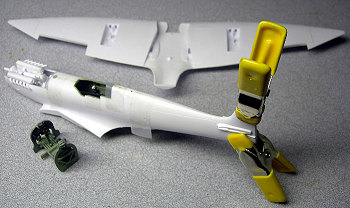 the back of part B25,
gluing A34 to that assembly, and then gluing this whole assembly into the front
of the fuselage (I now have a nicely detailed Merlin engine for my spare parts
bin, but I have no idea when or if I will ever use it). I used miniature clamps
to hold the fuselage halves together while I glued them with my favorite liquid
glue: methyl ethyl ketone, AKA MEK. If you don’t know about this stuff, you can
purchase a quart of it for a fraction of the cost of liquid hobby glues, and, in
my opinion, it works better. (Your editor also spent several days in the
hospital as a young sailor after using this material to clean the cockpit of a
Skywarrior. No preventative measures were taken by this young fool, such as
proper ventilation and a proper vapor mask. It can be very dangerous so
use it with caution. Ed)
the back of part B25,
gluing A34 to that assembly, and then gluing this whole assembly into the front
of the fuselage (I now have a nicely detailed Merlin engine for my spare parts
bin, but I have no idea when or if I will ever use it). I used miniature clamps
to hold the fuselage halves together while I glued them with my favorite liquid
glue: methyl ethyl ketone, AKA MEK. If you don’t know about this stuff, you can
purchase a quart of it for a fraction of the cost of liquid hobby glues, and, in
my opinion, it works better. (Your editor also spent several days in the
hospital as a young sailor after using this material to clean the cockpit of a
Skywarrior. No preventative measures were taken by this young fool, such as
proper ventilation and a proper vapor mask. It can be very dangerous so
use it with caution. Ed)
After adding the rudder and the horizontal stabilizers, I assembled the wings, then glued them to the fuselage. The fit, while not perfect, was nevertheless not too bad. I used Mr. Surfacer 1000 to fill the gaps and seams that remained after gluing the pieces together. I also glued the gun bay covers on at this time, since I was not intending to display the model with these open.
 One nice thing about leaving out
the assembled engine is that I unintentionally managed to avoid a problem that
others seem to have encountered with this kit. Tom Cleaver emailed me a warning
about how the kit’s fuselage has a tendency to get bulged out by the firewall
and the engine, and in the process create an anhedral rather than the proper
dihedral wing configuration. Unfortunately, when I received Tom’s email, I had
already glued the firewall in and the wings on the kit ; in fact, I had started
the filling and sanding process. Needless to say, I anxiously eyeballed the
model from the front on a flat surface, and, after consulting several references
on the standard Spitfire dihedral (somewhere around 6 degrees, according to
references I was able to find), concluded that I still had some scale dihedral
in my wings (close enough for government work, that is). Breathing a sigh of
relief, I continued the construction process by attaching the flaps, the
underside radiators and the lower engine cowling.
One nice thing about leaving out
the assembled engine is that I unintentionally managed to avoid a problem that
others seem to have encountered with this kit. Tom Cleaver emailed me a warning
about how the kit’s fuselage has a tendency to get bulged out by the firewall
and the engine, and in the process create an anhedral rather than the proper
dihedral wing configuration. Unfortunately, when I received Tom’s email, I had
already glued the firewall in and the wings on the kit ; in fact, I had started
the filling and sanding process. Needless to say, I anxiously eyeballed the
model from the front on a flat surface, and, after consulting several references
on the standard Spitfire dihedral (somewhere around 6 degrees, according to
references I was able to find), concluded that I still had some scale dihedral
in my wings (close enough for government work, that is). Breathing a sigh of
relief, I continued the construction process by attaching the flaps, the
underside radiators and the lower engine cowling.
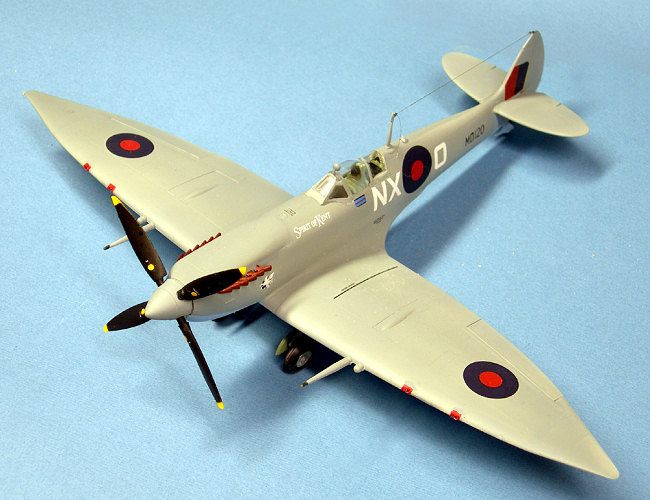
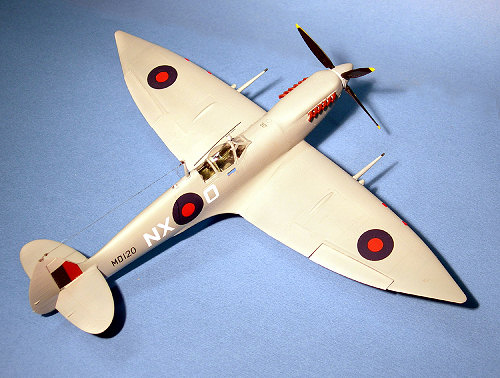
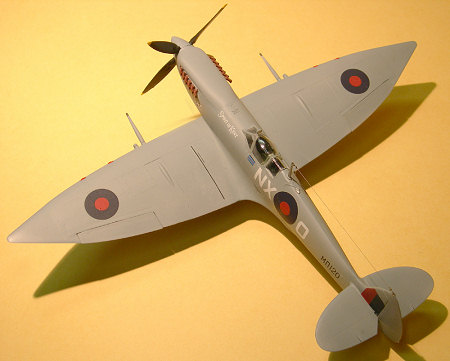
I continued to wet sand the Mr. Surfacer-filled seams, and once satisfied with them, I attached all of the other pieces that would be painted in the basic scheme I had chosen (Medium Sea Grey with Azure Blue undersides). I masked the canopy with Scotch Magic Tape, trimmed the framing with a new no. 11 Exacto blade, and then headed for the paint shop.
| COLORS & MARKINGS |
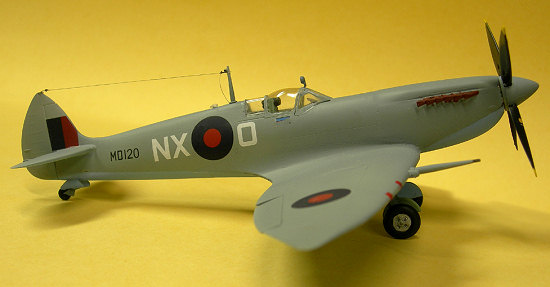
I first painted the undersides with Model Master RAF Azure Blue, then set the model aside to let that dry. Once dried, I masked off the demarcation between the gray and the blue on the sides of the fuselage with Scotch 1/8 inch plastic tape (otherwise known as pin striping tape, available at most auto paint stores). I covered the undersides of the model with a combination of Scotch magic tape and paper to keep the blue areas from getting gray overspray. I then painted the topsides with MM RAF Medium Sea Grey. Once this paint dried, I gave the topsides a good coat of Testors Clear Glosscoat (I didn’t bother with the undersides, since no decals were being applied there).
 I painted the ends of the four
prop blades with German Yellow, then masked them off and painted the remainder
of the blades with Testors gloss black, thereby avoiding the need for applying a
gloss overcoat to provide a good surface for the prop decals.
I painted the ends of the four
prop blades with German Yellow, then masked them off and painted the remainder
of the blades with Testors gloss black, thereby avoiding the need for applying a
gloss overcoat to provide a good surface for the prop decals.
I opted to use the kit’s decals for the aircraft of Sqn. Ldr. James O’Meara, OC No. 131 Squadron, Colerne, March 1944. The decals went down pretty well with a little help from a generous application of Solvaset (caution: this stuff is pretty strong, so always test on a decal you know you won’t be using before you go for the real thing!).
Once the decals had fully dried, I washed the model with warm soap and water to get rid of any Solvaset and decal film or water stains. I then added the wheels, glued the prop blades to the propeller hub, and then gave the entire model a good coat of Testors Dullcoat to provide the final flat finish.
I carefully peeled off the Scotch masking tape from the canopy, and then brushed on a generous coat of Future Floor Polish to the glass areas of the canopy to give it a nice surface and clear finish. I finished off my model with the only non-box stock item: a stretched sprue radio antenna with white glue insulators that I then painted with MM Anthracite Gray.
| CONCLUSIONS |
My overall assessment is this was a very pleasant build, and the finished model looks very nice. I would say that, based on my experience with this kit, ICM appears to have some very competitive products in today’s plastic kit market. Does it fit like a Tamiya kit? No, but it fits good enough so that there is not a lot of filing and sanding required, which is just what the kit doctor ordered as far as I’m concerned. I highly recommend this kit to all Spitfire lovers.
| REFERENCES |
 1.
J. Scutts, “Spitfire in Action,” Squadron Signal
Publications, Inc., 1980.
1.
J. Scutts, “Spitfire in Action,” Squadron Signal
Publications, Inc., 1980.
2. "The Spitfire Society Website", World Wide Web, 2006.
December 2006
Copyright ModelingMadness.com. All rights reserved. No reproduction in any form without express permission from the editor.
If you would like your product reviewed fairly and fairly quickly, please contact the editor or see other details in the Note to Contributors.