Airfix 1/72 Spitfire V
| KIT #: | A55001 |
| PRICE: | $10.00 used (minus paints) |
| DECALS: | One option |
| REVIEWER: | George Schembri |
| NOTES: |
| HISTORY |
 It’s a
Spitfire, not sure what I can add to the mountain of information on R.J.
Mitchell’s iconic design which first took flight in 1936. Production numbers
exceeded 20,000 units in numerous variants, from the Mk 1 to the Mk 24. The
Mk.Vc was the first Spitfire to have the ‘C-Type’ or Universal wing which did
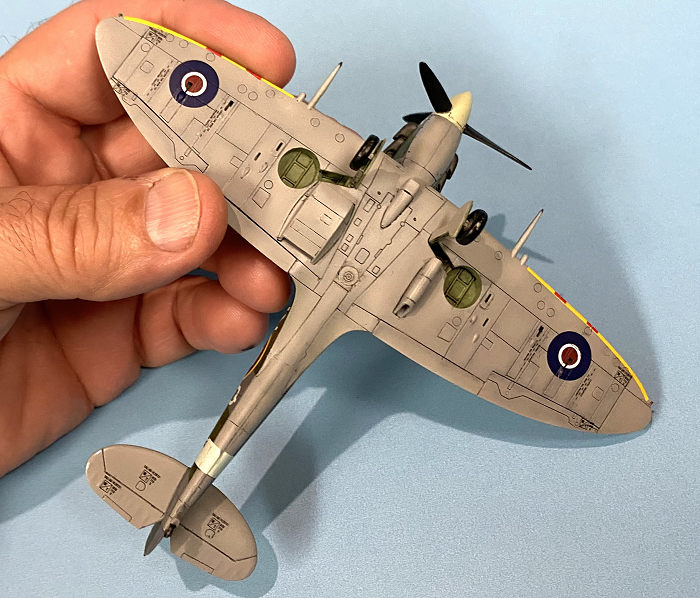
allow several different arming configurations. This Mk.Vc build is armed with
the typical configuration of four 20mm Hispano Cannons and four 0.303 Browning
Machine guns. The Mk.V also saw the use of the Rotol Propeller, Rotol being the
company formed by Rolls Royce and Bristol Aeroplane Company which focused on
propeller development for both companies; the name was simply a contraction of
"ROlls-Royce" and "BrisTOL". Shift to the Rotol Propeller occurred after studies
found problems with the constant speed unit in the original de Havilland
propeller. Examination of several crashes revealed ice covered the spinner and
blades up to eighteen inches from the hub; pending modifications to the de
Havilland deisgn, a number of Rotol propellers were ‘borrowed’ from the
Hurricane production process and used on Spitfires.
It’s a
Spitfire, not sure what I can add to the mountain of information on R.J.
Mitchell’s iconic design which first took flight in 1936. Production numbers
exceeded 20,000 units in numerous variants, from the Mk 1 to the Mk 24. The
Mk.Vc was the first Spitfire to have the ‘C-Type’ or Universal wing which did
allow several different arming configurations. This Mk.Vc build is armed with
the typical configuration of four 20mm Hispano Cannons and four 0.303 Browning
Machine guns. The Mk.V also saw the use of the Rotol Propeller, Rotol being the
company formed by Rolls Royce and Bristol Aeroplane Company which focused on
propeller development for both companies; the name was simply a contraction of
"ROlls-Royce" and "BrisTOL". Shift to the Rotol Propeller occurred after studies
found problems with the constant speed unit in the original de Havilland
propeller. Examination of several crashes revealed ice covered the spinner and
blades up to eighteen inches from the hub; pending modifications to the de
Havilland deisgn, a number of Rotol propellers were ‘borrowed’ from the
Hurricane production process and used on Spitfires.
In addition to this build, I recently acquired the 1988 publication of Morgan and Shacklady’s “SPITFIRE The History” from Key Publishing Ltd and I find it hard to put the book down each time I pick it up. The book follows the finer details of Spitfire development and modification and lists the production serial number of every Spitfire – all before Wikipedia!
| THE KIT |
This Spitfire Mk. Vc is Airfix kit A55001 – not to be confused with the splendid other Airfix Spitfire Mk.Vc kit A02108 from 2020 – or any other of the ‘recent’ Airfix-Hornby 1/72 scale Spitfires which are all very nice kits. This Airfix A55001 release is also from 2020 and has been released as a 'Starter Kit' and a 'DogFight Doubles Kit'.
 I was a bit
surprised when I acquired this kit expecting a Trop option and did not get it,
also the only prop option is a Rotol prop which does limit your choice of
aircraft to build. Don’t let the 'Starter' dissuade your enthusiasm about this
kit, it is a very adequate kit. Lots of proper engraved panel lining, but the
only riveting is in the nose cowling. The kit has a total of 26 pieces, 2 of
which are for the attractive Spitfire shaped display base. You'll only need 20
pieces to complete the build if you decide to build in the wheels down ‘parked’
option and include the pilot. You will also need to fill in the display stand
mounting hole where the belly navigation light is located.
I was a bit
surprised when I acquired this kit expecting a Trop option and did not get it,
also the only prop option is a Rotol prop which does limit your choice of
aircraft to build. Don’t let the 'Starter' dissuade your enthusiasm about this
kit, it is a very adequate kit. Lots of proper engraved panel lining, but the
only riveting is in the nose cowling. The kit has a total of 26 pieces, 2 of
which are for the attractive Spitfire shaped display base. You'll only need 20
pieces to complete the build if you decide to build in the wheels down ‘parked’
option and include the pilot. You will also need to fill in the display stand
mounting hole where the belly navigation light is located.
I did get my kit second hand and there was supposed to be paint and brushes included, but those were missing which did not concern me much as I would choose other paints to complete the build and I do have enough brushes, thank you. My experience with other starter kits is that the supplied kit paints are not top choice, but for someone getting into the hobby the kits paint do provide a cost effective and convenient option that takes the guess work out of matching proper expected shades.
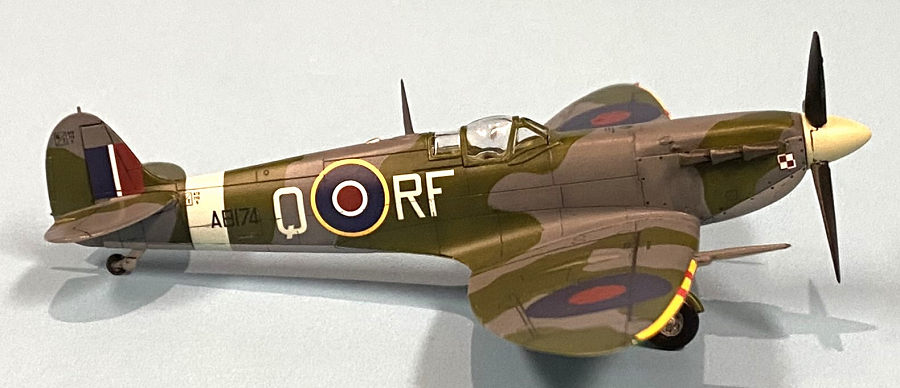
The decals are minimal with no stenciling. The decals allow one option, aircraft AB174 flown by Polish Ace Antoni Głowacki who is notable for achieving "ace-in-a-day" status during the Battle of Britain, shooting down five aircraft on 24 August 1940. Paint guide and decals placement are on the bottom of the box like other kit releases.
| CONSTRUCTION |
The kit does go together fairly quickly, with separation for the sprue being easy enough without too much trimming required prior to assembly. Practically no flash was observed on my kit. There are side panel details in the cockpit area, but no actual structure pieces or gunsight. There is no control panel and no control stick, with the pilot seat being glued onto the wing assembly and is then ends up in position when the wings are glued to the fuselage. Adding the pilot does help distract from the minimal cockpit. The exhaust ports and top engine cowling are all one piece and you will need to put the propeller base in place and be careful with the gluing if you want a rotation prop. There is a bit of a gap under the exhaust which I did not bother to fill in and is not noticeable on the final build.
 I did need a
little bit of filler along the wing/fuselage joint, adding masking tape on each
side of the joint before adding the filler to minimize adding filler to the
surrounding panel lines. I do like this softer plastic that Airfix uses these
days, but care must be taken when adding and sanding putty filler since you
might be sanding off some of that soft plastic if you apply to much putty
filler.
I did need a
little bit of filler along the wing/fuselage joint, adding masking tape on each
side of the joint before adding the filler to minimize adding filler to the
surrounding panel lines. I do like this softer plastic that Airfix uses these
days, but care must be taken when adding and sanding putty filler since you
might be sanding off some of that soft plastic if you apply to much putty
filler.
The stabilizers mount ‘into’ the fuselage very nicely, and using Tamiya thin cement does help fill in that mini seam from at the joint location.
Being a starter kit’, some details are missing. I added the few 'bumps' behind the exhaust by dabbing CA glue and added a small piece of stretched sprue for the port side vent just below the exhaust. I filled in the belly mounting hole by slicing a thin piece off the actual mounting rod for a perfect fit. I also added the pilot head bumper and plate behind the seat as well as the missing pitot tube under the wing, using a bit of plastic card and stretched sprue.
| COLORS & MARKINGS |
To remove any oils and sanding residue, I gently washed the completed model down with a soft toothbrush and a bit of Windex with a final water rinse. The plane was primed with Mr. Surfacer 500 thinned down with Mr. Color Aqueous Hobby Color Thinner 400. Panels were lined spraying thinned down Tamiya X-18.
I figured I would finish the build with the supplied Głowacki markings, I actually worked with a gent named Glowacki in the 1990's. I don't think there was a relation, but you never know.
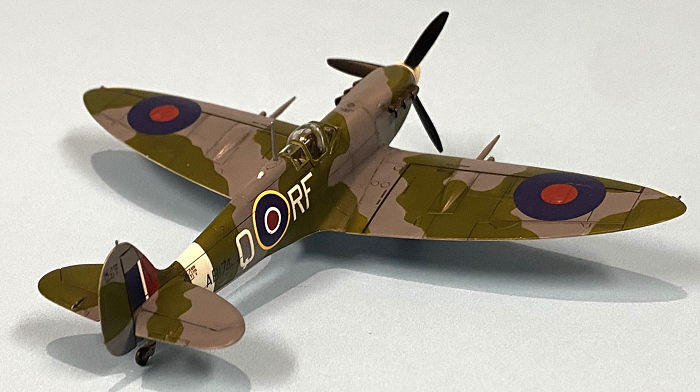
 The
camouflage scheme has some tight curved for this smaller 1/72nd scale. I’ve been
experimenting with home made masks and decided to do it again with this build.
The rear box art was measured out and compared to the actual model dimensions.
The proper ratio was typed into my laser printer/copier and the box art was
copied/printed on to regular printer paper. I placed wide Tamiya masking tape
over the photocopied images and traced out the camo patterns with a sharpened X-acto
blade. I planned to cover each colour in turn, first covering the expected grey
areas and spraying the green, then covering the green and spraying the grey.
This sequence would minimized coverage of the pre-painted lines and provide
consistent panel shading. There would be practically no feathering between
colours, but I planned to carefully modulate painting the different shades and
colours to distract from the lack of feathering. Also, when you shrink the
actual plane down to 1/72nd scale, I always wondered just how much feathering
would actually be evident. You might lose some points in a competitive build
choosing this method, but you’ll prob gain a point or two for matching the nice
tight curves of the scheduled camo pattern. This method also helps with
frustration of overspray.
The
camouflage scheme has some tight curved for this smaller 1/72nd scale. I’ve been
experimenting with home made masks and decided to do it again with this build.
The rear box art was measured out and compared to the actual model dimensions.
The proper ratio was typed into my laser printer/copier and the box art was
copied/printed on to regular printer paper. I placed wide Tamiya masking tape
over the photocopied images and traced out the camo patterns with a sharpened X-acto
blade. I planned to cover each colour in turn, first covering the expected grey
areas and spraying the green, then covering the green and spraying the grey.
This sequence would minimized coverage of the pre-painted lines and provide
consistent panel shading. There would be practically no feathering between
colours, but I planned to carefully modulate painting the different shades and
colours to distract from the lack of feathering. Also, when you shrink the
actual plane down to 1/72nd scale, I always wondered just how much feathering
would actually be evident. You might lose some points in a competitive build
choosing this method, but you’ll prob gain a point or two for matching the nice
tight curves of the scheduled camo pattern. This method also helps with
frustration of overspray.
I was going to use Vallego 'AV Model Air' paints, 'Air War' RAF Colors Day Fighter 1941-1945 set. Trusting that the kits AV71324 Drk Grn, AV71273 Ocean Grey and AV71307 Med Sea Grey to be the proper shades and I'm happy that I did. These paints are ‘Air’ paints ready for the airbrush, but I found that thinning them down made the spraying so much easier with a fine tipped airbrush, I used AK 712 thinner for that job and the thinner did a very good job thinning them down with very good flow. I did need to wipe the airbrush tip with thinner every now and then when the spray did reduce from time to time. Once complete, I was very happy that I used the Vallego paints as the colour looks great and no major flow issues were encountered.
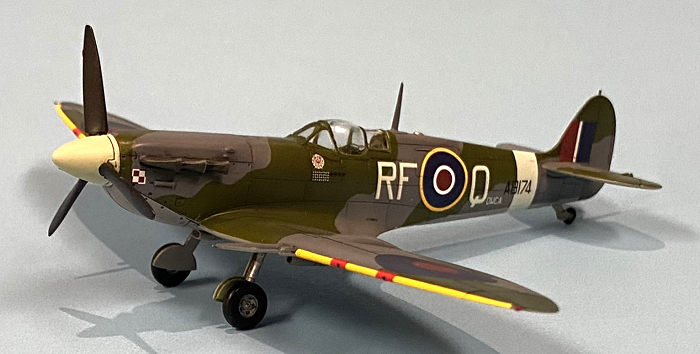
I gave the model a couple of thin coats of Future in prep for the decals. The kit decals are minimal, but I was impressed with the way responded to Micro Set/Sol solutions. The softened decals hugged the panel lines and conformed to the bumps with no tearing or ripping. The fuselage insignia and ID lettering is one complete piece which helps with alignment and the excess film was barely visible at the end of the build. The rear fuselage band is also a decal and it also fit very nicely in place. Stencilling was taken from the Revell Spitfire Vb kit in my spares box and those were a bit on the thick side but I used them away, they did their job. I used a scaled photo copied decal for the belly light and the top fuel tank cap. I guess I could have drilled the top engine cap, but figured I would prob mess up the drilling position and decided to go with a decal.
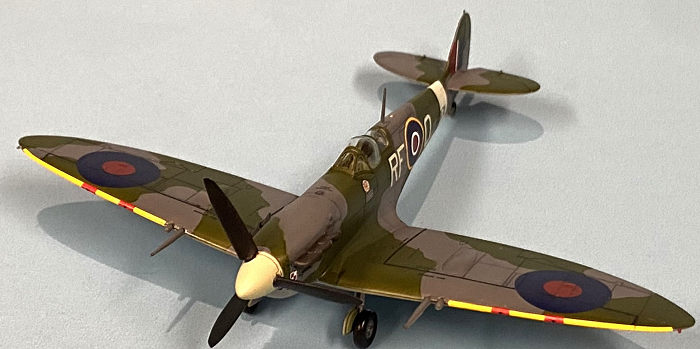
 Looking at
other kit instructions for stenciling placement, there is some question if the
wings yellow leading edges should be there or not. The Airfix plans do not show
yellow leading edges, but Eduards 1/48 scale Spitfire Vc indicates they were
used. I decided to add them using trimmed pieces from a Micro Scale Yellow sheet
and Red trim pieced for the machine gun ports. Once the decals were totally dry,
I traced out the panel lines that were covered with any decals to allow better
and even flow of the expected Panel Liner liquid.
Looking at
other kit instructions for stenciling placement, there is some question if the
wings yellow leading edges should be there or not. The Airfix plans do not show
yellow leading edges, but Eduards 1/48 scale Spitfire Vc indicates they were
used. I decided to add them using trimmed pieces from a Micro Scale Yellow sheet
and Red trim pieced for the machine gun ports. Once the decals were totally dry,
I traced out the panel lines that were covered with any decals to allow better
and even flow of the expected Panel Liner liquid.
A few more light coats of Future were added to seal everything up and left to cure for a couple of days in order to prep for the addition of Tamiya Black Panel liner liquid. Excess liner was removed with a hobby cotton swab that was VERY LIGHTLY dabbed with Tamiya X-20 Enamel thinner. A final thin coating of Future was applied; once dried, the final coat was sprayed after mixing a 33/33/33 mix of Micro Satin/Flat/X-20 Thinner.
| FINAL CONSTRUCTION |
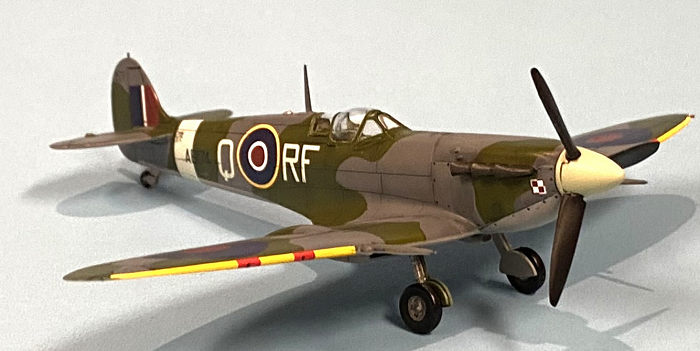 The landing
gear was added which are one piece gear/fairing with a separate wheel. The port
side gear fitted snuggly in place, but the starboard side had to be secured with
CA glue as the receiver hole was curiously deformed for some reason – no big
deal – just need a little attention. The radio mast was added, fitting nicely
into place with Tamiya thin liquid cement filling in the little line gap. Wing
navigation lights were added to each wing. The canopy was painted free hand and
had a very nice fit. I only realized later that when the photos were taken that
I forgot about the wing pitot tube - I'll add that very soon.
The landing
gear was added which are one piece gear/fairing with a separate wheel. The port
side gear fitted snuggly in place, but the starboard side had to be secured with
CA glue as the receiver hole was curiously deformed for some reason – no big
deal – just need a little attention. The radio mast was added, fitting nicely
into place with Tamiya thin liquid cement filling in the little line gap. Wing
navigation lights were added to each wing. The canopy was painted free hand and
had a very nice fit. I only realized later that when the photos were taken that
I forgot about the wing pitot tube - I'll add that very soon.
| CONCLUSIONS |
This kit is definitely a ‘starter kit’ and can easily be comparable to the Hobby Boss Easy Assembly line and with the addition of a few finer details the finished product does provide a very nice Spitfire Mk. Vc model. Beginners will be able to produce a very presentable airplane using the paint and brushes supplied for the build along with a cool display base, if utilized. Not exactly what I expected, but this is a nice quick build project to test out home made masks and to try out the AV Air paints which I used for the first time. Getting this kit second hand made it a very economical choice for my project, although modelers with a higher demand for detail and building complexity may need to choose another Spitfire among the other fine Airfix releases.
A very enjoyable build that is recommended as a starter kit.
Model completed May 2025
References – Wikipedia, ‘Spitfire in Action’ – Squadron Publications, ‘Spitfire, The History’ - Key Publishing Ltd.
| REFERENCES |
George Schembri
Copyright ModelingMadness.com. All rights reserved. No reproduction in part or in whole without express permission from the editor.
If you would like your product reviewed fairly and fairly quickly, please contact the editor or see other details in the Note to Contributors.