Airfix 1/48 Spitfire PR.XIX
| KIT #: | |
| PRICE: | |
| DECALS: | two options |
| REVIEWER: | Michael Rohde |
| NOTES: |
| HISTORY |
The PR XIX was the final Photo Reconnaissance version to see active service with the RAF. Produced by mating features of the MK XI Spitfire to the powerful Rolls Royce Griffon engine of the Mk XIV, the PR XIX was one of the fastest Spitfire variants and without doubt a very aesthetically pleasing aircraft.
Due to its role as a
reconnaissance aircraft this version did not feature any armament, instead
relying upon its high top speed to evade potential enemies. Against piston
engine opponents this worked well, but
 with the
advent of the Luftwaffe's new jet interceptors in the last year of WW 2 rendered
the MK XIX vulnerable and post war MiG 15's rendered it obsolete.
with the
advent of the Luftwaffe's new jet interceptors in the last year of WW 2 rendered
the MK XIX vulnerable and post war MiG 15's rendered it obsolete.
The first PR XIX was delivered to the RAF on the 27th November 1944, with the final airframe being delivered on the 18th May 1945. The initial 25 aircraft were unpressurized, but this was later changed and the internal fuel capacity was also increased, thus improving the aircraft's effectiveness.
After the war the PR XIX served in the Far East, operating over Hainan Island and finally performed the RAF's last ever operational sortie by a Spitfire over Malaya on the 10th June 1957. However, the PR XIX continued to be used as a trials aircraft, even seeing a new role in the early 1960's as a training aircraft , teaching RAF fast jet pilots how to intercept slower piston aircraft in case of an operational need during the Indonesian conflict.
Today a number of PR XIX's are kept flying, most notably with the Battle of Britain Memorial Flight, but also with a number of private collectors.
| THE KIT |
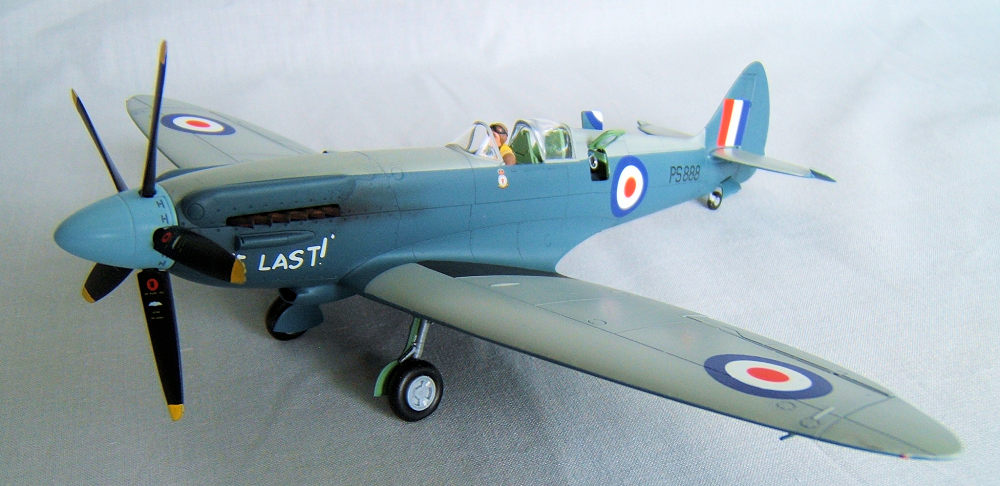
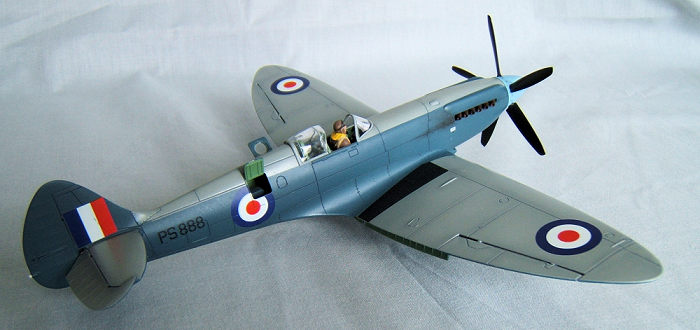
In the box we find 3 Sprues moulded in light blue plastic and one sprue of clear parts holding 98 pieces in total. We have a choice of weighted and unweighted tyres , open or closed canopy, Landing gear in up or down position and a nicely moulded pilot figure. All surface and cockpit interior details are nice and crisp .
The decal sheet offers : RAF 81 Sq Malaya 1954, and Swedish Air Force 11 th Flygflotilla 1955.
| CONSTRUCTION |
As per instructions I
started off with the cockpit. I prepared all the parts , did the subassemblies
of forward and aft bulkhead sections and airbrushed according to the
instructions. I decided to utilize the pilot figure and for that I had to test
fit the pilot--- ie proper placement in the se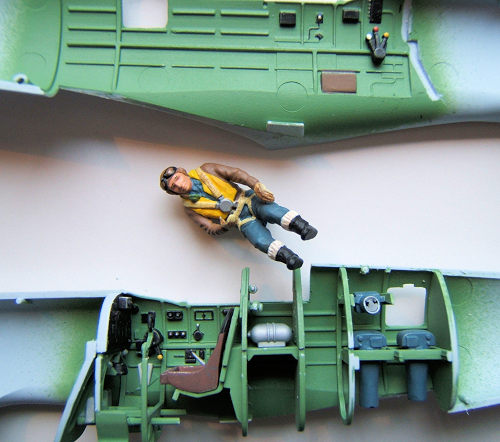 at
and feet resting on the rudder pedals. This was possible only by cutting the
lower legs off , removing a section of about two mm and reattaching the
lower legs .This did the trick and the figure could be seated properly. Then I
glued both arms into position with one hand resting on the control column grip
and the other on the throttle control. Important to mention is that the figure
had some mould shift issues which needed to be cleaned up first. The pilot
figure was painted as per instructions.
at
and feet resting on the rudder pedals. This was possible only by cutting the
lower legs off , removing a section of about two mm and reattaching the
lower legs .This did the trick and the figure could be seated properly. Then I
glued both arms into position with one hand resting on the control column grip
and the other on the throttle control. Important to mention is that the figure
had some mould shift issues which needed to be cleaned up first. The pilot
figure was painted as per instructions.
I decided to open up the maintenance hatches for the cameras. This was achieved using a surgical scalpel . The hatches supplied in the kit were dry fitted to make sure the dimensions were correct. Now it was time to close up the fuselage ( with the pilot in seated position because it would have been impossible to insert the figure after the fuselage shells were glued together)
I decided not to follow the instructions in regards to fitting the propeller in case a excess drop of liquid cement would seize the propeller. Instead I fitted the propeller shaft only. The propeller can be pushed onto the shaft with a slight interference fit. Besides , I was able to paint the propeller separately and did not have to mask off the complete painted propeller assembly when it came to painting the overall camo.
The wings went together
easily but when it came to attach the wings to the fuselage I encountered a fit
problem. There was a considerable gap which needed to be filled with evergreen
strip and Tamiya putty. I did not expect that to happen with a new Airfix kit. A
friend of mine who is very knowledgeable in that field told me that Airfix/
Hornby kits made in China were not as good as the ones made in India and that he
encountered the same problem. But all kits are now made in India and problems of
that sort are a thing of t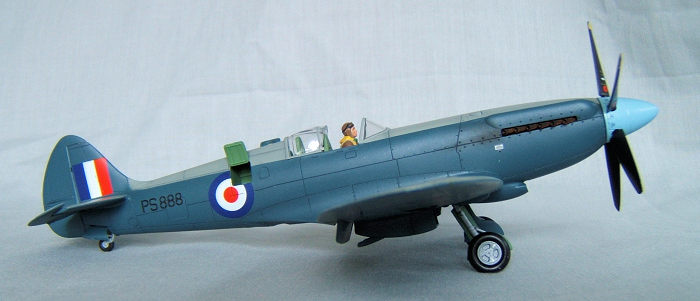 he
past. Anyway – I got that sorted and proceeded to getting the complete landing
gear set painted to be attached after the main paint job is finished.
The canopy was dry fitted and prepainted as well.
he
past. Anyway – I got that sorted and proceeded to getting the complete landing
gear set painted to be attached after the main paint job is finished.
The canopy was dry fitted and prepainted as well.
Before I started with the overall camo scheme I highlighted all panel lines with matt black adjusting the airbrush nozzle to a fine setting to avoid too much overspray. I have seen other modellers using this technique and I wanted to give this a try. The end result did come out quite good but was less effective on the darker RAF blue surfaces.
The model was prepared for decalling with a fine coat of Tamiya clear gloss Enamel and left to dry. The decals were easy to work with and went on well with a bit of Microsol. A final coat of Humbrol satin clear was used to seal the decals.
| CONCLUSIONS |
I can only recommend this kit. Airfix has given us a good range of 1/48 scale Spitfires and the price / quality ratio is very good.
10 May 2018
Copyright ModelingMadness.com
If you would like your product reviewed fairly and fairly quickly, please contact the editor or see other details in the Note to Contributors.
Back to the Main Page Back to the Review Index Page Back to the Previews Index Page