Airfix 1/48 Spitfire Vb
|
KIT #: |
A05125 |
|
PRICE: |
£16-99 |
|
DECALS: |
Two options |
|
REVIEWER: |
Frank Reynolds |
|
NOTES: |
New tool kit |

The Spitfire Vb was a logical update of the preceding Spitfires Mks.I and II, in
response to lessons learned in combat during the Battle of Britain in 1940.
Initially fitted with a Merlin 45 engine of 1470hp, over 400hp more than the
original Mk.1, its most obvious feature was the introduction of 20mm cannon. The
Vb was capable of being fitted with tropicalisation that resulted in a very
distinctive lower nose profile and an
 larged under wing oil cooler. Three
sizes of slipper tank could be fitted under the centre section to improve range.
As the war progressed many Mk.Vs were
updated,
some with modified windscreens and cockpit canopies, some with wing tips clipped
for low altitude operations. By September 1943 twenty seven RAF squadrons were
operating Spitfire Vbs . As later Spitfires entered service well used and war
weary Vbs were transferred to overseas areas of operations and to other air
forces. Vbs could, for example, be found in the inventory of the South African
Air Force, Turkey, Yugoslavia and intriguingly, for a short time, that of the US
Navy, the inspiration for the following project.
larged under wing oil cooler. Three
sizes of slipper tank could be fitted under the centre section to improve range.
As the war progressed many Mk.Vs were
updated,
some with modified windscreens and cockpit canopies, some with wing tips clipped
for low altitude operations. By September 1943 twenty seven RAF squadrons were
operating Spitfire Vbs . As later Spitfires entered service well used and war
weary Vbs were transferred to overseas areas of operations and to other air
forces. Vbs could, for example, be found in the inventory of the South African
Air Force, Turkey, Yugoslavia and intriguingly, for a short time, that of the US
Navy, the inspiration for the following project.
When modelling a Spitfire V, good reference sources are essential to get
the right combination of features and it will always be a trap for the unwary.
Sometimes the only answer is an inspired guess.
This new tooling is supplied in Airfix’s now standard top opening box
with a rather flimsy lid. There are five parts frames in pale blue plastic and
one of clear.
The parts are very
cleanly moulded with no evidence of flash or sinkage and are beautifully
engraved with sharp clean panel lines and subtle fabric texture to the rudder
and elevators. The transparent parts are reasonably well done but there is some
distortion visible in the cockpit hood mouldings.
Instructions consist of a 14 page
booklet
with construction steps set out in 46 pictorial stages keyed to CAD drawings
with the relevant parts colour coded to each stage. There are two
finishing options in the full colour three-views, one offering an early
Mk.Vb of No 317 Polish fighter squadron, interestingly based upon a currently
operated restored example at Duxford, England.
(This seems to be an increasingly normal thing for Airfix
kits. Ed) The other is an early tropicalized Mk.Vb of No 249
Sqn, RAF, operated in the defence of Malta, in an unusual scheme of upper
surfaces in Dark Earth and Medium Grey.
 The decal sheet is well executed being sharply printed, matt finished and
includes a generous amount of airframe stencilling and an instrument panel.
The decal sheet is well executed being sharply printed, matt finished and
includes a generous amount of airframe stencilling and an instrument panel.
The kit is impressively comprehensive and offers enough options that a careful
study of the instructions is essential. There are many parts on the frames that
are not applicable to either of the options in the box and this suggests that
there could be other variations in the future.
There are two types of gun sight. Two types of wheel hub, plain and five spoke
variety. Three types of windscreen/hood – the early windscreen with external
armour plate, the later type with integral armour and a third type with no
windscreen armour and a flat hood that hints that a Mk.1 boxing might appear.
There are two types of wing tip, normal elliptical and clipped wings, in both
clear and blue plastic. There is a set of underwing bombs and shackles that
could only be relevant to a Mk.Vc. An optional fit is the large 90 gallon belly
tank applicable to aircraft ferried to Malta. The large chin-type tropical
filter is included with the option of the small standard carb intake instead.
Two types of underwing oil cooler are offered, original and an enlarged tropical
type. There is a choice of two propeller/spinner combinations for the early De
Havilland and later Rotol units. Two types of radio mast are in the box and
three types of exhaust stack, all of three-stub variety, a very early plain
type, a later variety with flared pipes and a third with the heater pipe
connected.
This is a comprehensive package, giving every encouragement to go ahead and
build and yielding quite a harvest for the spares box.
This is a classic case of “just when you think it’s all over”. I had just
happily completed what I thought was the last of 56 representative Spitfire and
Seafire types, covering the 29 air arms that operated Supermarine’s finest in
squadron service, when a friend said “what about the US Navy?”
A clanger had been duly dropped as we say in Southern England. This had
to be corrected and the Airfix Vb was to be treated to a change of colours.
Cruiser Scouting Squadron 7 (VCS-7) was formed in May 1944 to provide
artillery spotting support to the heavy ships of the US Navy when they bombarded
the Normandy coast on D-Day. Gunfire support to the entire invasion fleet was
recognised as a naval task so a number of Royal Navy and Royal Air Force
squadrons, together with a US Navy unit formed the Air Spotting Pool, based at
Lee on Solent, on Britain’s South Coast.
 The catapult flights came from the battleships Nevada, Texas and Arkansas
and the cruisers Quincy, Augusta and Tuscaloosa. Their Kingfisher and Seagull
floatplanes were landed at at the British Fleet Air Arm base at Lee on Solent
while their pilots underwent Spitfire training on Spitfire Vs with the USAAF’s
67th Reconnaissance
Group at Membury.
The catapult flights came from the battleships Nevada, Texas and Arkansas
and the cruisers Quincy, Augusta and Tuscaloosa. Their Kingfisher and Seagull
floatplanes were landed at at the British Fleet Air Arm base at Lee on Solent
while their pilots underwent Spitfire training on Spitfire Vs with the USAAF’s
67th Reconnaissance
Group at Membury.
The
Air Spotting Pool at Lee on Solent comprised around 90 Spitfire Vbs, considered
long in the tooth as interceptors, but fast, agile and sufficiently hard hitting
to survive in the intense operations of the invasion. All of the aircraft
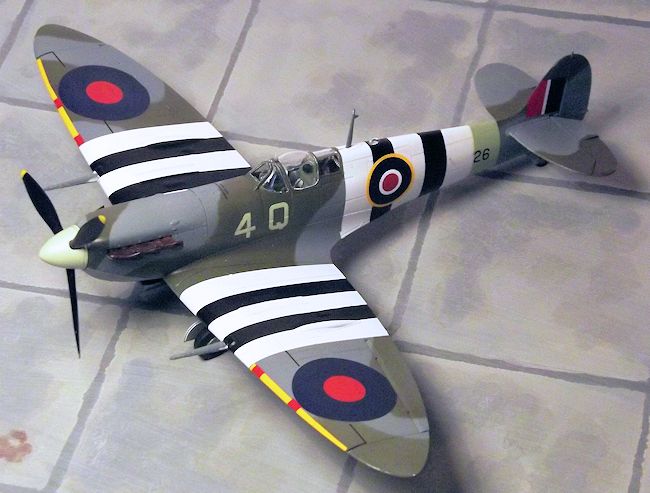
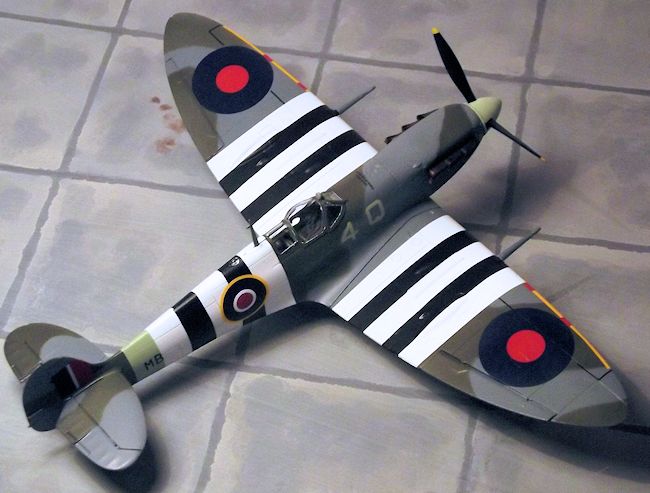
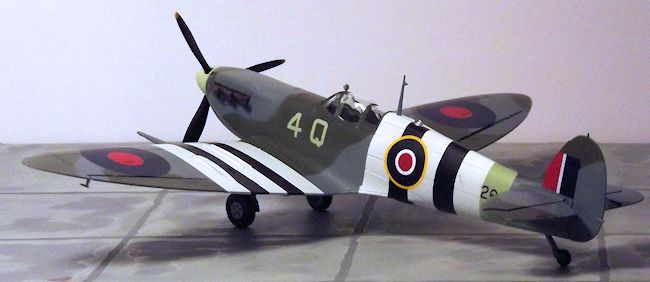
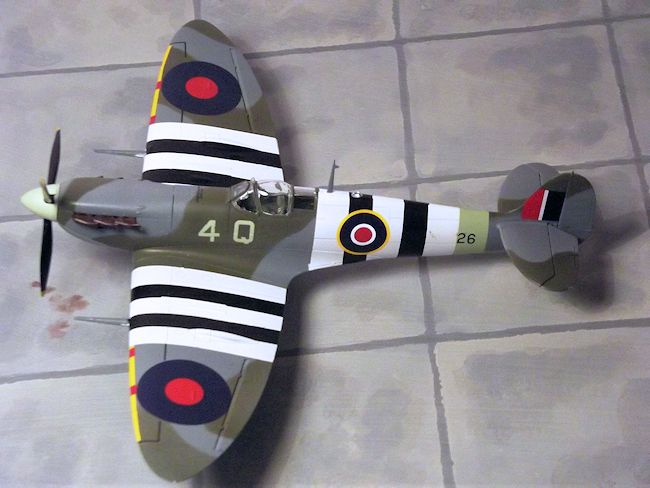
carried standard RAF-style camouflage and invasion stripes. The VCS-7 aircraft
were distinguished by the number “4” and an individual code letter painted
either side of the fuselage forward of the windscreen. Historians have
identified at least sixteen Spitfires so marked. They gave good service in
support of the invasion bombardment and were withdrawn from service on 26 June,
after just fifty days in commission, their job well done and their crews went
back to operating their floatplanes from their assigned capital ships. They
carried out 209 sorties, losing nine aircraft. None seem to have been lost in
air to air combat.
Construction begins with the interior, which is satisfyingly detailed. There are
two separate cockpit side walls which also form the interior of the lower
fuselage, resulting in the characteristic floorless cockpit of a Spitfire. There
are four bulkheads providing the engine firewall, instrument panel, pilot’s seat
support and headrest support. The seat is well detailed with separate sides,
rear armour plate, seat frame and head rest. The cockpit tub has notches to the
sides to give a positive alignment to the bulkheads. Well detailed levers,
pedals, trim wheels and oxygen bottle are separately moulded. The cockpit
interior was
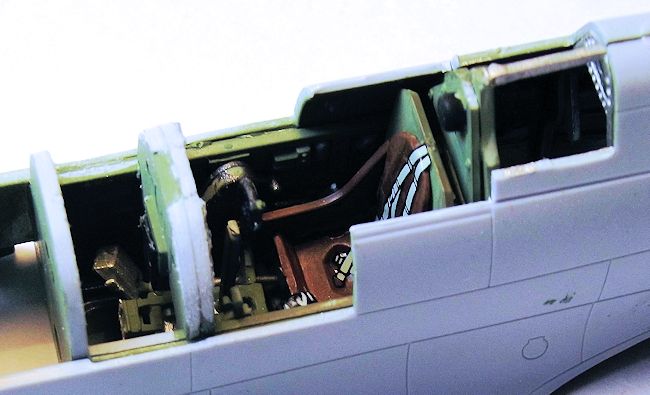 finished in Xtracrylix XA1010 Interior Grey Green, with the section
aft of the seat in Tamiya XF-16 Flat Aluminium. The instrument panel, control
boxes and handles were picked out in Flat Black. The kit provides an effective
decal for the instrument faces and seat belts were provided by a decal stolen
from a Revell Spitfire sheet.
finished in Xtracrylix XA1010 Interior Grey Green, with the section
aft of the seat in Tamiya XF-16 Flat Aluminium. The instrument panel, control
boxes and handles were picked out in Flat Black. The kit provides an effective
decal for the instrument faces and seat belts were provided by a decal stolen
from a Revell Spitfire sheet.
The entire cockpit pod is trapped between the fuselage halves and it is a very
tight fit, needing a degree of juggling and fettling to get it right. This is a
stage of construction that demands care and a good deal of dry fitting the sub
assemblies. The kit provides a choice of windscreens and canopies and to
accommodate this the whole upper cowling
between the engine and cockpit is a separate “U” shaped component. This needs to
be carefully juggled into position, mindful of the fact that it is intended to
be a tiny fraction wider than the surrounding fuselage to represent the armour
plating fixed over the forward fuel tank. I found that the tops of the bulkheads
needed some trimming before the top cover would sit down satisfactorily.
Before the fuselage halves are joined a
decision has to be made as to whether the cockpit hood is to be open or closed.
If closed, an appropriate transparency is provided, but the upper edges of the
cockpit have to be trimmed away about 1mm to a scribed line moulded into the
fuselage halves. This was straightforward matter of a few strokes of a scalpel
blade. The fuselage halves can now be glued together and attention turns to the
wings.
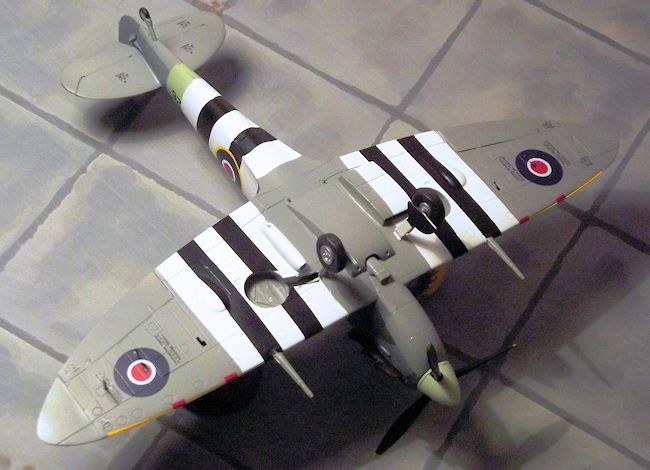
The lower wing is a full span section and in a departure from Airfix
tradition, the flaps are moulded in place, with no option for dropped flaps
available. There is an option for holes to be opened up for attachment of the
belly fuel tank or a display stand that is available separately. The walls to
the circular wheel wells are glued to the lower surface. Again in a departure
from Airfix tradition the wing is provided with front and rear stub spars that
span between the wheel wells and help to set up the correct dihedral. An unusual
undercarriage arrangement has been tooled, whereby each leg has an angled pintle
(stub) at the top of the leg that fits into the rear face of the front spar, the
remainder of the gear leg is to be added later. The spars and leg stub/pivot
were found to be a very close fit and some shaving and fettling of the parts was
necessary. I chose to add the lower wing section to the underside of the
fuselage and then add the separate left and right upper wing mouldings in case
they needed adjustment. I need not have worried since they were a perfect fit.
The upper wing panels incorporate the elliptical tips.
 Next come the tail planes, formed in a style that has become familiar
with the later breed of Airfix kits such as Spitfires 12 and 19 and the Seafire
17. The horizontal tails consist of separate upper and lower surfaces that fit
positively into sockets in the fuselage. The elevators are a one piece structure
with a central joining bar. I find it easier to cut the two elevator sections
apart and to line them up when gluing either side of the tail fine. The one
piece rudder and ailerons can now be added and the various flying surfaces
checked for alignment.
Next come the tail planes, formed in a style that has become familiar
with the later breed of Airfix kits such as Spitfires 12 and 19 and the Seafire
17. The horizontal tails consist of separate upper and lower surfaces that fit
positively into sockets in the fuselage. The elevators are a one piece structure
with a central joining bar. I find it easier to cut the two elevator sections
apart and to line them up when gluing either side of the tail fine. The one
piece rudder and ailerons can now be added and the various flying surfaces
checked for alignment.
The lower section of the engine cowl needed some adjustment to get it to
seat into the leading edge of the wing. Next I added the small carburettor air
intake under the centre section
The under wing radiator and oil cooler show the degree of sophistication that is
found in current Airfix kits with moulded fine mesh detail inside the components
and a positionable outlet door on the radiator housing. These parts fit snugly
into positive recesses in the lower wings.
A centre section fuel tank was added next. The kit only provides the
large ferry tank that tends to be associated with the supply of Spitfires to
Malta, so I used a spare 30 gallon slipper tank from an ICM kit, This was noted
in various reference sources as being fitted to the Spotting Pool Spitfires to
extend their loiter time over the battle.
The canopy was added and I chose the closed option, not forgetting to add
the gun sight before the canopy went on. The hood and fixed rear section are
supplied in one piece, with a separate windscreen.
They fitted snugly and were secured with Airfix Clearfix glue, then
masked with Tamiya tape trimmed with a fresh scalpel blade. Next I added the
wing cannon.
The propeller assembly has a positive keying system to prevent the blades
from being assembled backwards. The spinner was painted Sky in Xtracrylix
XA1007 , with the blades in Flat Black
and tips picked out in Yellow. The prop assembly was set aside while painting
was carried out.
The
paint scheme was based upon black and white photos that can be accessed on line
after a search, but the most useful reference that I could find in print was a
back issue of Model Aircraft Monthly magazine and its article by Andrew Thomas,
referenced below.
 The basic airframe was finished overall in Tamiya White Fine Surface
primer, applied from a rattle can. This serves as a primer – just as it says on
the can – but is also so dense and smooth that it serves as an excellent white
finish. The large areas of the wing and fuselage invasion stripes were masked
off with masses of Tamiya tape in preparation for the camouflage colours; the
underside airbrushed in Tamiya XF-83 RAF Medium Sea Grey, the upper surfaces
shadow shaded in Tamiya’s XF-81 RAF Dark Green and XF-82 RAF Ocean Grey. The
upper colours were masked with sausages of Blu-tack to provide a slightly
feathered camouflage demarcation line. The whole airframe was then brush painted
with Future/Klear to provide a good base for the decals.
The basic airframe was finished overall in Tamiya White Fine Surface
primer, applied from a rattle can. This serves as a primer – just as it says on
the can – but is also so dense and smooth that it serves as an excellent white
finish. The large areas of the wing and fuselage invasion stripes were masked
off with masses of Tamiya tape in preparation for the camouflage colours; the
underside airbrushed in Tamiya XF-83 RAF Medium Sea Grey, the upper surfaces
shadow shaded in Tamiya’s XF-81 RAF Dark Green and XF-82 RAF Ocean Grey. The
upper colours were masked with sausages of Blu-tack to provide a slightly
feathered camouflage demarcation line. The whole airframe was then brush painted
with Future/Klear to provide a good base for the decals.
The black stripes to the wings and fuselage came from solid decal strip
that I cut from an old Academy Spitfire sheet and the wing leading edge yellow
strips from a Revell sheet. They could equally well have been painted
conventionally. The wing upper roundels came from the kit decal sheet, while the
fuselage and under wing roundels and tail flashes came from the decal dungeon.
The kit decals were used for stencilling and wing walk lines but much of this
would have been overpainted by the invasion striping, so only small amounts of
stencilling were used.
There is no reference that I have found to tie up the airframe serials
with squadron codes, so although the codes are based upon a photograph, the
partially overpainted airframe serials are based upon guesswork. Those small
airframe serials came from a generic sheet.
The biggest challenge came in trying to find suitable decals for the squadron
codes on the forward fuselage. Eventually I settled upon Sky code letters from
Xtradecal sheet X72189. This sheet provides
 letters only, so the “Q” came
directly from the sheet while the number “4” was cobbled together by slicing up
sections from the letters “I” and ”Z”. A further brush coat of Future/Klear
sealed the decals followed by an airbrush misted coat of
Xtracrylix Flat varnish/.
letters only, so the “Q” came
directly from the sheet while the number “4” was cobbled together by slicing up
sections from the letters “I” and ”Z”. A further brush coat of Future/Klear
sealed the decals followed by an airbrush misted coat of
Xtracrylix Flat varnish/.
The undercarriage is added next and there is a separate set of parts for
those who like a retracted option. I went for the extended version but Airfix’s
approach to it is far from conventional and not far from a PITA for this
modeller to execute. The join between the undercarriage legs and the pintle
and stub arrangement housed in the wing
is shallow and potentially weak. It is definitely not novice friendly. The main
leg and in-wing stub each have a flat section cut onto them to serve as a half
lapped joint. At the same time the instructions show that each leg has to be
angled forward by 77 degrees and set up at 93 degrees splay to the wing under
surface. I left the wheels off to avoid a dead weight on the end of the legs
while I tacked then in place with tube cement and then pushed and prodded them
for about half an hour while waiting for the cement to go off, constantly
checking the legs’ alignment against the drawings in the instructions. I would
much prefer the good old fashioned square peg into a square wing socket
arrangement in Airfix kits of old. Left overnight to dry the legs still looked
really fragile so when adding the gear leg doors I extended the upper edge of
the doors with a sliver of 20 thou.
plastic card. This enabled me to glue
the doors to both the wing underside an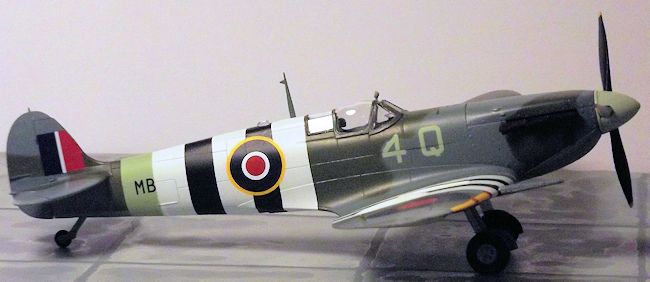 d the leg and stiffen up the structure.
Not strictly scale, but good for my peace of mind and it ain’t gonna show when
parked in my showcase. The wheels were added once I was satisfied that the
undercarriage structure had well and truly set hard.
d the leg and stiffen up the structure.
Not strictly scale, but good for my peace of mind and it ain’t gonna show when
parked in my showcase. The wheels were added once I was satisfied that the
undercarriage structure had well and truly set hard.
The engine exhausts were attached, painted in Tamiya XF-64 Red Brown, overlaid
with X-33 Bronze.
Finally, adding the pitot head, mirrors and propeller assembly completed a very
enjoyable build.
I rate this
as a strong candidate for Kit of the Year. It is impressively comprehensive,
well engineered and a lot of thought has gone into its design. It repays careful
work but it is not a kit for the beginner. I query whether it might be over
engineered in some aspects, but can hardly criticize for being too well
detailed. The only filler needed was the slightest trace along main joint lines.
I have already started on another one. Highly recommended and, for what is on
offer, amazing value for money.
Model
Aircraft Monthly Magazine, Volume 6
Issue
2, February 2007.
Aeroguide
Classics Number 1, Supermarine Spitfire Mk V. Linewrights Ltd 1985.
Spitfire in
Action. Squadron Signal Publications 1980.
Supermarine
Spitfire. Ducimus Books Ltd 1970.
Frank Reynolds
September 2014
Kit supplied
by my LHS, Spot on Models and Hobbies of Swindon, England.
Copyright ModelingMadness.com. All rights reserved. No reproduction in any form without express permission from the editor.
If you would like your product reviewed fairly and
fairly quickly, please
contact
the editor
or see other details in the
Note to
Contributors.
Back to the Main Page
Back to the Review
Index Page 2025