Revell 1/48 Spitfire IXe
| KIT #: | 4661 |
| PRICE: | £12-99 |
| DECALS: | Two options |
| REVIEWER: | Frank Reynolds |
| NOTES: | Reboxed ICM kit, Alley Cat ACD 48009 |
| HISTORY |
It is regularly quoted that the only significant difference between a Spitfire
Mk.IX and a Mk.XVI is that the former is fitted with a Rolls Royce Merlin 60
series engine and the latter with a Packard Merlin 266. Both carry the
manufacturers’ designation of type 361, so they are regarded as the same
aircraft type by the factory, yet as different types by their principal
operator, the Royal Air Force, who would have had to adopt different logistics
chains for the different engine installations. For modelling purposes, the two
are essentially the same shape, although the inevitable trap for Spitfire
modellers lies in establishing variations that exist in armament, the types of
tail plane, wing tips and fuselage configuration.
 Most Spitfire IX’s are of the traditional high back variety as are early Mk.XVIs.
The majority of Mk.XVIs,
however have a low back fuselage, bubble canopy, clipped wings and a
pointed tail fin. A commonly seen difference between IXs and XVIs is the
fact that Mk.XVIs had
an “e” type wing with their cannon in
the outboard position and an inner stub present for a .50 cal machine gun; by
contrast many IXs had the cannon inboard and the outboard stub could be blanked
off.
Most Spitfire IX’s are of the traditional high back variety as are early Mk.XVIs.
The majority of Mk.XVIs,
however have a low back fuselage, bubble canopy, clipped wings and a
pointed tail fin. A commonly seen difference between IXs and XVIs is the
fact that Mk.XVIs had
an “e” type wing with their cannon in
the outboard position and an inner stub present for a .50 cal machine gun; by
contrast many IXs had the cannon inboard and the outboard stub could be blanked
off.
There is a version of the MK.IX that is often overlooked, that with the low back
configuration. It was produced in relatively small numbers at the end of the
Mk.IX production run. Although it was dramatically different in appearance from
the more conventional high back aircraft it can only be identified by
cross-referencing photographs and documents with a serial number. These much
rarer IXs seem to been very camera shy, so modelling references can be hard to
find and unless a reliable photo source is available, the elusive low back IX
can be almost anonymous.
Used in limited numbers by the RAF, the low back Mk.IX
was also supplied in squadron strength
to the post war air forces of Denmark and South Africa.
| THE KIT |
Contained in Revell’s now standard letter box type end opening box, there are
five parts frames in softish medium grey plastic and one in clear. The frames
are bagged and could easily be accommodated in a box barely half the size. There
is a sheet of good quality decals with a choice of two RAF finishes for Mk.XVI
Spitfires and the decals include an instrument panel and good selection of
airframe walkway lines and stencilling.
 The mouldings clearly originate from the ICM Spitfire series, a line of kits
that have been around for almost 15 years. The parts show some signs of mould
wear and slight flash but nothing that requires major cleaning up. The
instructions run to four A4 pages in greyscale, but an amazing 37 stages of
construction with exploded views. Paint colours are keyed entirely to Revell’s
range.
The mouldings clearly originate from the ICM Spitfire series, a line of kits
that have been around for almost 15 years. The parts show some signs of mould
wear and slight flash but nothing that requires major cleaning up. The
instructions run to four A4 pages in greyscale, but an amazing 37 stages of
construction with exploded views. Paint colours are keyed entirely to Revell’s
range.
The kit is remarkably complex for 1:48 scale and can be completed with engine
cowlings open to reveal a highly detailed engine, the cockpit interior is well
detailed and the exterior features well engraved panel lines and recessed rivet
and bolt heads. There are many optional parts that are not applicable to the kit
as boxed.
The ICM kit has gained a reasonable reputation over the years, although it came
in for justified criticism when first released due to quality issues. There is
no doubt that their Spitfires are complex but carefully designed.
For modelling purposes, the kit contents will serve as a low back Spitfire IX, with an appropriate colour scheme and decals.
| CONSTRUCTION |
The key reference material for this project is the book “Spitfire International”
detailed in the footnote below. This 480 page bible by three eminent aviation
historians is a tour de force reference work detailing
countries for which there is some sort
of record of the Spitfire series in use, but specifically provides highly
detailed records of the airframes that saw squadron service with 26 air arms
including, where possible, individual serial numbers and their eventual fate.
Outside of the RAF, the biggest documented user of the low back Spitfire IX
is the South African Air Force, which
ordered 136 aircraft in September 1946, with the intention of equipping five
squadrons. They were drawn from RAF stocks, some having seen squadron service,
others had been delivered from the production line straight into storage at
Maintenance Units. There were 50 aircraft designated F.IXe, with Merlin 63
engines and 86 HF.IXe, with Merlin 70
power plants. The two aircraft types confusingly featured both high and low back
versions. The book gives detailed reference to over 1,000 Spitfires that were
operated by South Africa during and after World War 2, but it is the late
delivery of those 136 aircraft to
 their homeland in 1946 that caught my eye and
was to form the basis of this project. To illustrate just how much of a
minefield it can be in trying to define the colours and configuration of
Spitfires there is one stunning photograph on page 327 of the Air Britain book.
It depicts a flight of just six Spitfire HF.IXes of No 1 Squadron SAAF in 1951.
Those six aircraft have the two different types of rear fuselage, two are high
back, four are low back; four of the six carry squadron code letters, but of the
two that do not, one is high back and one is low; there are three different
styles of fuselage roundel in the picture and three different styles of upper
wing roundel.
their homeland in 1946 that caught my eye and
was to form the basis of this project. To illustrate just how much of a
minefield it can be in trying to define the colours and configuration of
Spitfires there is one stunning photograph on page 327 of the Air Britain book.
It depicts a flight of just six Spitfire HF.IXes of No 1 Squadron SAAF in 1951.
Those six aircraft have the two different types of rear fuselage, two are high
back, four are low back; four of the six carry squadron code letters, but of the
two that do not, one is high back and one is low; there are three different
styles of fuselage roundel in the picture and three different styles of upper
wing roundel.
Armed with a kit that could be built with the correct permutation of features, I
acquired the Alley Cat decal sheet ACD 48009, labelled as “Supermarine Spitfire
Mk.XVIe Bubble top (SAAF)”. This is a well produced,
crisply printed sheet that has four
options listed by the manufacturer as follows:
1)
L.F.Mk XVIe “5531” of Air Operations School AFS Langebaanweg, May 1953. This has
upper surfaces in overall Extra Dark Sea Grey with Medium Sea Grey undersides.
The national insignia features Springbok type roundels.
2)
L.F Mk.XVIe “5583” of the same unit in January 1953, overall silver with black
anti glare panel, Springbok insignia.
3)
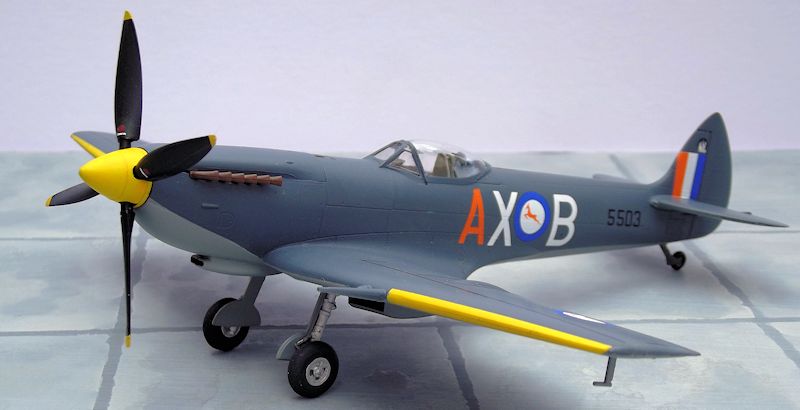
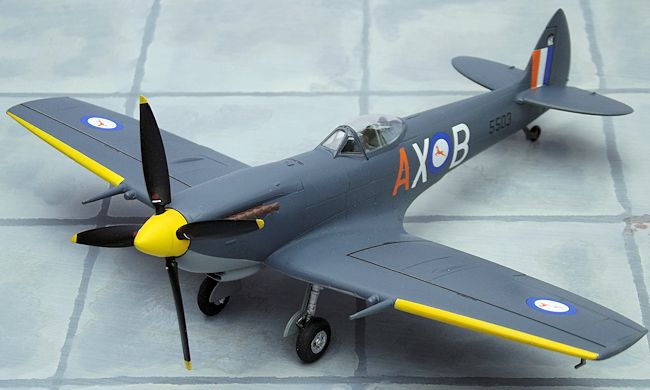
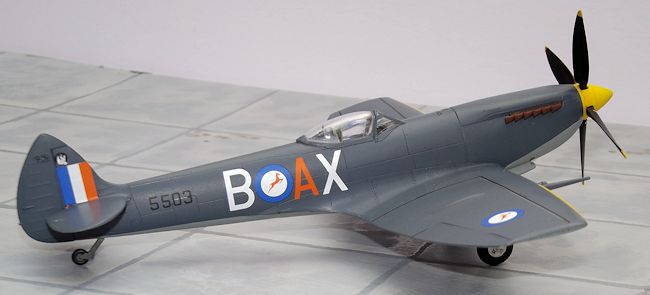
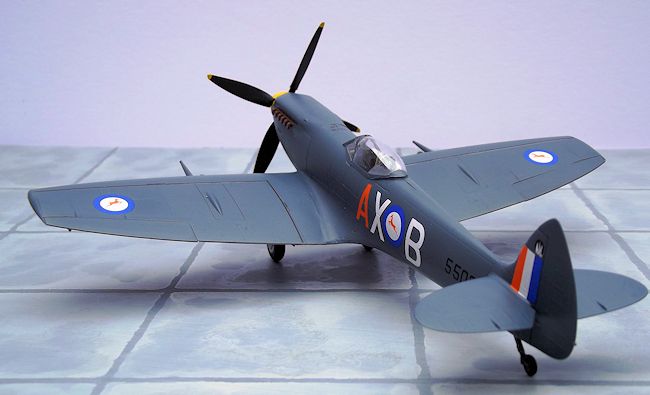
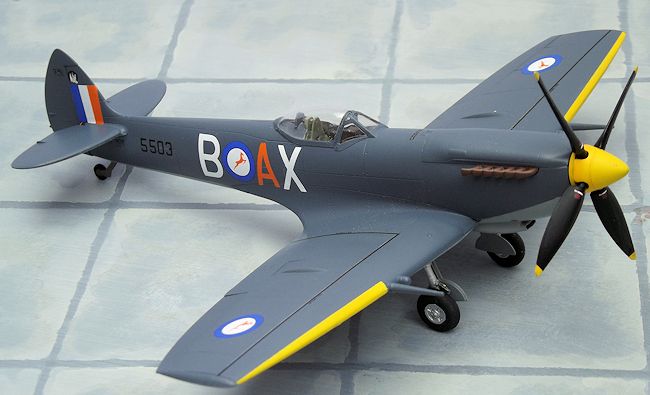
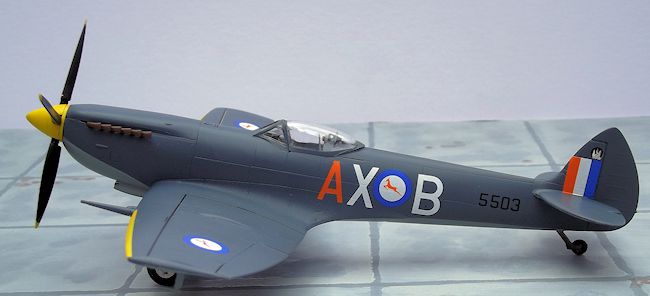
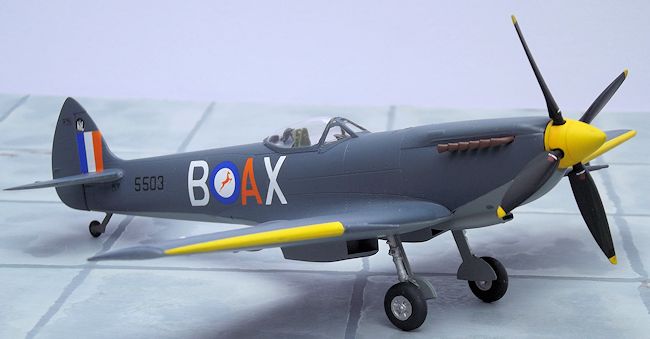
L.F.Mk.XVIe “5503, AX*B” of the same unit, EDSG over MSG, with Springbok
insignia.
4)
L.F. Mk.XVIe
“5553 AX*K” of the
same unit, late 1940s in an RAF style scheme of Dark Green and Ocean Grey to the
upper surfaces and Medium Sea Grey lower surfaces with an earlier RAF style
roundel.
The decals feature the correct shade of Orange for the roundel centres and full
squadron codes and badges. However, there is one matter of designation that
illustrates the whole conundrum of the Mks IX and XVI, for the Air Britain book
lists all of the aircraft on the Alley Cat sheet as being Mk.IX. The decals are
excellent, just what I need and will bring an important and interesting Spitfire
variant into my collection. I shall nevertheless bow to the research of Messrs
Terbeck, van der Meer and Sturtivant
and
 their 480 page book ,and my SAAF Spitfire will be catalogued and
displayed as a MK.IX
their 480 page book ,and my SAAF Spitfire will be catalogued and
displayed as a MK.IX
The parts frames were first washed with warm soapy water to remove the mould
release and my next routine procedure is to remove the parts that are called out
in the instructions as not for use and also those parts that I choose not to use
for the build. I always set these parts aside in a zip lock bag until the
project is completed, just in case I have chosen to leave out the wrong part.
This kits yields quite the largest spare parts harvest that I have experienced
with any 1:48 kit. The parts that Revell recommend as not for use total 22,
being alternative wing tips, tail planes, wing cannon bulges, carb air intake,
separate engine covers and a belly fuel tank. I chose not to fit the kit
supplied underwing bombs and rockets, so a further 29 parts went into the spares
box. I also elected to finish the kit with the engine cowlings and wing gun
hatches
in place so there was no
need to build the complex engine and wing guns so a further 42 parts went into
the spares archive. There are surely few kits where you can set aside 93 parts
before commencing assembly.
Assembly began with the fuselage interior, which consists of a front and rear
bulkhead, a floor frame, seat, rudder pedals and control stick. They assemble as
one unit with a good positive fit of parts. A decal is provided for the
instrument panel. The interior was painted in Xtracrylix XA1010 Aircraft Grey
Green, with small details picked out in Black. Seat belts were fashioned from
painted masking tape. The instructions direct that the cockpit interior is
fitted into the underside of the assembled fuselage. I decided
 to glue it into
one unassembled fuselage half to allow for any juggling when closing up the
fuselage components. The engine assembly can be omitted and the kit instructions
show that the firewall bulkhead should still be glued in place. This component
is too wide for comfort, so I omitted it and carefully assembled the fuselage
using the cockpit interior as the main joining piece. There is a small circular
plate joining the fuselage halves at the extreme nose. I fitted the top cowling
straight away to stabilise the fuselage assembly, taped all the joints closed
and left the whole unit overnight to dry.
to glue it into
one unassembled fuselage half to allow for any juggling when closing up the
fuselage components. The engine assembly can be omitted and the kit instructions
show that the firewall bulkhead should still be glued in place. This component
is too wide for comfort, so I omitted it and carefully assembled the fuselage
using the cockpit interior as the main joining piece. There is a small circular
plate joining the fuselage halves at the extreme nose. I fitted the top cowling
straight away to stabilise the fuselage assembly, taped all the joints closed
and left the whole unit overnight to dry.
The next morning the tape was removed and the fuselage found to be satisfactory.
In the absence of the engine, the instructions show that the exhausts can be
added direct into the slots in the cowl sides. Since I had not yet added the
lower cowl, small strips of plastic card were glued to the interior behind the
exhaust openings to stop them falling through into the interior when adding them
after the final painting stage.
The one piece lower wing was then glued in place under the fuselage centre
section. It was necessary to trim away part of the bulkhead behind and below the
pilot’s seat to enable the wing to sit down snugly against the lower fuselage
fairings. The left and right wing upper halves were trimmed and sanded before
being glued in place and adjusted for fit before the glue dried. There were some
gaps along the upper wing joint that needed some filler, Squadron Green Putty
was ideal. The lower cowl, incorporating the carburettor air intake was added
next and needed some trimming around the area where it blends into the wing
leading edge. The fuselage and wing assembly was left overnight to settle and
dry out.
The main airframe assembly was completed with the installation of the underwing
radiators, clipped wing tips, horizontal tail sections and the wing cannon. Some
filler was found to be needed around the lower wing to fuselage join and to the
underside of the carburettor intake. On each wing there was a shallow
 trench
where mould sinkage had occurred just forward of the aileron cut out. This was
easily dealt with by a swipe of filler. The front and rear sections of the clear
canopy were masked with Tamiya tape, trimmed with a fresh scalpel blade. The
area of the fuselage immediately behind the pilot’s head rest was painted Extra
Dark Sea Grey since this would show through the closed canopy on completion. The
gun sight was added and when everything was dry, the canopy sections were
attached with Humbrol ClearFix and the transparencies covered with Tamiya tape,
trimmed with a fresh scalpel blade.
trench
where mould sinkage had occurred just forward of the aileron cut out. This was
easily dealt with by a swipe of filler. The front and rear sections of the clear
canopy were masked with Tamiya tape, trimmed with a fresh scalpel blade. The
area of the fuselage immediately behind the pilot’s head rest was painted Extra
Dark Sea Grey since this would show through the closed canopy on completion. The
gun sight was added and when everything was dry, the canopy sections were
attached with Humbrol ClearFix and the transparencies covered with Tamiya tape,
trimmed with a fresh scalpel blade.
The whole airframe was coated with grey auto primer from a rattle can which revealed a couple of minor scratches and dents that were touched in with filler, the primer retouched and the airframe smoothed down with a couple of passes of an ultra-fine sanding stick.
| COLORS & MARKINGS |
The propeller spinner and wing leading edge stripes were sprayed Yellow using
Tamiya XF-3 Flat Yellow. The wing stripes were covered up with Tamiya tape and
the undersides sprayed Medium Sea Grey in Xtracrylix XA1003. At the same time
the undercarriage doors and wing pitot were painted while still on their parts
frames. When dry the underside was masked off ready for painting the upper
surfaces in Xtracrylix XA 1005 Extra Dark Sea Grey. I used my regular Iwata HP-C
airbrush.
 When dry, the masking to all except the canopy was removed and the airframe
brushed with two coats of Future/Klear floor polish to seal the paint and act as
a gloss coat to ease the application of decals.
When dry, the masking to all except the canopy was removed and the airframe
brushed with two coats of Future/Klear floor polish to seal the paint and act as
a gloss coat to ease the application of decals.
The Alley Cat decals are of good quality, sharply printed and well defined with
a matt finish. They need to be trimmed fairly closely around each subject but
went on fairly easily and responded to Micro Sol and Micro Set decal solutions.
The Revell kit sheet provided the necessary wing walk lines and stencilling. The
stencilled airframe instructions are naturally in English and I have no idea
whether the information also appeared on the airframe in Afrikaans. Even so, I
know of no suitable decals, so they remain as standard.
The airframe was given a misted coat of Xtracrylix Flat varnish to seal the
decals in place.
Finally I added the undercarriage, under wing pitot inlet and the propeller. The canopy masking was removed and the engine exhausts were attached, painted in Tamiya XF-64 Red Brown, overlaid with X-33 Bronze.
| CONCLUSIONS |
The Revell/ICM
mouldings provide a convincing Spitfire IX/XVI at a reasonable cost. It is not
the easiest kit to build since it is relatively complex in its design, but with
care and patience a good result is possible. The Alley Cat decals enabled me to
add a further sub-variant to my collection of Spitfires and it provides a
colourful and unusual subject
Even
straight from the box, it can be recommended as good value.
| REFERENCES |
Supermarine
Spitfire. Ducimus Books Ltd 1970.
Spitfire
International by Helmet Terbeck, Harry van der Meer and Ray Sturtivant, Air
Britain 2002.
October 2014
Kit supplied by my LHS, Spot on Models and Hobbies of Swindon, England.
If you would like your product reviewed fairly and fairly quickly, please contact the editor or see other details in the Note to Contributors.