Trumpeter 1/48 Spiteful F.14
| KIT #: | 02850 |
| PRICE: | $ |
| DECALS: | Three options |
| REVIEWER: | Jonathan Prestidge |
| NOTES: |
| HISTORY |
The designers of the Supermarine Spiteful had the unenviable task of trying to replace the iconic Supermarine Spitfire. How do you improve on one of the best-performing, most-beloved fighter aircraft of WWII? Great question!
From it’s inception, one of the best features of the Spitfire had been it’s elliptical wing. With regard to performance, the Spitfire’s elliptical wing allowed for high speeds, great handling, and multiple armament options. With modification, the wing was able to handle the increased power, performance, and weight of later Spitfire marks.
But there were a few problems. The Spitfire’s elliptical wing had a very
strong leading edge but the lighter structure behind the leading edge could flex
at high speed, limiting it’s dive speed to around 480 mph. Additionally, with
regard to ease of construction, the Spitfire’s elliptical wing
 was a
nightmare, requiring many times the man-hours to build compared to the wing of a
Bf 109 or Hurricane. Another undesirable feature of the Spitfire’s wing was it’s
narrow-track landing gear which resulted in many an accident on takeoff and
landing.
was a
nightmare, requiring many times the man-hours to build compared to the wing of a
Bf 109 or Hurricane. Another undesirable feature of the Spitfire’s wing was it’s
narrow-track landing gear which resulted in many an accident on takeoff and
landing.
So, the Air Ministry asked the designers at Supermarine, to replace the elliptical wing with a laminar flow design that was easier to produce, incorporated wide-track landing gear, and allowed for improved speed and roll rate. To this end, Supermarine mated a Griffon-engined, Spitfire fuselage, to a new, laminar-flow wing with wide-tracked landing gear. A taller tail fin was added to the Spiteful to improve directional stability with the powerful Griffon engine and 5-bladed prop. Finally, the Griffon engine was angled down slightly at the front to aid pilot view over the long nose.
Problem solved right? Well, unfortunately, the new wing did not possess the friendly flying characteristics of the elliptical wing, especially nearing a stall. And, though it was faster than the equivalent Spitfire, the improvement was not as good as was hoped. The end of WWII and the advent of the new jet fighters spelled the end for the Spiteful. Though a handful were produced, the Spiteful remains a beautiful side-note to history and a stepping stone from the Spitfire to the early British jets. The Spiteful’s wing ultimately found it’s way onto the Supermarine Attacker. But that’s another story.
| THE KIT |
 The
date on this kit is 2012. When new, the Trumpeter Spiteful F. MK.14 received
praise for it’s ease of construction, good fit, restrained surface detail, and
overall shape. It also received criticism for it’s underscale cockpit interior,
see-through radiators, thick cockpit canopy, and questionable decals.
The
date on this kit is 2012. When new, the Trumpeter Spiteful F. MK.14 received
praise for it’s ease of construction, good fit, restrained surface detail, and
overall shape. It also received criticism for it’s underscale cockpit interior,
see-through radiators, thick cockpit canopy, and questionable decals.
The kit plastic parts have very fine engraved panel lines and some fine rivet detail. Parts count is low by todays standards. The decals are opaque but the colors seem off and the markings are incomplete. There are three marking options: two are “what-if” schemes and the third has the wrong serial number.
| CONSTRUCTION |
This was a simple build. It is difficult to botch things up if one follows the directions. Instead of a comprehensive build log here, I will touch on a few modifications and additions I made to improve the kit.
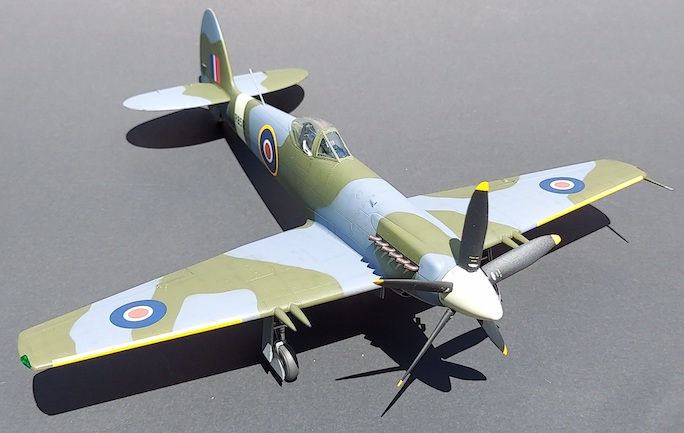
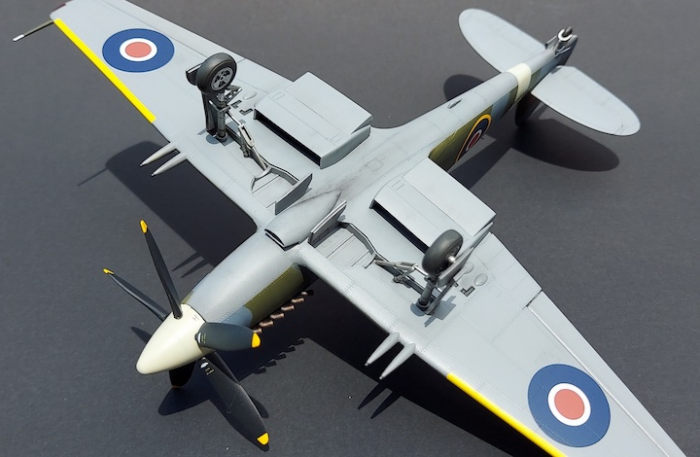
Before starting assembly, I made a few simple modifications to the kit parts. First, I took the two main landing gear wheels and flat spotted them using a file. Next, I drilled out the exhaust stacks with a #11 Exacto blade. Finally, I drilled out the ends of the four cannon barrels with a #11 Exacto blade.
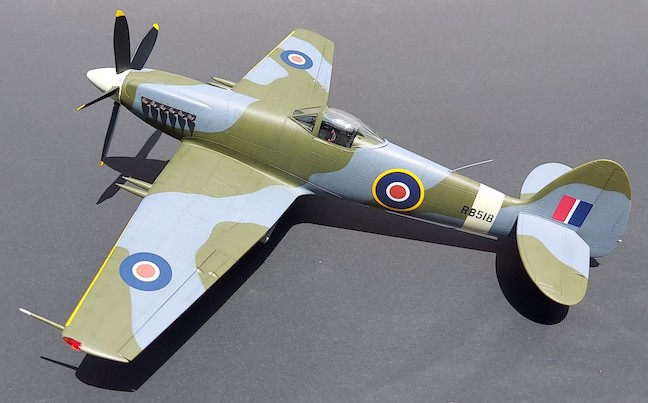
 I
made a few additions for the sake of accuracy. There is a small but prominent
air scoop on the right side of the nose of the Spiteful that is missing on this
kit. I used a plastic Q-tip handle, cutting a section in the shape of the scoop
and glueing it where the scoop should reside. Next, I added thin strips of
plastic to the seat to represent seatbelts. I made a whip antenna out of thin
plastic rod for the rear fuselage. Finally, I blocked off the interior of the
radiator housings with plastic card that was painted black, eliminating the
see-through effect of the photo-etched kit parts.
I
made a few additions for the sake of accuracy. There is a small but prominent
air scoop on the right side of the nose of the Spiteful that is missing on this
kit. I used a plastic Q-tip handle, cutting a section in the shape of the scoop
and glueing it where the scoop should reside. Next, I added thin strips of
plastic to the seat to represent seatbelts. I made a whip antenna out of thin
plastic rod for the rear fuselage. Finally, I blocked off the interior of the
radiator housings with plastic card that was painted black, eliminating the
see-through effect of the photo-etched kit parts.
Once the Interior was assembled and painted flat black, I picked out details with varying colors and painted the seatbelts. They really dress up what is visible through the canopy on the completed model.
Continuing with construction, I deviated from the instructions by glueing the upper wings to the fuselage halves first to insure a good wing-root fit. The lower wing was added after the fuselage halves were joined. I glued the flaps in the closed position and added the tail-planes at this time. Overall fit was great, requiring only minor cleanup. I attached the canopy with white glue and masked it. Final sanding of seams was completed in preparation for paint. I left the detail parts (landing gear, lights, prop) off until after painting and detailing was complete.
| COLORS & MARKINGS |
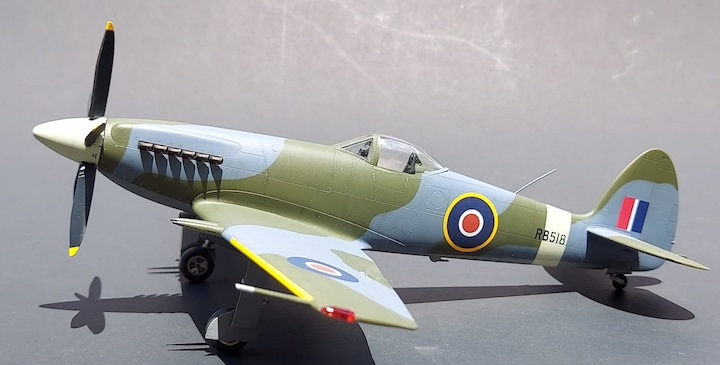
Prior to paint, I pre-shaded the kit by brushing thin black paint on all the panel lines. Polyscale Dark Green, Ocean Gray, and Israel Gray acrylics were sprayed with my Badger Anthem dual-stage airbrush. I masked between the colors with thinly rolled snakes of kneaded eraser. I then applied a thick coat of rubber cement over the color I was protecting. This technique is much faster for me than cutting paper/tape masks and keeps out paint better than any method I have previously tried. Once the paint was dry, the rubber cement peeled right off. I had no ill effects due to the rubber cement reacting with the underlying acrylic paints or peeling them off.
 Once
the base colors were sprayed, I weathered the plane with pastels applied with a
closely cropped paintbrush. Light exhaust staining, oil streaks, and panel line
enhancement add to the realism and give the finish some depth. The weathering
was kept to a minimum since the reference photos of RB515 showed a lightly
weathered airframe. I sealed the weathering with several coats of Future Floor
Polish in preparation for decals.
Once
the base colors were sprayed, I weathered the plane with pastels applied with a
closely cropped paintbrush. Light exhaust staining, oil streaks, and panel line
enhancement add to the realism and give the finish some depth. The weathering
was kept to a minimum since the reference photos of RB515 showed a lightly
weathered airframe. I sealed the weathering with several coats of Future Floor
Polish in preparation for decals.
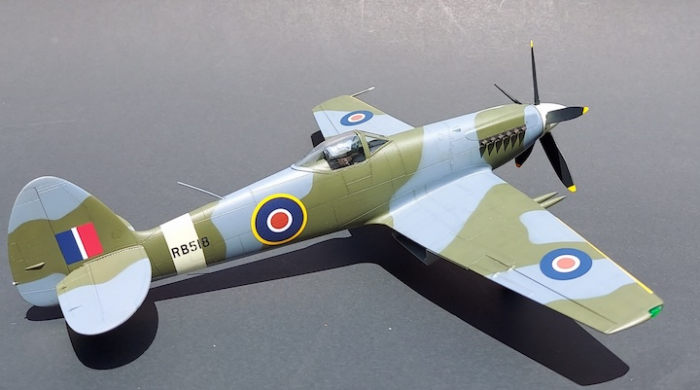
I used decals from the decal dungeon for most of the markings. Only the serial number was kit-supplied and it is wrong - it should be RB515 instead of RB518 but I decided to just leave it. I also added decals on the prop and spinner to better match pictures of the plane. I used Micro Sol and Micro Set to settle the decals into place. Once the decals dried, I gave the plane an airbrushed coat of Polyscale Satin clear. Final detail painting, weathering and touchups were then completed. The landing gear, lights, prop and antenna were added at this time.
| CONCLUSIONS |
Overall, this is a fun, easy kit that can be turned out well. The surface detail looks great under a coat of paint and the kit provides a good starting point if one wishes to super-detail it. There are a few minor omissions that I would recommend addressing - namely the see-through radiators, nose air scoop, seatbelts and whip antenna. If you replace the thick canopy, I recommend replacing the interior, otherwise it’s fine. The decals really do need replacing. If you take your time and get these right, you will be rewarded with a great model. I thoroughly enjoyed researching, building and improving this kit. Recommended for modelers with a little experience.
21 March 2023
Copyright ModelingMadness.com. All rights reserved. No reproduction in part or in whole without express permission.
If you would like your product reviewed fairly and fairly quickly, please contact the editor or see other details in the Note to Contributors.