Airfix 1/48 Spitfire Vb
|
KIT #: |
04100 |
|
PRICE: |
€ |
|
DECALS: |
Two options |
|
REVIEWER: |
Spiros Pendedekas |
|
NOTES: |
Old tooling |
RAF No.92 (formerly known as “East India”) is a Test
and Evaluation Squadron based at RAF Waddington, Lincolnshire. It was formed as
part of the Royal Flying Corps at London Colney as a fighter unit on 1 September
1917 and deployed to France in July 1918, where it flew both air superiority and
direct ground support missions. It was disbanded at Eil on 7 August 1919 and
reformed on 10 October 1939, at Tangmere Airfield. Though supposed to be
equipped with medium bombers, it instead became one of the first RAF units to
receive Spitfires, going on to fight in the Battle of Britain.
 In February 1942, the Squadron was posted to Egypt to join Air Headquarters
Western Desert to support the Allies on the ground. Upon the personnel’s arrival
there in April no aircraft were available, with some pilots flying operations
with Hawker Hurricanes of 80 Squadron. Spitfires finally arrived in August and
the unit commenced operations from RAF Heliopolis over the El Alamein sector,
and then at Landing Ground 173 in the Western Desert.
In February 1942, the Squadron was posted to Egypt to join Air Headquarters
Western Desert to support the Allies on the ground. Upon the personnel’s arrival
there in April no aircraft were available, with some pilots flying operations
with Hawker Hurricanes of 80 Squadron. Spitfires finally arrived in August and
the unit commenced operations from RAF Heliopolis over the El Alamein sector,
and then at Landing Ground 173 in the Western Desert.
Neville
Frederick Duke, DSO, OBE, DFC & Two Bars, AFC, FRAeS (11 January 1922 – 7 April
2007) was a British test pilot and fighter ace of the Second World War, credited
with the destruction of 27 enemy aircraft and acknowledged as one of the world's
foremost test pilots. In 1953, he became holder of the world air speed record
when he flew a Hawker Hunter at 727.63 mph (1,171.01 km/h) over Littlehampton.
Duke was posted to 92 Squadron at Biggin Hill in April, flying Spitfire Mk Vs.
When the unit was withdrawn for a rest in October 1941, Duke was posted to North
Africa to fly with 112 Squadron on the Curtiss Tomahawk, which he found less
agreeable than the Spitfire. In November 1942, he rejoined the recently
transferred to North Africa 92 Squadron, flying the tropicalized Spitfire Mk V.
He became a Flight Commander in February 1943 and received a Distinguished
Service Order in March. By the end of his second tour in June, Duke had amassed
a further 14 victories to his total and was awarded a bar to his DFC.
For a more comprehensive history on Neville Duke and his accomplishments, you
should look no further than Tom’s article on a beautifully built Eduard ER821
Neville Duke’s Spitfire Vb.
 This is the
late 70’s Airfix mold that had been reboxed numerous times till 2013 and
superseded by the 2014 new tool. Simplistic and soft on details, compared to the
more recent offerings, let alone the latest Wunderkits, but with correct shape
and pleasant, uncomplicated construction, this is an unpretentious elderly
fellow that had loyally accompanied us during our earlier modeling years.
This is the
late 70’s Airfix mold that had been reboxed numerous times till 2013 and
superseded by the 2014 new tool. Simplistic and soft on details, compared to the
more recent offerings, let alone the latest Wunderkits, but with correct shape
and pleasant, uncomplicated construction, this is an unpretentious elderly
fellow that had loyally accompanied us during our earlier modeling years.
The specific kit is the 1994 Mk.Vb rebox and was a surprise present from my
Dutch friend John. Needless to say, I jumped into building it immediately upon
reception. For a more in-depth look at the kit's contents, you may read its preview found
at the MM archives.
I started by attaching the front and rear bulkhead
(the front contains the instrument panel) to the starboard fuselage half, then
joined the fuselage. The seat, control stick, gunsight and the rear wheel were
left off to be attached at end stages. The prop shaft was affixed in position
and secured by styrene pieces glued to the fuselage, thus retaining its rotating
function, with the prop itself also able to be attached at end stages.
 Basic
cockpit color was Hu78 Interior Green, with instrument panel, side consoles,
stick grip and headrest painted black. The instrument panel and consoles were
dry brushed with silver to bring out the raised details and had a couple of red
“knobs” done with red paint and a very fine brush. The seat had its cushion
painted “leather” and received seat belts made from masking tape.
Basic
cockpit color was Hu78 Interior Green, with instrument panel, side consoles,
stick grip and headrest painted black. The instrument panel and consoles were
dry brushed with silver to bring out the raised details and had a couple of red
“knobs” done with red paint and a very fine brush. The seat had its cushion
painted “leather” and received seat belts made from masking tape.
The main wing was then assembled and attached to the fuselage, followed by the
Vokes tropical intake. I decided to separate the elevators from the horizontal
stabilizers, in order to droop them for more dynamic looks. To do so, I gently
ran the back side of my hobby knife through the hinge lines, then, upon
separation, smoothed the appearing edges and finally attached the horizontal
stabilizers to the fuselage.
While the radiator shape-wise looked good , its prominent inlet and outlet
screens were totally flat, so I decided to attach pieces of fine mesh onto them,
painted black and heavily dry brushed with silver, with the final result looking
more believable. The radiator housing was then attached, with the duct innards
painted “steel”.
Overall fit varied from good (fuselage) to average (wing roots, air filter).
With the basic model assembled, I decided to treat the emerging gaps first with
liquefied styrene and then with “normal” putty. Upon sanding, I took the bird to
the paint shop!
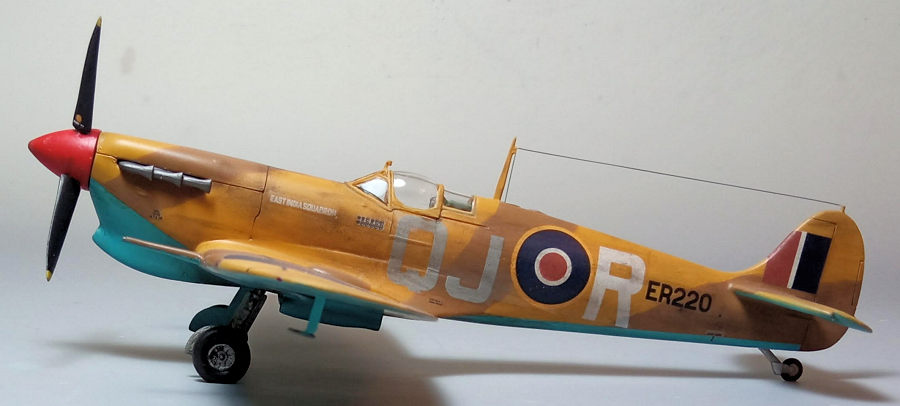
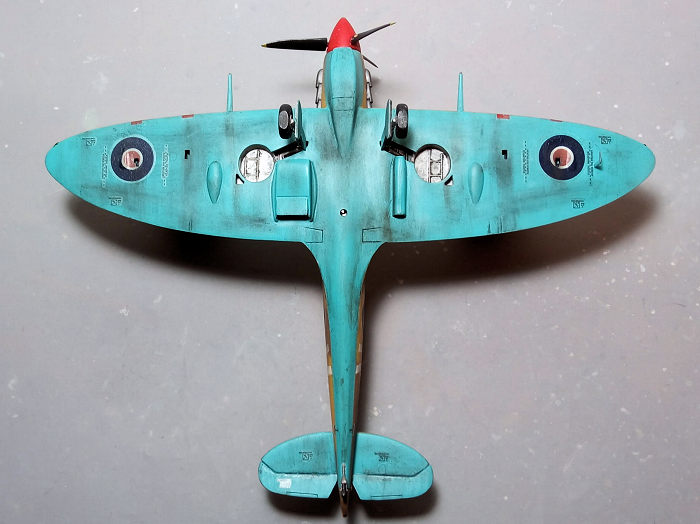
I first
gave the undersides a coat of Hu89 Middle Blue, then masked it off and
proceeded to the top camo, giving the topsides a coat Hu63 Sand, followed by
Hu110 Natural Wood. In order to create not too hard demarcation lines I used
strings of Tak, carefully spraying the brown at more or less right angles
close to the demarcations, in order to create a tight but not hard effect.
 Regarding the chosen shades, they were more or less of what was handy by the
time of painting. Yours Truly claims no accuracy on shades rendition, maybe
not even close - the blue might be too bright, the “sand” leaning towards
yellow and the brown tad lighter than what we consider “standard” shades of
Azure Blue, Middle Stone and Dark Earth respectively. Anyway, with the
result not looking out of place, I gave the bird a coat Future to prepare it
for decaling.
Regarding the chosen shades, they were more or less of what was handy by the
time of painting. Yours Truly claims no accuracy on shades rendition, maybe
not even close - the blue might be too bright, the “sand” leaning towards
yellow and the brown tad lighter than what we consider “standard” shades of
Azure Blue, Middle Stone and Dark Earth respectively. Anyway, with the
result not looking out of place, I gave the bird a coat Future to prepare it
for decaling.
I used the kit decals, which, despite being almost 30 years old, behaved
satisfactorily: they easily detached from their backing paper and more or
less conformed to the model’s surfaces, aided with some decal softener.
Presumably due to their age, they would start to shatter if moved around too
much, so I tried to get them right first time, with some touching up applied
with like colors where necessary. No apparent silvering was noticed, with a
final coat of Future sealing them.
I attached the main gear legs, followed by the doors
and wheels. The main legs had brake lines attached from stretched sprue and
the wheels were filed to look weighted. By looking at net pics, I saw
restored Spitfire main legs featuring torque links, so I happily rushed to
scratch build and add them to my Desert Spitfire’s legs, only to be notified
by Tom Cleaver that the torque links were a post war feature, so I removed
them. Thanks (once again), for the valuable heads-up right on time, Tom!
The rear wheel had been left off before joining the fuselage halves, as it
would have absolutely no chance surviving my less than delicate modeling
practices. In order to attach it at these final stages, I cut off its strut
mounting lugs, applied a small amount of liquefied styrene to the opening
and inserted the strut into the opening. By determining the length and angle
from the kit drawings, I secured the rear wheel in the correct position by
using some tak and let the liquefied styrene cure.
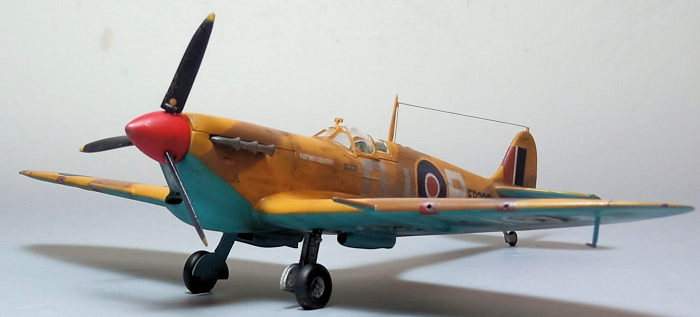
Legs, bays, door innards and wheel rims were painted “steel”, brake lines
and tires black and oleos were highlighted with my fine tip silver pen.
Underside blue would also be a possibility for all above steel painted
items, at least from a point onwards.
Finalizing
the cockpit, the seat, gunsight and control stick were attached (the latter
pushed forward, to compensate for the “drooped” elevators). The exhausts
were painted Testors Burned Metal and also attached, as were the 20mm
cannons and the underwing pitot tube, which had their tips painted also
burned metal.
 The 5-piece prop was constructed, its assembly being easier than initially
anticipated, with the blades positively secured onto the spinner base. The
spinner was painted red, whereas the blades were black with yellow tips. The
elevators were attached “drooped” at this time, as well.
The 5-piece prop was constructed, its assembly being easier than initially
anticipated, with the blades positively secured onto the spinner base. The
spinner was painted red, whereas the blades were black with yellow tips. The
elevators were attached “drooped” at this time, as well.
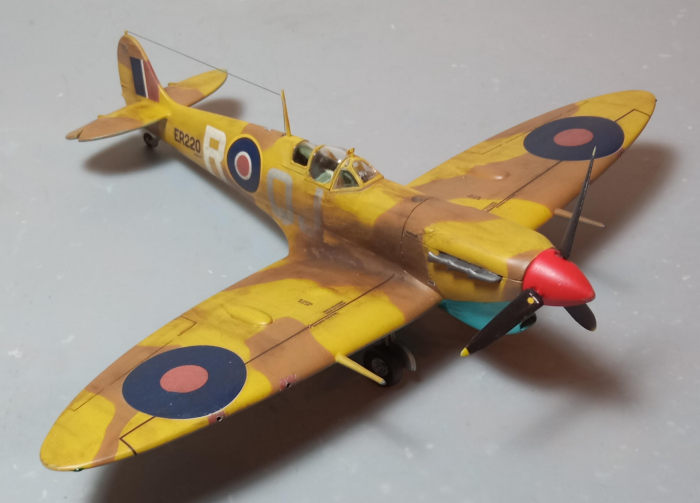
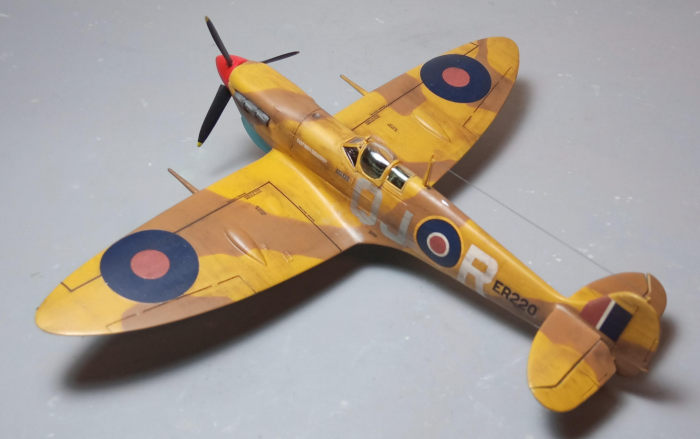
It was then weathering time, for which I decided not to restrain myself,
since this bird would be continuously operating under harsh desert
conditions. I thus first applied a hefty black wash at the main gear area,
giving it an oily look. Next an equally hefty amount of dark brown and dark
dry pastels was applied at all areas where dust, dirt, grim or engine
staining would reside. Finally, some silver dry brushing was applied at
places where paint might peel off due to personnel walking or sand blasting,
like the wing roots and blade leading edges. A final matt coat sealing
everything.
The front antenna mast was attached, while the fin located tiny one was
fabricated from stretched sprue, since the molded-on one had (typically for
me) been broken off during early stages of construction. The aerial wire was
replicated from pieces of thin stretched sprue, accordingly run. The prop
was finally attached.
The transparencies had their frames hand painted and attached. Fit was
so-so, with the emerging gaps taken care of white glue. The rear view mirror
was carefully attached on top of the windscreen and painted with frame
color, with his reflective area highlighted by my fine silver pen. Blobs of
red and green clear paint replicated the wing tip lights, while the dorsal
identification light, represented by a mere bulge on the plastic, was
highlighted with my fine silver pen, before calling Neville Duke’s bird
done!
If you want a modern, detailed 1/48 Spitfire,
there are definitely other choices to look for, let alone the newer Airfix
one. Indeed the older mold is exactly this: a kit that shows its age.
However the correct general shape, the still acceptable detail and pleasant,
uncomplicated construction are still countable assets of this iconic kit,
which has earned the modelers’ respect through the years. If you have one or
come across one, resist the temptation to keep it as a collector item and go
on building it: a really attractive result will occur.
Happy modeling!
Spiros Pendedekas
14 April 2023Copyright
ModelingMadness.com. All rights reserved. No reproduction in part or in whole
without express permission.
If you would like your product reviewed fairly and fairly quickly, please
contact
the editor or see other details in the
Note to
Contributors.
Back to the Main Page
Back to the Review
Index Page
Back to the Previews Index Page