| KIT #: | F-194 |
| PRICE: | AU$10-00 (at a Swap n' Sell) |
| DECALS: | Two options |
| REVIEWER: | George Oh |
| NOTES: | 1969 tooling |
| HISTORY |
 At the end of WWI, the
victorious Allied nations quickly set about preventing Germany from waging war
again. Germany was denied a large army, aircraft, submarines and tanks. But
nobody ever mentioned future technology, so Germany put a lot of research into
the fields of jet and rocket engines.
At the end of WWI, the
victorious Allied nations quickly set about preventing Germany from waging war
again. Germany was denied a large army, aircraft, submarines and tanks. But
nobody ever mentioned future technology, so Germany put a lot of research into
the fields of jet and rocket engines.
In mid-1944, Germany began to launch history's first cruise missiles at England, from large fixed launch-sites in France. The jet-propelled V-1, or Fieseler Fi-103, was small, fast and carried about half a ton of explosive, but because it had only a rudimentary guidance system, it was aimed at a large area target - London. At a preset time after launch (= distance), its fuel system was closed-off, the pulse-jet engine stopped, and the flying bomb dived into the ground.
The British response to these Divers, or Doodlebugs, or Buzz-bombs, was to immediately set-up a layered defence system. The V-1s were to be attacked by Spitfires, Tempests and Meteors over the sea, then by anti-aircraft guns and barrage balloons over the land. False impact locations were broadcast over the radio, and this led the Germans to re-aim the subsequent V-1s. The V-1 proved to be a difficult target, and some fighter pilots found that they could knock it off-course by flipping-up a V-1s wingtip with one of their own, or by using their wingtip vortex to disrupt the airflow over the V-1s wing. Either of these actions disrupted the V-1s gyroscopic stabiliser.
Because it was such a revolutionary weapon, the Allied nations scrambled to secure V-1 (and the more-advanced V-2) hardware, technology and the technicians, behind it, for their own use.
| THE KIT |
 This is an original olde
FROG kit, repopped by Novo in eastern Europe in their signature brick-red
plastic. Parts-wise, it is unchanged from the original. Funnily enough, it came
in an original FROG lid-and-tray box that held 4 frames that supported a 2-part
stand, 4 parts for a surprisingly-accurate V-1 and 24 parts for the Spitfire.
Optional parts allowed for the Spitfire to be built wheels-up and the canopy to
be posed open. Panel-line detail was of the raised variety, with strong grooves
that defined the moving surfaces. Trailing edges were quite thin as they were
cast integral with the wing upper parts. The cockpit consisted of 4 bland parts
- floor/seat pan, seat/bulkhead, control column and a pilot. An omission is the
lack of shell ejector chutes for any of the guns, but they are easily
replicated.
This is an original olde
FROG kit, repopped by Novo in eastern Europe in their signature brick-red
plastic. Parts-wise, it is unchanged from the original. Funnily enough, it came
in an original FROG lid-and-tray box that held 4 frames that supported a 2-part
stand, 4 parts for a surprisingly-accurate V-1 and 24 parts for the Spitfire.
Optional parts allowed for the Spitfire to be built wheels-up and the canopy to
be posed open. Panel-line detail was of the raised variety, with strong grooves
that defined the moving surfaces. Trailing edges were quite thin as they were
cast integral with the wing upper parts. The cockpit consisted of 4 bland parts
- floor/seat pan, seat/bulkhead, control column and a pilot. An omission is the
lack of shell ejector chutes for any of the guns, but they are easily
replicated.
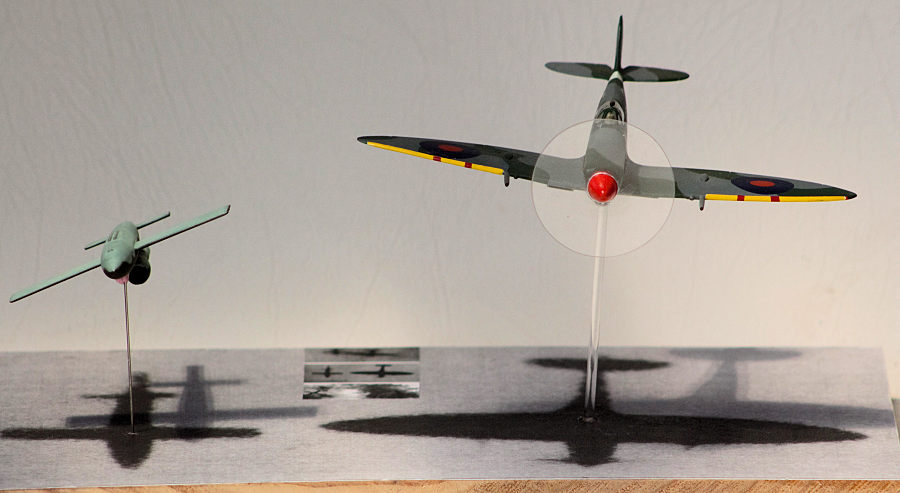
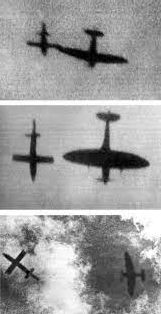
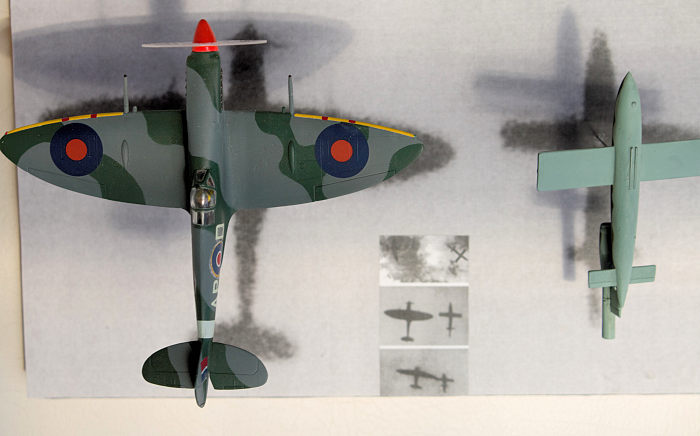
I always wanted to build this kit, and the spur to do so, was a FROG group build on an internet modelling site. My intention was to build it as an in-flight interception, and the kit stand placed them in-trail (with the V-1 leading) as per a famous photo. But I wanted to build it in the more dramatic pose of the Spitfire tipping the V-1 off-course, as depicted in a famous set of three photos.
| CONSTRUCTION |
The build went very quickly - aided by the straight-forward build, the low parts-count, and the very-good fit of the parts. In fact, almost no filler was required on either of the models. I didn't waste time inside the cockpit as it was obstructed by an Airfix Archie figure (which I painted carefully, as he would be seen).
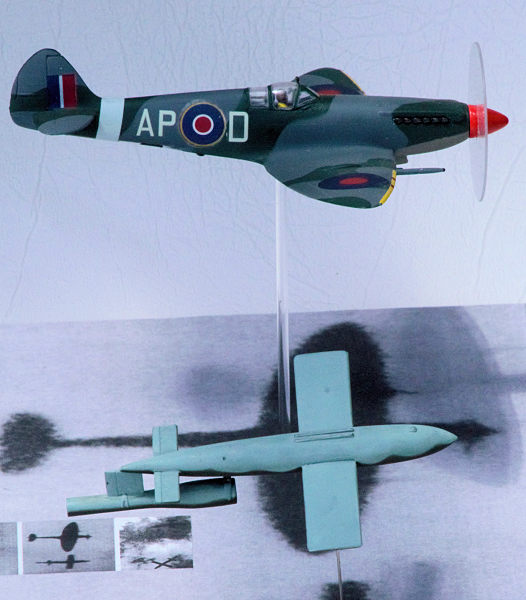
I pre-painted the 2 parts for the wheels-up option and glued them in-place, ensuring that they were flush with the underside. The wheels had to be masked before painting. The only snag I hit was when I lost the radiators after painting them (Twit!!! I found them 2 months later), so I had to scratch-build two replacements from 1mm plastic card. The thickness let me sand then to the correct(ish) shape with thin lips. Small bits of sponge filled them and stopped the see-through look.
Some filler was needed around the Spitfire's wing parts (wing/fuselage and wing-roots) and tailplane roots, and the V-1's engine. I used Perfect Plastic Putty because it can be smoothed and contoured with a damp fingertip or cotton-bud/Q-tip.
| COLORS & MARKINGS |
 Painting the Spitfire had to be planned
carefully, because of the complexity of the masking. I started with a
general coat of white, to cover the dark plastic, and so I could paint, then
mask-off the sky band around the fuselage. After touching-up the white
around the masked band, I masked-off some white, then sprayed a light-grey
on the undersides. After I unmasked the white, I then paused and took a
breath.
Painting the Spitfire had to be planned
carefully, because of the complexity of the masking. I started with a
general coat of white, to cover the dark plastic, and so I could paint, then
mask-off the sky band around the fuselage. After touching-up the white
around the masked band, I masked-off some white, then sprayed a light-grey
on the undersides. After I unmasked the white, I then paused and took a
breath.
Eventually, the undersides were masked, and the top-sides were prayed with a medium grey. Masks of tape and paper followed, and I sprayed Tamiya IJN green as the RAF dark green camouflage pattern, with hard edges. I prefer to remove the masking as soon as I have cleaned the airbrush. After a day of drying, I applied more masks, then I brush-painted the black portion of the belly invasion stripes.
The V-1 was less-complicated, though I painted it before attaching the engine to the body. I sprayed it sky blue then masked it with a wriggly snake of Blutack on the body, and a straight one on the engine, before I sprayed the tops with a different dark green. Both models were lightly drybrushed to highlight their details, yet keep them clean.
The only tricky painting problem was the Spitfire's exhausts. Here, the trick was to mask the area with tape, cut through the tape around the exhausts (and the recesses around them helped a LOT). They were brush-painted with black, followed by a dry-brushing with bronze, in the direction of the airflow over them. This keeps the 'openings' black.
I was lucky in that the decals were in-register, and that they worked well, despite their age. I put them down onto puddles of Future, and hoped that they'd snuggle-down around any detail. The carrier-film still silvered - Rats!!!
| FINAL BITS |
My last requirement was the propeller. I lopped-off the 5 blades and replaced them with a clear plastic disc (without any blurring), because the V-1 was a fast target, so the Spitfire would be going flat-out to catch it. Prop-blur is only visible when the propeller is turning relatively slowly. In a deviation from the painting guide, I gave the Spitfire a bright red spinner, because I wanted the splash of colour.
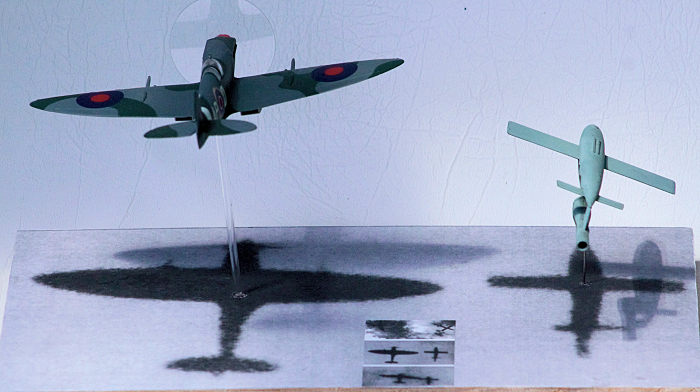 To display this duo, I enlarged the
middle shot of the famous photo-sequence, till it was about the size of the
Spitfire, and fortunately, the V-1, as well. This, I glued onto a piece of
cut-to-size board then drilled (unsuccessfully) holes in the
Centre-of-Gravity of the models, and then corresponding holes in the board.
The object was to support each model vertically and directly above its
'shadow'. Lengths of brass tube were superglued into the belly of the
Spitfire, and the spine of the V-1. These were cut so that they were flush
with the surface of their relative airframes. They accepted the vertical
supports that held the model above its shadow.
To display this duo, I enlarged the
middle shot of the famous photo-sequence, till it was about the size of the
Spitfire, and fortunately, the V-1, as well. This, I glued onto a piece of
cut-to-size board then drilled (unsuccessfully) holes in the
Centre-of-Gravity of the models, and then corresponding holes in the board.
The object was to support each model vertically and directly above its
'shadow'. Lengths of brass tube were superglued into the belly of the
Spitfire, and the spine of the V-1. These were cut so that they were flush
with the surface of their relative airframes. They accepted the vertical
supports that held the model above its shadow.
Now, you wouldn't tap the wing of a V-1 down, because this would cause the flying-bomb to roll towards you (remember that 1/2-ton of explosives). The V-1s were tipped away by flicking its wingtip upwards. Close and careful examination of the shadow of the V-1 will reveal that the shadow of the pulse-jet is on the left / Spitfire-side of the axis of the V-1. Logically, this evidence indicates that the V-1 was upside-down - so it was tumbling after it had been tipped. You might disagree, but that is my read, and that is how I chose to display these two models.
| CONCLUSIONS |
27 June 2022 Copyright
ModelingMadness.com. All rights reserved. No reproduction in part or in whole
without express permission. If you would like your product reviewed fairly and fairly quickly, please
contact
the editor or see other details in the
Note to
Contributors.