| KIT #: | 8281 |
| PRICE: | $49.95 |
| DECALS: | Five options |
| REVIEWER: | Dan Lee |
| NOTES: | Profipak |
| HISTORY |
The Mk IX Spitfire was born out of need/desperation as it became obvious from the loss rate that the FW190s out performed the Spitfire MkV in early 1942. To regain some balance in air combat, the RAF and Supermarine took the Mk V airframe and added the more powerful Rolls Royce Merlin 61 engine to it.
 The resulting plane was rushed into
production with the C wing or universal wing. It became the most numerous
Spitfire type to be produced. Further details can be found in much better
histories and build articles.
The resulting plane was rushed into
production with the C wing or universal wing. It became the most numerous
Spitfire type to be produced. Further details can be found in much better
histories and build articles.
The Unit
The 52nd Fighter Group was one of three fighter groups to fly Spitfires. The other two were the 31st and the 4th (aka the RAF Eagles, a wing mostly filled with US pilots in RAF service.) The 4th transitioned first in 1943 to the P-47 and later to glory in the P-51. The 31st and 52nd flew their Spitfires in the Med Theater till the spring of 1944 when P-51s finally arrived.
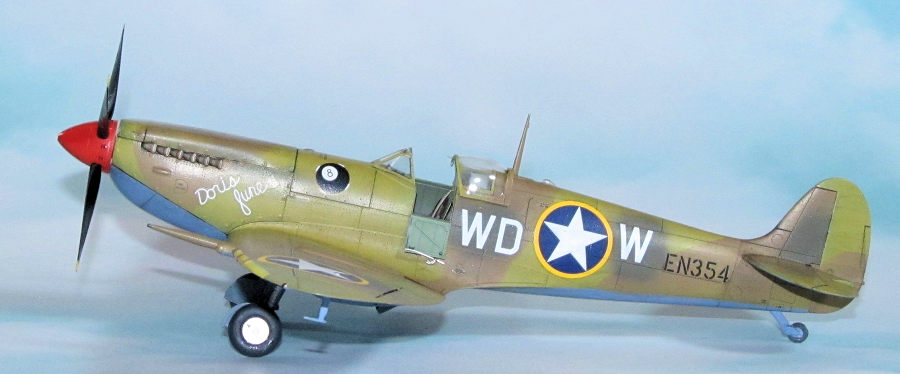
The 52nd flew many close support and air superiority missions in the Med Theater in the Spitfire. One of the more famous Spitfires was Lt Leonard Helton's Doris.
| THE KIT |
This is one Eduard's best ever kits. The profipack version includes 207 plastic parts, 14 clear parts, a photo-etch sheet for the cockpit, decals for five different Spitfires and a kabuki tape mask set for the clear parts and wheels. The plastic is very detailed and well done with no flash or sink marks.
| CONSTRUCTION |
 The cockpit was first. I painted
most of the parts Tamiya XF-71 because it was close enough to British Interior
Green. Once the parts were dry, I started assembling the cockpit. I found it
(like others) to be a touch fiddly, but once everything snapped into place it
was good. I used the Eduadrd PE that came with it, but I didn't find it to be a
big deal to add (maybe because I'm so used to it or because this is Eduard's
kit.) The cockpit fit right into the starboard fuselage half as per the
instructions.
The cockpit was first. I painted
most of the parts Tamiya XF-71 because it was close enough to British Interior
Green. Once the parts were dry, I started assembling the cockpit. I found it
(like others) to be a touch fiddly, but once everything snapped into place it
was good. I used the Eduadrd PE that came with it, but I didn't find it to be a
big deal to add (maybe because I'm so used to it or because this is Eduard's
kit.) The cockpit fit right into the starboard fuselage half as per the
instructions.
I avoided the headache assembling the wing as I actually re-read reviews of the kit and noted where the problems might be. Forewarned is forearmed. I used CA glue for the external seams. Sanding and polishing the seams was a breeze.
The fuselage went together without any issues (again forewarned) and the Barracuda resin drop in replacement hood went in without too much trouble. I didn't need to do that much filling/sanding. I also helped myself by using CA glue along the visible seams and Tamiya Extra Thin cement along the internal joints when gluing it together. The seams were sanded and polished smooth.
Attaching the wing and fuselage was easy. I didn't need any plastic putty to fill in the gaps. The remaining parts like the canopy, guns, ailerons and landing gear were cleaned up for painting.
| COLORS & MARKINGS |
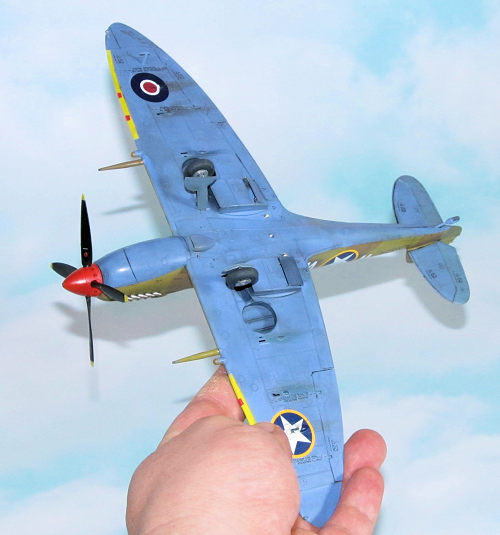
 I wanted to do a Spitfire in US markings for a while so I
followed Eduard's paint guide for Doris. I first primed the model with Badger
Stynylrez primer and when it was dry I sprayed Mission Models Azure Blue on the
bottom and then masked the area below the demarcation line. Next I sprayed
Mission Models Middlestone on the top. When the Middlestone was dry, I made
masks using painters tape for the Dark Earth. I used Gunze's Dark Earth for the
dark earth patches. In the Eduard color diagram, they show dark brown paint
patches that were used to cover up the original RAF IDs (the 52nd
received hand me down Spitfires from the RAF.) I sprayed on Tamiya Dark Khaki
freehand at low pressure to prevent overspray.
I wanted to do a Spitfire in US markings for a while so I
followed Eduard's paint guide for Doris. I first primed the model with Badger
Stynylrez primer and when it was dry I sprayed Mission Models Azure Blue on the
bottom and then masked the area below the demarcation line. Next I sprayed
Mission Models Middlestone on the top. When the Middlestone was dry, I made
masks using painters tape for the Dark Earth. I used Gunze's Dark Earth for the
dark earth patches. In the Eduard color diagram, they show dark brown paint
patches that were used to cover up the original RAF IDs (the 52nd
received hand me down Spitfires from the RAF.) I sprayed on Tamiya Dark Khaki
freehand at low pressure to prevent overspray.
I forgot to add the yellow ID trim along the leading edge of the wing and remembered after I just added the insignia decals. Fortunately, I used masks made of post-It notes to avoid peeling up the decals and light sprayed the yellow ID trim.
 The rest of the parts were painted
accordingly including the red spinner.
The rest of the parts were painted
accordingly including the red spinner.
I used the Eduard decals. I didn't have any issues with the decals except those that were self inflicted. Instead of an oil paint wash, I used a watercolor wash to pop out the detail (two drops black, one drop dark umber, one drop of dish soap with five drops of water.) The excess was removed with damp Q tips.
Once the plane was mostly assembled, I sprayed on the Tamiya flat coat to seal everything in.
The various small bits were added to the model such as the cannon barrels, gunsight, canopy, lights and antenna among others. The landing gear was probably the most fiddly part of the build for me. I used CA glue to keep the landing gear in place. In my experience, I found the Eduard landing gear is still better than the Airfix landing gear only because the assembly isn't as fragile. I brush painted the ID lights with various clear colors.
Voila, I had my Eduard Spitfire in US markings.
| CONCLUSIONS |
This is kit is everything that everyone has raved about for the last six or seven years. It builds very nice and fits very well as long as you remove the sprue nubs off the parts and keep the paint off the joins. I liked the Barracuda resin replacement hood instead of the two piece Eduard one which requires filling and sanding that will destroy the details on those parts. It was a drop in replacement as advertised. Even the photo-etch parts were not a headache to use (yeah, I know!)
I still like the Airfix Spits (because they are cheaper) but they have been supplanted by the Eduard Spitfire as my favorite to build. The kits are definitely worth getting just for the amazing detail alone.
9 August 2021
Copyright ModelingMadness.com. All rights reserved. No reproduction in part or in whole without express permission.
If you would like your product reviewed fairly and fairly quickly, please contact the editor or see other details in the Note to Contributors.