| KIT #: | 32001 |
| PRICE: | $109.00 |
| DECALS: | Three options |
| REVIEWER: | Lee Kolosna |
| NOTES: | Basic kit build |
| HISTORY |
The Spitfire’s deserved place in
aviation history was earned by its performance during the Battle of Britain in
1940. Even though the largest share of the fighting against the Luftwaffe was
carried out by the less glamorous Hurricane, the Spitfire captivated the
emotions of the public and went on to be come one of the premier fighter aircraft
of World War II. Pressed into combat during desperate times, the Spitfire
embodied the feisty spirit of a besieged nation through its graceful lines, high
speed, and excellent maneuverability. First flown in 1936, the Spitfire entered
service in 1938. The Mark Ia became operational in early 1940, equipped with
eight .303 inch Browning machine guns, and was powered by a Rolls Royce Merlin
II engine of 1175 HP.
come one of the premier fighter aircraft
of World War II. Pressed into combat during desperate times, the Spitfire
embodied the feisty spirit of a besieged nation through its graceful lines, high
speed, and excellent maneuverability. First flown in 1936, the Spitfire entered
service in 1938. The Mark Ia became operational in early 1940, equipped with
eight .303 inch Browning machine guns, and was powered by a Rolls Royce Merlin
II engine of 1175 HP.
Fighting against the onslaught of attacking German fighters and bombers, the Spitfires flew multiple missions each day, pushing both the pilots and their aircraft to the extreme limits of endurance. After nearly a year of furious combat, the German high command backed down and redirected its attention to other areas of the world, giving the United Kingdom a chance to catch its collective breath. The populace owed a great debt to the RAF, and the Spitfire continued to be steadily refined through upgrades to engine and armament. Over 22,000 were produced, serving throughout the entire war. Never lost were the delightful flying characteristics and elegant lines that made this one of the most beautiful aircraft ever created.
| THE KIT |
This is the very first kit issued by Kotare, a model company based in New Zealand and formed after the unfortunate demise of Wingnut Wings. Kotare’s design philosophy is to provide modelers with kits that are faithful to the subject, exquisitely detailed but only where it is visible, extensively researched, and relatively straightforward to build without the need for any aftermarket items. Unlike more complex model kits from other manufacturers in this scale, there are no open cowlings or gun bays, no working landing gear and control surfaces, no exposed engines or armament bays, and a fidelity to the subject as best can be accomplished with plastic injection molding. There are only plastic parts, 117 of them, with no resin, photoetch, or other media.
What Kotare has accomplished – with their very first kit no less – is nothing short of remarkable. The model has recessed panel lines where appropriate and raised rivets and overlapping panels in other areas such as the rear half of the fuselage, just like a real Spitfire. The control surfaces and flaps can be positioned as desired, but Kotare builds in as a default the characteristic downward deflection of the elevators seen in Spitfires at rest. The kit includes two variants of the seat, one with a molded-in harness and one without.
There are two types of propeller and corresponding spinner (de Havilland and Rotol), separate cabin doors for either open or closed configuration, and separate canopy pieces to depict the sliding middle section as either open or closed. There are individual decals provided, over a hundred of them, for the individual gauges in the instrument panel and information placards and stencils for the cockpit. The decals themselves are printed by Cartograf (the best in the business, in my experience) for three different mid-production Spitfire Ias, all involved in the Battle of Britain campaign. The mid-production run consists of those aircraft made at the Supermarine factory between September 1939 and April 1940.
Even more impressive is the twenty-eight-page instruction manual, which is a serious modeler’s dream full of research tidbits, photos of the aircraft being depicted, educated conjectures about color callouts, and excellent full-color painting instructions. I’ve never seen anything like it in all my decades of modeling.
Those familiar with my model kit reviews on Modeling Madness know that I endeavor to list the shortcomings of a kit based on the research I do before every project. With this model, these are the issues I have discovered:
None
 Oh, all
right – I do have one disagreement with Kotare and that is the color of the
squadron code letters, which specs state should be in Medium Sea Grey. Kotare
referred to period color photographs taken on Kodachrome transparency film
by Life magazine to conclude that the code letters were a slightly darker and
bluer tone than Medium Sea Grey. I don’t know if I agree with them on that
determination but they state right in the instruction booklet that it’s okay if
the modeler doesn’t come to the same conclusion that they do. What a breath of
fresh air these kit instructions are.
Oh, all
right – I do have one disagreement with Kotare and that is the color of the
squadron code letters, which specs state should be in Medium Sea Grey. Kotare
referred to period color photographs taken on Kodachrome transparency film
by Life magazine to conclude that the code letters were a slightly darker and
bluer tone than Medium Sea Grey. I don’t know if I agree with them on that
determination but they state right in the instruction booklet that it’s okay if
the modeler doesn’t come to the same conclusion that they do. What a breath of
fresh air these kit instructions are.
In the box unbuilt, I’ve never been more impressed with a model kit and I’ll save the reader from having to skip down to the conclusions section of this review after having now completed it: this is the finest model kit that I’ve ever built. It’s not a simple kit to build and it requires a lot of attention to detail and careful reading and following of the instructions, but my goodness this is one amazing model kit.
| CONSTRUCTION |
It pays to read the
entire instruction booklet from beginning to end, as it will assist one in
painting decisions, minor differences between the three different aircraft, and
guidance on the proper assembly sequence. One of the more interesting aspects
of this project is Kotare’s determination that the middle frames of the cockpit
were not painted in the usual Interior Grey-Green we see in almost all WWII
British aircraft, but a color they call “apple green”, which is much greener and
more intense than what modelers are used to seeing inside a Spitfire. A mixture
is recommended using Tamiya, Humbrol, and Gunze paints. I chose Tamiya and
mixed two parts of X-18 Park Green with one part of XF-71 Sky. This was sprayed
over the floor, walls, rudder linkages, and inside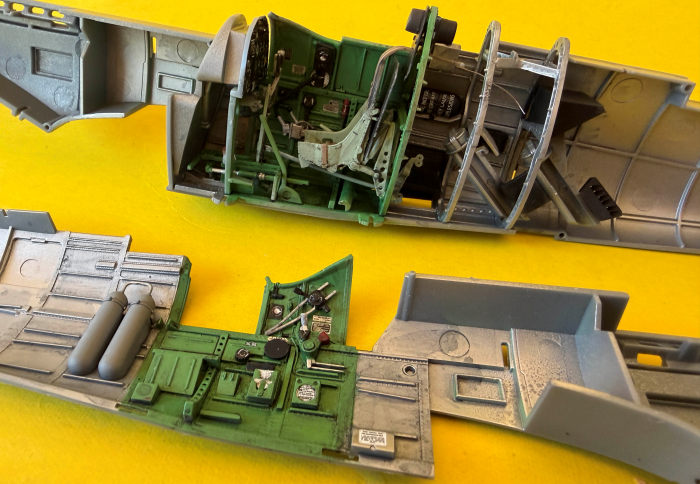 the cabin door. The seats in
this range of Spitfires were metal and painted Interior Grey-Green or Flat
Black, and not the more ubiquitous red-brown seen on the plastic seats of later
Spitfires. (Don’t call it Bakelite! It’s actually a resin and paper molded
material called SRBP that was referred to as “plastic” at the time, but it’s not
how we commonly use the term nowadays.) The rest of the interior was painted
with Alclad II Lacquer Aluminum. Kotare provides very detailed instructions on
how to paint the various switches and consoles on the sides of the cockpit using
flat black, medium gray, and brass.
the cabin door. The seats in
this range of Spitfires were metal and painted Interior Grey-Green or Flat
Black, and not the more ubiquitous red-brown seen on the plastic seats of later
Spitfires. (Don’t call it Bakelite! It’s actually a resin and paper molded
material called SRBP that was referred to as “plastic” at the time, but it’s not
how we commonly use the term nowadays.) The rest of the interior was painted
with Alclad II Lacquer Aluminum. Kotare provides very detailed instructions on
how to paint the various switches and consoles on the sides of the cockpit using
flat black, medium gray, and brass.
I chose to use the seat with the molded-on seat harness, which look quite good and relieves me of the misery of attaching photo-etch pieces – a task I hate with the fire of a thousand suns. The harness was painted with a light tan and the metallic portions like buckles and eyelets were picked out with a silver color pencil. One small issue I dealt with is that the slot through the armor plate behind the seat isn’t tall enough to allow the injection molded seat belt to pass through. I opened the slot with an X-acto knife blade and all was well.
After all the interior parts were painted, it was time to add the dozens and dozens of individual decals to the instrument panel and cockpit sides. Applying each one individually took several hours under a bright light and the use of an Optivisor, but the results are sensational, even better than the color photo-etch pieces I’ve used in other Spitfire kits.
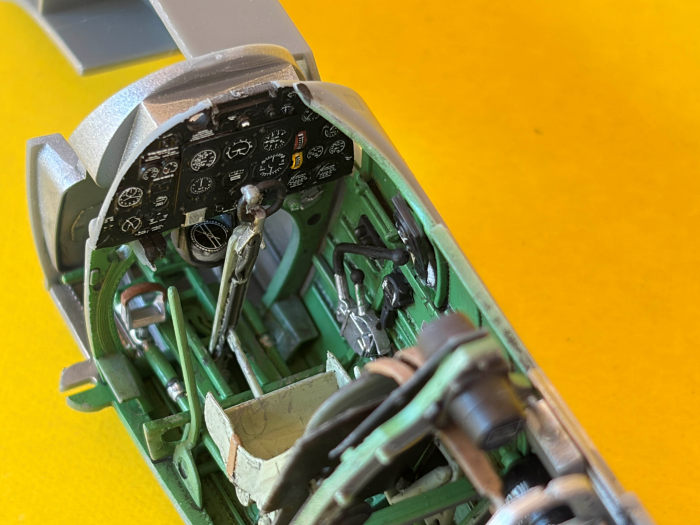 I applied an enamel
dark wash over the interior pieces to deepen the shadows and add depth, and then
used a silver color pencil to scratch up places of high wear like the seat, the
control column, and the rudder control linkages.
I applied an enamel
dark wash over the interior pieces to deepen the shadows and add depth, and then
used a silver color pencil to scratch up places of high wear like the seat, the
control column, and the rudder control linkages.
The fuselage halves were glued together with CA glue to prevent ghost seams appearing later. I sanded the seams smooth, trying to be as careful as possible to not remove the surrounding raised rivet detail. There is a piece for the spine of the aircraft that didn’t fit quite as well as other pieces did, which introduced a slight step between it and the fuselage sides. I filled this with CA glue and sanded it smooth, but the nearby raised rivets were wiped out by this work. I chose to use a ponce wheel to restore at least the impression of rivets. Kotare’s desire to replicate the Spitfire’s construction design does give the modeler a challenge in this one area.
The fuselage assembly was put aside as instructed and attention was then devoted to the wings. Individual machine gun barrel ends are glued into the bottom half, as are the components of the wheel wells. The top half of the wings are then glued on. Kotare research indicates that these mid-production aircraft came from the factory in the half black/half white undersides of the wings with aluminum fore and aft fuselage sections. The interiors of the underwing radiators were painted accordingly, as were the wheel wells, insides of the landing gear doors, the landing gear struts, and the wheel hubs. When the Eau-de-nil, Sky Type S, or Duck Egg Blue (note: this gets really complicated) paint was added later to the undersides of all aircraft in August 1940, these areas were not repainted.
The wing root fillets are separate pieces that are added to the assembled wing piece, which is then glued onto the previously-completed fuselage. I was delighted at how well the wing fit and did not need any filler of any sort whatsoever. I struggle to think of the last time I built any model, in any scale, that did not need the wing root seams filled. I’m just incredibly impressed.
 The fuselage was
completed by adding the top and bottom pieces of engine cowling, and a large
cover piece in front of the windscreen over the fuel tank. The latter piece
left small gaps that needed to be filled, which I did again using CA glue. I
re-scribed the outline of the piece as Kotare mentions that these covers were
hand-made and tended to be somewhat ill-fitting anyway.
The fuselage was
completed by adding the top and bottom pieces of engine cowling, and a large
cover piece in front of the windscreen over the fuel tank. The latter piece
left small gaps that needed to be filled, which I did again using CA glue. I
re-scribed the outline of the piece as Kotare mentions that these covers were
hand-made and tended to be somewhat ill-fitting anyway.
The control surfaces were added. The flaps were glued shut, the ailerons posed in the neutral position, the elevators deflected downwards, and the rudder slightly off to the starboard side. Inside the cockpit the rudder controls are appropriately positioned for this offset, a really nice touch.
The windscreen and cockpit rearward vision panels were glued on. Even though it really wasn’t necessary, I wanted a perfectly smooth transition between the surrounding fuselage and the clear sections, so I carefully filled the tiny gaps with Mr. Surfacer 500.
I looked for any stray sanding scratches on the model and polished them smooth. I washed the model with warm soapy water to remove any oils left from all the handling during construction. The model was rinsed with clean water and allowed to air dry in preparation for the painting phase.
| COLORS & MARKINGS |
I masked off the
clear pieces with Tamiya tape and primed the model with Vallejo Grey Surface
primer. Testors Acryl Sky Type S was used on the undersides after debating
whether N3277 was painted over in Duck Egg Green (Sky or Eau-de-nil), Duck Egg
Blue, or some custom mix available to the ground crew at 234 Squadron. I chose
the greene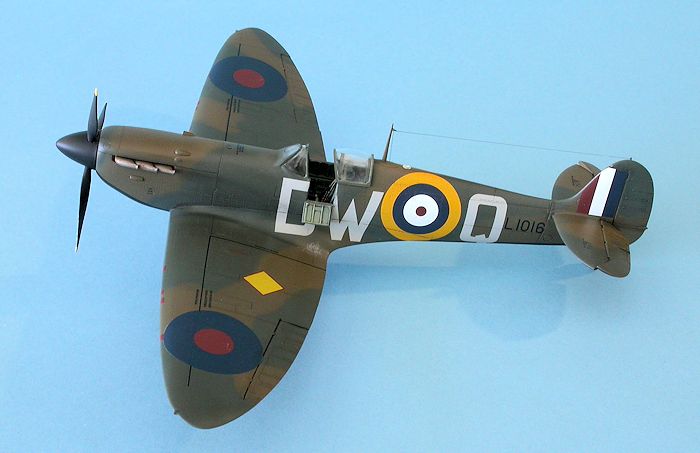 r shade, but the actual color is left to the sands of time and the
interpretation of a few black-and-white photographs.
r shade, but the actual color is left to the sands of time and the
interpretation of a few black-and-white photographs.
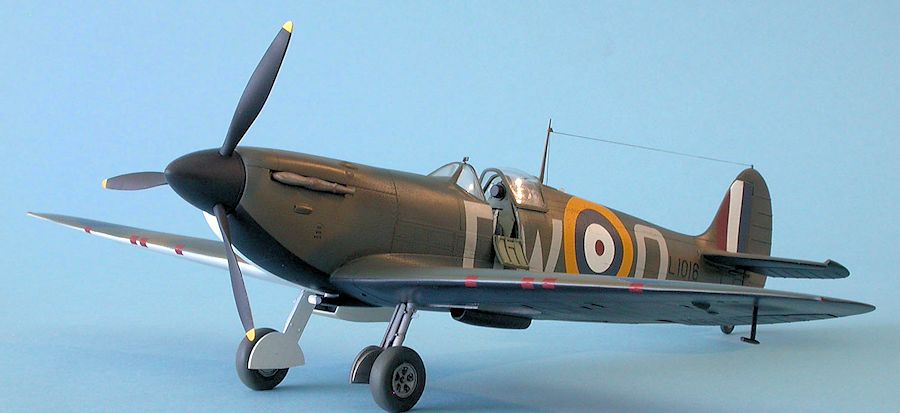
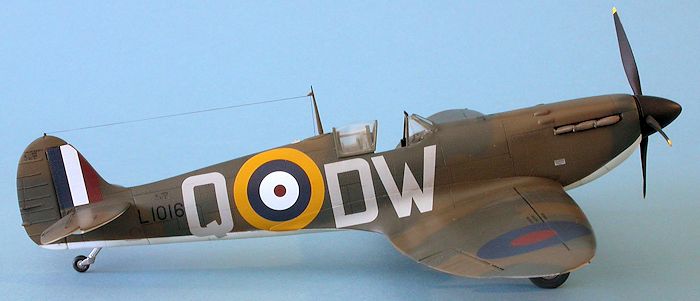
The undersides were masked off and I sprayed Vallejo Model Air Dark Earth on top. The disruptive camouflage scheme was laid out with masking tape as these aircraft had a hard demarcation line between the colors, unlike the softer feathered edges seen in Spitfires manufactured later. I use Vallejo US Forest Green FS34079 as a reasonable substitute for RAF Dark Green as Vallejo’s BS Dark Green is much too light in tone.
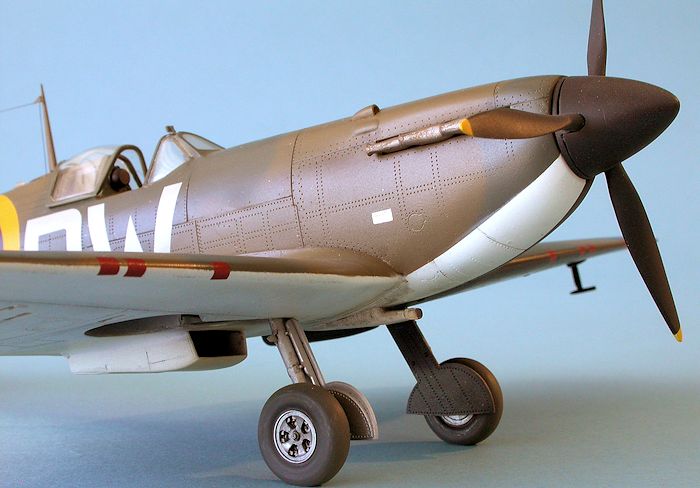
The propeller blades were painted with Vallejo Black Surface Primer with Vallejo Medium Yellow tips (3 mm in this scale). Spitfire propeller blades were made of wood at this period of time with a thin brass piece on the leading edge, so I did not depict any paint scratching or abrasion. The spinner was painted in Vallejo NATO Black, which is a good match for Night.
The kit decals for a Spitfire N3277 with No. 234 Squadron as photographed after an emergency landing in occupied France in August 1940 were selected. I sprayed a coat of Quick Shine Multi-Purpose Floor Finish as a gloss coat.
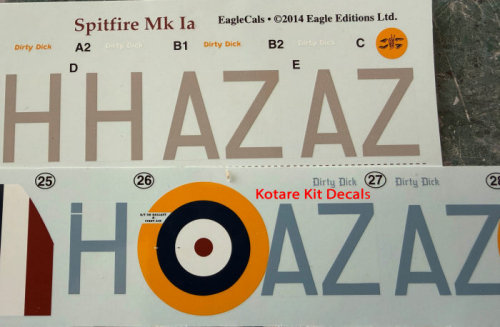
The kit decals behaved very well. I debated whether to use the kit decal aircraft code letters with their bluish-gray interpretation of the paint used on these aircraft, but elected instead to use the codes from an Eagle Editions decal sheet I had purchased ten years ago. The decals were applied with a small drop of Quick Shine in order to make them adhere to the surface and to shrink the decal over the raised detail as they dried. Still, I needed to soak some of the fuselage side decals where the rivets are most prominent with multiple applications of Micro Sol in order to get them to conform.
Kotare’s painting instructions point out that N3277 had some paint touchups on the starboard wing fillet, which extended out to almost the first machine gun bay. I used a slightly lightened Dark Earth for the fillet and a slightly darkened Dark Earth for the band extending front to back across the top of the wing, which covered up the wing walk line in those areas.
 I applied a pre-made
enamel dark wash by MIG Productions to dirty up the wheel wells, bomb bay, and
in all the panel lines. The Merlin engines in Spitfires are notorious for
leaking oil all over the underside of the fuselage, which I replicated with
streaks of the wash that were left to dry after letting them drip down and
rearwards on their own. The cordite stains from the shell ejection chutes as
well as from the front of the wings are evident in the photos printed in the
instruction manual. I used dark gray chalk pastel dust for these. I sprayed a
filter of extremely thinned Vallejo USAF Brown over the wings to impart a sense
of paint fading. A final coat of Testors Acryl Flat Clear sealed in the
weathering and the paint.
I applied a pre-made
enamel dark wash by MIG Productions to dirty up the wheel wells, bomb bay, and
in all the panel lines. The Merlin engines in Spitfires are notorious for
leaking oil all over the underside of the fuselage, which I replicated with
streaks of the wash that were left to dry after letting them drip down and
rearwards on their own. The cordite stains from the shell ejection chutes as
well as from the front of the wings are evident in the photos printed in the
instruction manual. I used dark gray chalk pastel dust for these. I sprayed a
filter of extremely thinned Vallejo USAF Brown over the wings to impart a sense
of paint fading. A final coat of Testors Acryl Flat Clear sealed in the
weathering and the paint.
The tires were painted with Vallejo Tire Black and sprayed around their circumference with highly thinned Polly Scale Mud. I added areas of paint chipping in the port wing root area using a silver color pencil. Exhaust stains were added with a thinned airbrushed layer of dark gray followed with medium gray chalk pastel dust applied with a brush.
| FINAL CONSTRUCTION |
 I had snapped off
the aerial wire post on the top of the rudder during construction, so I added a
short length of stiff brass wire to replace it. The main antenna post was added
and aerial wire affixed using nylon “invisible” thread. I have to give Kotare
kudos here as the antenna post has a very robust attachment pin unlike every
other Spitfire model, which prevents the post from bending backwards under the
strain from the taught aerial wire. The landing struts, tail wheel, pitot
tube, and identification light on the spine were attached. The landing struts
are engineered to give the proper stance with perfect alignment and strength – a
very nice and appreciated feature. The propeller and spinner were popped on the
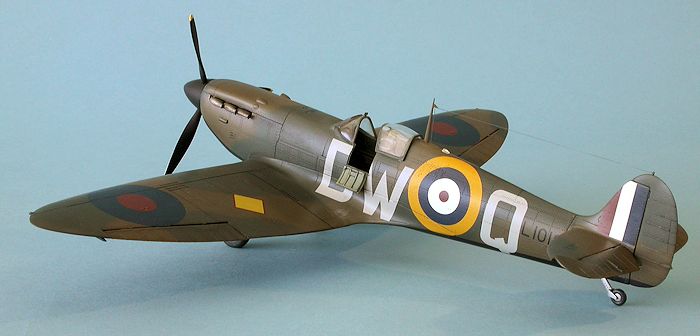
front shaft and the canopy placed on in the open position. Kotare provides two
cockpit doors, one open and one closed. Modelers tend to use the open one,
which is what I did, in order to display all the cockpit detail they worked so
hard on, but most photos of Spitfires at rest tend to show the door in the
closed position. Besides, how can one not show off that garish apple green
color?
I had snapped off
the aerial wire post on the top of the rudder during construction, so I added a
short length of stiff brass wire to replace it. The main antenna post was added
and aerial wire affixed using nylon “invisible” thread. I have to give Kotare
kudos here as the antenna post has a very robust attachment pin unlike every
other Spitfire model, which prevents the post from bending backwards under the
strain from the taught aerial wire. The landing struts, tail wheel, pitot
tube, and identification light on the spine were attached. The landing struts
are engineered to give the proper stance with perfect alignment and strength – a
very nice and appreciated feature. The propeller and spinner were popped on the
front shaft and the canopy placed on in the open position. Kotare provides two
cockpit doors, one open and one closed. Modelers tend to use the open one,
which is what I did, in order to display all the cockpit detail they worked so
hard on, but most photos of Spitfires at rest tend to show the door in the
closed position. Besides, how can one not show off that garish apple green
color?
The sliding portion of the canopy has a tiny latch mechanism to glue on underneath the front lip, and the rear-view mirror goes underneath the lip of the windscreen. My final step was to add the landing gear deployment indicators to the wings, which were painted red.
| CONCLUSIONS |
I’ve built a lot of Spitfires in 1/32 scale in my modeling career: the ancient Revell Mk. I kit, the Pro-Modeler Mk. Ia, the new-tool Revell Mk. II, the Hasegawa Mk. V, the Tamiya Mk. VIII, the Pacific Coast Models Mk. IX and Mk. XIV, and the Grey Matter/PCM conversion Mk. XVI. Only Tamiya’s excellent set of kits (VIII, IX, XVI) come within a country mile of this magnificent Kotare Mk. Ia (mid) kit. Tamiya provides a full engine that is hidden by ingenious tiny magnets under paper-thin engine cowling pieces, but Kotare’s attention to detail in regards to surface texture (rivets and overlapping aluminum panels) leaves Tamiya in second place, in my opinion.
I’ll repeat what I wrote above: this is the finest model kit that I have ever built. My appreciation for what Kotare has achieved with their very first release is immense. Fantastic nerdy research, a kit design that can only be described as brilliant, general ease of assembly, lack of do-dads like retracting landing gear and exposed engines that I have absolutely no interest in, and a devotion to fidelity like few other brands adds up to one brilliant model kit. I couldn’t be more impressed.
| REFERENCES |
Lucas, Paul. The Battle for Britain – RAF May to October 1940, Camouflage and Markings #2
T, Steve. Comments about Spitfire phenolic resin seats on the Modeling Madness Reader’s Forum.
18 June 2026
Copyright ModelingMadness.com. All rights reserved. No reproduction in part or in whole without express permission.
Thanks to me for picking this one up when it was on sale.
If you would like your product reviewed fairly and quickly, please contact the editor or see other details in the Note to Contributors.