Special Hobby 1/48 Spitfire V
| KIT #: | SH48100 |
| PRICE: | CAD$55.00 |
| DECALS: | Three optionse |
| REVIEWER: | Pablo Calcaterra |
| NOTES: |
| HISTORY |
After the stalemate between the USAAF squadrons based in Northern Australia and the IJN aviation during 1942 the new fighting season of 1943 was led by the so called “Churchill Wing”. Having replaced the P-40s squadrons this Wing was led by “Killer” Caldwell and formed by three supposedly experienced Spitfire ones: 54 (RAF), 457 and 452 (RAAF). In reality most of the experienced pilots were left behind in the UK while only the Squadron and some section leaders had fought against the Germans over northern Europe.
With them they had the best Spitfire version available: the Vc Trop that had fought successfully the Luftwaffe over Malta. There were, though, several shortcomings with these planes: they were painted in the desert scheme (very easily and fast fixed by the Australian Maintenance crews), inadequate heating for the guns (either not installed, low quality metals that were corroded) that would create stoppages during combat, CSU systems for the propellers that was inadequate for high altitude combat (good for mid height in Malta but not for the 30,000 ft that combats would typically take place over Australia. It was a design problem with the Hamilton Hydromatic propeller as the bled back ports between the front and rear chambers were too small and the unit would not operate properly. The oil would gel and now the airscrew was working like a fixed pitch one and override the maximum 3,000 rpm that the engines could take)
Oher issues that would
impact the Wing performance was that originally the controllers were a bit
unexperienced, the overconfidence of the pilots that kept on dogfighting with
the Zeros (though it was firmly established they should NOT do so) and finally
the inflexible attitude of Caldwell who insisted that only a single large
formation (wing) of the 3 Squadrons was to attack the Japanese. These made the
Allied planes very conspicuous and the Japanese were able to see them easily.
Moreover the attack w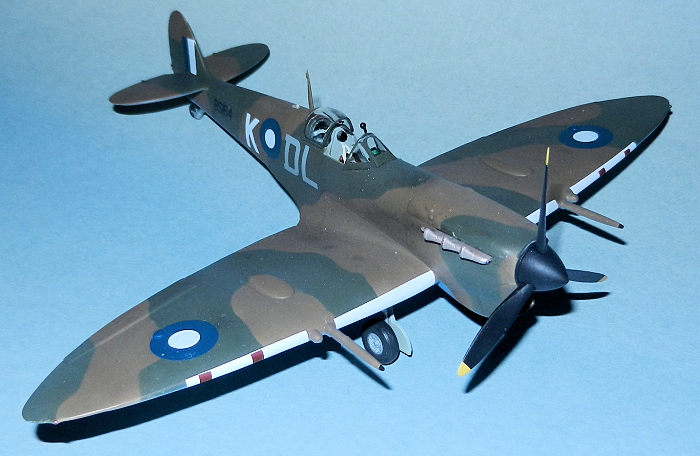 ould
normally be made from a single direction thus creating an easy solution for the
Zero pilots. Indeed, when occasions were presented to some Sqn Ldrs to attack
with advantage of surprise and position…Caldwell would not allow them to do so
because he wanted to (micro)manage the attacks. Thus on several occasions
perfect chances were lost…More about this below.
ould
normally be made from a single direction thus creating an easy solution for the
Zero pilots. Indeed, when occasions were presented to some Sqn Ldrs to attack
with advantage of surprise and position…Caldwell would not allow them to do so
because he wanted to (micro)manage the attacks. Thus on several occasions
perfect chances were lost…More about this below.
One of the most successful pilots was the leader of 54 Sqn, Sqn Ldr. Eric “Bill” Gibbs. Having joined the RAF before the war (the only pilot in the Wing actually) he had been transferred from Coastal Command to Fighter Command at the end of 1941 when he joined 54 Sqn. His combat experience in fighters was limited. He was fast tracked to Sqn Ldr in 1942. His two flight commanders had experience: Bob Foster (in the Battle of Britain) and Robin Norwood (much limited experience as he had joined his Sqn toward the end of the Battle)
March 2:
This was the first combat between the Japanese and the Wing. Caldwell’s section included GC Wally Walters when he lead 54 Sqn into combat. Air Controller was confused due to the (unexpected) courses of the enemies and after several changes of vectors. By the moment they were ready to attack the intruders the Wing had been reduced from 26 to only 6 Spits (those of the Winco section and two more from 54 Sqn). After a lengthy chase out over the ocean and with only 30 gallons of petrol left Caldwell finally saw the Zeros well below his planes. He gained on them by diving from 26,000 ft down to the 12,500 (!) were the Japanese were actually (as they were descending and gaining speed in doing so after their attack). Thinking that they were attacking Kates the 6 Spits engaged 15 Zeros (some of which were at 15,000 ft). The Spits attacked in line astern. When it was Gibbs time to attach he shot at one of the “bombers” with no success and was immediately attacked by one of the high flying Zeroes. Breaking left he saw another Zero climbing (after his dive and zoom attack) and climbed after it. His Spit was hit from a side by a high deflection shot. Gibbs continued after his target even under fire and tightened his turn and stuck to the Zero ahead which was now looping. Now benind the Zero and being very close he shot at it with a low deflection solution. Having hit the enemy in the cockpit area, Gibb’s Spit finally stalled and fell. He was able to follow the Zero as it dove into the sea. Luckily for him he had not been shot down by the unseen Zero that had hit him, nor any other Zero followed him down (a rookie mistake). With his cockpit area, engine hood and glycol system perforated by 7.7 bullets (luckily for him it seems the 20 mm shots had flown behind him) Gibbs managed to return to base with only 5 gals of fuel left.
March 15: the second raid took place but Gibbs scrambled too late, failed to find his Squadron and returned to base.
May 2: Caldwell formed the Wing with 452 in the centre, 54 to port and 457 to starboard. Struggling for height the Spits were not able to get to the Japanese before they bombed Darwin, home of 54 Sqn. The Zeros were flying at 31,000 ft. Tasked to attack a section of Zeros Gibbs let his squadron lag behind the others to be up sun. When Caldwell saw this he was not happy and ordered Gibbs to join up again…thus losing an invaluable opportunity for 54. Angered by this Gibbs complied but when the order to attack was given his geometry was so bad that 54 Sqn was forced to dive on the Japanese…vertically! At such high speeds and having been at 30,000 ft several of the Spits suffered CSU failure. Having throttled back and still gaining speed in the dive Gibbs was able to line up an unsuspecting Zero on the exterior of the formation and hit it hard in the cockpit area. Smoking badly the enemy fighter went straight down.
After recovering from hid
dive Gibbs climbed back and attacked the bomber formation hitting one bomber in
the fuselage and tail area with one cannon (the other had jammed). Breaking away
he saw that he only h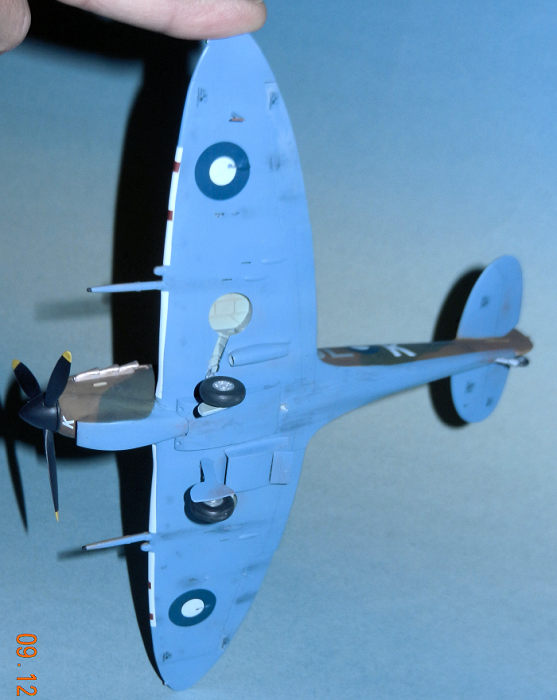 ad
22 gallons left and returned to base.
ad
22 gallons left and returned to base.
June 20: for a change the raid was done by the IJAAF. With Caldwell aborting with a bad radio Gibbs was given command of the Wing. Putting them in a loose formation they climbed towards the Japanese. But Gibbs’ CSU failed and was forced to also abort the mission. His job was not over as being in his plane on the ground he tried to lead some Spitfires to deal with some low flying attacking Japanese bombers.
June 22: Japanese fighter sweep. Gibbs was again Wing leader and with 54 and 457 Sqn they were ordered to climb towards the incoming raid while 452 was kept flying low in case another low level attack would take place. No contact was made as had been another fighter sweep (IJAAF)
June 28: the three squadrons climbed fast together to block another IJNAF attack. Gibbs’ 54 was further ahead and above the rest when they reached the Japanese and thus in an ideal position to attack them. Gibbs requested permission to attack immediately but Caldwell denied it. He wanted the 3 squadrons to attack at the same time. Another opportunity wasted by Caldwell’s micromanagement. A multiphased attack would have been better, hitting the Japanese from different directions and at different times. Caldwell’s tactics were too predictable. Moreover, the bombers were able to drop their eggs unopposed as time was wasted by the Wing’s movements ordered by Caldwell. And when things were “ready” the Japanese turned around in a way that Caldwell’s wing was now even more out of position. Forced to chase the fast departing and descending Japanese 54 Sqn gave up the chase 80 km out of sea. The other Squadrons engaged the Japanese with varying success.
June 30: The Wing took off with 39 Spitfires. Again Caldwell’s tactics ruined the chances of 54 to gain easy kills. Asked to cross over the Japanese formation and attack from the other side (!) invaluable time was wasted and finally Gibbs decided to attack head on instead from the other side. The other 2 Squadrons were impatiently waiting for the “slow” Gibbs to commence his attack…with only 7 Spits left in his formation (others having aborted due to mechanical issues). Lining up a bomber he hit it in the nose and one engine, dove under the Japanese formation, tried to climb to have another go, saw the Zeros diving dangerously on him, and then dived away from the danger. When ready to make another attack on the bombers Gibbs saw a Zero chasing a Spitfire. Racing to the rescue he was trapped by another Zero. Ignoring the plane on his tail he continued his attack and hit the Zero ahead in the wing roots. It started to smoke and spun and claimed it destroyed. The Zero behind him overshoot. Gibbs spiralled down trying to keep the two Zeros and the other Spit in sight but he was going so fast that he lost them. With no oxygen left Gibbs made the bad decision to climb towards the unescorted bombers (their guards having been engaged by the other Spit squadron). Gibbs made 4 passed without evident strikes. Then Caldwell informed him that a bomber was dropping out and had one engine on fire. Gibbs told Caldwell he would deal with it. He got behind the bomber and from very short distance (around 50 mts) he destroyed the other engine of the bomber thus claiming it as shot down. Having descended and refreshed with air he climbed yet again (!) after the bombers. Their formation was now down to 13 (6 were missing having been damaged/shot down). Flying at 22,000 ft he started to suffer again for lack of oxygen but attacked the bombers. This time the lack of oxygen made his attacks ineffective. Finally Gibbs gave up returning to base alone. He had claimed two more enemies and led morally his Squadron by executing 20 runs on the bombers!
July 6:
The second raid on Fenton took place. Attrition caused by the short time between raids had reduced the number of Japanese bombers and fighters. The big Wing climbed per the Controller instructions but lost several planes due to mechanical problems (i.e. 54 Sqn was down to 8 planes from 11…). Moreover there were no supplementary fuel tanks. On the positive side the lessons had been learnt and the Controller placed the wing perfectly up sun and slightly ahead of the enemies. Gibbs was the first to see the formation 25 km away. Caldwell again (!) ordered 54 to cross over the opposite side of the Japanese formation to attack it with a pincer movement. So there did 54 go again…Though many small formations of Zeros were seen by the RAAF Squadrons 54 failed to locate them which was not good news. With the 3 Squadrons in position Caldwell finally gave the order to attack leaving 457 as reserve. Diving on the bombers another Spit suffered CSU failure. 54 was down to 7 planes. Gibbs sprayed the formation as it sailed in front of him. His guns jammed after 2 seconds. He then focused on a lead bomber and hit it hard on the nose and one engine with his .303. The engine started to smoke and the plane fell off the formation. Gibbs claimed it destroyed. When he broke from his attack he saw 3 bombers falling and smoking. As he prepared to attack the bombers again he saw a Zero on his tail at 200 meters and about to fire on him! Luckily he saw it in time and dove while turning first to 17,000 ft (where he found the Zero still behind him) and then to 12,000 (when the Zero was gone). Bill Gibbs climbed again towards the bombers and sat up sun higher than his quarry. He saw other Spits climbing to reattack the bombers but Zeros where also up high waiting to pounce on the Spits. Before the Japanese fighters were able to intervene Gibbs attacked another bomber and hit it hard. The bomber then turned towards him and he had to bunt under the Japanese. He then realized that his oxygen was in the red and returned to base.
After the high number of
damaged bombers in this raid (2 shot down, 2 crash landed, 13 damaged out of 21
sent) the Japanese stopped their attacks. The Spits had also suffered a lot of
attrition but contrary to t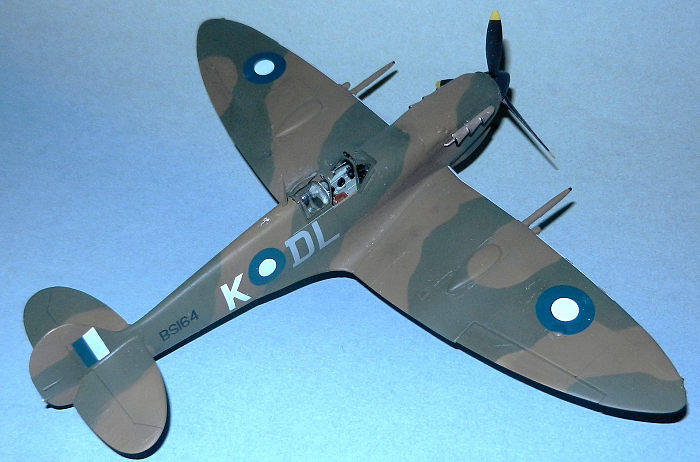 heir
enemies were able to make good their losses with planes from the Depots. By the
end of the month the Wing was up to full strength…and more and better trained
pilots were arriving.
heir
enemies were able to make good their losses with planes from the Depots. By the
end of the month the Wing was up to full strength…and more and better trained
pilots were arriving.
The Japanese turned their attention to other areas as they had failed to eliminate the Spitfires and were not able to prevent north Australia from becoming a launching pad for attack on the southern area of Japanese control.
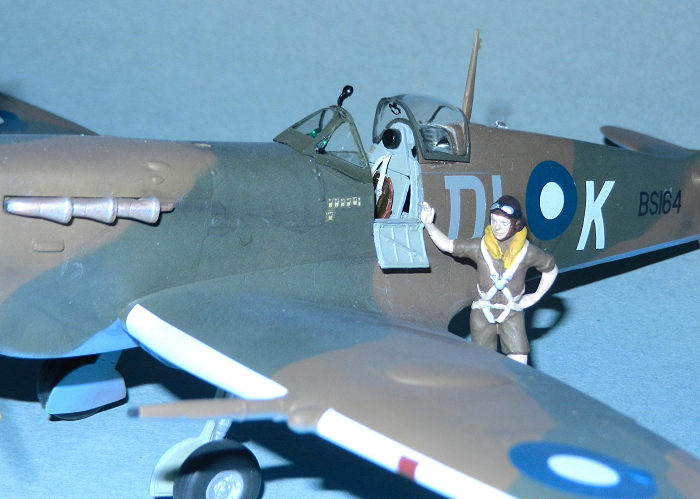
Bill Gibbs led the Squadron until the 11th January 1944. He was awarded a well deserved the DFC in November 1943. He stayed in the RAF after the war and transferred to the Secretarial Branch and retired from service in July 1953. He passed away in 1972. His Spit BS164 is under restoration in Australia.
I want to finally add that the misconceptions about the Zeros besting the Spitfires and almost wiping them out (i.e. Martin Caidin) is incorrect. The Japanese 202 AG claimed 101 Spits shot down for the loss of 3 Zeros and 2 bombers. In reality at most the Wing lost 22 Spitfires for 4 Zeros and 11 Bettys shot down against the IJNAF. Overclaiming at the wing was 3:1 while the IJNAF was 10:1! Moreover, as time passed the Wing was getting better at hitting the Japanese formations. On Zero to Spit combat the first achieved a 2:1 kill ratio. It was not, as I said above, because the Zero was better than the Spit, but because the Allied pilots were green, used the wrong tactics (Caldwell’s and individualism instead of a good look out and fighting in pairs), were most of times outnumbered 2:1 (bombers included) and furthermore were many times hindered by the failure of either/and CSU and jammed cannons. To put it in perspective, the Wing was losing 4 Spits per month! Not much being done in terms of wearing down the defenders as the Japanese wanted…When we add up the IJAAF planes that attacked twice the total of losses for the Japanese add up to 15 bombers, 7 Dinah and 6 fighters for a grand total of 28…for the actual loss of 28 Spits. This 1:1 rate is comparable to other theaters at the time…and the same that the P-40s had achieved against the same enemy in this theater in 1942.
| THE KIT |
The is a multimedia kit with plastic, resin and photoetched parts. Among the resin ones there is a propeller hub that better represents the shape of the Vc compared to the injected one, two cannons, the top of the wheel wells. Photoetched include the harness and several small parts in the cockpit.
Decals are for 3 different Australian Spitfires including the original version of the whisky shots (i.e. kills) sported by BS164.
Overall it is a very complete and detailed kit.
| CONSTRUCTION |
 I painted all
the interior surfaces with Vallejo RAF interior Green. The multi part instrument
panel (plastic, photoetched and acetate film) was put together. Seat was painted
in “brick red” to represent bakelite. Straps were painted light beige and glued
with cyano gel.
I painted all
the interior surfaces with Vallejo RAF interior Green. The multi part instrument
panel (plastic, photoetched and acetate film) was put together. Seat was painted
in “brick red” to represent bakelite. Straps were painted light beige and glued
with cyano gel.
I did not experience any problems during the process to put the kit together except for the wing to fuselage joint, especially on the border of attack area where (most likely due to lack of preparing the parts properly) I ended up with a gap big enough that forced me to add a sliver of very thin plastic card to cover the gap.
The kit has 3 under belly slipper drop tanks but instructions don’t tell which one is which in terms of capacity. Using the Otaki kit tank and some references I picked one of the tanks and attached it. For it to sit against the fuselage a lot of sanding had to be done in the front curved gap where it matches the back part of the Vokes filter.
Some rescribing had to be done where the wings meet the under the fuselage as putty had to be used to deliver a smooth surface.
With the kit assembled I covered cockpit and wheel wells with damp tissue paper and proceeded to primed the Spit.
| COLORS & MARKINGS |
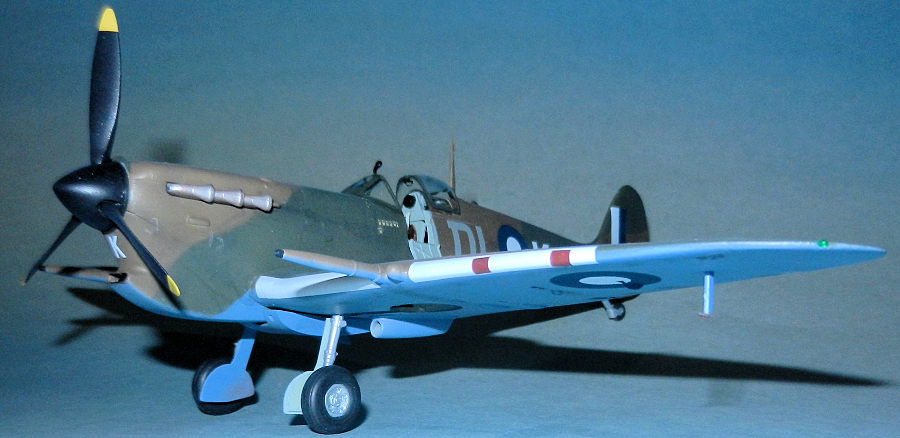
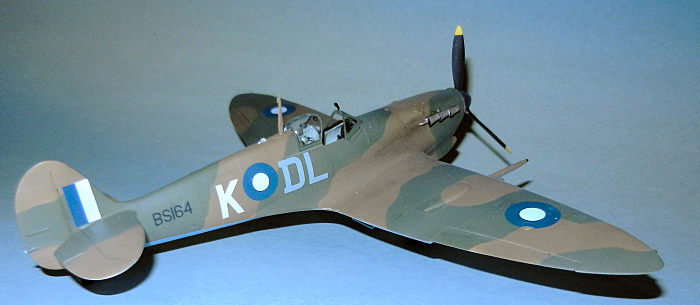
I primed the model with Vallejo Light Grey Primer. The top was painted with ModelMaster Brown 4846, masked and then painted with Vallejo Green 70.893 and finally the undersides with Vallejo Azure 71.108.
Quick Shine was sprayed to deliver a smooth surface for the decals. I dirtied the plane with sanded black and brick red pastels, very diluted black paint in water which was then applied as a drop and blown down the sides of the plane, and paint chips using a sharp silver pencils.
 The exhausts
painted in aluminum were drybrushed with Rust paint.
The exhausts
painted in aluminum were drybrushed with Rust paint.
Decals were the kit’s except for the fact that I wanted to represent the last version of the kill marks (5 ½ from Gibbs and a single one in a second row from one of his team mates). I scanned a good representation on line, adjusted size and colour, created the background colour for the printer and using white decal paper printed two sets. Once the ink was dry I carefully applied Decal Solution with a brush.
I had forgotten to paint the leading edge in white. Using white decal paper cut to shape (thinner towards the tip of the wings) I created this ID bands. I also used some red squares from the spares to represent the fabric covering the machine gun ports.
ModelMaster matt clear was used to seal the decals.
Unmasked the clear parts, attached landing gear doors and small details including the antenna mast and light behind it plus some touches of paint for the formation lights on tail and wingtips.
The British pilot comes from the Tamiya Buffalo.
| CONCLUSIONS |
A pretty pleasant build that delivers my tribute to No1 Wing flying in Australia. Something that I had wanted to do for a long time especially after finding the truth about their performance.
| REFERENCES |
- Darwin Spitfires by Anthony Cooper (a truly detailed and excellent book)
- Spitfire Vc vs A6M2/3 Zero-sen by Peter Ingman
- https://spitfireoverdarwin.home.blog/2021/03/14/restoration-of-raf-54-squadron-leader-e-m-gibbs-spitfire-mk-vc/
20 January 2026
Copyright ModelingMadness.com. All rights reserved. No reproduction in part or in whole without express permission from the editor.
If you would like your product reviewed fairly and fairly quickly, please contact the editor or see other details in the Note to Contributors.