| KIT #: | 07105 |
| PRICE: | $39.99 |
| DECALS: | Two options |
| REVIEWER: | Pablo Calcaterra |
| NOTES: | A Canadian ace from the area that flew the last Spitfire mark in service in the RAF |
| HISTORY |
Guy Elwood Mott was born in Oil Springs, ON (less than 100 km or 60 miles from London, ON where I live) in 1920. He moved to Sarnia, ON where he worked as a structural iron worker. On May 2nd 1941 he enlisted in the RCAF here in London, ON. His different postings during his training were to No1 Initial Training School located in Toronto until August 20 1941 when he graduated 71st in a class of 182 students. Then he flew Moths in St Catherine, ON where No9 EFTS was located. He finished 26th out of 36 in his Promotion and was initially not considered to be “Officer material” but on the other hand he was found to be above average in terms of flying skills and very eager to finish his training and go overseas to fight. He then continued his training at No1 SFTS at Camp Borden, ON flying Harvards and Yales. His records show that there was “Nothing to be improved in his flying skills”. Promoted to Sergeant on Jan 22 1942 he was transferred to 14 Sqn based in Nova Scotia on January 24 1942. On July 1 1942 Mott was promoted to Flight Sergeant. He joined 125 Sqn at Syndey, NS on May 1942 shortly after the Squadron was formed.
On September 27 during a routine flight his Hurricane developed a glycol leak
and smoke started to get into the cockpit. He gained height trying to return to
his base but by then there was so much smoke in the cockpit that he had no
vision outside the plane. He rolled the Hurricane and bailed out landing in the
water on that cold fall Sunday afternoon. At Bauline a 10 year old girl (Alma
Swain) was walking to Sunday School with her dad and they witnessed Mott
struggling with the sputtering Hurricane until he finally bailed out. Her dad
rushed to the rescue along 4 more fishermen. They jumped into a fishing boat and
after a while they returned to the dock with Mott. Each one had given him one of
their pieces of clothing as Mott’s clothes were soaked in the cold Atlantic
water and they had to keep him warm. Alma’s dad had given Mott his pants an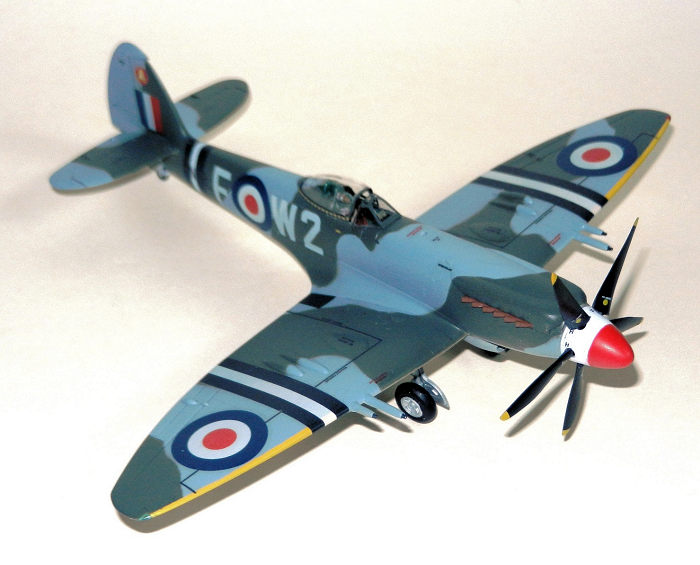 d she
remembers her dad walking into the house wearing his jacket to cover his naked
body below the waist! Many years later Guy Mott returned to the place and
visited Alma’s home bringing flowers to her mom. He wanted to personally thank
Mr. Butler for saving his life and for the pants he had lent him but
unfortunately Alma’s dad had passed away. A plaque at United Church in Bauline
remembers the rescue.
d she
remembers her dad walking into the house wearing his jacket to cover his naked
body below the waist! Many years later Guy Mott returned to the place and
visited Alma’s home bringing flowers to her mom. He wanted to personally thank
Mr. Butler for saving his life and for the pants he had lent him but
unfortunately Alma’s dad had passed away. A plaque at United Church in Bauline
remembers the rescue.
Mott was promoted to Flying Officer in May of 1943 and then Flight Lieutenant on November of the same year. By then he had amassed 445 hours in Hurricanes. 125 Sqn became 441 Sqn on February 8 1944 and crossed the Atlantic to join the battle flying from the UK. They were part of the Canadian Wing flying Spitfires IX led by Wing Commander “Johnny” Johnson. Not too much later on March 28 1944 Guy Mott flew his first mission and claimed his first damaged when along two other pilots they damaged a Me410.
His first victory happened on June 30 1944 when he downed a Me109. On this occasion S/L J. D. (Danny) Browne was leading 441 Sqn for the last time before being rested and he shot down a FW190. Pilots in his second section where Mott was flying were even more successful when they attacked 12 Me109s and shot down 3 and damaged a 4th. One of the victors was Guy Mott.
On July 5 Wing Cmdr Johnson was leading two Canadian Squadrons on a sweep in the Alencon area when approximately 12 FW190s were seen in a gap in the clouds. 441 was able to engage the Germans while the top cover Squadron was unable to join the fight. Now fighting below the clouds Johnson claimed two kills while Mott and another 2 pilots claimed one more each. Mott also shared a second victory on this combat. Total claims for the Squadron was 5 without loss.
On July 13th the squadron caught more FW190s at low height loaded with bombs and claimed 10 out of the 12 German planes with Mott scoring another kill. He claimed another 109 on July 18 and yet another 190 on July 27.
During ground attack missions he destroyed 19 vehicles, damaged 23 more and destroyed a train engine. Mott was shot down by flak on August 12th during an armed recce near Conde. He was hidden by a farmer for two days until American troops reached the farm and he was able to join his Squadron.
On October 20 1944 Flt Lt Mott was awarded his DFC and his citation reads: “…he is a courageous and determined pilot who has set a fine example to all. He has completed very many sorties and has at all times displayed the greatest keenness. He has destroyed four hostile aircraft”. Guy moved with the Squadron thru France and Belgium. On November 10th they escorted Prime Minister Winston Churchill and his party to France. The Squadron flew back landing after dark. Mott’s last entry in his Log Book is on November 26th. He finished his tour with 240 hours in Spitfires.
 He was posted back to Canada on December 21 1944 and he joined No9 SFTS as an
Instructor from February 1 to May 1 1945. He was released from active duty on
that month. Guy Mott finished his WWII service with 5 kills and 1 shared plus
one damaged.
He was posted back to Canada on December 21 1944 and he joined No9 SFTS as an
Instructor from February 1 to May 1 1945. He was released from active duty on
that month. Guy Mott finished his WWII service with 5 kills and 1 shared plus
one damaged.
Mott joined the RAF in 1947 and was posted to No1 Pilots Advanced Flying Unit going thru Central Gunnery School, Armament Practice Camp among several moves within 11 and 12 Group flying Meteors and Vampires. He was posted to the Far East Air Force in December 1948 and helped to establish No 27 Armament Practice Camp in Malaysia. He took command of the unit in the middle of 1949. He was Mentioned in Dispatches for his activities during this time.
80 Sqn was the last RAF Squadron that used Spitfires operationally. They were transported by sea to Hong Kong in August 1949 as the Chinese Nationalist Government was falling and the British Government wanted to show the resolve to defend the Colony from the victorious Communists. Roughly 32 Spitfires F24 were in service in 80 Sqn at the time. Guy Mott joined 80 Sqn RAF at Kai Tak, Hong Kong on December 5 1949 where he put his experience to good use as Weapons Officer and Attack Instructor. Mott’s tour ended in July 1951 and was released from the RAF on September 1 1951.
Many of the Spitfires had been kept in storage during the duration and 11 of them were lost in accidents with 6 pilots killed while in service in the Far East. 80 Sqn flew their last Spitfires in December 1951 and 8 of their planes were transferred to the Hong Kong Air Force where they served until 1955. The rest were scrapped.
Guy Mott finally returned to Canada where joined the RCAF Reserve on September 16 1951. He resumed his life as a civilian and worked in the Canadian oil industry for the next 33 years before retiring in the mid-1980s. The ace of Sarnia passed away in January 2006.
| THE KIT |
 This Airfix kit was issued in 1996 and was one of their best kits they
released in this scale until they started with their new launches a few years
ago.
This Airfix kit was issued in 1996 and was one of their best kits they
released in this scale until they started with their new launches a few years
ago.
You can build a Spit 22 or a 24, there are two types of windshields, two types of cannons and rockets for the 80Sqn version. Details are very good, fine recessed lines. The decal sheet is very good with 3 versions available: F22 from 73 and 603 Sqn and a F24 from 80 Sqn that was the machine of their Sqn Leader.
I have received information about some minor errors in the shape of the radiators but nothing that I considered worth improving.
| CONSTRUCTION |
 There is really nothing difficult or complicated with this kit. Everything
fits very well.
There is really nothing difficult or complicated with this kit. Everything
fits very well.
This is one of the kits that I had assembled in Argentina in the late 90s and that suffered during the trip to Canada (I am in restoration mode these months…)
I had originally used Humbrol paints but the gloss varnish yellowed (more than yellowed…it browned!) like it always does to the point that the grey and green were quite indistinguishable. Add to the fact the partial disassembly thanks to the Custom’s Agents then I decided a few months ago to fix it.
Missing was the canopy hood, 3 out of the 4 sections of the flaps, one radiator and one landing gear leg plus the doors. For some reason the varnish on top of the main decals was just peeling off like old scotch tape and I had some fun taking it off using my pliers.
When a friend from the IPMS London, ON who had 3 of this kit in his stash and was using one of them as source for spares gave me the hood and the decal sheet along with the landing gear parts I decided to “restore” the plane. I removed the paint (and decals) with oven cleaner.
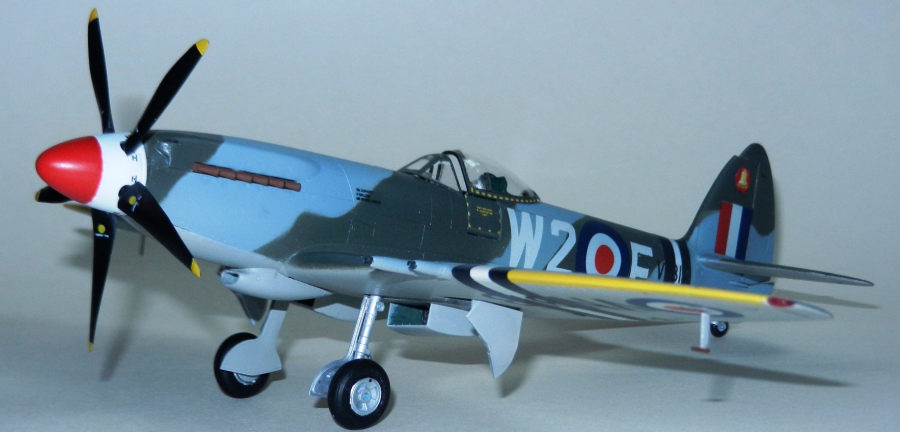
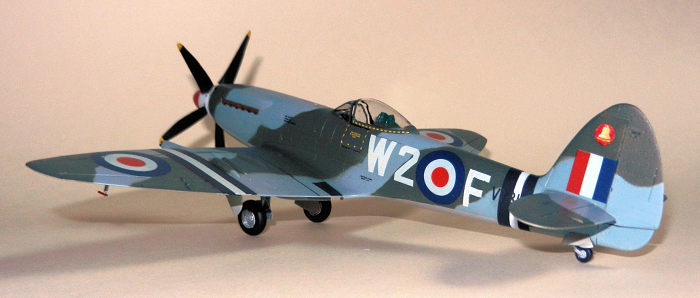
In order to make a more “relevant” version I decided to do Guy Mott’s plane. I found on line a very good and inspiring drawing of VN317 in flight that claims it was his plane. That’s how I learned about him and I started to research his story (a Canadian ace from our region flying this Spitfire mark in Hong Kong!). But thru the book by Listerman I found out that VM317 was destroyed en route to Hong Kong so it could have never sported the theater ID bands not it could not have been flown by Mott in the Far East. After some Internet research and enquiries to his relatives I was able to obtain the letters of several of the 80Sqn Spits Guy Mott had flown. Looking for those letters in Listerman’s book yielded two pictures. The best one was F (VN318) and I decided I could do that one by modifying the A.
I retouched the paint in the cockpit which was pretty straightforward because the wings came off very easy (In the 90s I was still applying glue over the paint…). I had been able to remove the instrument panel and seat and paint them better using pictures as reference for little colour details and Future for the face of the dials. Added an Airwaves photoeched set of seatbelts and then I pushed everything back into the fuselage walls. A bit of putty was required to improve my 90s building skills along the engine hood and other areas.
Wings were glued with some difficulty to the fuselage product of the fact
that as the top portions were not “unglueable” from the bottom ones I was not
able to dry fit them and get a better alignment/fit. Nevertheless with some
patience, Tamiya liquid glue and Tamiya tape to keep the dihedral things worked
quite well (but not perfectly as one wing root has a slight step but not the
other). One of the wingtip lights was also
 missing so I took pieces of red and
green plastic cutlery, cut them to size, glued them on their respective wingtips
and sanded them out to shape. It worked great!
missing so I took pieces of red and
green plastic cutlery, cut them to size, glued them on their respective wingtips
and sanded them out to shape. It worked great!
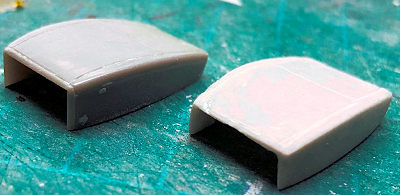
The 3 missing portions of the flaps were made with a very thin sheet of plastic from an old box from something. The missing radiator was copied using Blue tak as the material for the mould (using the original radiator as the template) and then I filled the shape engraved in the Blue tak with 2 part epoxy thus creating the walls of the radiator as a single piece. After sanding and adjusting the shape a bit I added the two screens with pieces of plastic painted black and slightly drybrushed with aluminum. Both the original and the copied radiators fit in place very well.
Guns were added and after a bit of twisting and juggling I was able to install the new landing gear legs. This was, in my opinion, in the 90s and now, the most challenging part of the assembly.
| COLORS & MARKINGS |
I gave the kit a coat of Vallejo light grey primer which works great to set
the paint. Then I used ModelMaster Acryl 4759 for the undersides. At this point
I realized I had not painted the leading edges of the wings in yellow. So I used
tape to mask the front of the bottom side of the wings and gave the area a nice
spray of yellow.
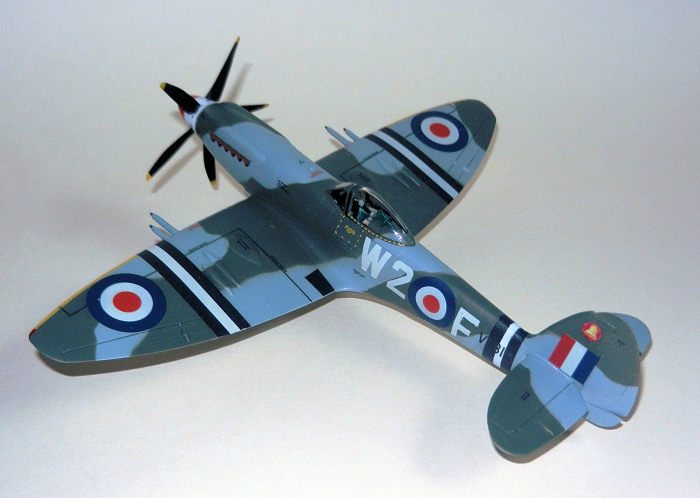
 Then I masked the yellow ID bands on the undersides and using
more Tamiya tape strips marked the edge of the bands on the top of the wings.
With these strips as a reference I masked the yellow on the top of the wings and
then removed the reference strips (that’s what happens when you are not
thoughtful about the process and steps to paint the kit!)
Then I masked the yellow ID bands on the undersides and using
more Tamiya tape strips marked the edge of the bands on the top of the wings.
With these strips as a reference I masked the yellow on the top of the wings and
then removed the reference strips (that’s what happens when you are not
thoughtful about the process and steps to paint the kit!)
Grey for the top side was ModelMaster Acryl 4746. Once masked with worms of blue tak and paper I airbrushed the RAF Dark Green from the same brand. I masked the area around the landing gear wells and spray them with ModelMaster Aluminum. A heavy layer of Future was sprayed on the kit and after leaving it to cure for roughly 3 days I applied the decals.
Most of the decals were from the sheet that Rob has passed me. The only ones left from the original kit where the ones on the propeller blades. For the F (one of the planes identified on Mott’s Log Book) I chopped the A from the kit and re-assembled it accordingly.
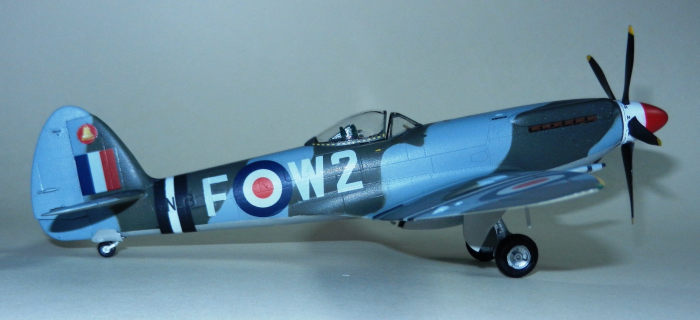
Because the black and white fuselage ID bands of the kit have the serial
number already printed I cut out the white portion and replaced it with a strip
of white decal paper. Then the two black sections were added but th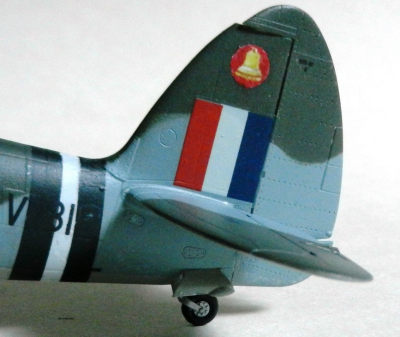 ey still
showed the original serial number on white. I covered these letters and numbers
with the decals from the version of the plane that did not have the ID bands.
With other numbers I proceeded to create the portion of the serial number that
would have only be seen on the white portion of the tail ID band. Rearranging letters and numbers I created the ones for under the wings.
ey still
showed the original serial number on white. I covered these letters and numbers
with the decals from the version of the plane that did not have the ID bands.
With other numbers I proceeded to create the portion of the serial number that
would have only be seen on the white portion of the tail ID band. Rearranging letters and numbers I created the ones for under the wings.
The 80 Sqn Bell badge I found on line, scaled it down and printed it on white decal paper. After protecting the ink with decal solution I carefully cut it out and put them in place. I was quite satisfied with all the surgery of the decals to transform them as I needed.
| FINAL CONSTRUCTION |
I sprayed Vallejo Semi Gloss varnish that I had successfully used for the first time a few days earlier with much success. In this case (and there are a couple of theories around…not letting Future cure enough or a too heavy coat of Future that prevents the varnish from grabbing on properly) this varnish started to crack horribly after a few minutes as it started to dry. I sprayed even more varnish. Most of the cracks were hidden on a thick layer of it but some other even uglier and deeper cracks appeared.
Frustrated and with the varnish still fresh I put it under the tap and used water to remove it. It came off like white skin…(this plane has been peeled off twice!) but in the process the water also started to attack the Future and it started to come off as well! Oh my! Now the edge of the decals was starting to lift off. Panic!
A nightmare as you can imagine as I was about to ruin the replacement decals! Luckily I was able to stop the process by stopping the water coats and drying the plane with a soft fabric cloth and Q tips. Decals were safe but now the clear edges were white (Future attacked by water) and had developed a light step (as Future + decals are thicker than the original coat of paint)
 I started to trim off the clear edges trying to minimize the white areas.
Then I left the kit to sit overnight. Upon inspection the other white areas had
disappeared (this means that most likely I had needlessly trimmed the decals the
day before…)
I started to trim off the clear edges trying to minimize the white areas.
Then I left the kit to sit overnight. Upon inspection the other white areas had
disappeared (this means that most likely I had needlessly trimmed the decals the
day before…)
A nicer and slightly finer coat of Future sealed the decals and paint and I tried to even out the slight step as much as I could. I was quite successfully I would say. Once the new coat of Future cured for another couple of days I decided not to risk it again with Vallejo’s and went back to my old friend ModelMaster Acryl Flat varnish. A single fine coat sealed the decals and gave the plane the look I was looking for. Phew!
With this process behind I added all the minor details starting from the center of the undersides and moving out. The pitot and antenna had to be scratchbuilt as had been lost many years ago.
The exhausts were glued in place. These were left with the original paint that I used in Argentina as I did a satisfactory job at the time (these are the propellers were the only 2 parts that retained the original paint from the 90s) \, Then I moved to the top of the plane where the gunsight, the windshield, propellers and hub were glued and finally the hood along with the access door were presented but not glued.
I forgot to add the whip antenna behind the cockpit but will do some day in the future…
| CONCLUSIONS |
A very good kit from Airfix. I’d say the predecessor of the good quality of their newer models recently launched that showed them the way and what they could achieve.
| REFERENCES |
Aces of WWII website
Ciel de Gloire – Guy Mott
The Downhome – My mom remembers
The RCAF overseas – The 5th year
The Supermarine Spitfire F 24 by Phil Listemann
441 Tactical Squadron, Canadian National Defence Department
Shell and Bassell Retirees website
London Gazette, Oct 20 1944
Wikipedia
With special thanks to Geoff and Georgia Gander
2 November 2020
Copyright ModelingMadness.com
Thanks to
for the review kit. You can find this kit at your favorite hobby shop or on-line
retailer. If you would like your product reviewed fairly and
fairly quickly, please
contact
the editor or see other details in the
Note to
Contributors. Back to the Main Page
Back to the Review
Index Page
Back to the Previews Index Page