Testors/Hawk 1/72 Spitfire F.22
|
KIT #: |
005 |
|
PRICE: |
$5.00 |
|
DECALS: |
One option |
|
REVIEWER: |
Peter Burstow |
|
NOTES: |
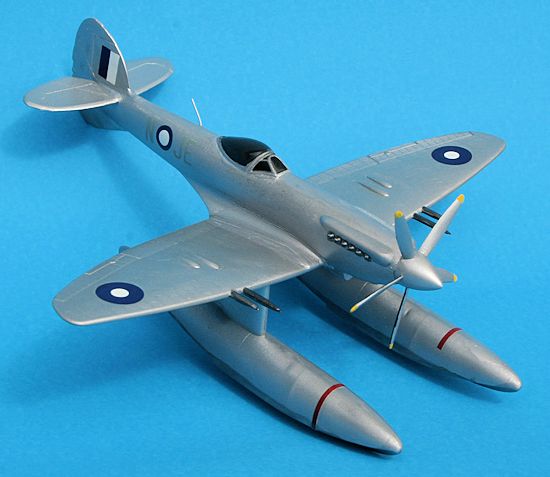
What If? Conversion to floatplane |

 In late 1945 Australian and New Zealand troops were tasked with mopping up
Japanese enclaves on the many small islands and atolls in the South West Pacific
Area. Number 107 Squadron RAAF, a Vought Kingfisher operator, was assigned to
provide floatplane support to the operation. 18 of the latest floatplane fighters,
the Spitfire 22, were issued to the squadron, to supplement the ageing
Kingfishers.
In late 1945 Australian and New Zealand troops were tasked with mopping up
Japanese enclaves on the many small islands and atolls in the South West Pacific
Area. Number 107 Squadron RAAF, a Vought Kingfisher operator, was assigned to
provide floatplane support to the operation. 18 of the latest floatplane fighters,
the Spitfire 22, were issued to the squadron, to supplement the ageing
Kingfishers.
The Spitfire 22 was developed from the Mark 21, with a cut down rear fuselage
and much enlarged tail surfaces. 263 were produced, the first flying in March
1945. A floatplane version was not
really
built.
There are plenty of references to Spitfires on Modelling Madness, so I
won't repeat it.
Suffice it to say it was not in regular RAF service for long with
most Spit 22s quickly being passed on to reserve units or sold overseas.
I think this is the Hawk kit from 1967 re-boxed. I have seen other boxings of
this kit which are labelled Testors-Hawk. I didn't check scale, but apart from
the tail it looks like a late model Spitfire.
It was purchased for $5 from my local second hand dealer.
 Instructions where a single A4 (about) sheet, badly yellowed, generic kit
making instructions on one side, and an exploded view on the other. Paint
references were for Testors paints, with both the number and name.
Instructions where a single A4 (about) sheet, badly yellowed, generic kit
making instructions on one side, and an exploded view on the other. Paint
references were for Testors paints, with both the number and name.
A very simple kit, 12 parts including the stand. Covered in rivets and
raised line detail. The tail is for a Mk.21, the fin and tailplane is far too
small for a Mk. 22. A stand base was included but the arm was missing. No
interior at all. No undercarriage. Poor fit of fuselage halves. Wing is one
piece and a poor fit with fuselage. Canopy is clear but does not fit, too wide
for body. Prop blades wrong shape and too small. Decals useless, look like they
have been eaten by silverfish.
There where a lot of
ejector pin marks on lower surface of wing. A couple of sink marks on the
fuselage at the alignment pins.
A
previous owner had kindly sanded most of the rivets and raised lines off.
I decided to modify the kit to a "what if" Mk. 22
floatplane using floats and ventral fin extension donated from PM
Spitfire Vb floatplane (PM-216)
The PM floats were rivet free, ejector pin marks on the inside, but had a number
of deep sink marks on the upper and lower surfaces at the alignment pins.
Didn't start with the cockpit, there isn't one! Sanded mating surfaces
and joined fuselage halves using liquid poly. Filled and sanded joints,
especially around the lump which is supposed to be the carburettor air intake. I
then added the ventral fin extension and filled the joint. Finished sanding and
polishing the rivets and raised lines. I tried an experiment using an acrylic
exterior building filler. It didn't work very well. Lots of shrinkage, didn't
stick well to the plastic, and had a grainy finish. Dug it out and used
super-glue gel instead.
 Using a Pegasus Spiteful as a template I removed the fin fillet and built
up the fin with 0.5 mm plasticard. I re-scribed the fin to rudder hinge line
which was destroyed in this process. A lot more filling, re-scribing and sanding
later and I had a reasonable Spitfire 22 fin and rudder, with a Spitfire
floatplane shaped ventral extension.
Using a Pegasus Spiteful as a template I removed the fin fillet and built
up the fin with 0.5 mm plasticard. I re-scribed the fin to rudder hinge line
which was destroyed in this process. A lot more filling, re-scribing and sanding
later and I had a reasonable Spitfire 22 fin and rudder, with a Spitfire
floatplane shaped ventral extension.
The wing is one piece with no wheel wells, just a raised line marking
about where they go. I filled the 8 ejector pin marks on the lower surface, and
sanded off the two wheel bulges on each side, inboard of the cannon breech
bulges. Scraped, sanded and removed all the rivets and other raised lines.
Joined the wing to the fuselage and filled and sanded the wing root joints.
There was a bad mismatch around the air intake which needed more filling and
sanding to get right. Added the underwing radiator boxes, which needed a bit of
sanding to make fit. Re-scribed and cleaned up the flap and aileron joints.
a raised line marking
about where they go. I filled the 8 ejector pin marks on the lower surface, and
sanded off the two wheel bulges on each side, inboard of the cannon breech
bulges. Scraped, sanded and removed all the rivets and other raised lines.
Joined the wing to the fuselage and filled and sanded the wing root joints.
There was a bad mismatch around the air intake which needed more filling and
sanding to get right. Added the underwing radiator boxes, which needed a bit of
sanding to make fit. Re-scribed and cleaned up the flap and aileron joints.
Painting the inside of the canopy Tamiya Acrylic Sea Blue, to hide the
fact I was too lazy to add any cockpit detail, like a seat or a pilot. Joined
the canopy and filled and sanded the joint, the canopy was about 1 mm too wide.
Again using the Pegasus Spiteful as a template I cut two new tailplane halves
from plasticard. Hint, tack the halves together before shaping, tailplane halves
that are a different shape are very noticeable on a model. I used a dab of
super-glue. Do not use liquid or tube poly glue. Super-glue does not dissolve
polystyrene and can usually be scraped or sanded off.
When I was happy with the shape I separated the halves with a razor
blade, cleaned up the leading and trailing edges and scribed the elevator line.
I then fixed the halves to the fuselage with liquid poly. Next day I filled and
sanded the joints.
 I added the kit prop after cleaning up the flash using a Flex-I-file.
This was
the only flash on the kit.
That was all parts of the kit used except part number 1, the prop boss, as I was
not going to make it rotatable.
I added the kit prop after cleaning up the flash using a Flex-I-file.
This was
the only flash on the kit.
That was all parts of the kit used except part number 1, the prop boss, as I was
not going to make it rotatable.
The PM Spitfire floats were joined, joints cleaned up and the sink marks
filled. When offered up to the Testors wing there was large gaps as the
underside wing profile was completely different. Think of a banana on a table. I
filed the top of the float pylons flat to make a better joint. The float pylons
were joined to the lower wing with liquid poly, jigged to keep them straight,
and left to dry overnight. Next day I filled the joint with super-glue.
I made a small whip antenna from a length of 0.5mm copper wire, drilled a
hole in the fuselage, and attached it with super-glue. Thinner wire or even a
cat's whisker would have been better.
After a wash and scrub, I covered the kit with Mr Surfacer. Found a
number of spots that needed more filling and cleaning up. After a lot of work I
had a model ready to paint.
After masking the canopy, I painted the whole kit with gloss silver spray
can enamel from my local hardware store, "White Knight" brand. This dries almost
instantly and I was able to give it 8 light coats over two days. After the first
coat a number of flaws were visible and dealt with by more filling with Mr
Surfacer, and gentle sanding.
I ended up with a high gloss finish that was very bland, more a "High
Speed Silver"
finish rather than
natural metal. Strangely, the rivet and raised line details, which were all
sanded and polished off, and invisible under the Mr Surfacer primer, reappeared
faintly, and are quite visible in some lights.
 I hand painted details such as exhausts, propeller and cannons with
various Tamiya acrylic paints. The lower surfaces of the floats and sides up to
the waterline were hand brushed with Tamiya gloss "Metallic Grey" to represent
the lanolin which was mopped on to these surfaces on RAAF floatplanes and flying
boats.
I hand painted details such as exhausts, propeller and cannons with
various Tamiya acrylic paints. The lower surfaces of the floats and sides up to
the waterline were hand brushed with Tamiya gloss "Metallic Grey" to represent
the lanolin which was mopped on to these surfaces on RAAF floatplanes and flying
boats.
The unit code and fuselage roundel decals came from a Red Roo Kingfisher
sheet number RRD7250, these were thin and conformed well without any setting
solutions. The wing decals and fin flash came from a Hasegawa sheet of RAAF
historic and contemporary markings. These were thick, and required a softening
solution to make them conform to the surface. I used Mr Mark Softer. The red
propeller warning stripes came from the Airfix A-26 Invader sheet, which must
have been nearly 40 years old, as I built that kit in the 70's. If you store
decals well, in envelopes, dry, out of the light and away from insects they can
keep a long time.
A final spray with Long Life floor polish, (much the same as Future or
Pledge) and it was done.
 A remarkably crude kit, even by the standards of 1967. That year Airfix produced
the Hellcat and B-25 among others. I was looking forward to a quiet afternoon
build and it ended up taking days of filling and sanding, as well as the
modifications needed to make it look halfway decent. I probably could have done
more sanding and polishing as some of the joints and patches are still a little
rough, but it is unlikely ever to end up in a contest. Don't pass this kit of to
a junior modeller, it might put them off for life. Give them something nicer.
A remarkably crude kit, even by the standards of 1967. That year Airfix produced
the Hellcat and B-25 among others. I was looking forward to a quiet afternoon
build and it ended up taking days of filling and sanding, as well as the
modifications needed to make it look halfway decent. I probably could have done
more sanding and polishing as some of the joints and patches are still a little
rough, but it is unlikely ever to end up in a contest. Don't pass this kit of to
a junior modeller, it might put them off for life. Give them something nicer.
I was pleased with the final result, a much more interesting build than the
latest shake the box kits. After sitting it next to the
Airfix Supermarine S6B, I was almost tempted to do another in Schneider
Trophy colours.
Peter Caygill, Combat Legend, Spitfire Mks VI - F.24, Airlife,
Marlborough, 2004
William Green, Warplanes of the Second World War, Fighters Volume 2, Macdonald,
London 1961
Geoffrey Pentland, RAAF Camouflage & Markings Vol 2, Kookaburra, Melbourne 1989
Wikipedia
Peter Burstow
January 2013
Copyright ModelingMadness.com. All rights reserved.
If you would like your product reviewed fairly and fairly quickly, please
contact
the editor
or see other details in the
Note to
Contributors.
Back to the Main Page
Back to the Review
Index Page 2026