| KIT: | Italeri 1/72 Spitfire Mk IX |
| KIT #: | 094 |
| PRICE: | $10.00 MSRP |
| DECALS: | Three options |
| REVIEWER: | Shervin Shambayata |
| NOTES: |
| HISTORY |
Spitfire is probably the most beautiful fighter plane ever built and a deadly
one at that. It is the plane that is most closely associated with the British
victory in the Battle of Britain (although Hawker Hurricanes were more numerous
and scored more kills during the battle). Mk IX was designed as a stop-gap
measure by the RAF to meet the threat presented by Fw.190A by mating a Merlin 60
engine to a Mk V body. As it was, Mk IX was considered the best of Merlin
powered Spitfires. A number of Spitfires were flown by the USAAF, especially in
the Mediterranean Theater of Operations (MTO).
| THE KIT |
Please see Scott's
preview for more information on what comes in the box.
| CONSTRUCTION |
 I am not going into step-by-step building of this kit. Rather I am going to
address the problems that will arise with building of this kit. I had read a
number of reviews including
Scott's, which complained about poor fit of this model. These were helpful
in trying to minimize the amount of filling and sanding that was necessary on
this model. There are five areas of concern as far as building this model goes:
I am not going into step-by-step building of this kit. Rather I am going to
address the problems that will arise with building of this kit. I had read a
number of reviews including
Scott's, which complained about poor fit of this model. These were helpful
in trying to minimize the amount of filling and sanding that was necessary on
this model. There are five areas of concern as far as building this model goes:
1. The fit of the radiators into the lower wing.
2. The fit of the lower wing to the upper wing halves.
3. The fit of the wing to the lower cowling.
4. The wing root joints.
5. The fit of the carburetor in take to the lower wing.
I could not do anything about the fit of the radiators as my skills in filling,
sanding and painting through the narrow intakes leave a lot to be desired. So I
just painted the radiators black and glued them to the wing.
As for the upper wing halves the problem with these-as Scott has mentioned in
his review -is that there is no lip to on the top wings before the ailerons to
line up the trailing edge of the lower wing with the leading edge of the
ailerons. This problem was solved by making a lip out of strip styrene per
Scotts suggestion. After I was happy with the fit of the wing I attached the
long wing tips to the wings, ran superglue over the joints and sanded the joints
until I got a good fit.
 Next was the fit of the wing to the fuselage. In order to get this right the
fuselage has to be assembled correctly. This means that first I had to attach
the cowling halves to the fuselage halves. After I had the cockpit painted Polly
Scale British Interior Gray Green and assembled and fitted between the fuselage
halves and glued the halves together, I went about fitting the wings onto the
fuselage. When I was test fitting the wing to the fuselage, I realized that
because the fuselage plastic is so thin, both fuselage halves are slightly
warped with the wing roots actually pointing down. The cockpit is too narrow,
and by attaching the cockpit to both fuselage halves this warping is made
permanent. Therefore, the first step to getting the wings fit properly is to
detach the cockpit from one of the fuselage halves. Next I attached the wing
assembly to the fuselage from the tail end of assembly up to the wing roots.
Then I attached the front of the lower cowling to the front of the fuselage
assembly. I then attached the tail of the lower cowling to the front of the wing
assembly so the lower cowling was properly aligned with the bottom of the wing.
This left a gap between the lower cowling and the upper cowling but after the
lower cowling joints with the lower wing and the front of fuselage were dried, I
ran a bead of liquid cement along the gap and pressed the lower cowling to the
fuselage. This caused the fuselage to widen, thus aligning the wing roots on the
fuselage with the wing roots on the wing assembly with no gap between them. I
then ran a bead of cement along the wing roots as well, completely attaching the
wings to the fuselage. After all this process the only things that I needed to
fill were a couple of small hole at the very front of the wing joints.
Next was the fit of the wing to the fuselage. In order to get this right the
fuselage has to be assembled correctly. This means that first I had to attach
the cowling halves to the fuselage halves. After I had the cockpit painted Polly
Scale British Interior Gray Green and assembled and fitted between the fuselage
halves and glued the halves together, I went about fitting the wings onto the
fuselage. When I was test fitting the wing to the fuselage, I realized that
because the fuselage plastic is so thin, both fuselage halves are slightly
warped with the wing roots actually pointing down. The cockpit is too narrow,
and by attaching the cockpit to both fuselage halves this warping is made
permanent. Therefore, the first step to getting the wings fit properly is to
detach the cockpit from one of the fuselage halves. Next I attached the wing
assembly to the fuselage from the tail end of assembly up to the wing roots.
Then I attached the front of the lower cowling to the front of the fuselage
assembly. I then attached the tail of the lower cowling to the front of the wing
assembly so the lower cowling was properly aligned with the bottom of the wing.
This left a gap between the lower cowling and the upper cowling but after the
lower cowling joints with the lower wing and the front of fuselage were dried, I
ran a bead of liquid cement along the gap and pressed the lower cowling to the
fuselage. This caused the fuselage to widen, thus aligning the wing roots on the
fuselage with the wing roots on the wing assembly with no gap between them. I
then ran a bead of cement along the wing roots as well, completely attaching the
wings to the fuselage. After all this process the only things that I needed to
fill were a couple of small hole at the very front of the wing joints.
Finally came the carburetor intake. While having the lower cowling properly
lined up with the lower wing helps the fit of the larger of the two carburetor
intakes, I still needed a lot of sanding to get the carburetor intake to fit
properly. As my sanding wasn't perfect I used superglue as filler and used a
spot sander to smooth things out.
Other things to note:
| COLORS & MARKINGS |
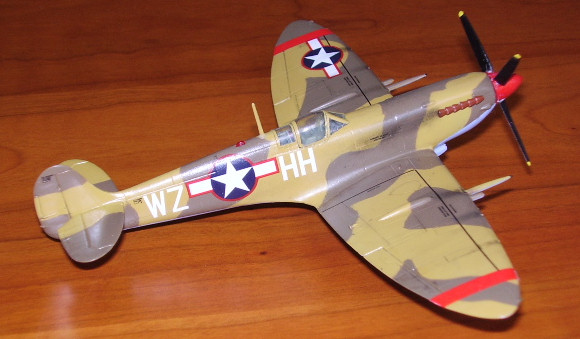
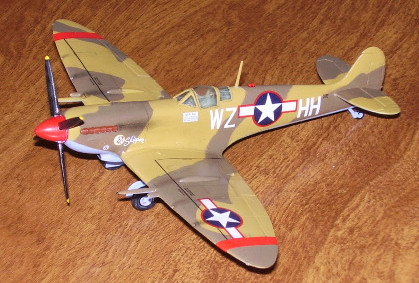
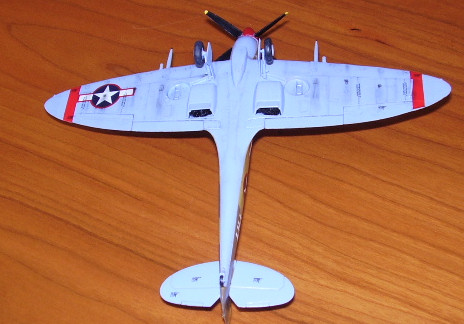
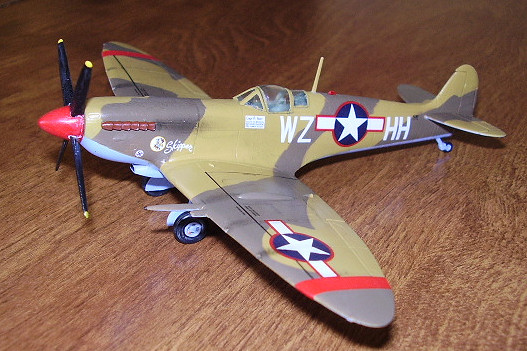
 I think the sharpest looking camouflage for any Allied aircraft in WWII is the
RAF desert scheme. Also, I think the sharpest looking Allied insignia is the US
insignia with the red border. Given these, when I saw Aeromaster's American
Spitfires sheet with the Mk IX called Skipper with the desert camouflage and red
bordered insignia I knew what scheme I wanted to paint this aircraft.
I think the sharpest looking camouflage for any Allied aircraft in WWII is the
RAF desert scheme. Also, I think the sharpest looking Allied insignia is the US
insignia with the red border. Given these, when I saw Aeromaster's American
Spitfires sheet with the Mk IX called Skipper with the desert camouflage and red
bordered insignia I knew what scheme I wanted to paint this aircraft.
First I masked the canopy parts with Bare Metal Foil and attached them to the
fuselage with Krystal Klear. These clear parts are extremely thin and if you add
an after market interior, you could use the kits canopy in the open position.
After attaching the canopy I shot the canopy with Polly Scale RAF interior
gray-green. Next I went about painting the bottom of the aircraft with Misterkit
RAF Azure blue. (Misterkit is an Italian acrylic paint which thins with alcohol;
covers beautifully, and best of all, hand brushes the same color as it
airbrushes). I left the azure blue to dry for a day. I then masked the bottom of
the aircraft and proceeded to shoot the topside of the aircraft with Gunze RAF
middlestone.
While I left the middlestone to dry, I scanned the camo pattern from the
Aeromaster instruction sheet. I then used the Photoshop to enlarge the pattern
to the right size. I got printouts of the patterns and proceeded to cut them to
create masks. I then covered the back of the masks with Tombo multi-glue. As RAF
camo patterns have a hard edge, making hard masks is appropriate. Tombo
multi-glue is a glue that when left to dry in open air, it produces a tackiness
similar to that on the back of a Post-it note. I use it every time I want to use
complex hard masks.
 I then applied these masks to the aircraft and sprayed the aircraft with Gunze
RAF dark earth. After that was dried I removed the masks and coated the aircraft
with Future. Once the Future was dried I applied the decals. The Aeromaster
sheet does not provide the stencils for this aircraft; therefore, I used the
kits decals which went on fine. Final clear coat of Microscale satin was then
applied and the model was ready for the final bits and pieces.
I then applied these masks to the aircraft and sprayed the aircraft with Gunze
RAF dark earth. After that was dried I removed the masks and coated the aircraft
with Future. Once the Future was dried I applied the decals. The Aeromaster
sheet does not provide the stencils for this aircraft; therefore, I used the
kits decals which went on fine. Final clear coat of Microscale satin was then
applied and the model was ready for the final bits and pieces.
| FINAL CONSTRUCTION |
These meant building, painting and attaching the propeller; paint, building and
attaching the landing gears; painting the small light behind the cockpit with
Humbrol clear red and attaching with Krystal Klear, and painting and attaching
the pitot tube and the antenna mast. One note here about the propeller: the
blades are individually molded and there are no alignment pins. Unless you have
jig for the blades (which I didnt have) then you are in for one heck of an
adventure. Just make sure your significant other and small children are not
around as there is a good chance that you would paint the air purple with
certain choice four-letter words.
I also painted the wing-tip lights with Humbrol silver first and then painted
the port light Humbrol clear red and the starboard light Humbrol clear green.
Finally, I ground some black pastel and proceeded to weather the model with gun
stains and exhaust stains.
| CONCLUSIONS |
 This is not an easy kit to build but with a little bit of care the pain is
minimized and the result is a nice looking kit at a very cheap price. Grade: A-.
This is not an easy kit to build but with a little bit of care the pain is
minimized and the result is a nice looking kit at a very cheap price. Grade: A-.
March 2006
If you would like your product reviewed fairly and quickly by a site that has over 300,000 visitors a month, please contact me or see other details in the Note to Contributors.