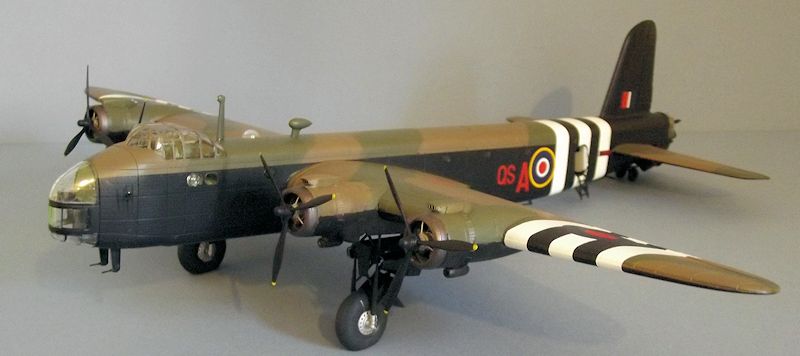
Italeri 1/72 Short Sterling IV
| KIT #: | 1350 |
| PRICE: | £39-99 |
| DECALS: | Four options |
| REVIEWER: | Frank Reynolds |
| NOTES: | Eduard canopy Mask No CX403, Price £8-40 |
| HISTORY |
Popular history has been less than kind to the Short Stirling. It entered service in early 1942 and was the RAFs first four-engine long range heavy bomber yet its achievements tend to be overlooked in comparison to the Handley Page Halifax and, in particular, the Avro Lancaster. Too easily dismissed as being too low and too slow in its performance envelope, it nevertheless held the line throughout 1942 and into the early part of 1943 until the second generation of bombers arrived. It is one of a number of aircraft types that were in production throughout the European campaign of World War 2.
The mighty bomber was the result of a British requirement, issued in 1936 and the contract was awarded to Short Brothers, a company well experienced with the construction of large four-engine flying boats, but who had never built a large landplane. Shorts nevertheless completed the aircraft to the customer’s exact requirements, to the extent of restricting the wingspan to 99 feet so that it could be stored in existing hangars – a fact that would hamper its ability to operate much over 12,000 feet when fully loaded.
 If the
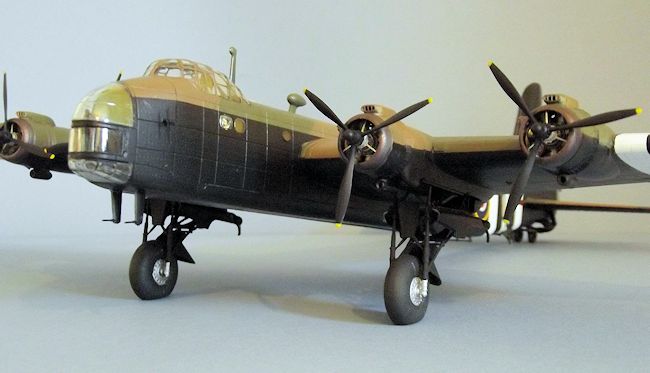
Stirling in flight was characterised by its stubby wing, on the ground its
appearance was dominated by a massive and tall main undercarriage. When under
development, this large and complex aircraft was so revolutionary that it was
thought necessary to air test a 50% scale version and it was discovered that an
increase of three degrees in wing incidence was required to bring take off
distance to a reasonable level. This was only established when the design was at
an advanced stage, so the only quick solution was to increase the height of the
main gear.
If the
Stirling in flight was characterised by its stubby wing, on the ground its
appearance was dominated by a massive and tall main undercarriage. When under
development, this large and complex aircraft was so revolutionary that it was
thought necessary to air test a 50% scale version and it was discovered that an
increase of three degrees in wing incidence was required to bring take off
distance to a reasonable level. This was only established when the design was at
an advanced stage, so the only quick solution was to increase the height of the
main gear.
Although eventually eclipsed as a bomber, the Stirling found a new and vital role as a transport for airborne forces, for the delivery of paratroops and as a glider tug, making a significant contribution to the D Day assault and Arnhem campaign of 1944 and the Rhine River crossing of 1945.
Of the 2,371 Stirlings built 610 were transport variants, all constructed at the Short Brothers and Harland factory in Belfast, Northern Ireland.
The Stirling IV was fitted with four Bristol Hercules engines of 1,650hp each. In this transport variant, armament was restricted to a tail turret with four Browning machine guns.
With the coming of peace the Stirling rapidly disappeared from the RAFs inventory. None has survived to be preserved.
| THE KIT |
This comes in Italeri’s now familiar tray – type box with dramatic colour artwork. There are four large parts frames moulded in medium grey plastic, one in clear, a rather chunky etched metal fret and a small square of plastic mesh.
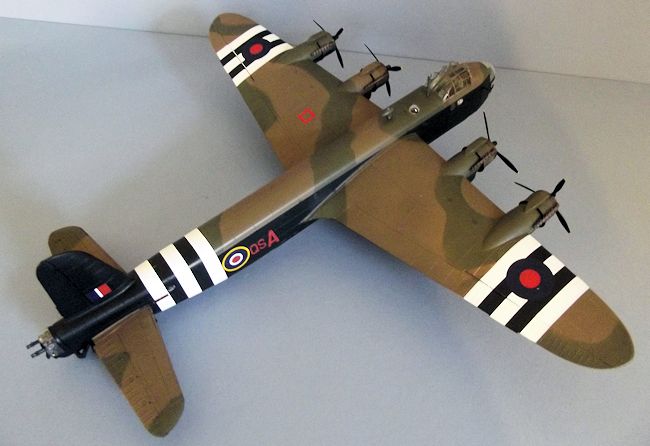
 The decal
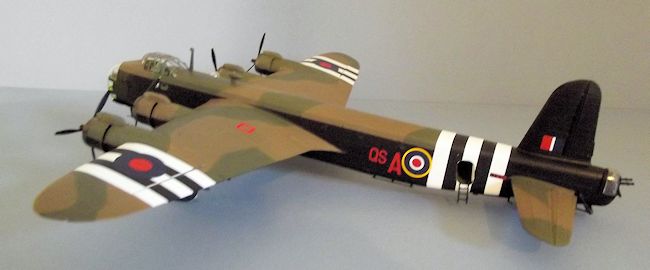
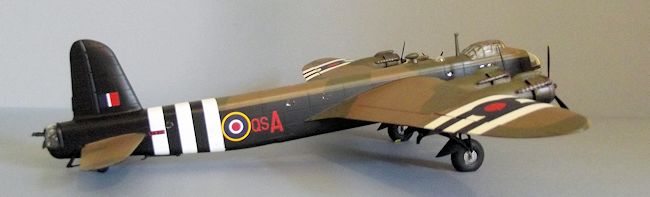
sheet provided four options for the type’s only wartime operator, the Royal Air
Force, all in standard camouflage of Dark Green and Dark Earth upper surfaces
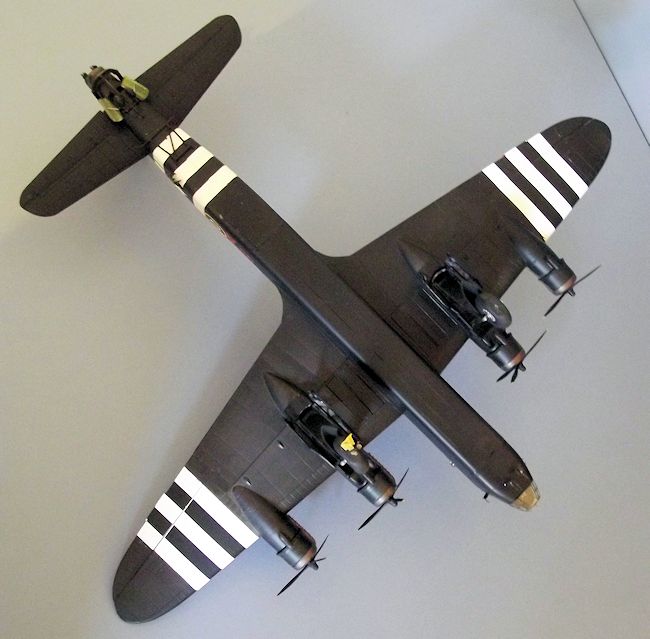
with Night Black fuselage sides and under surfaces. Three of the options have
D-Day Black and White stripes to wings and fuselage. The decals were sharply
printed with good colour density.
The decal
sheet provided four options for the type’s only wartime operator, the Royal Air
Force, all in standard camouflage of Dark Green and Dark Earth upper surfaces
with Night Black fuselage sides and under surfaces. Three of the options have
D-Day Black and White stripes to wings and fuselage. The decals were sharply
printed with good colour density.
The plastic to the main parts is on the soft side, with a hint of flash in some areas but nothing that I found to be excessive. Surface detail is fairly heavily engraved but not as dramatic as that found on Italeri’s recent Short Sunderland and it seems acceptable under a coat of paint.
The instructions run to sixteen pages of A4 paper in CAD style with exploded views that can be vague as to parts location and they best serve as a guide to how groups of parts relate to one another rather than a definitive assembly sequence. For example, I had no plans to add external aerials to the fuselage before the wings were added. The painting guide for the four finishing options is printed in colour and colour call outs are restricted to Italeri’s own paint range and FS numbers.
The instructions repay careful study and a careful building plan is needed.
| CONSTRUCTION |
This begins with the interior, which is satisfyingly detailed but much of which will be lost to view when the fuselage halves are closed up.
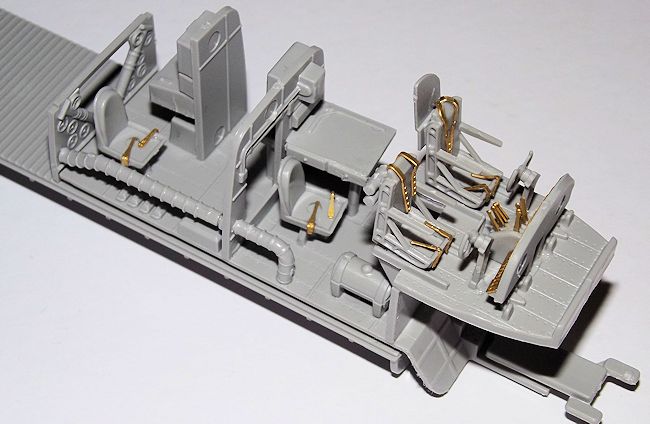 The first
ten stages of the instructions deal with the interior. There is a long bomb bay
roof/fuselage floor, an upper flight deck and a separate floor for the rear
fuselage. The crew seats are built up from multiple parts with the seat belts
and main instrument panel provided on etched metal.
The first
ten stages of the instructions deal with the interior. There is a long bomb bay
roof/fuselage floor, an upper flight deck and a separate floor for the rear
fuselage. The crew seats are built up from multiple parts with the seat belts
and main instrument panel provided on etched metal.
This kit certainly has educational value in illustrating the various crew positions in the “upstairs- downstairs “ layout of this large bomber and the rear compartment even provides a chemical toilet on a raised etched platform, life raft stowage and a bulkhead curtain. The twin leg tailwheel assembly is quite fragile and needs to be carefully aligned. I could see no way of adding this later in construction so it was to be left sticking out of the tail aperture for the remainder of the build and requires care in handling.
I elected to build all of the interior first then paint it, so as to ensure firm joints between the parts. The basic colours are RAF Interior Green (I used Tamiya XF-71) to the nose area and Aluminium Silver(XF-16) to the rear fuselage. Seat cushions were picked out in Dark Tan and the seat belts in a medium green to provide contrast. The instrument panel is intended to be built by applying a painted etch panel over a decal but I settled for just floating the decal over the panel and applying decal setting solution over the raised detail.
Before the fuselage halves are joined some small holes need to be opened up and a decision made as to whether an opening for a large nose window should be formed by cutting along scribed lines. This underlines the need to study the instructions, since only one of the four options has this feature and I needed some help from the internet to confirm the choice.
 The
fuselage windows should be glued in place before closing up the assembly but I
prefer to add small windows at the painting stage using Micro Kristal Klear so I
only added the pair of bulged windows below the edge of the flight deck. With
the large amount of flooring and bulkheads to be trapped between the fuselage
halves, I was impressed by the fact that the fuselage closed up without fuss,
using tube cement for strength, so the halves were taped together and left
overnight to set.
The
fuselage windows should be glued in place before closing up the assembly but I
prefer to add small windows at the painting stage using Micro Kristal Klear so I
only added the pair of bulged windows below the edge of the flight deck. With
the large amount of flooring and bulkheads to be trapped between the fuselage
halves, I was impressed by the fact that the fuselage closed up without fuss,
using tube cement for strength, so the halves were taped together and left
overnight to set.
I now had left a fuselage structure some 370mm long, about the limit for my normal work area, so I decided to keep the fuselage as a separate unit and add the wing assemblies later. Various hatches are fitted to the spine and belly, including a cover for the redundant upper turret opening. Three nose transparencies were fitted, together with the substantial flight deck glazing. The tail turret can be added much later.
The tailplanes have separate control surfaces with fine moulded hinge detail and were a simple plug in fit along with the similarly designed single tail fin. When all this had set overnight I added the Eduard paint masks. Now this set might seem costly at £8-49 but it is perfectly engineered to fit this kit and has an astonishing 90 die cut pieces, including wheel masks and masking was completed over about three hours with a couple of coffee breaks to rest my tired eyes.
The fuselage is completed by juggling the six long bomb bay doors into place and these were the most challenging part of the kit since they did not have a positive location and I found that the best method was to work from the outside edge of the bomb bay towards the centre.
Setting the
heft fuselage assembly aside, attention now turned to the wings. The upper and
lower wing panels are each in one piece and incorporate the engine nacelles.
Italeri offer the option to cut away the wing tip navigation lights and insert
clear plastic replacements. I decided to pass on the offer. Each wing
 panel has
three under surface bomb cells, each cell closed off by a pair of doors. There
is a subtle difference in size between the doors due to the wing taper so
careful reference to the instructions is essential. These were glued shut and a
little fettling was necessary to get them to sit flush with the wing. The upper
and lower wing panels are kept separate at this stage, when it is time to turn
attention to that quirky undercarriage.
panel has
three under surface bomb cells, each cell closed off by a pair of doors. There
is a subtle difference in size between the doors due to the wing taper so
careful reference to the instructions is essential. These were glued shut and a
little fettling was necessary to get them to sit flush with the wing. The upper
and lower wing panels are kept separate at this stage, when it is time to turn
attention to that quirky undercarriage.
This large and complex assembly could make or break this kit and it is to the toolmaker’s credit that they have made a good job of it. Just following the instructions linking the side frames to the cross bracing and adding the mudguards gives a good result. I assembled all of the parts before painting, so as to ensure strong joints.
The undercarriage assembly is added to the wing by slipping it through an aperture in the lower half of the inner engine nacelle and it is seated on two small ribs and a cross beam assembly. This provides a strong and positive location but this big unit protrudes awkwardly from the wheel bay throughout the rest of construction. The large one piece upper wing panels were glued in place, followed by the ailerons. There is no option for dropped flaps in the kit.
Next came the four engines and again taking the time to study the instructions pays dividends since there are keyed locations between the front and rear cylinder banks and although the cylinders need some slight trimming to fit inside the cowls, care must be taken not to trim off the small pins that are moulded onto the ends of some of the cylinders since they serve to align and support the cowlings. I left the cowl fronts and exhaust pipes off until later in the build since they were to be painted in a weathered brass/copper colour and it saved fiddly masking.
The rear turret was assembled, incorporating etched metal parts in the form of a gun support bracket and the two small spent cartridge chutes. These have to be carefully folded and there are no plastic alternatives. This requires care since the internal framework is a tight fit inside the turret. The interior structures were sprayed flat Black and the quadruple machine guns picked out in gunmetal. The turret exterior was masked out for spray painting and the turret assembly set aside to be added at the end of the build.
The awkward wing assemblies were added to the fuselage using tube cement for a strong joint which proved to have a good positive fit with no need for filler
| COLORS & MARKINGS |
 The whole
airframe was painted with grey auto primer applied from a rattle can then the
areas due to receive invasion stripes undercoated with Tamiya White primer. The
striped areas were masked over using Tamiya tape.
The whole
airframe was painted with grey auto primer applied from a rattle can then the
areas due to receive invasion stripes undercoated with Tamiya White primer. The
striped areas were masked over using Tamiya tape.
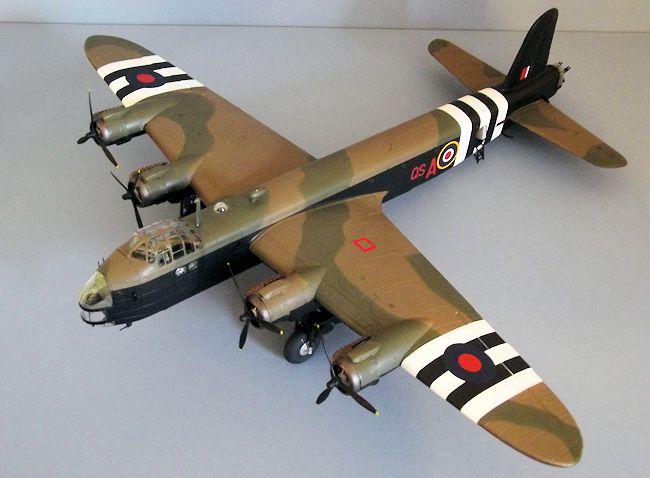
The upper surfaces were airbrushed with Xtracolor XA1002 Dark Earth. Then the upper camouflage was completed by marking out the areas of Dark Green by low tack putty rolled into thin strings with the areas in between covered with Tamiya masking tape, the airbrushed with Tamiya Acrylic XF-81 Dark Green.
The lower surfaces were airbrushed with a mixture of Tamiya XF-1 Flat Black and XF-18 Semi-gloss Black mixed 50:50.
The paint was left to settle overnight and the masked areas of white uncovered, then the whole airframe was finished in two brushed coats of Johnsons Klear/Future to provide a base for the decals.
The decals
provided are simple, but effective. Italeri provides all of the invasion
striping as large decals, essentially split between the upper and lower
surfaces. I had failed to spot that the one piece decal for each aileron is
intended to be wrapped around the leading edge and had long since glued these
components in place, but was easy enough to slice them into upper and lower
sections with a scalpel
 blade.
There is little in the way of stencilling on the sheet and application of the
deals was quite straightforward and they responded well to Micro Sol and Micro
Set decal setting solutions. My choice of finish was for a GT Mk.IV of No 620
Sqn, RAF Fairford, Gloucestershire on 6 June 1944. Barely 10 miles from my home,
the runway at that field still resounds to the sound of military aircraft during
the annual Royal International Air Tattoo.
blade.
There is little in the way of stencilling on the sheet and application of the
deals was quite straightforward and they responded well to Micro Sol and Micro
Set decal setting solutions. My choice of finish was for a GT Mk.IV of No 620
Sqn, RAF Fairford, Gloucestershire on 6 June 1944. Barely 10 miles from my home,
the runway at that field still resounds to the sound of military aircraft during
the annual Royal International Air Tattoo.
The decals were sealed in with two misted coats of Xtracrylix Flat varnish and the final round up could begin.
I added the already painted engine cowlings, cowl fronts, exhausts and intakes. The tail turret came next, followed by a check back through the instructions to account for the main wheels, aerials, pitot heads and glider towing yoke.
| CONCLUSIONS |
This is a large and impressive subject, but probably not one for a beginner. The etch parts are formed from a relatively thick sheet of metal and seem to lack the subtlety of many aftermarket parts. The fact that some of these components are structural, not optional, is a bit of a pain since you just have to use them and I am not a great fan of etch. I cannot help feeling that Italeri are trying a bit too hard with this element of the kit and it may drive the price up unnecessarily.
Most parts were a good fit, particularly in joining the fuselage halves and adding the wings and the undercarriage assemblies were well engineered, yet by contrast the eighteen bomb bay doors were a sloppy fit.
This kit repays careful planning and the instructions are not as intuitive as, say, the latest ones from Airfix.
So this is not a shake and bake exercise, but it is a rewarding one and can be recommended with only slight reservations. It certainly looks imposing on my shelf.
| REFERENCES |
British Warplanes of World War 2. Aerospace Publishing 1998.
Famous Bombers of the Second World War by William Green. Macdonald 1960.
The Short Stirling by Geoffrey Norris. Profile Publications No 142, 1966
August 2015
Copyright ModelingMadness.com. All rights reserved. No reproduction in any form without express permission from the editor.
If you would like your product reviewed fairly and fairly quickly, please contact the editor or see other details in the Note to Contributors.
Back to the Review Index Page 2025