
| KIT #: | A08001 |
| PRICE: | £24.99 ($34.95 in the US) |
| DECALS: | Two options |
| REVIEWER: | Frank Reynolds |
| NOTES: |
| HISTORY |
The Avro Lancaster Mk.II is the strange cousin of the family. Of the
7377 aircraft
built, just 301 were the Mk.II version. It was significantly
different, in that the familiar liquid-cooled Rolls Royce Merlin engines of the
main Lancaster variants was replaced with Bristol Hercules air cooled radial
engines. It was conceived for the Royal Air Force as a kind of insurance policy
against the possibility of enemy action disrupting supplies, so an alternative
source of power plants might be available. The decision was taken early on in
the Lancaster production programme and the first prototype flew in November
1941. Production of this variant was entrusted solely to the Armstrong Whitworth
factory in Coventry. It was to be March 1943 before the Mk.II reached squadron
service and operational trials proved disappointing for the type could not
comfortably achieve the 20,000- 22,000 foot altitude of a Merlin
 Lancaster
bomber stream and frequently struggled to achieve 15,000 feet, the sort of
operational altitude expected for less capable types in the RAF’s bomber
inventory. After a few months service, the Mk.II
was downgraded
from an 18,000lb bomb load to 14,000lb in an attempt to improve performance. The
type had two other characteristics that set it apart, for many
were fitted
with an FN64 remotely operated ventral turret with two .303in machine guns and
with characteristic bulged bomb bay doors that permitted the carriage of an
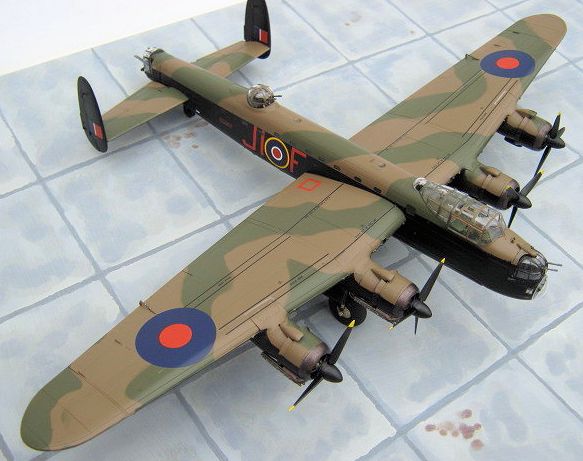
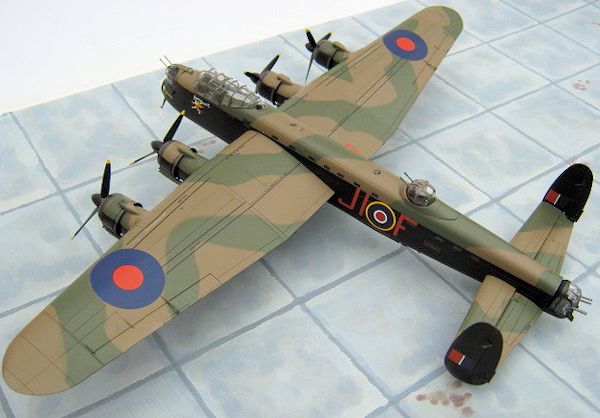
8,000lb bomb. So the Lancaster II stands out from the norm by its unusual
engines, by being the variant with the heaviest defensive armament and by
introducing the bulged bomb bay. The type gained a reputation for being reliable
and some crews preferred the air cooled engines that were less vulnerable to
flak damage. However they would disappear from the order of battle by September
1944 since the shortage of Merlin engines had never materialised and there was
no reason to continue with a separate logistics chain for such a specialised
type.
Lancaster
bomber stream and frequently struggled to achieve 15,000 feet, the sort of
operational altitude expected for less capable types in the RAF’s bomber
inventory. After a few months service, the Mk.II
was downgraded
from an 18,000lb bomb load to 14,000lb in an attempt to improve performance. The
type had two other characteristics that set it apart, for many
were fitted
with an FN64 remotely operated ventral turret with two .303in machine guns and
with characteristic bulged bomb bay doors that permitted the carriage of an
8,000lb bomb. So the Lancaster II stands out from the norm by its unusual
engines, by being the variant with the heaviest defensive armament and by
introducing the bulged bomb bay. The type gained a reputation for being reliable
and some crews preferred the air cooled engines that were less vulnerable to
flak damage. However they would disappear from the order of battle by September
1944 since the shortage of Merlin engines had never materialised and there was
no reason to continue with a separate logistics chain for such a specialised
type.
The Lancaster II is most associated with No.6 (Canadian) Group of Bomber Command as a means of upgrading them from twin-engine Vickers Wellingtons and principally operated by Nos. 408, 426 and 432 Squadrons from their Yorkshire bases.
| THE KIT |
This is the third boxing of the new tool Airfix Lancaster, the first two
being different packaging of the “Dambuster” B.Mk.III Special and it is curious
that the current release should again be an unusual version that was only
produced in relatively small numbers, although Airfix are to be congratulated on
this since the B.Mk.II has only previously been available via aftermarket
conversion sets.
It comes packaged in the now familiar red-coloured stout Airfix box with
dramatic CGI artwork on the lid.
 The
parts are crisply and neatly moulded in pale blue-grey plastic with subtle
scribed detail. As with the previous Dambuster release there are parts supplied
that are not relevant to the subjects modelled, showing that other variants of
Lancaster are yet to come. It is frustrating that Airfix do not provide a sprue
chart nor are parts “not for use” called out, so extra time is needed to sort
out construction. There is a wholly new parts frame containing the components
for the radial engines, propellers and enlarged bomb doors that are unique to
this variant. The bomb doors can be constructed open but no bombs are supplied,
being offered in a separate accessory pack. Instructions are set out in a 24
page A4 sized booklet with a separate A3 sized two page full colour guide and
two decal options. First, and the subject of this build, is from No 514 Sqn RAF,
Waterbeach Cambridgeshire, 1944. The second is from No 408 Sqn. Royal Canadian
Air Force, Linton on Ouse, Yorkshire, 1944. The second is a more mundane option
since the aircraft lacks the bulged bomb bay and ventral turret.
The
parts are crisply and neatly moulded in pale blue-grey plastic with subtle
scribed detail. As with the previous Dambuster release there are parts supplied
that are not relevant to the subjects modelled, showing that other variants of
Lancaster are yet to come. It is frustrating that Airfix do not provide a sprue
chart nor are parts “not for use” called out, so extra time is needed to sort
out construction. There is a wholly new parts frame containing the components
for the radial engines, propellers and enlarged bomb doors that are unique to
this variant. The bomb doors can be constructed open but no bombs are supplied,
being offered in a separate accessory pack. Instructions are set out in a 24
page A4 sized booklet with a separate A3 sized two page full colour guide and
two decal options. First, and the subject of this build, is from No 514 Sqn RAF,
Waterbeach Cambridgeshire, 1944. The second is from No 408 Sqn. Royal Canadian
Air Force, Linton on Ouse, Yorkshire, 1944. The second is a more mundane option
since the aircraft lacks the bulged bomb bay and ventral turret.
This is a kit that requires time and patience in the build, working progressively from one stage to another. There are 110 stages of construction set out in the pictograms so time spent study before assembly is time well spent. There is some scope to build up sub-assemblies for those who like to take that route.
| CONSTRUCTION |
Assembly begins with the interior, using the long bomb bay roof as the
fuselage floor and building up the flight deck in the nose area. Good basic
details are provided with the pilots’ instrument panel and throttles, internal
bulkheads and tables for the navigator and flight engineer. There is a tiny
decal for the navigator’s table forming a clearly identifiable map of North-West
Europe.
 The
crew seats are reasonably well detailed, but for some reason the radio operator
has no seat. The fuselage windows are provided as clear strips, but I chose to
omit these and install windows of Micro Kristal Kleer at the painting stage. Two
stout wing spars are fitted across the floor assembly at this stage. The kit is
engineered in such a way that the gun turrets can be added late in the build and
this helps considerably when painting. The interior was painted Tamiya XF-71 IJN
cockpit green with the area around the flight deck and bomb aimer’s compartment
XF-1 flat black.
The
crew seats are reasonably well detailed, but for some reason the radio operator
has no seat. The fuselage windows are provided as clear strips, but I chose to
omit these and install windows of Micro Kristal Kleer at the painting stage. Two
stout wing spars are fitted across the floor assembly at this stage. The kit is
engineered in such a way that the gun turrets can be added late in the build and
this helps considerably when painting. The interior was painted Tamiya XF-71 IJN
cockpit green with the area around the flight deck and bomb aimer’s compartment
XF-1 flat black.
Closing up the fuselage halves showed a slight mismatch between the
parts along the fuselage spine and the joint required some filler. There are two
prominent windows on the fuselage spine that Airfix have omitted. They are shown
as solid on the kit parts, so I drilled them out, to be finished later with
Kristal Kleer. I decided to add the flight deck main glazing at this stage.
Since the Mk.II is from the Lancaster’s early production period the shallow bomb
aimer’s chin blister is appropriate and the flight deck has flat side windows.
The fairings around the mid upper and rear turrets were also glued in place.
Attention now turns to the wings and this concentrates the mind. The
wheel wells are built up with fore and aft ribs between the front and rear wing
spars that poke out from the fuselage centre section. Then the upper and lower
wing halves are glued together while trapping the spars and wheel wells inside.
It works, and works well but a clear head and plenty of dry runs will pay
dividends. Next the tailplane halves were added but I left the fins until much
later since they would be painted and added separately. The basic airframe was
left for a couple of days to harden, while the main engine nacelles were built
as separate assemblies – a perfectly straightforward exercise and once
everything had dried they simply slip in place under the wings. Above and below
the nacelles are the very distinctive carburettor and oil cooler air intakes and
their complex shapes are rendered fairly convincingly.
Now the awkward part, for the main gear legs must be added next and will
stick out and dangle around for the whole of the rest of the build. Airfix has
engineered the main gear to fix onto the front face of the front wing spar, so
the gear legs have to be fitted from above in a slot between the wing leading
 edge
and the rear part of the engine nacelle. Once this assembly has dried, a cover
plate fills the gap between the wing leading edge and the nacelle. This applies
to all four engines and I found the cover plates to be a rather sloppy fit, so
the joints were tidied up with Revell’s Plasto soft filler.
edge
and the rear part of the engine nacelle. Once this assembly has dried, a cover
plate fills the gap between the wing leading edge and the nacelle. This applies
to all four engines and I found the cover plates to be a rather sloppy fit, so
the joints were tidied up with Revell’s Plasto soft filler.
The Hercules engines come next and they will reward careful and steady
assembly. They are finely moulded with the engines in three parts, consisting of
a front and rear row of cylinders and a nose gearbox.
On each row, one cylinder has a small stub on its tip.
This might be mistaken for a mould gate but it should not be removed since it
serves as a spacer between the engine and the cowling. The engines were painted
gunmetal with a dark wash to dirty them up a little. The engine cowlings consist
of two halves with a separate circular collector ring that features a
cross-shaped inset strut to support the propeller shaft. This again should not
be removed since it serves to align the engine centrally within the cowling –
necessary since the engine mounting points are subtle and delicate. The interior
of the cowlings are painted black. The distinctive “hedgehog” type exhaust pipes
are well rendered in two parts and can be added after the cowlings are painted.
I chose to divert to the construction of the four gun turrets at this
point. They are reasonably well detailed with sufficient internal brackets and
framing and the gun barrels commendably thin. They would be added at the final
finishing stage.
| COLORS & MARKINGS |
 Next
I painted the main airframe in camouflage colours and most of the doors and
small parts that were still on the parts frames. The Lanc. was painted as
follows: Dark Earth, Xtracrylix XA1002; Dark Green, Tamiya XF-81; Black, Tamiya
X-18 Semi Gloss Black; all flatted down with a coat of Xtracrylix Matt varnish.
The distinctive exhaust collector rings and hedgehog exhaust pipes were painted
in Tamiya X-33 Bronze finished with a wash of dirty thinners. A challenge came
in masking off the transparencies, done by carefully slicing Tamiya/Kabuki tape
– necessary since I have not yet found any aftermarket masks for this new kit.
The turret frames are clearly defined and their interior frameworks have enough
detail to be convincing to my eye. The decals went on without fuss and reacted
well to Micro Sol and Set. There is little in the way of stencilling but the
prominent wing walk lines are crisp and clearly defined. The decals were sealed
with a coat of Xtracrylic matt varnish.
Next
I painted the main airframe in camouflage colours and most of the doors and
small parts that were still on the parts frames. The Lanc. was painted as
follows: Dark Earth, Xtracrylix XA1002; Dark Green, Tamiya XF-81; Black, Tamiya
X-18 Semi Gloss Black; all flatted down with a coat of Xtracrylix Matt varnish.
The distinctive exhaust collector rings and hedgehog exhaust pipes were painted
in Tamiya X-33 Bronze finished with a wash of dirty thinners. A challenge came
in masking off the transparencies, done by carefully slicing Tamiya/Kabuki tape
– necessary since I have not yet found any aftermarket masks for this new kit.
The turret frames are clearly defined and their interior frameworks have enough
detail to be convincing to my eye. The decals went on without fuss and reacted
well to Micro Sol and Set. There is little in the way of stencilling but the
prominent wing walk lines are crisp and clearly defined. The decals were sealed
with a coat of Xtracrylic matt varnish.
| FINAL CONSTRUCTION |
The whole airframe was then propped upside down on the work bench while
the underside was fitted out. The main gear assembles are well detailed and
sturdily engineered. I needed some reference to photographs to pick out the
black legs with silver detailing and I used a colour wash to dirty it up a
little. Airfix offer dropped wing flaps but I chose to fit them retracted and
although the bomb doors can be fixed open I elected to build them shut so as to
emphasise the shape of the bulged bomb doors and
 the
prominent ventral turret. This kit has some neat touches, with the main gear
doors having small support struts moulded on and this is useful in lining them
correctly. The main wheel tyres have flats moulded on in convincing style. The
tail fins were added at this stage.
the
prominent ventral turret. This kit has some neat touches, with the main gear
doors having small support struts moulded on and this is useful in lining them
correctly. The main wheel tyres have flats moulded on in convincing style. The
tail fins were added at this stage.
Then on with the propellers, a few aerials, the mass balances to the
control surfaces and the whole package springs into life. The fuselage windows
were filled with Micro Kristal Klear, which I find to be a brilliant option,
since there is no worry about masking off the tiny windows during construction.
I used just a hint of weathering by tracing the exhaust staining, mainly
under the wings, with a blow over of well-thinned Tamiya Smoke X-19.
I enjoyed making the Lancaster II, but I can’t help feeling that, when
seen parked nose to nose with a Merlin engined variant, it still looks odd.
However, it seems wrong to use such a word to describe a legend, perhaps
“unusual” is more appropriate.
| CONCLUSIONS |
This is a bold move by Airfix in choosing a fairly obscure version of
the Lancaster. It is a kit that rewards patience and planning. There are some
niggles with warped parts, but nothing that could not be corrected. The kit is
well engineered, the decals are comprehensive and of good quality.
It is a major project, but one that is worthwhile. Recommended.
| REFERENCES |
“Lancaster, The Story of a Famous Bomber”, Harleyford Publications, 1961
Aircraft Profile No 235, Avro Lancaster Mk.II, by Bruce Robertson.
Profile Publications Ltd., 1972.
Aircam Aviation Series No 12, Avro Lancaster in Unit Service by Mike
Garbett and Brian Goulding, 1968.
October 2013
Copyright ModelingMadness.com. All rights reserved. No reproduction in part or in whole without express permission from the editor.
If you would like your product reviewed fairly and fairly quickly, please contact the editor or see other details in the Note to Contributors.
Back to the Review Index Page 2023