Italeri 1/72 AS.51 Horsa
| KIT #: | 1356 |
| PRICE: | £19-99 |
| DECALS: | Six options |
| REVIEWER: | Frank Reynolds |
| NOTES: | 2014 boxing for D-Day 70 anniversay |
| HISTORY |
The Allies were quick to learn the
lessons of the employment of assault gliders by Nazi Germany in the early years
of World War 2 and rapidly introduced their own specialist designs. The USA
developed the Waco CG-4 and the British the AS.51 Horsa, a product of the
Airspeed Division of the De Havilland Aviation Company. First flown on 12
September 1941 the Horsa was primarily of wood construction, which led to it
being manufactured widely by sub-contractors in the furniture industry. Some
3,000 Horsas were built. It was a big aircraft, with a wingspan of 88ft, a
maximum take off weight over 15,000lb and the ability to carry 25 troops. The
rear fuselage could be detached at a transport joint by the wing trailing edge
to provide quick access to the load compartment. The tricycle undercarriage w as
fixed, but could be jettisoned if required to permit landing on rough terrain
using the underbelly skid. A glider so big needed a powerful tug, Stirling Vs,
Halifaxes or Albemarles – all converted bombers- were commonly used.
as
fixed, but could be jettisoned if required to permit landing on rough terrain
using the underbelly skid. A glider so big needed a powerful tug, Stirling Vs,
Halifaxes or Albemarles – all converted bombers- were commonly used.
Horsas first went into action with British forces during the invasion of Sicily in July 1943, and then figured prominently on D-Day and the Arnhem operation in 1944 and the Rhine River crossing – the biggest airborne operation in Europe. The Horsa will forever be associated with a breath taking feat of arms when they delivered the first assault of D-Day, when three gliders landed in the dark on a slim strip of land by the Orne Bridge in Normandy, on the night before the massive invasion, when the glider borne troops, using only the weapons they could carry with them, held what came to be known as Pegasus Bridge until relieved by the invading forces. Six gliders carried 181 troops of the Oxfordshire and Buckinghamshire Light Infantry in the assault and incredibly five of the gliders landed within 50 yards of their target
I have been to Pegasus Bridge as a tourist and I find it chastening to stand on that narrow strip of rough land between the Orne River and the adjacent Caen canal and try to grasp how this small band of warriors plunged from the night sky to crash land in enemy-held territory to take the bridge and to hold until relieved. Even in daylight it would be a remarkable feat of airmanship for the aircrew.
| THE KIT |
 This is
packed in Italeri’s standard, rather flimsy, tray type box. The striking box art
painting majors on the figures in the set, showing the British Airborne forces
troops on a moonlit night with crash-landed Horsa in the background. The glider
has about 100 parts in medium grey plastic, crisply moulded with only slight
amounts of flash which is not bad for a kit that dates from the 1970s. There is
a smaller parts frame in crystal clear plastic with the cockpit glazing in one
large piece, assorted small windows and a prop for the rear fuselage.
This is
packed in Italeri’s standard, rather flimsy, tray type box. The striking box art
painting majors on the figures in the set, showing the British Airborne forces
troops on a moonlit night with crash-landed Horsa in the background. The glider
has about 100 parts in medium grey plastic, crisply moulded with only slight
amounts of flash which is not bad for a kit that dates from the 1970s. There is
a smaller parts frame in crystal clear plastic with the cockpit glazing in one
large piece, assorted small windows and a prop for the rear fuselage.
In keeping with the D-day anniversary theme the kit also includes two parts frames in hard plastic for thirteen multipose figures of British airborne troops, neatly detailed and with a range of optional weapons and webbing.
The decal sheet helpfully includes the large Black and White invasion stripes, and national insignia but the only variations of finish on offer relate to different airframe serials.
| CONSTRUCTION |
This is a part of a small series of “Allied Airborne Forces”
that I have recently built and is an ideal display companion to an Albemarle or
Italeri’s own Stirling V. The Horsa story figures prominently in a gallery at
the Museum of Army Flying at Middle Wallop in England where a full airframe is
displayed a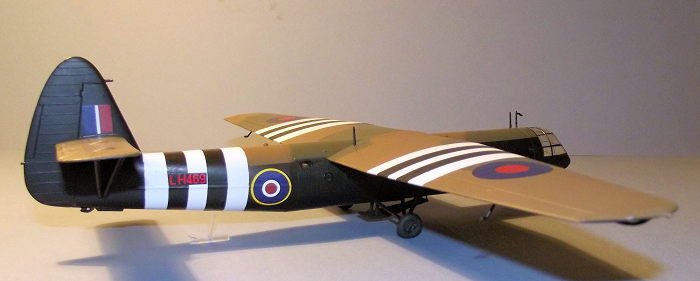 long
with a number of dismembered nose and fuselage sections permitting a close
inspection of the complex wooden structures forming the 30 sub-assemblies that
went to make up this remarkable machine. It is place of pilgrimage and a place
of modelling inspiration, that has encouraged me to build a C-47 tug, Stirling
tug, Albemarle tug, Hotspur training glider, Waco CG-4A and this latest effort.
long
with a number of dismembered nose and fuselage sections permitting a close
inspection of the complex wooden structures forming the 30 sub-assemblies that
went to make up this remarkable machine. It is place of pilgrimage and a place
of modelling inspiration, that has encouraged me to build a C-47 tug, Stirling
tug, Albemarle tug, Hotspur training glider, Waco CG-4A and this latest effort.
In the absence of engine nacelles and retractable landing gear this promised to be a fairly simple build. The nose and cockpit section is a separate unit and it is convenient to assemble this first adding the floor, rear bulkhead, seats, control sticks, pedals and instrument console. The whole was sprayed inside with Tamiya XF-71 Cockpit Green and while the airbrush was loaded, the same colour applied to inside of the main fuselage halves. I had no plans to detail the interior of the fuselage, since the side access doors were to be glued shut and virtually nothing could be seen through the tiny circular porthole-type windows in the fuselage sides. Italeri provide flooring and bench seating for the fuselage interior, which I omitted for the reason that it would not be seen and in the futile hope that by reducing weight in the rear of the fuselage it might balance on its landing gear
The two fuselage halve were thus
glued together to form a hollow tube and the nose section glued to the front,
taking care to ensure that it lined up with the top centre line joint in the
fuselage. The tail s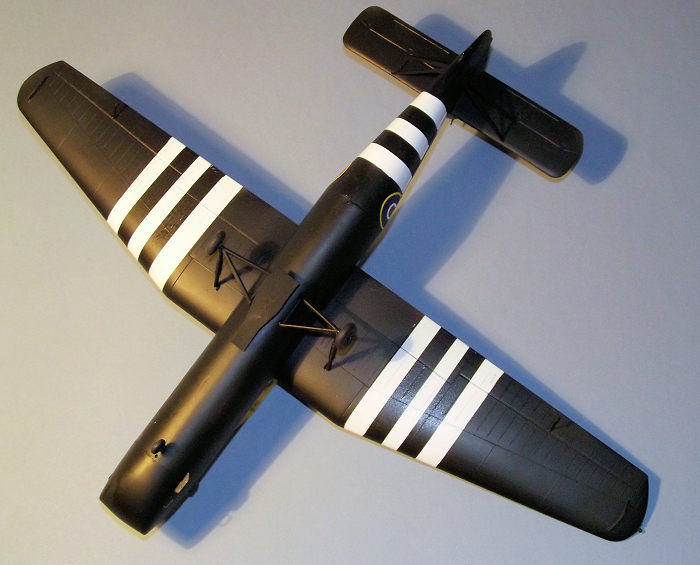 ection
again comes in two halves, with the joint at the trailing edge of the wing
corresponding with the transport joint on the full size version, handy for
diorama builders who wish to show the fuselage broken open after landing, but
not relevant to my build, so the two halves were glued together and butt jointed
into the centre fuselage. The structure was set aside to harden while attention
turned to the wing.
ection
again comes in two halves, with the joint at the trailing edge of the wing
corresponding with the transport joint on the full size version, handy for
diorama builders who wish to show the fuselage broken open after landing, but
not relevant to my build, so the two halves were glued together and butt jointed
into the centre fuselage. The structure was set aside to harden while attention
turned to the wing.
Consisting of a three part upper wing with the outer lower section in two parts the wing panels were glued together and set atop the main fuselage as a saddle joint. It took time to carefully align the wing horizontally in relation to the vertical tail fin and I resorted to a temporary jig of paint tins and low tack putty to keep everything in line while the glue dried hard over a couple of days. Once this had set satisfactorily the one piece horizontal tail planes were glued in place, using the kit supplied bracing struts temporarily fixed in place with low tack putty to line them up.
The cockpit was treated to a minimal instrument fit from a generic decal sheet and the pilots’ seats detailed with simple seat belts trimmed from Tamiya masking tape. The beautifully clear cockpit canopy was masked with Tamiya tape trimmed to shape with a fresh scalpel and the glazing glued in place. The small fuselage windows could wait until the end of the build since I prefer to make such glazing from Micro Kristal Klear, applied with a toothpick, as a finishing touch.
I now had a complete airframe which required a minimum of filling and rubbing down, so I could proceed to the painting stage.
| COLORS & MARKINGS |
The airframe was primed with grey auto primer from a rattle can. The white areas of the invasion stripes were applied with Tamiya Extra Fine white primer from a rattle can and masked off with Tamiya tape
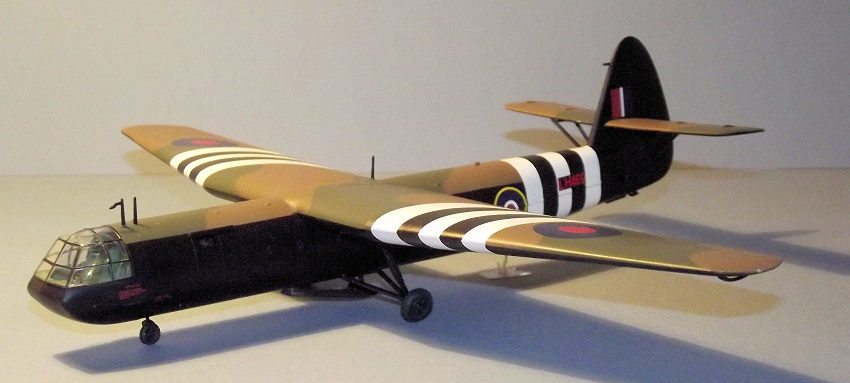
The upper surfaces were painted in
Xtracrylix XA 1002 Dark Earth applied by my Iwata HP-C airbrush. The relevant
areas were masked off with Tamiya tape and the contrasting camouflage of Tamiya
XF-81 Dark Green was applied. When the paint had dried enough the upper surfaces
were masked off with T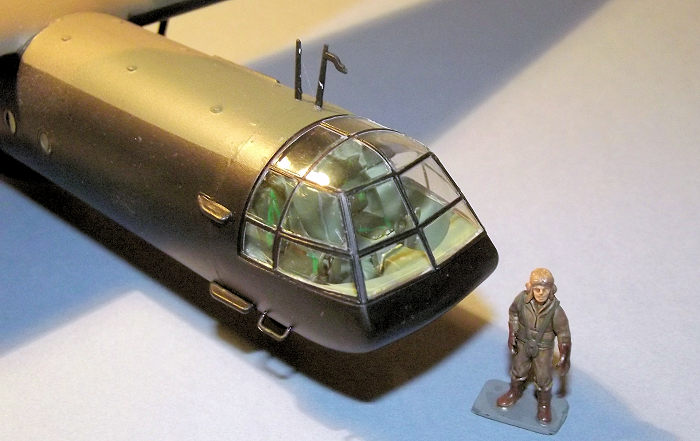 amiya
tape ready for the application of Tamiya X-18 semi-gloss Black to the sides and
under surfaces.
amiya
tape ready for the application of Tamiya X-18 semi-gloss Black to the sides and
under surfaces.
On completion of the paintwork the masking was stripped away with the exception of the masking to the glazing and the whole airframe treated to two hand brushed coats of Future/Klear floor polish prior to the application of decals.
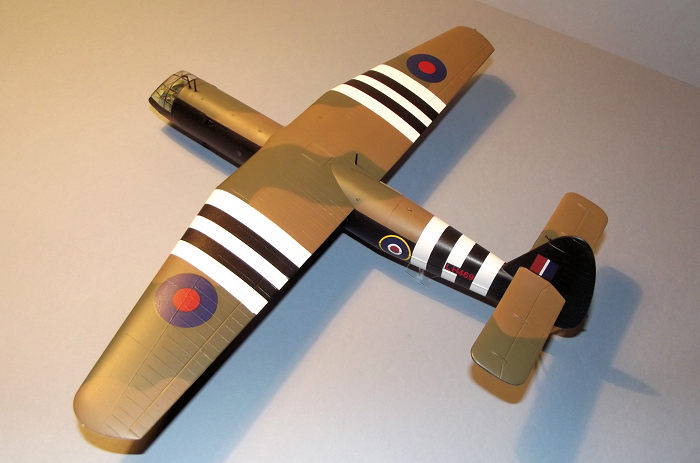
The Black stripes were carefully cut away from the adjoining White areas on the decal sheet and laid onto the White painted areas of the wings. I find this to be much more manageable that trying to flop large decals onto a tapering rear fuselage and wings without creating tears or bubbles in the decals. The decals responded well to Micro Sol and Micro Set and the application of the simple national insignia and airframe serial number completed the job. After a further hand brushed coat of Future/Klear to seal the decals, the airframe was finished with two misted coats of Xtracrylix flat varnish and the masking removed from the glazing.
The main and nose gear, tail struts and belly skid had been pre-painted Black while still on the parts frame. The tyres were picked out in Tamiya XF-85 Rubber Black. The airframe was propped upside down while these components were glued in place and after a day left for the joints to set the upper fuselage aerials were glued in to finish the job. The remaining small windows were glazed with Micro Kristal Klear applied with the tip of a wooden toothpick.
This kit is a chronic tail sitter;
it does not even come close to teetering. I could have packed the nose and
forward fuselage with weight but I did not have the courage to risk overloading
the fragile looking landing gear. So I went for Italeri’s solution – the crystal
clear tail prop – it works well enough and most of the time I for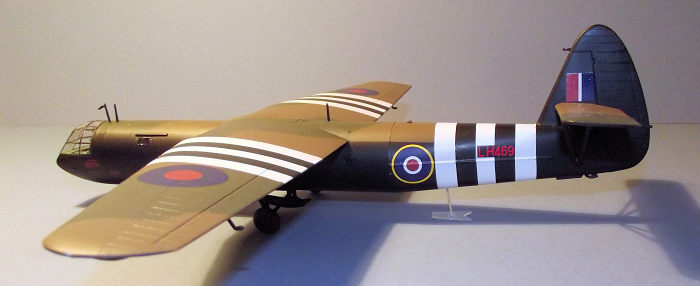 get
that it is there. As an aside , when that brilliant movie A Bridge Too Far was
shot in the 1970s the production company built a number of full scale copies of
Horsas and apparently found their versions to be tail heavy so in most of shots
their Horsas have a substantial wooden prop under the tail.
get
that it is there. As an aside , when that brilliant movie A Bridge Too Far was
shot in the 1970s the production company built a number of full scale copies of
Horsas and apparently found their versions to be tail heavy so in most of shots
their Horsas have a substantial wooden prop under the tail.
I painted up a handful of the figures in the kit purely to decorate my display shelf. Their red berets provide a splash of colour and are so reminiscent of happy times spent many decades ago with Airfix OO/HO figures.
| CONCLUSIONS |
This old kit stands the test of time well. It provided a reasonably relaxed build and the fit of parts was acceptable. One of the educational aspects of scale modelling is to appreciate the relative sizes of subjects and the Horsa is impressively bulky when parked next to a C-47. Recommended for the ease of the build and a reasonable price for a project that needed no aftermarket.
| REFERENCES |
British Warplanes of World War II, Aerospace Publishing Ltd 1998
3 March 2017
Copyright ModelingMadness.com
If you would like your product reviewed fairly and fairly quickly, please contact the editor or see other details in the Note to Contributors.
Back to the Main Page Back to the Review Index Page Back to the Previews Index Page