Hobbycraft 1/48 Vampire Mk I
| KIT: | Hobbycraft 1/48 Vampire Mk I |
| KIT #: | HC 1573 |
| PRICE: | $15 or so |
| DECALS: | Three options |
| REVIEWER: | Dale Rannals |
| NOTES: | Resin tail-boom set (Little Fokkers TMC005) |
| HISTORY |
…….Or…….
What to do when you totally lose interest in a kit.
Ahhhh, the jet engine…..what a marvelous invention….at least in theory.
In actual practice there were just a few minor problems.
They had a voracious appetite for fuel, for instance…..this resulted
in a totally unacceptable short range.
Also, they exhibited a distinct lack of power, so much so that the
piston-engined counterparts generally had much greater performance.
The real clincher though was their amazing ability to completely self
destruct at random times; a characteristic that did not endow pilot confidence!
Each country’s development teams worked frantically to solve this
problem, and all were unsuccessful.
Harmonics…uneven
combustion temperatures…fuel stability….many things were tried.
The race to figure this out was of the utmost priority, for the winner
would control the skies.
It seemed just out of the reach of the technology of the times,
unfortunately.
 Also
unfortunately, this meant there were quite a few advanced airframes sitting
around in search of engines that didn’t explode.
Nice reliable Merlin’s and R2800’s and DB605’s.
So the shoe-horning began.
Some airframes readily took to the conversions; others were not so
well suited.
Also
unfortunately, this meant there were quite a few advanced airframes sitting
around in search of engines that didn’t explode.
Nice reliable Merlin’s and R2800’s and DB605’s.
So the shoe-horning began.
Some airframes readily took to the conversions; others were not so
well suited.
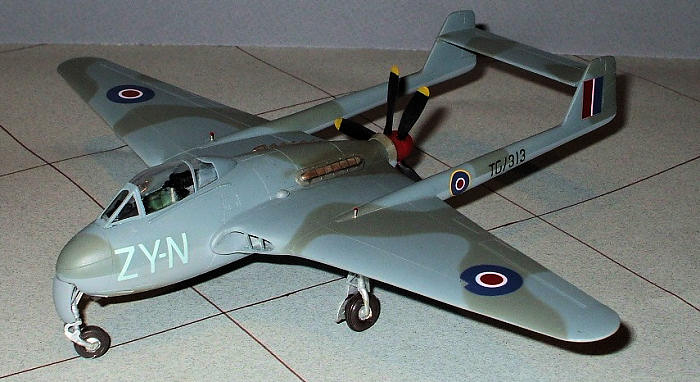
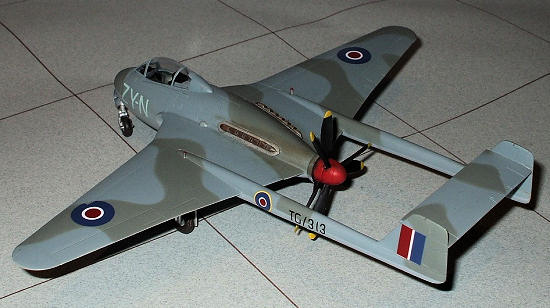
One of the happiest outcomes was of course the De Havilland Vampire Mk1b.
Its little egg shaped fuselage was adapted to house a Merlin in a
pusher configuration. Of
course there were the inevitable problems to overcome: Telescoping oleos were
fitted to increase ground clearance and contra-rotating propellers were used as
the space between the booms was restrictive.
The original intakes were kept for glycol and oil cooling duties;
fitting aptly sized radiators was not too much of a problem.
The result was a quite capable little fighter whose performance was
more than hoped for. Pilots
loved the visibility it offered and the comfort of the added “armor” provided by
that engine sitting behind them.
It ended up being
produced in large numbers and went on to serve many countries postwar.
The Vampire was considered to be a largely experimental design due to its
unorthodox arrangement and the use of a single engine, unlike the Gloster Meteor
which was always specified for production. The low-powered early British jet
engine types meant that only twin-engine aircraft designs were considered
practical; but as more powerful engines were developed, particularly Frank
Halford's H.1 (later known as the Goblin); a single-engined jet fighter became
more viable. De Havilland were approached to produce an airframe for the H.1,
and their first design, the DH.99, was an all-metal, twin-boom, tricycle
undercarriage aircraft armed with four cannon. The use of a twin boom (similar
to that of the Lockheed P-38), kept the jet pipe short which avoided the power
loss of a long pipe that would have been needed in a conventional fuselage. The
DH.99 was modified to a mixed wood and metal construction in light of Ministry
of Aircraft Production comments, and the design was renumbered to DH.100.
 Under
specification E.6/41 for two prototypes, design work on the DH.100 began at the
de Havilland works at Hatfield in mid-1942, two years after the Meteor.
Under
specification E.6/41 for two prototypes, design work on the DH.100 began at the
de Havilland works at Hatfield in mid-1942, two years after the Meteor.
Originally named the "Spider Crab," the aircraft was entirely a de Havilland
project, exploiting the company's extensive experience in building with molded
plywood for aircraft construction. Many of the basic design features were first
used in their Mosquito bomber. It had conventional straight mid-wings and a
single jet engine placed in an egg-shaped, aluminum-skinned fuselage, exhausting
in a straight line.
Geoffrey de Havilland Jr., the de Havilland chief test pilot and son of the company's founder, test flew prototype LZ548/G on its maiden flight 20 September 1943 from Hatfield. The flight took place only six months after the Meteor's maiden flight. The first Vampire flight had been delayed due to the need to send the sole remaining flight engine to Lockheed to replace one destroyed in ground engine runs in the prototype XP-80. The production Vampire Mk I did not fly until April 1945, with most being built by English Electric Aircraft due to the pressures on de Havilland's production facilities which were busy with other types. Although eagerly taken into service by the RAF, it was still being developed at war's end, and consequently the Vampire never saw combat in the Second World War.
| THE KIT |
 This
is Hobbycraft’s 1/48th scale Vampire Mk1.
I have read, however, that this incarnation is not without its
problems.
Lots of them it seems.
But let’s start with the good.
It has two sprues of grey plastic and one clear for the canopy.
Nice decals (well, they looked nice anyway) and typical instructions
for Hobbycraft…i.e., pretty basic.
This
is Hobbycraft’s 1/48th scale Vampire Mk1.
I have read, however, that this incarnation is not without its
problems.
Lots of them it seems.
But let’s start with the good.
It has two sprues of grey plastic and one clear for the canopy.
Nice decals (well, they looked nice anyway) and typical instructions
for Hobbycraft…i.e., pretty basic.
Okay, now the bad.
Upon inspecting the sprues, my Mk1 eyeballs locked onto two mis-shapen
pieces of plastic.
The drop tanks…or at least that is what they were supposed to be.
Short shot to the extreme, I guess quality control was on break when
this passed thru the line.
I didn’t plan on using them anyway, so no big deal for me, but this
was pretty shoddy!
Now, please understand, I like Hobbycraft kits.
They’ve done subjects no-one else had and usually gave you some pretty
interes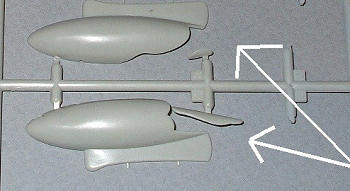 ting
decal options.
But this was pretty poor for any kit maker.
The other kit parts, however, looked crisp and nicely detailed, with
no flash. Go
figure.
ting
decal options.
But this was pretty poor for any kit maker.
The other kit parts, however, looked crisp and nicely detailed, with
no flash. Go
figure.
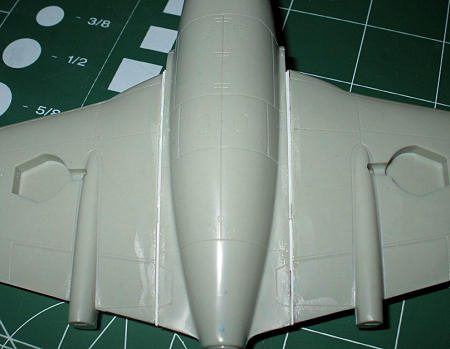
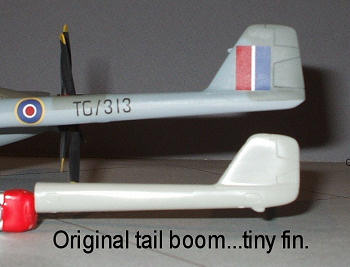
Ah, and now the ugly. I knew what I was getting into with this kit. From reading reviews here and elsewhere, I came to the following conclusions: First off, the tailpipe area is wrong. Too short. A quick glance at a good reference photo and this is readily apparent. Okay, I’m not going to try to fix that. Next, the tail booms are too thin and the fins too small. A fix is possible here. But the most glaring problem is the pronounced anhedral of the wings, i.e., a downward slope. I had read somewhere that they had mixed up the molds on the production run and put the gear wells in the wing tops. I don’t know if that’s possible but something is surely amiss here. Out of the box this Vampire is going to look very tired with droopy wings. Major surgery here methinks. Hhhmmmmm…is this worth it?
| CONSTRUCTION |
 Well
of course it is worth it!
To my rescue came Little Fokkers (by Tom’s Modelworks) resin tail boom
correction set.
Much nicer.
And after dry fitting the wings to the fuselage bits it seemed to me that the
wing angle problem could be solved by shimming.
Lots of shimming.
Okay, so let’s do this.
Well
of course it is worth it!
To my rescue came Little Fokkers (by Tom’s Modelworks) resin tail boom
correction set.
Much nicer.
And after dry fitting the wings to the fuselage bits it seemed to me that the
wing angle problem could be solved by shimming.
Lots of shimming.
Okay, so let’s do this.
I started with the cockpit (earth-shattering…..I know).
Nothing major here.
The parts fit well and the cockpit tub fit nicely to the fuselage top
half. I did
screw up though (NO!
Say it isn’t so!) by painting the interior, well, interior green.
I believe it shoulda been black.
The fuselage halves were mated together after installing the front
wheel well and the non-descript tailpipe.
Easy so far, right?
Next the wings were assembled and some major dry-fitting and thinking was
done (at least the dry fitting part wasn’t painful!).
I found that I could get the right wing stance (just a slight dihedral
from the drawings I looked at) by gluing the top front portion to the fuselage
and adding evergreen strip to the bottom gap and some more strip to the top rear
area. I did
just that and allowed it to dry for
 a
day or two. I
trimmed down any excess strip sticking out.
Okay, time for a serious “putty, sand, and repeat” session.
Quite a bit of this actually but at least now I had a Vamp with a much
better stance.
a
day or two. I
trimmed down any excess strip sticking out.
Okay, time for a serious “putty, sand, and repeat” session.
Quite a bit of this actually but at least now I had a Vamp with a much
better stance.
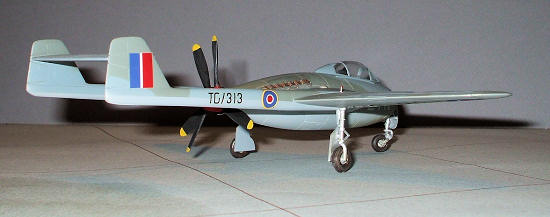
Next on the agenda were the resin tail booms. I glued these on with CA glue, all-in-all a bit fiddly; trying to get the booms on and the elevator between them and get everything straight! Fun fun. Again, putty and lots of sanding was done to get an acceptablly smooth joint.
| COLORS & MARKINGS |
Okay, pretty standard camo scheme here.
Dark Green and Dark Sea Grey with an underside of Medium Sea Grey.
These Model Master enamels were duly sprayed with my trusty Badger
150. Didn’t
do any major shading.
Next was a coat of Future in anticipation of decals.
The decals went on okay, the choice being a rather generic postwar bird. The decals, however, wanted to adhere the moment they were placed on the model and they seemed a tad brittle….not a good combination when you need to move them around. A portion of one of the roundels on the wing top broke away after drying. Strange.
| FINAL CONSTRUCTION |
The finish line is in sight now.
I added the landing gear to the little bird and…….
The model sat for about nine months.
It was at this point that I just sorta lost interest in this kit.
I don’t really know why.
Occasionally I would look at it and think “Geeeeeeez, all I have to do
is flat coat it and I’m done.”
But I never got around to it.
Sad.
Inspiration comes in strange forms.
Thank the Brewster Buffalo.
In the back of Squadrons “Buffalo in Action” book is a model of
Brewster’s follow-on fighter.
It was to be a twin boom pusher.
It looks pretty nice and this got me thinking. A Vampire would look
pretty cool with a pusher prop.
But why would they
have done that?
Hhhhhmmmmm…….what if the jet engine had failed?
I
 know
the British liked to have several engine options available for new fighters (a
very good policy, I might add!), would the Vampire have been different?
Would have they hedged their bets with the jet engine?
know
the British liked to have several engine options available for new fighters (a
very good policy, I might add!), would the Vampire have been different?
Would have they hedged their bets with the jet engine?
I picked up the Spidercrab that had been languishing for months, and
tried to place several of my spare props between the booms.
All were too big.
Bummer.
Wait, what about a small contra-rotating prop?
Would that transmit the power of, say, a Merlin or Sabre?
Sure, why not?
So I cut down two three-bladed props to just fit between the booms.
But then another problem arose.
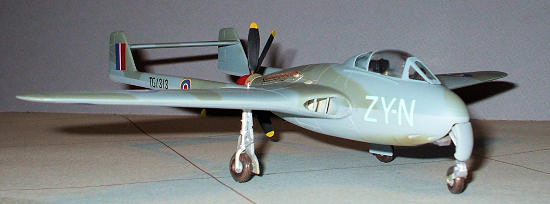
The Vampire sits awfully low to the ground.
Even with the small props, the blades would still hit the ground.
Okay, fine.
Longer landing gear.
The original struts were cut off and I drilled mounting holes for
longer replacements.
In this case the main gear were from an Arii Tony kit and the nose
wheel from a Ju-88 tail wheel.
Much better….they could easily be telescoping gear to fit in the
original wheel wells…right?
Work with me here and just nod your head.
Come on, they did it with the P-47 Thunderbolt!
Oh yeah, when you are drilling new holes for the new landing gear, try
not to go thru the top of the wing.
I did.
Not wanting to fill and sand and re-paint, I drilled thru the other side also
and added simple mechanical gear position indicators.
Works for me.
As for cooling radiators, there are already two nice intakes in front of the wings. I’m sure heat exchangers could have been built to fit the space and suitable outlets fitted. Lastly I fitted two exhausts from a Hasagawa Typhoon in a position on the fuselage just above the wing.
| CONCLUSIONS |
So here now sits a strange Spidercrab.
Could have this aircraft existed?
I don’t think anything I thought about here was impossible, though I’m
sure aircraft engineers could point out numerous faults.
But hey, for me it brought new life into a kit that I had spent a
whole lot of effort on and then just lost interest in.
For that point alone, it was worth it.
Whatever you are building right now……have fun with it!!! (You are
building something, right?)
| REFERENCES |
Wikipedia
The Internet
Fighters
ISBN 0-89673-103-0
Thanks to me and my
fondness for anything different from the norm for this one.
July 2008
Copyright ModelingMadness.com.
If you would like your product reviewed fairly and fairly quickly, please contact the editor or see other details in the Note to Contributors.