
Airfix 1/72 Mosquito PR.XVI
| KIT #: | |
| PRICE: | |
| DECALS: | Two options |
| REVIEWER: | Frank Spahr |
| NOTES: |
| HISTORY |
Desperately needed. The right aircraft at the right time. Cutting edge. Groundbreaking. Incredibly versatile. Iconic. Beautiful. The Wooden Wonder.
To me, the De Havilland D.H. 98 „Mosquito“ is all that.
Developed privately by De Havilland aircraft, in part against then valid
doctrines, the Mosquito prototype took to the air at the end of 1940, and
was introduced into service at the end of 1941. It had originally been
envisaged as an unarmed light bomber and recce plane, protected mainly by
its speed. Improved engines made arming it possible, a nd night fighters and
fighter bombers joined the variants. The wooden construction of the fuselage
saved on strategic materials. The Mosquito was used not only in the
reconnaissance role, but also for low-level precision bombing raids on
high-value targets. The sleek aircraft was a morale booster, direly needed
at the time of its inception. Books and movies have made the aircraft famous
and kept it in the memories, even though hardly any are airworthy by now.
The Germans tried to produce their own Moskito, the Ta 154, but it suffered
from structural failure caused by acidic glue.
nd night fighters and
fighter bombers joined the variants. The wooden construction of the fuselage
saved on strategic materials. The Mosquito was used not only in the
reconnaissance role, but also for low-level precision bombing raids on
high-value targets. The sleek aircraft was a morale booster, direly needed
at the time of its inception. Books and movies have made the aircraft famous
and kept it in the memories, even though hardly any are airworthy by now.
The Germans tried to produce their own Moskito, the Ta 154, but it suffered
from structural failure caused by acidic glue.
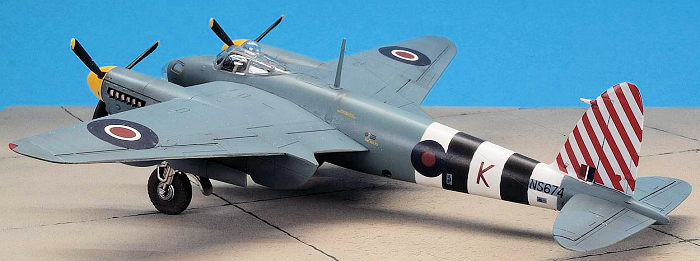
There were several reconnaissance versions of the Mosquito, right from the start. The subject of this kit is the PR XVI. It was based on the latest bomber version, the B XVI. It was unarmed and carried a high-powered multiple camera installation and augmented fuel storage. Its canopy was modified with top and side blisters to improve visibility. With underwing auxiliary fuel tanks, missions of up to 2,000 miles were possible. Some PR XVIs were provided to the USAAF, using it also for weather and photographic reconnaissance. Some aircraft were modified to carry the H2S /H2X ground observation radar, used to identify bombing targets where no visual identification was possible.
PR XVIs were also used as high-speed postal planes throughout the Allied conferences at Yalta and Potsdam.
At the end of the war, they were superseded by the latest reconnaissance version, the PR Mk 34.
| THE KIT |
I´ve been fascinated by this aircraft for a very long time, since my childhood. I must have built some then current Airfix kit in the seventies, and a Monogram FB kit in the 1990s. When I saw the box art of the 2023 issue PR XVI, with the attractive scheme, I was instantly hooked and upon the next good opportunity, got one. I´m sorry to say I did not take the time and the photos for a proper preview, especially after finding there is none on this site yet.
Suffice it to say from my personal point of view: This kit is well-designed, with a large parts count of 142 and fine surface detail, both raised and recessed, and where appropriate. The parts are crisply molded, with lots of small casting reservoirs. Yet I found one small short shot area atop one engine nacelle. It was rather simple to correct, luckily. The clear parts are neat and crisp and clear, and the sprue attachments well designed for removal without damage. The wingtips are molded clear to incorporate the navigation lights, and interesting approach. The level of detail is quite high, and the cockpit and wheel well areas are quite adequate in my eyes.
 The decals are well printed by
Cartograf, they are in register and they did perform well when used.
Markings are for two planes with quite colourful schemes, one from the SAAF,
and the other from the USAAF.
The decals are well printed by
Cartograf, they are in register and they did perform well when used.
Markings are for two planes with quite colourful schemes, one from the SAAF,
and the other from the USAAF.
The kit instructions are as all the new Airfix offerings are – well-thought out, very clear, broken down in many steps to keep things easy to follow, and with quite some helpful aspects. The kit has a template for drilling the formation lights openings into the fuselage, and paint mask parts for the wheel wells. The complex landing gear construction is aided by using the attachment points in the wheel well as a building jig. The exhausts are cleverly molded in two sections sliding into one another, and their housings are designed and marked to make them fit. Those who contributed to the kit have been properly thanked in the instruction booklet.
There have been some gripes in the modeling forums about this kit, but from what I saw, it looked more like the usual noise than some serious flaws. Obviously, YMMV.
Anyway, when I had unpacked my kit, I was quite happy with it and felt a serious building urge. This for sure would not languish in the stash for long. I already had the EME show in Lingen in mind for a completion date.
| CONSTRUCTION |
I started this kit whilst
waiting for replacement decals to arrive from the Czech Republic for the
previous project. With limited space, and a Liberator kit still around, I
decided to tackle small and less messy tasks first. So I applied the Eduard
paint masks to the nose and cockpit transparencies, where they worked well
as usual. I then snipped off all the mold shrinkage reservoirs from the
parts, and
 removed all the plastic detail from the kit parts where PE would
be applied. That done, and no decals in sight, and it being the weekend, I
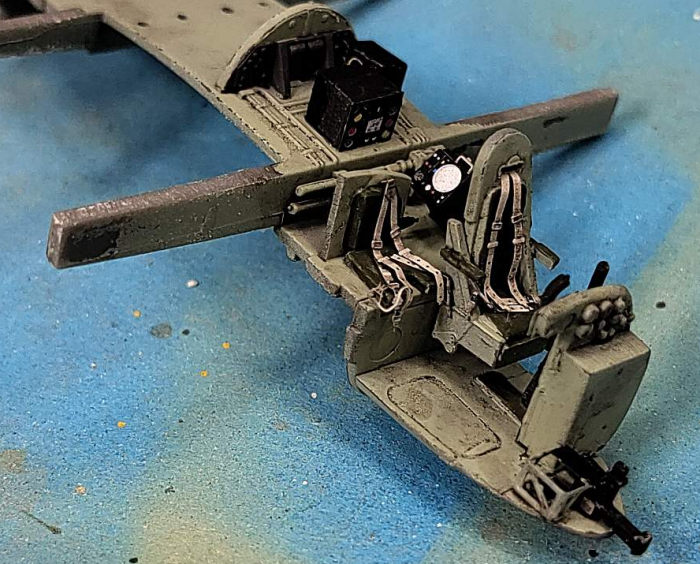
started constructing the cockpit, with parts fit very satisfying. Having
prepared what I needed for this area (cockpit interior and fuselage halves)
I primed them and then painted them the appropriate shade of institutional
grey green.
removed all the plastic detail from the kit parts where PE would
be applied. That done, and no decals in sight, and it being the weekend, I
started constructing the cockpit, with parts fit very satisfying. Having
prepared what I needed for this area (cockpit interior and fuselage halves)
I primed them and then painted them the appropriate shade of institutional
grey green.
That done, I tackled the Eduard Zoom set. My tried and proven approach is to sort out the workable from the positively ludicrous parts, and only use what I find I can tackle. For instance, I rather glued some of the instrument panel thingies onto styrene backings instead of folding the backings from PE. And don´t get me started on small levers and other extremely small and impossible for me to handle items. I then gave the interiors a wash and a flat coat prior to closing up the fuselage.
Parallel to that I started on the other subassemblies, such as the engine nacelles, props and the like.
Things went mostly quite smooth and uneventful, the fit was good and I was soon ready for paint. Two things are worth mentioning: I found one small short shot area on the upper aft end of one engine nacelle, which could be fixed with a bit of styrene. The other was that I attached the wings without first sliding the engine cooler faces into them. But to a casual observer, this omission hopefully should not be readily visible. Let´s keep it between us.
| COLORS, MARKINGS, & THE REST OF THE BUILD |
Having applied all the Eduard masks, I used some of my remaining Parafilm M to cover the painted and weathered exhausts. I then primed the model with Stynylrez Grey. After doing some minor corrections I sprayed the fin and the aft fuselage white. Some masking later, I sprayed the black invasion stripes, and then preshaded the rest of the model, mainly where there were panel lines or raised structures, to add a bit of variation later. I then sprayed the model in Vallejo Model Air Faded PRU Blue, with some more tonal variations to lend some interest to the model. Upon demasking the stripes, I found areas to correct, not unexpectedly.
That done, I glosscoated the model with Future, and – after curing time – applied the decals. They worked very well, and even the diagonal striping on the tailfin fit and needed only minor brushed corrections later. I needed some Micro Sol to let the decals adhere to surface detail. I should have added the fin-mounted pitot tube prior to decaling, as the striped decal partially runs over it, but brushpainting afterwards worked well, too. The decals were sealed and blended in with another coat of Future. I then added the dorsal antenna and the landing gears. I added ochre pastel chalk to the tyres, sealing it with a flat coat, and restoring the tread areas by drybrushing dark grey oil paint.
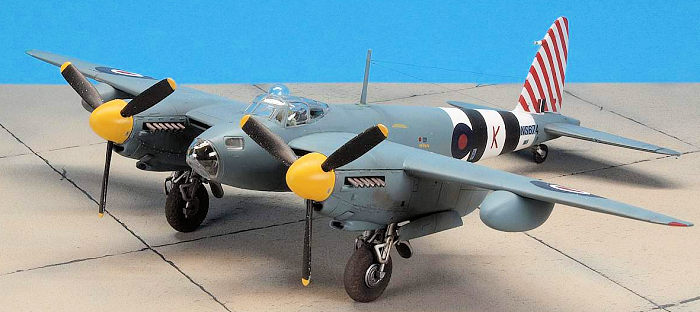 The props were painted, the
spinners decaled, and then assembled. Some light drybrushing with silver was
added to the wingtips. On the leading edge.
The props were painted, the
spinners decaled, and then assembled. Some light drybrushing with silver was
added to the wingtips. On the leading edge.
For weathering, I did some light washing here and there, and drew the blackish liquid in the direction of the airstream at others. The undersides of the aircraft received a light misting of Ammo of Mig´s Washable Dust (RAL 8000).
At about this point I realized I had somehow goofed in assembling the prop shafts, so the props would not fit onto the nacelles. Well, well, well. I snipped and ground away the offending bits until the props would go on.
The final work session consisted in: Getting the props to fit. Adding the wheel hubs to the tyres and then mounting the wheels to the landing gear. Removing all the masks. Make some corrections where they (or rather I) hadn´t worked cleanly enough. Painting the clear parts for the wingtip navigation lights with transparent red and green. The antenna wires were made from Caenis flyfishing monofilament. They are very thin, yet to me seem to give a scale-appropriate effect. I then placed the model on the simple base I had made, but kept it removable.
| CONCLUSIONS |
I have always loved this aircraft, since my first Airfix model 50-odd years ago. Building this very neat kit was a fun project with very limited extra effort, and I like the end result. Any goofs and glitches are mine. Highly recommended!
| REFERENCES |
Scutts, Jerry: Mosquito in Action Part I. Carrollton 1992
30 March 2026
Copyright ModelingMadness.com. All rights reserved. No reproduction in part or in whole without express permission.
If you would like your product reviewed fairly and fairly quickly, please contact the editor or see other details in the Note to Contributors.