Pavla 1/72 Martinet TT.1
| KIT #: | 72045 |
| PRICE: | $30.00 |
| DECALS: | Four options |
| REVIEWER: | Torben Plesberg |
| NOTES: | Short run kit, bought in Sweden, extra decal sheet included for Svensk Flygtjänst |
| HISTORY |
The Miles M. 25 Martinet was the first British aircraft to be designed specifically for target towing. It was developed from the Miles Master, and with a strengthened airframe for the extra stress caused by target towing. The Martinet got a longer nose, a higher cockpit and greater wingspan. The towing gear was in a fairing beneath the fuselage, and the winch was powered by a wind mill.
 The
prototype flew for the first time in late April 1942, and the aircraft was
ordered by the RAF and the FAA. Altogether, 1724 Martinets were produced by
Miles Aircraft Ltd.
The
prototype flew for the first time in late April 1942, and the aircraft was
ordered by the RAF and the FAA. Altogether, 1724 Martinets were produced by
Miles Aircraft Ltd.
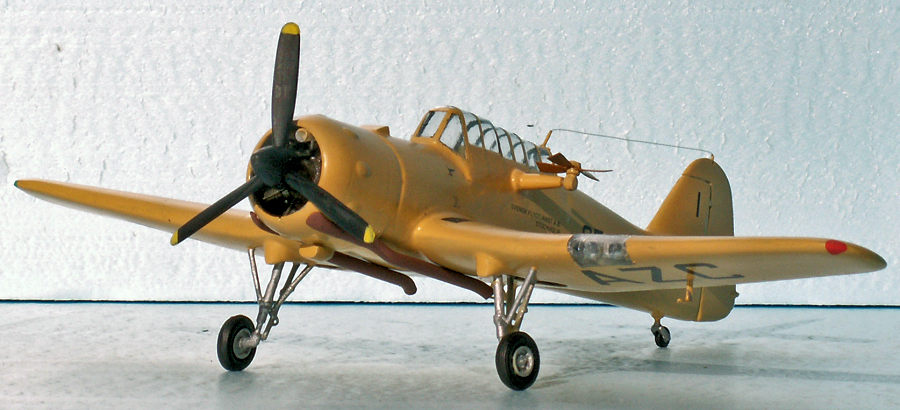
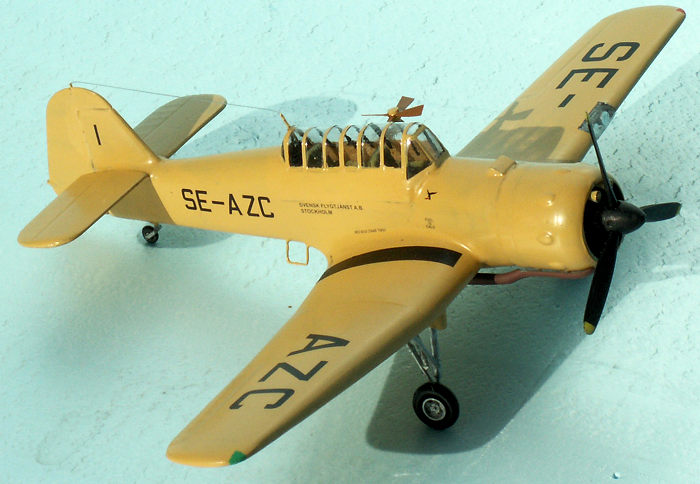
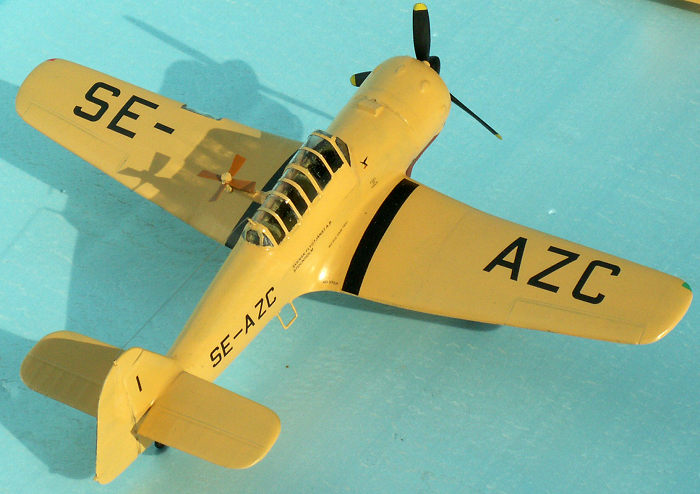
Other operators of the Martinet TT after the end of WWII, were: Belgium, France, Ireland, Portugal, Sweden and Turkey. The subject of my model is a Martinet operated by Swedish Air Services Ltd. – Svensk Flygtjänst AB. This company operated eight aircraft from 1946 to 1951, until the Martinets were succeeded by the Fairey Firefly TT,
Only a single Martinet survives to this day. The survivor was operated by the RAF, in Iceland/Reykjavik. In 1949, the aircraft was sold to a civil local flying club. Two years later, however, the aircraft crashed. The wreckage survived for 26 years on the crash site, until it was recovered and stored by the Icelandic Aviation Historical Society. After another 19 years of storage indoors, the wreckage was returned to Britain, where it became a restoration project – the only Miles Martinet in the world! The responsible museum has done a marvelous job, and in the end, they will get a complete restored Miles M 25 Martinet TT 1.
| THE KIT |
The kit
comes in relatively large, flat box with a picture of a British and a French
aircraft on the lid. The box opens in the ends, and is therefore not suited as a
base during the construction. The instructions is an A5 leaflet with 12 pages.
Page one gives a short history of the aircraft in Czech and English. Page two
shows the sprue, the clea r parts, the resin parts, and explains the symbols used
later. Page three shows a color guide with reference numbers for Humbrol colors.
Steps one to five in the construction are shown. Pages four to six show step six
to eighteen of the construction process. I presume, that pages seven to eleven
show how to paint, and decal the four options of the kit. These pages were
missing in the instructions of the special kit: In return, there was a scale
drawing to 1/72 scale, with kind permission from Björn Karlström, and two really
good close ups of the real thing, showing some important details: the mill and
the position of the stencils on the fuselage and wing root beneath the cockpit.
The box of the kit was labelled: Svensk Flygtjänst AB, Stockholm. The special
decal sheet covered the civil registrations of all eight Swedish Martinets in a
very good quality. The late Thomas of Helsingborg Hobby center was very eager to
offer kits of Swedish aircraft with special designed decal sheets, to please
Swedish modelers – and me! The original decal sheet of the kit has the following
options: French Air Force, RAF, RAAF and FAA.
r parts, the resin parts, and explains the symbols used
later. Page three shows a color guide with reference numbers for Humbrol colors.
Steps one to five in the construction are shown. Pages four to six show step six
to eighteen of the construction process. I presume, that pages seven to eleven
show how to paint, and decal the four options of the kit. These pages were
missing in the instructions of the special kit: In return, there was a scale
drawing to 1/72 scale, with kind permission from Björn Karlström, and two really
good close ups of the real thing, showing some important details: the mill and
the position of the stencils on the fuselage and wing root beneath the cockpit.
The box of the kit was labelled: Svensk Flygtjänst AB, Stockholm. The special
decal sheet covered the civil registrations of all eight Swedish Martinets in a
very good quality. The late Thomas of Helsingborg Hobby center was very eager to
offer kits of Swedish aircraft with special designed decal sheets, to please
Swedish modelers – and me! The original decal sheet of the kit has the following
options: French Air Force, RAF, RAAF and FAA.
The parts of the kit are mostly crude and need correction to fit properly together. The very thick inner wings differ in thickness by almost 2 mm! The starboard wing must be sanded a lot to match the port one.
| CONSTRUCTION |
 Building a Pavla Martinet TT 1 is not an easy job. Actually, it is a genuine
challenge! The resin parts, however, deliver some nice parts to the otherwise
poor kit. The construction raises some problems, and in the following, I shall
provide some advice to deal with them.
Building a Pavla Martinet TT 1 is not an easy job. Actually, it is a genuine
challenge! The resin parts, however, deliver some nice parts to the otherwise
poor kit. The construction raises some problems, and in the following, I shall
provide some advice to deal with them.
Step 6: The propeller is hopeless. I found another useable three bladed propeller in my stocks, one without three loose blades!
Step 8: The two cowling halves are oval, if you just glue them together. The circular disc (part 26) can help a lot. If you sand the cylinders of the engine to the same gauge as the disc, it is realistic to glue the cowling halves together with the disc and the engine in place inside. Add a suitable clamp to fix the parts until the glue has set.
Step 10-11: I don’t understand the sketch showing the canopy and the position of two seats. If the seats are placed that low, neither the pilot nor the wire operator will be able to look out through the canopy. Compared to step 14, the cockpit floor must be raised about 5 mm, to place the seats right.
Step 12: The wheel well openings must be milled closer to the front edge of the wing. Otherwise, the position of the main undercarriage legs will be too far to the rear.
The
dihedral will be wrong if you just glue the upper wing halves to the one- piece
underwing. The instructions show the correct dihedral on page eleven. The
material of the wing is rather generous in thickness, and that is definitely an
advantage, because this makes it possible to sand the starboard upper w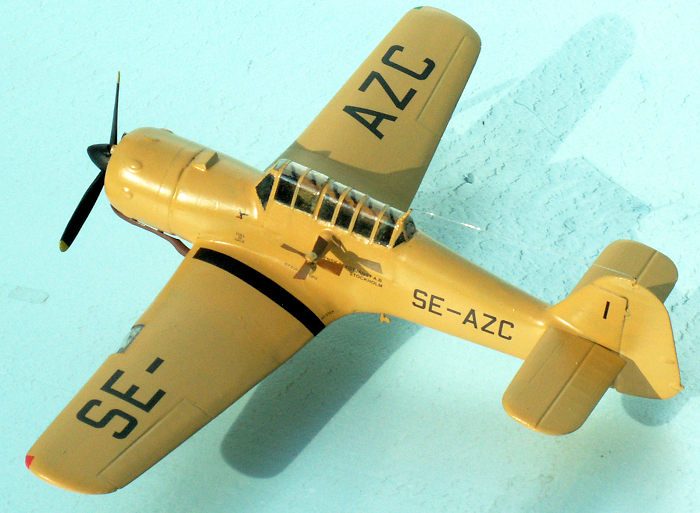 ing 2 mm
thinner. Both inner wings should of course have the same thickness! The trailing
edge of the entire wing is far too thick – no sharp edge at all. It is a major
job to sand the trailing edge of the wing until it is reasonably sharp!
ing 2 mm
thinner. Both inner wings should of course have the same thickness! The trailing
edge of the entire wing is far too thick – no sharp edge at all. It is a major
job to sand the trailing edge of the wing until it is reasonably sharp!
Step 13: I scratch built a new tail wheel fork of brass wire, and drilled a hole for the wheel shaft.
Step 14: The fuselage fits extremely bad with the wing. It is simply not possible to glue the wing in place, unless you have done a lot of sanding of both fuselage and wing. To make the Vacform canopy fit properly with the cockpit opening, is a major job. Fortunately, there is a clearly visible rim on the fuselage exactly where the canopy ends downwards. That means, no meticulous filling and sanding is necessary here. The aircraft looks that way.
Step 17: You must drill the holes for the undercarriage legs – they are not with the kit.
Step 18: The mill – resin part R 12 – was unusable: Too weak and the wrong shape. I scratch built a proper mill by cutting two double blades from the rim of a sheet of photo etched parts for ship models. Then I drilled a 0.8 mm hole just in the center of each double blade. Now the blades were easy to assemble on an 0.8 mm gauge shaft with super glue. When the blades were twisted a little, the mill rotated nicely when being blown. The mill was fixed to part R 11 and a small home made disc – like part 23.
| COLORS & MARKINGS |
 The
color scheme of a Swedish Martinet TT is yellow all over. The color may vary
somewhat, but anything between HB 24 Trainer Yellow and HB 7 Light buff,
including HB 154 Insignia Yellow is a good choice. My choice was HB 7 Light
Buff, because this color is gloss, and thus well suited for the decaling.
Undercarriage and wheel hubs are aluminum, Revell 99 Aqua aluminum. Tires,
walkways, spinner and propeller blades are matt black, and the propeller has
yellow tips. The very long exhaust pipes are Rust, Revell Aqua 83. The engine is
Gun Metal, HB 53 Acryl, the two protruding tubes in the top of the engine are
yellow. The mill is wood, HB 110 Natural Wood.
The
color scheme of a Swedish Martinet TT is yellow all over. The color may vary
somewhat, but anything between HB 24 Trainer Yellow and HB 7 Light buff,
including HB 154 Insignia Yellow is a good choice. My choice was HB 7 Light
Buff, because this color is gloss, and thus well suited for the decaling.
Undercarriage and wheel hubs are aluminum, Revell 99 Aqua aluminum. Tires,
walkways, spinner and propeller blades are matt black, and the propeller has
yellow tips. The very long exhaust pipes are Rust, Revell Aqua 83. The engine is
Gun Metal, HB 53 Acryl, the two protruding tubes in the top of the engine are
yellow. The mill is wood, HB 110 Natural Wood.
The decaling was rather simple: The civil registration letters in black SE-AZC on wings and fuselage. The logo of Svensk Flygtjänst AB beneath the canopy on either side of the fuselage and some stencils on the fuselage and wing roots. Finally, the entire model got a layer of HB Satin Cote to protect the decals and provide a nice finish.
| CONCLUSIONS |
The Pavla- Models 1/72 Miles Martinet TT is a rather poor short run kit, and not recommendable for beginners. I was rather pleased with my effort to make a reasonable Martinet TT from this hopeless kit. However, if you are a fan of target tugs, it is the only game in town in this scale, if you want an injection kit. If you prefer an expensive resin kit with white metal parts, Magna Models is offering just such a kit. It is a challenge to build a Martinet TT from the Pavla-Models kit. I found it worth to take the trouble to add a Swedish Martinet TT to my SAAB 17 TT, and my Firefly TT, all in the yellow colors of Svensk Flygtjänst AB.
| REFERENCES |
Wikipedia article:” Miles M 25 Martinet TT”
Björn Karlström’s drawing of this aircraft.
18 February 2020
Copyright ModelingMadness.com.
If you would like your product reviewed fairly and fairly quickly, please contact the editor or see other details in the Note to Contributors.
Back to the Main Page Back to the Review Index Page Back to the Previews Index Page