Revell 1/32 Lysander III
| KIT #: | 04710 |
| PRICE: | $25.00 when new |
| DECALS: | Three optionse |
| REVIEWER: | Spiros Pendedekas |
| NOTES: | Matchbox tooling |
| HISTORY |
In 1934, the Air Ministry issued
Specification A.39/34 for an army co-operation aircraft to replace the Hawker
Hector, inviting submissions from Hawker, Avro, Bristol and, later, Westland.
The Westland P.8 submission, was a design created by Arthur Davenport under
“Teddy” Petter, aiming to meet RAF needs for a tactical reconnaissance aircraft.
Petter consulted pilots to identify requirements, focusing on features like
field of view, low-speed handling and short takeoff and landing (STOL)
performance. The goal was effective photographic reconnaissance and artillery
observation up to 15,000 yards behind enemy lines.
 The type
would feature high wings, a Bristol Mercury engine and fixed conventional
landing gear on an inverted U tube. Its streamlined spats would have internal
springs for the wheels, fittings for removable stub wings capable of carrying
light bombs or supply canisters and could even each accommodate a Browning
machine gun.
The type
would feature high wings, a Bristol Mercury engine and fixed conventional
landing gear on an inverted U tube. Its streamlined spats would have internal
springs for the wheels, fittings for removable stub wings capable of carrying
light bombs or supply canisters and could even each accommodate a Browning
machine gun.
The wing design featured a reverse taper towards the root, resembling a bent
gull wing from some angles. It employed a girder-type construction with light
wood stringers for aerodynamic shaping. The forward fuselage consisted of a
duralumin tube, whereas the rear utilized welded stainless steel tubes.
Components were crafted from channel extrusions, with the wing being
fabric-covered and thickest at the strut anchorage, akin to later Stinson
Reliant models.
Contrary to its looks, the plane embodied advanced aerodynamic features,
including fully automatic wing slats and variable incidence tailplane, achieving
a stalling speed of a mere 56 knots. Its high-lift devices enabled exceptional
short takeoff and landing (STOL) performance, favored by Special Duties pilots
like Squadron Leader Hugh Verity. The automatic slats and flaps facilitated
slow-speed flight, leading Verity to describe the Lysander's landing as akin to
coming down "if not like a lift, at least like an escalator."
The Air Ministry selected the Westland aircraft over the other prototypes in
September 1936. Lysanders entered service in June 1938 for army co-operation,
initially for message-dropping and artillery spotting. By the war's outbreak,
Mk.Is were replaced by Mk.IIs, with older models sent to the Middle East.
After the German invasion of France on 10 May 1940, Lysanders served as spotters
and light bombers. Despite some victories over German aircraft, they were
vulnerable to the Luftwaffe even when escorted. Withdrawn during the Dunkirk
evacuation, they continued supply missions from England. By the fall of France
their unsuitability for coastal patrol and army cooperation had been largely
solidified, with army AOP pilots deeming them "too fast for artillery spotting,
too slow against fighters and ill-suited for landing on soft ground". However,
not all was lost, as their short-field capability allowed for clandestine
operations behind enemy lines, particularly in occupied France with the French
Resistance. A total of 1,786 Lysanders were built.
| THE KIT |
 This is the
1998 Revell reboxing of the classic 1978 Matchbox mold, being one of the
company’s then more advanced toolings. The kit was reboxed by Revell in 1998 and
repopped in 2003. The specific copy was bought some time in the mid-00s at a
very reasonable price from one of my beloved, sadly now closed toy/hobby shops
in my equally beloved hometown (Chalkis, Greece) and for a more in-depth look at
its contents you may read its preview,
found in the ever growing MM archives
This is the
1998 Revell reboxing of the classic 1978 Matchbox mold, being one of the
company’s then more advanced toolings. The kit was reboxed by Revell in 1998 and
repopped in 2003. The specific copy was bought some time in the mid-00s at a
very reasonable price from one of my beloved, sadly now closed toy/hobby shops
in my equally beloved hometown (Chalkis, Greece) and for a more in-depth look at
its contents you may read its preview,
found in the ever growing MM archives
| CONSTRUCTION |
I first assembled the interior, which
consists of a good 30 parts, with around 10 of them representing the distinctive
framing. Basic cockpit color was a home brewed green resembling Humbrol’s 78
Cockpit Green, the instrument panel, sidewall consoles and stick grip were
painted black and the rear gun and ammo magazines were painted gunmetal, I used
the nice decal for the instrument panel, while I dry brushed with silver the
side consoles and levers, adding few “pins” of red and yellow paint to simulate
some knobs.
Lysanders featured a prominent gunsight supported by four thin curved struts.
Since this was not provided by the kit, it was constructed using a leftover
transparency for the gunsight itself and stretched sprue for the supporting
struts.
The average cockpit detail would be grossly noticeable through the greenhouse
transparencies, especially at this scale, so I decided to add the good looking
pilot figures which featured separate arms The only issue was that they were
totally identical, so I decided to breathe some life to them by chopping off and
repositioning their heads and lower arms to more random, natural positions.
Their uniforms were painted Oxford Blue, their helmets, boots and gloves
“leather”, their goggles black with silver lenses, their seat belts “linen” and
their life jackets yellow.
 The
cockpit was next trapped between the fuselage halves and the spats were
assembled and attached in position. Normally, the wheels should have been
trapped between the spats’ halves, but I decided to add them at late stages by
removing a triangular part out of each wheel that would be invisible once
attached and slide them in. Many Lysanders featured distinctive stub wings
attached to the spats, to mount small bombs on, but many did not. Since I
preferred the latter looks, I omitted them and for the same reason I omitted the
equally distinctive retractable message hook.
The
cockpit was next trapped between the fuselage halves and the spats were
assembled and attached in position. Normally, the wheels should have been
trapped between the spats’ halves, but I decided to add them at late stages by
removing a triangular part out of each wheel that would be invisible once
attached and slide them in. Many Lysanders featured distinctive stub wings
attached to the spats, to mount small bombs on, but many did not. Since I
preferred the latter looks, I omitted them and for the same reason I omitted the
equally distinctive retractable message hook.
The simplified 3-piece engine was assembled and attached to the 4-piece cowling.
To add some interest, by consulting net available pics, I added the cowling
mounting struts from stretched sprue in front of the engine and the two oil
cooler inlet ducts from leftover plastic hollowed cotton bud stems. The engine
was painted black, then heavily dry brushed with silver, while the cowling
innards were painted the same as the cockpit’s interior green. The completed
assembly was finally attached to the fuselage.
Next subassemblies were the two main wings (4-piece each) which were not to be
attached but at late stages, to facilitate painting. The 2-piece rudder and the
4-piece tailplanes were then assembled and attached, with the elevators drooped
for more dynamic looks.
This concluded basic model assembly, which presented average to low complexity.
Overall fit varied from relatively good to at areas challenging (like fitting of
the cockpit between the fuselage halves) but nothing too bad that far, my main
concern being the upcoming fit of the wings and transparencies at late stages.
After a couple of filling and sanding rounds, I took the beast to the paint
shop!
| COLORS & MARKINGS |
 I
first painted all undersides Hu23 Duck Egg Blue, then masked it off and painted
the topside camo with Testors 2116 IJN Green and 2111 Italian Brown for the dark
green and dark earth respectively. For the demarcation lines I used strings of
Tak to create a tight yet not dead hard effect. My color choice is by all means
not claiming to be correct, more like having those bottles handy at that time. A
coat of Future prepared the bird for decaling.
I
first painted all undersides Hu23 Duck Egg Blue, then masked it off and painted
the topside camo with Testors 2116 IJN Green and 2111 Italian Brown for the dark
green and dark earth respectively. For the demarcation lines I used strings of
Tak to create a tight yet not dead hard effect. My color choice is by all means
not claiming to be correct, more like having those bottles handy at that time. A
coat of Future prepared the bird for decaling.
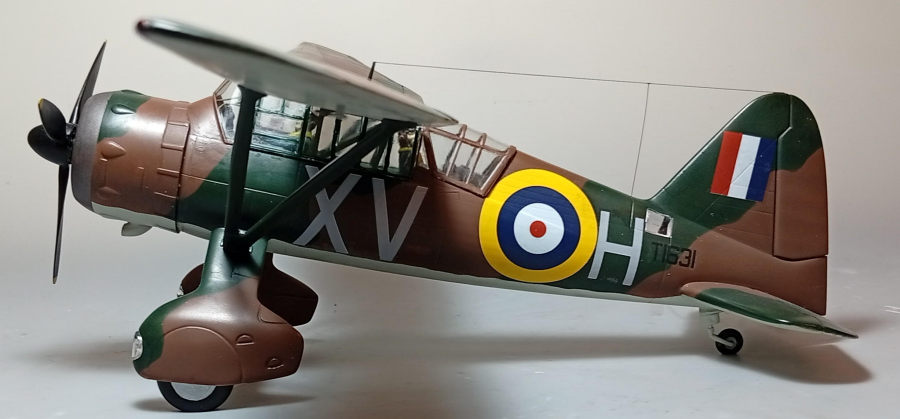
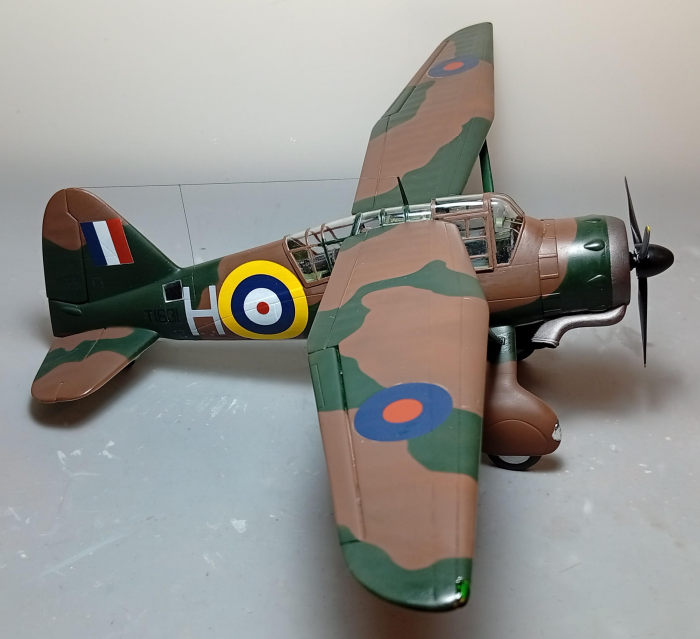
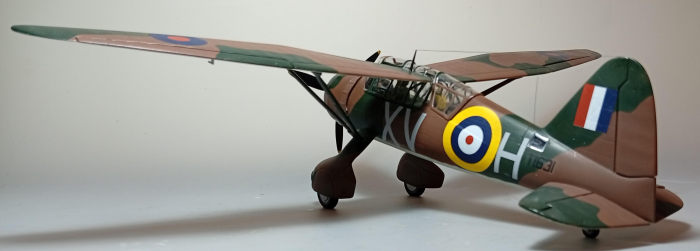
I used the kit decals, to represent No. 2(AC) Sqn. T1631/XV-H Mk.III machine, as
it stood in RAF Sawbridgeworth by 1941. To my pleasant surprise, the 25 year old
decals behaved nicely, not complaining even by the use of strong decal softener
in order to conform (especially those at the fuselage sides), with a coat of
Future sealing them.
| FINAL CONSTRUCTION |
The wings were inserted to their top
fuselage supporting framing, then secured in position by attaching their
supporting struts which were mounted onto the spats. This was the first of two
feared steps (the other being attaching the transparencies). What I did was to
first secure with glue the wings to the top framing, then glue the struts to the
spats and let the struts’ top attaching area rest on the wings undersides before
securing them with glue. Albeit there are locating holes at the wings’
undersides where the struts locating pins are supposed to fit, I did not use
them as guides, but I shaved off the pins and let the struts rest naturally, to
obtain correct wing alignment.
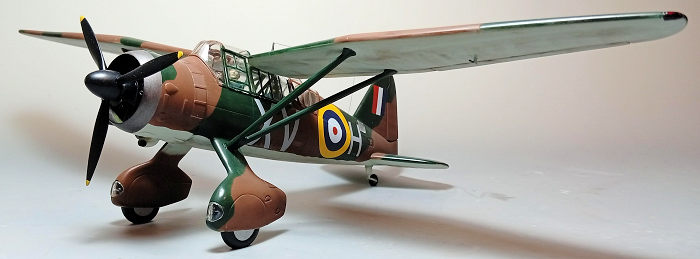
The wheels had a narrow triangular section (with the triangle’s top extending to
the wheel center) sawn off, so they could be inserted to the spats and glued in
position. They were tad filed to look weighted and painted silver with black
tires. The tail wheel was assembled and attached at this time as well,
accordingly painted.
 The prop was
assembled and press fitted in position. It was painted black with yellow tips
and had some silver dry brushing at its outer leading edges, to simulate light
wear. The 2-piece exhaust was assembled, had its opening properly hollowed,
painted Mr Hobby burned iron and attached in position, with the same shade used
to paint the cowling’s exhaust collector ring.
The prop was
assembled and press fitted in position. It was painted black with yellow tips
and had some silver dry brushing at its outer leading edges, to simulate light
wear. The 2-piece exhaust was assembled, had its opening properly hollowed,
painted Mr Hobby burned iron and attached in position, with the same shade used
to paint the cowling’s exhaust collector ring.
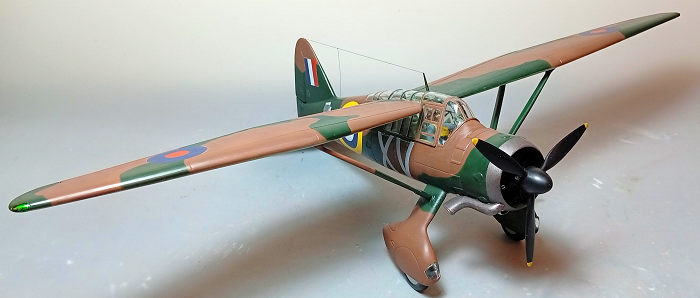
Time for some weathering, consisting of selective application of brown and black
dry pastels, to simulate dirt, grime, exhaust stains and so on, with a satin
towards matt coat giving the bird its final hue.
The transparencies had their well defined (but oversized for the scale) framing
hand painted and attached in position. They fitted reasonably, apart from the
big side ones that did not want to conform, as the cockpit framing interfered.
To make them conform, I had to shave off the outer sides of the cockpit framing
to become thinner, something that sounds easier than the hair raising process it
actually was, compromising the structural integrity of the almost completed
model. Not sure why this misfit happened, not excluding operator error. All
transparency gaps were treated with white glue.
The port located underwing pitot tube was attached, with its body painted
underside color and its tip gunmetal. The antenna mast was attached at an inward
camber angle and painted per the camo surrounding, while thin stretched sprue
was used to simulate the aerial wire. Blobs of red and green clear paint
replicated the wingtip lights, before calling the Lysander done!
| CONCLUSIONS |
As of 2026, this is still the only game in
town if you want a 1/32 Lysander. For a 1978 mold, this is not a bad kit and one
of Matchbox better offerings: general shape looks correct, molding is relatively
crisp with little flash, panel lines are mostly engraved (though tad deep),
detail is generally on an acceptable level (but the cockpit and engine are on
the sparse side), transparencies are well molded (but their frames are
oversized), decals are nicely done and instructions are superb.
 Out of the
box, an attractive and impressively sized Lysander will emerge, while with some
super detailing at a few key areas a really awesome example will result (but
please note that from some research, apart from decals and masks, not a lot of
aftermarket stuff seems to exist, so you will have to improvise).
Out of the
box, an attractive and impressively sized Lysander will emerge, while with some
super detailing at a few key areas a really awesome example will result (but
please note that from some research, apart from decals and masks, not a lot of
aftermarket stuff seems to exist, so you will have to improvise).
While the build itself looked simple and straightforward (and, for the most
part, it was), I did experience some difficulties in attaching the wings and,
especially, in fitting the side transparencies. Maybe that’s the reason
(together, possibly, with the lack of detail), that we don't see too many of
them built and consequently why Revell has never reissued the kit since 2003.
It is not a very easy kit to find and if you do, a high “collector’s” price tag
is expected. If you have or get one, go on and build it, only bearing in mind
that you should allocate a voluminous shelf space, as the finished model is big!
Happy Modeling!
Spiros Pendedekas
20 February 2026
Copyright ModelingMadness.com. All rights reserved. No reproduction in part or in whole without express permission from the editor.
If you would like your product reviewed fairly and fairly quickly, please contact the editor or see other details in the Note to Contributors.