
Airfix 1/48 Walrus Mk.I
| KIT #: | A09183 |
| PRICE: | $43.00 |
| DECALS: | Two options |
| REVIEWER: | Andrew Garcia |
| NOTES: | Enhanced with Vector VDS 48-118 Walrus Engine and Eduard Etch & Brassin |
| HISTORY |
Designed by the same creator of the Spitfire, the Supermarine Walrus (originally known as the Supermarine Seagull V) was a British single-engine amphibious biplane reconnaissance aircraft designed by R. J. Mitchell and first flown in 1933. Designed for use as a fleet spotter to be catapult launched from cruisers or battleships, the Walrus was later employed in other roles, notably as a rescue aircraft for aircrew in the sea. The Walrus continued in service throughout the Second World War, with the Fleet Air Arm (FAA), Royal Air Force (RAF), Royal Australian Air Force (RAAF), Royal New Zealand Navy (RNZN) and Royal New Zealand Air Force (RNZAF). It was the first British squadron-service aircraft to incorporate in one airframe a fully retractable main undercarriage, completely enclosed crew accommodation and all-metal fuselage. This explanation was adapted from Wikipedia and there’s much more to know about this aircraft so I suggest you see the Walrus page in Wikipedia for more information.
| THE KIT |
 The Airfix
Walrus kit is molded in light gray and clear styrene with approximately 156
parts, decals are nicely printed with some nice stencils. It is a 2017 kit
release and benefits from new 3D CAD and EADS Laser measuring systems to capture
accurate complex shapes and fine details providing the basis for a beautiful new
mold release. A recent Airfix Walrus 2019 release, the Airfix A09187 Walrus Mk I
Silver Wings, is essentially the same kit with overall silver dope color
schemes. Previously Classic Airframes (CA) and Special Hobby (SH) kits were the
best in class kits for 1/48th scale Walrus builders. The CA & SH kits have very
informative building instructions, some nice details in etch metal & resin and a
decent Walrus can be had from those sources as well. The Airfix kit is newer,
has finer details and is easier to build. For most of us it replaces the CA & SH
kits as best-in-class.
The Airfix
Walrus kit is molded in light gray and clear styrene with approximately 156
parts, decals are nicely printed with some nice stencils. It is a 2017 kit
release and benefits from new 3D CAD and EADS Laser measuring systems to capture
accurate complex shapes and fine details providing the basis for a beautiful new
mold release. A recent Airfix Walrus 2019 release, the Airfix A09187 Walrus Mk I
Silver Wings, is essentially the same kit with overall silver dope color
schemes. Previously Classic Airframes (CA) and Special Hobby (SH) kits were the
best in class kits for 1/48th scale Walrus builders. The CA & SH kits have very
informative building instructions, some nice details in etch metal & resin and a
decent Walrus can be had from those sources as well. The Airfix kit is newer,
has finer details and is easier to build. For most of us it replaces the CA & SH
kits as best-in-class.
| CONSTRUCTION |
A clear and well-drawn kit assembly booklet is provided. I followed the kit assembly instructions. I recommend in steps 3, 15 and 16 you use the main fuselage half A01 or A02 as a guide to get the correct alignment of the bulkhead parts D35 and D32 before committing these parts to glue and if possible taking great care during assembly not to glue the fuselage half in place at the wrong time before all the hull portion components are added.
Unlike a newer Tamiya kit where the assembly parts
design and engineering anticipates modeler mistakes by creating parts that avoid
alignment problems Airfix assumes you are careful and closely read the
instructions or understand the visual cues in the assembly diagram. As is the
case with the new tool Tamiya Spitfire I or Bf 109G-6 kits incorporating into
their component design clever shapes to avoid assembly problems, Airfix does not
add in fail-safe alignment parts for the most part. Airfix does inform you of
the alignment issue in its diagram but you might not realize the importance of
the suggestion until later when the fuselage parts wi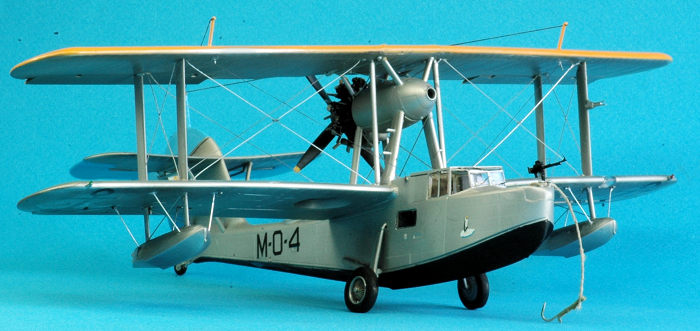 ll
not correctly close because of a slightly misaligned bulkhead such as parts D35
and D32. The Airfix kit is a precision design and there isn’t any wiggle room
for misaligned parts so be forewarned – the fuselage won’t close if parts D35
and D32 are not at the correct angle to fit into the “female” side on the
fuselage half.
ll
not correctly close because of a slightly misaligned bulkhead such as parts D35
and D32. The Airfix kit is a precision design and there isn’t any wiggle room
for misaligned parts so be forewarned – the fuselage won’t close if parts D35
and D32 are not at the correct angle to fit into the “female” side on the
fuselage half.
There are a number of build options you should decide upon before construction. Do you want extended or folded wings? Does your airframe represent the ASW, Spotter or SAR Walrus versions? Are you using the correct decal for the choices you made in building the airframe? You should be aware and make a decision before starting the build on how much detailing and where you want to do enhancements using aftermarket on the inside of the Airfix Walrus kit. Airfix did a commendable job fully detailing in plastic most of the interior. I commend them for the excellent work on this kit interior. However, unless you are using a medical device that can be manipulated to assist viewing once it enters the fuselage you can’t see much of the interior detail from outside once the fuselage halves are closed. Most of the visible areas are inside the pilot’s cockpit glazing area, around the two machine gunner openings and some spaces around the two side port & starboard windows. I did realize this but wanted to use all the Eduard etched metal interior components. You may not want to spend much time on interior details when they can’t be seen after the fuselage halves are closed together. I went through the three step process to create the wood grained table tops inside the fuselage, kit part D30 and even added lap belts to the seats in that area. It looked great before I closed up the fuselage.
Following the kit assembly instructions resulted in a fast and easy build. The rigging step consumed the most time but there is a large rigging diagram provided with the kit. During steps 29, 30 and 31, I added some string to simulate the anchor rope and wound it on the spool, part D22.
| COLORS & MARKINGS |
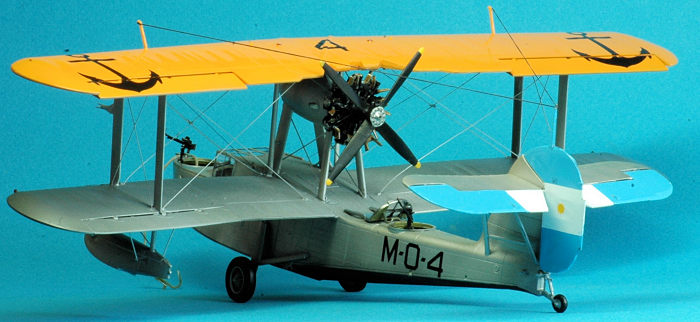
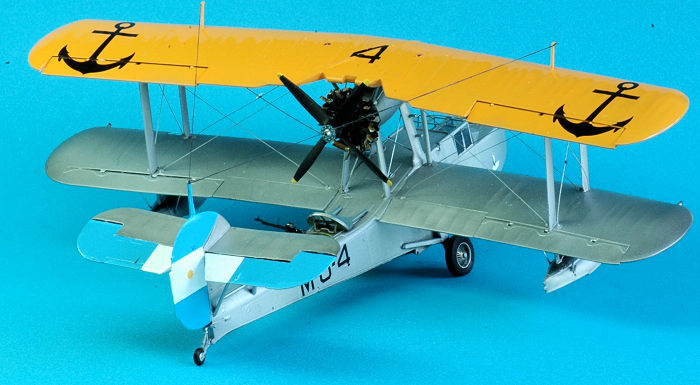
I wanted to model an overall aluminum dope airframe of the Argentinian Navy (Armada Argentina) from the late 1940’s which was also used in a polar exploration. Two Walrus airframes were acquired pre-WWII and photos exist of them carried onboard the Argentine Navy Cruiser “La Argentina” during a visit to San Francisco in 1940. The post WWII color scheme used a flat black fuselage bottom.
 In my decal
inventory I found the Classic Airframes CA48-006 and Xtradecal X48178 decals.
Both had this Argentinian Navy color scheme and were printed by Microscale so I
was confident of good results. I chose the Classic Airframes CA48-006 release
because it had the horizontal stabilizer and vertical rudder paint sections
printed on the decal sheet ready to be applied saving me from some masking and
painting. The CA decal was sized for the CA/SH kit and this area differs in size
compared to the Airfix kit. Not a big problem and it was a big help having the
correct section measurements to start with. Using the decal required some paint
touch up for areas not covered by the decal. I used Tamiya X-14 Sky Blue and
XF-2 Flat White in a mix to match the decal colors to complete the painting of
blue and white sections on the tail area. The Blue area per the Xtradecal X48178
decal instructions is called FS35190 “Celeste”. The top of the wing is called
out as Chrome Yellow FS 13538 per the CA decal instructions and “Orange” per
Xtradecal X48178. I used Gunze Aqueous H24 Orange Yellow for the top of the
upper wing.
In my decal
inventory I found the Classic Airframes CA48-006 and Xtradecal X48178 decals.
Both had this Argentinian Navy color scheme and were printed by Microscale so I
was confident of good results. I chose the Classic Airframes CA48-006 release
because it had the horizontal stabilizer and vertical rudder paint sections
printed on the decal sheet ready to be applied saving me from some masking and
painting. The CA decal was sized for the CA/SH kit and this area differs in size
compared to the Airfix kit. Not a big problem and it was a big help having the
correct section measurements to start with. Using the decal required some paint
touch up for areas not covered by the decal. I used Tamiya X-14 Sky Blue and
XF-2 Flat White in a mix to match the decal colors to complete the painting of
blue and white sections on the tail area. The Blue area per the Xtradecal X48178
decal instructions is called FS35190 “Celeste”. The top of the wing is called
out as Chrome Yellow FS 13538 per the CA decal instructions and “Orange” per
Xtradecal X48178. I used Gunze Aqueous H24 Orange Yellow for the top of the
upper wing.
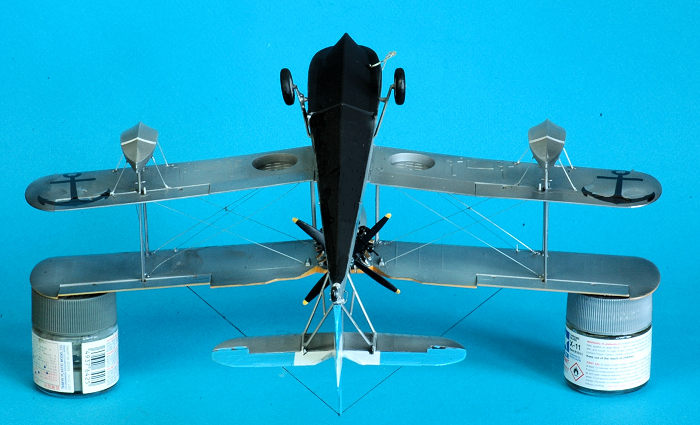
The overall airframe was aluminum dope or a silver dope color. The shade I wanted was obtained by using mixtures of Alclad ALC-119 Airframe Aluminum, ALC-116 Semi-Matt Aluminum with some areas highlighted obtained by light sprays of ALC-107 Chrome and ALC-105 Polished Aluminum to add some shading and dimension to the drab metal color. I used the Alclad black lacquer primer before the metallic colors were applied.
| FINAL CONSTRUCTION |
 I added
a number of enhancements to the Airfix kit. Most were aftermarket and a few were
scratch built additions. There are some very nice aftermarket products for the
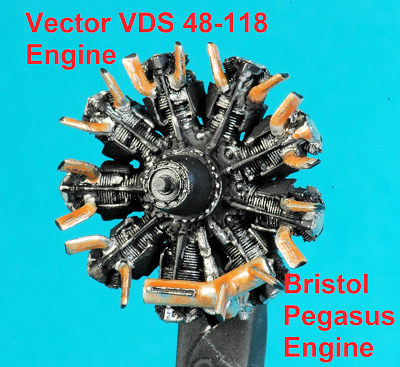
Airfix Walrus. I added the Vector VDS 48-118 Engine (Bristol Pegasus Engine)
which is a model unto itself. Vector has created a masterpiece resin casting in
their product. Once assembled, using close up photography, I was amazed at the
fine detailing of the engine from barely visible coil springs on the valve
rocker arms to exquisite fins and detailing on the cylinder castings. Since the
Walrus engine is quite visible and prominent this is a great choice when looking
for improved details. The kit engine is acceptable and with dry brushing will
provide a nice modeling experience. If you want more, the Vector resin engine is
the way to go. There is a mismatch in diameter of the Vector engine shaft with
the Airfix kit propeller. You will have to modify the kit prop part in order to
interface it with the Vector resin engine. I opted to glue Airfix part D11, the
kit plastic prop shaft into the Airfix prop part D17. Once dry and hardened I
drilled a 1.2mm hole into the prop and was able to mate the Vector engine shaft
to the Airfix styrene prop.
I added
a number of enhancements to the Airfix kit. Most were aftermarket and a few were
scratch built additions. There are some very nice aftermarket products for the
Airfix Walrus. I added the Vector VDS 48-118 Engine (Bristol Pegasus Engine)
which is a model unto itself. Vector has created a masterpiece resin casting in
their product. Once assembled, using close up photography, I was amazed at the
fine detailing of the engine from barely visible coil springs on the valve
rocker arms to exquisite fins and detailing on the cylinder castings. Since the
Walrus engine is quite visible and prominent this is a great choice when looking
for improved details. The kit engine is acceptable and with dry brushing will
provide a nice modeling experience. If you want more, the Vector resin engine is
the way to go. There is a mismatch in diameter of the Vector engine shaft with
the Airfix kit propeller. You will have to modify the kit prop part in order to
interface it with the Vector resin engine. I opted to glue Airfix part D11, the
kit plastic prop shaft into the Airfix prop part D17. Once dry and hardened I
drilled a 1.2mm hole into the prop and was able to mate the Vector engine shaft
to the Airfix styrene prop.
From Eduard I added the Brassin 648 205 Lewis Mark
III resin machine guns, Eduard Brassin 648343 Walrus Mk.I Wheels, # 48929 Eduard
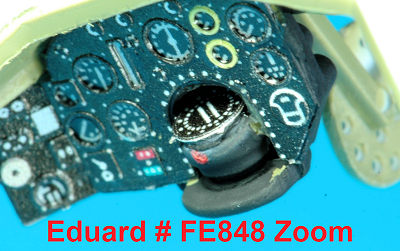
PE Walrus Mk.I Exterior Detail Set, and # FE848 Eduard Color Zoom PE Walrus Mk.I.
I did not use the EX557 Eduard Mask Walrus Mk.I because they were unavailable
when I acquired the additional aftermarket items I wanted to use for the
 project.
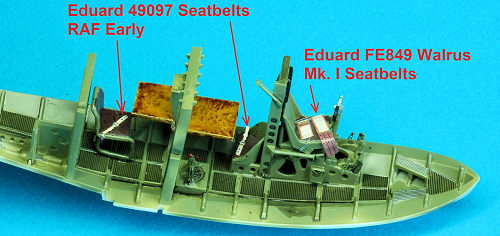
I also used the EDUFE849 Eduard Color Zoom PE Walrus Mk.I Seatbelts because they
were beautifully painted and captured to look of a Walrus restraint system.
However, after using them I have serious concerns about the Eduard FE849 Colour
Zoom PE seatbelts since they appeared to be seriously over-sized as if they were
intended for a 1/32nd or 1/24th scale Walrus. After looking at some walk-around
detail photos I am not sure what happened with Eduard’s effort this time because
the etched belts were too large. The EX557 masks are highly recommended because
this kit has a greenhouse cockpit glazing with many panels. You can make your
own masks using your favorite medium but it is easier for sure to use the tried
and true Eduard masks.
project.
I also used the EDUFE849 Eduard Color Zoom PE Walrus Mk.I Seatbelts because they
were beautifully painted and captured to look of a Walrus restraint system.
However, after using them I have serious concerns about the Eduard FE849 Colour
Zoom PE seatbelts since they appeared to be seriously over-sized as if they were
intended for a 1/32nd or 1/24th scale Walrus. After looking at some walk-around
detail photos I am not sure what happened with Eduard’s effort this time because
the etched belts were too large. The EX557 masks are highly recommended because
this kit has a greenhouse cockpit glazing with many panels. You can make your
own masks using your favorite medium but it is easier for sure to use the tried
and true Eduard masks.
I learned something during this build that I
overlooked in my initial reference photo review. The unique navigation wing
lights used by the Walrus are different than most other airframes. The lights
have a partial cover – essentially a directional shade. I added the Quickboost
resin navigation lights to the wing edges and an MV Products Light Lens LS20,
0.086 inches (2.2mm) size, for the lower wing edge internal landing light. The
Quickboost QB48846 resin navigation lights have the correct shape incorporating
the half-shell cover over the transparent light portions designed to shield the
pilot from any light exposure during nocturnal flying while still providing the
safety lights for other aircraft safety and visibility purposes. Most built
Walrus models appear to have painted their two wing edge navigation light
extensions as if it is similar to most other airframes, that is as a simple
round transparency when it is not.
 Quickboost
provided a value add with their product incorporating the extended shade to the
resin base along with red and green lamp transparencies.
Quickboost
provided a value add with their product incorporating the extended shade to the
resin base along with red and green lamp transparencies.
I was really impressed with the Eduard Brassin 648343 Walrus Mk.I Wheels. It is a lot of value for the price. You can assemble it in the usual covered wheel version or select the exposed wire wheel. It features excellent quality and the end result, when you use the wire wheel versions as I did, is something you cannot do with injection molded styrene plastic. The product provides a resin guide to shape the wire spokes of the wheels, a resin rim with air valve too, and it includes a paint mask. The fit was perfect. It was not a disappointment in any way and a very pleasant surprise how nicely it turned out. My only concern with this addition was the resin wheel opening for the axel was not sized correctly to fit the kit plastic axel. The kit parts E24 & E25 plastic axel was roughly 2.07mm with a tapered shape and the resin hole in the wheel was about 1.67mm to 1.9mm depending on how and where you measure it. It’s a small difference but in scale models it can cause alignment problems.
Yes, the cost of added resin and etched metal products was greater than the sum of the kit purchase price. You can build a nice Airfix Walrus kit OOB, but I thought the aftermarket products for the most part gave me the modeling experience that I was looking for and gave me the finished kit that I am very pleased with.
I added the rigging wires using Dai-Riki fishing line (Size 3X / .008 7.25lb test) for the wing bracing wires and used nickel-steel wire for the engine nacelle and underwing floats area. There is a new product, Aims AIMPE48009 1:48 Supermarine Walrus Mk.I/Mk.II bracing wires, that’s designed to be used with Airfix kit that provides etch metal pre-measured segments for rigging that would be worth considering since the Walrus has additional rigging which includes the engine nacelle. It, the Aims AIMPE48009 product, was not available at the time of my build but it could be very helpful so take a look at it.
 My
scratch-built additions were made by using scrap etched metal fret parts and
fine wire to create the wind screen wiper blades and enhanced the pitot into the
correct two probe configuration using very thin guitar wire. Airfix provides a
single probe pitot on the wing strut which is not correct. It is in the correct
location and the size looks okay but it should be modified for accuracy. I used
some fine guitar wire to form the two-pronged pitot modifying the kit plastic
part.
My
scratch-built additions were made by using scrap etched metal fret parts and
fine wire to create the wind screen wiper blades and enhanced the pitot into the
correct two probe configuration using very thin guitar wire. Airfix provides a
single probe pitot on the wing strut which is not correct. It is in the correct
location and the size looks okay but it should be modified for accuracy. I used
some fine guitar wire to form the two-pronged pitot modifying the kit plastic
part.
I added E-Z-Line antenna wires to the main wing-top antenna masts in the “V” configuration connecting them to the tail post and also used a finer sized E-Z-Line Lycra thread for the radio antenna wire leading into the cockpit. There are two small raised areas on the side of the fuselage behind the pilot compartment on both sides of the airframe. They represent the brown or white colored glass or Bakelite resisters where the radio wire leads terminate when entering the fuselage. Airfix did a nice job providing them and they were an opportunity for an easy enhancement by painting the resistors and attaching the antenna lead wires to those spots.
I don’t have an answer for this question but why did Airfix not supply the large antenna mast on the rear tail? It appears in the last page of the assembly instructions diagram but was not found before that appearance. Was it an oversight or omission? Most photos and aftermarket decal sheets show the Walrus with a prominent tail antenna post. The attachment of a large V-shaped antenna from the two wing posts to the tail seems to be a signature look for the Walrus. I read the Airfix instructions a few times looking for the step and part number for the antenna mast but at this time I couldn’t find it. So, I added the mast to the top of the vertical tail using a piece of resin taken from the Eduard Brassin 648343 Walrus Mk.I Wheels. The small exposed tail wheel has a support frame that is cut away and disposed. Its size, thickness and shape made for a perfect mast so I used it for that purpose making the resin wheel set and even more valuable addition to the build. I’ll include it here in the scratch built additions section of construction since it was a needed addition.
The Eduard Brassin 648 205 Lewis Mark III resin machine guns required a gun mount on the Walrus. There are two of them, one in the nose and one behind the engine area. I used the kit plastic guns, parts E31 and E32 to get a rough cut gun mount by removing the area below the kits plastic guns. They were shaped to fit the circular openings so it was a good starting place. I enhanced the plastic gun mounts with some etch metal pieces to support the Eduard resin guns and am happy with how they look. The Eduard resin Lewis guns are superlative providing tiny etched metal post and bead gunsights and a resin bullet recharging handle for fine detailing.
| CONCLUSIONS |
 The Airfix
kit was a very nice kit to build. I enjoyed it and now have a very unique
subject in my home display. It was a pleasure to build and you can get some
additional satisfaction if you add some of the many aftermarket parts and decals
that are available for this kit. Overall fit and quality of product is generally
superb except potentially for the fuselage join and wing addition steps where
some fit and gap problems can surface. Several reviews I read before starting my
build indicated concerns with fit problems. Yes, I did have some kit assembly
problems with the fuselage initially not closing together and the wings not
quite fitting up to the fuselage sides when they were added. But, I overcame
those obstacles and used a small amount of styrene sheet to fill in gaps. Once
dry and filed smooth it looked acceptable and I moved on with the build. Those
fit issues I felt were caused by my own improvidence during assembly rather than
a poor quality of product concern.
The Airfix
kit was a very nice kit to build. I enjoyed it and now have a very unique
subject in my home display. It was a pleasure to build and you can get some
additional satisfaction if you add some of the many aftermarket parts and decals
that are available for this kit. Overall fit and quality of product is generally
superb except potentially for the fuselage join and wing addition steps where
some fit and gap problems can surface. Several reviews I read before starting my
build indicated concerns with fit problems. Yes, I did have some kit assembly
problems with the fuselage initially not closing together and the wings not
quite fitting up to the fuselage sides when they were added. But, I overcame
those obstacles and used a small amount of styrene sheet to fill in gaps. Once
dry and filed smooth it looked acceptable and I moved on with the build. Those
fit issues I felt were caused by my own improvidence during assembly rather than
a poor quality of product concern.
Take some time to look on the internet for walk around photos. You can benefit from the many walk around photos on the web of existing museum airframes and add many details to your build. It makes it easier to visualize how things go together as well. The kit has many options with straight or folded wings choices, open or closed canopy, single or dual mount defensive guns for the rear crewman, underwing ordnance for an ASW anti-submarine warfare version or ASR search and rescue version, or ship reconnaissance and observation platform as the one I chose to model so there’s a lot to like about it. Airfix’s Walrus did not disappoint me in any way. This kit definitely sets the standard for 1/48th scale Walrus Mk. I kits and is highly recommended.
| REFERENCES |
Mushroom Models Publications Yellow Series No 6113 Supermarine Walrus & Stranraer
Warpaint Books # 039 - Supermarine Walrus
Seawings.org.uk on the internet
2 July 2019
Copyright ModelingMadness.com. All rights reserved. No reproduction in any form without express permission from the editor.
If you would like your product reviewed fairly and fairly quickly, please contact the editor or see other details in the Note to Contributors.
Back to the Main Page Back to the Review Index Page Back to the Previews Index Page 2026