Flashback 1/48 Miles Magister
| KIT #: | KLH8924 |
| PRICE: | $19.00 on discount |
| DECALS: | Three options |
| REVIEWER: | Christopher Campbell |
| NOTES: | Nice kit and a fairly simple build |
| HISTORY |
First flying in 1937, the Miles Magister was derived from the earlier Miles Hawk trainer of 1935. It was a low wing, two place monoplane trainer powered by a four-cylinder 130 horsepower de Havilland Gypsy Major engine. Largely built of spruce with fabric skinning, the aircraft in a time when all metal aircraft were rapidly becoming the rule.
 However, this little, low
wing cantilever monoplane with its fixed, spatted landing gear impressed the
powers that be in the Air Ministry. It was the first R.A.F. trainer to be fitted
with flaps. It exhibited exceptional handling and performance for what it was.
It was fitted with a two-place open cockpit, the aft fitted with a hood that
could be lowered for instrument training.
However, this little, low
wing cantilever monoplane with its fixed, spatted landing gear impressed the
powers that be in the Air Ministry. It was the first R.A.F. trainer to be fitted
with flaps. It exhibited exceptional handling and performance for what it was.
It was fitted with a two-place open cockpit, the aft fitted with a hood that
could be lowered for instrument training.
It was selected to fill the R.A.F. specification for a new trainer and went into production immediately. More than 1200 would be produced and would see service with numerous air forces. Operators would include Australia, Belgium, Canada, Egypt, Estonia, Great Britain, Ireland, Latvia, Malaya, New Zealand, Portugal, South Africa, Thailand, and Turkey. A few are still flying today, and a number are preserved in museums.
It was a simple, basic, and rugged little aircraft that did its job of training pilots and acclimating them to modern monoplanes quite well. It was also a clean, simple design with attractive lines that still look sleek and modern in a way. Like many designs, its beauty is in its simplicity and purity of purpose.
| THE KIT |
 Released by Flashback in
2001, this kit flew under my radar initially. Then I happened upon a listing
online and had to have one; two really. It is something of a short run kit,
though well molded in grey plastic with some photo etch. Decals are included for
Two R.A.F. aircraft, one from a Czech Squadron, and one Royal Egyptian Air Force
aircraft. These are well printed, and the Egyptian markings used performed well.
Released by Flashback in
2001, this kit flew under my radar initially. Then I happened upon a listing
online and had to have one; two really. It is something of a short run kit,
though well molded in grey plastic with some photo etch. Decals are included for
Two R.A.F. aircraft, one from a Czech Squadron, and one Royal Egyptian Air Force
aircraft. These are well printed, and the Egyptian markings used performed well.
It is much better molded and with better fit than many short or limited run kits of this era, or even today. Still, as with any limited production article, test fitting is the rule of the day here. If that rule is followed, assembly is fairly simple and straight forward.
| CONSTRUCTION |
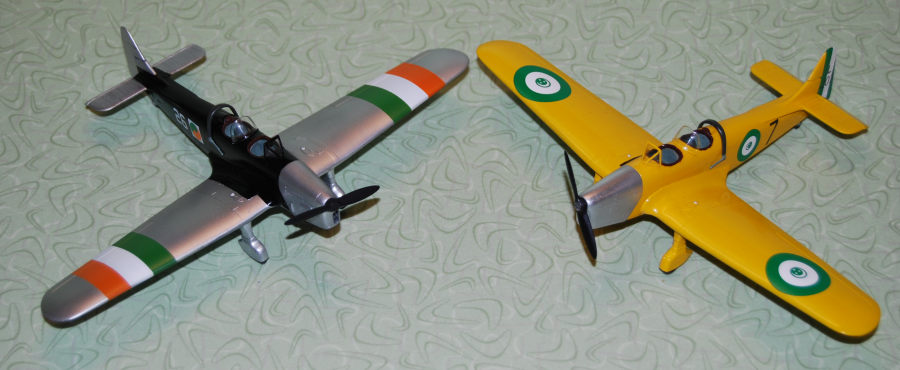
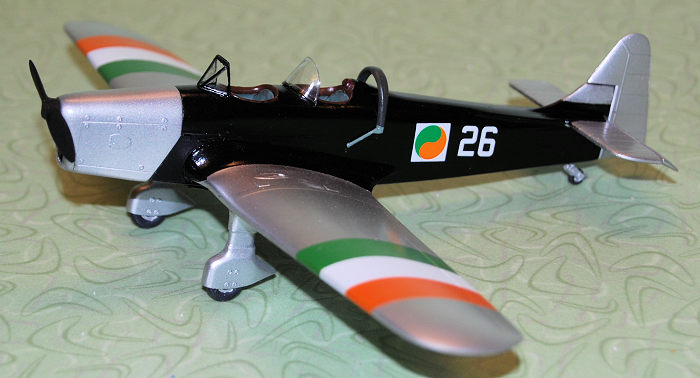
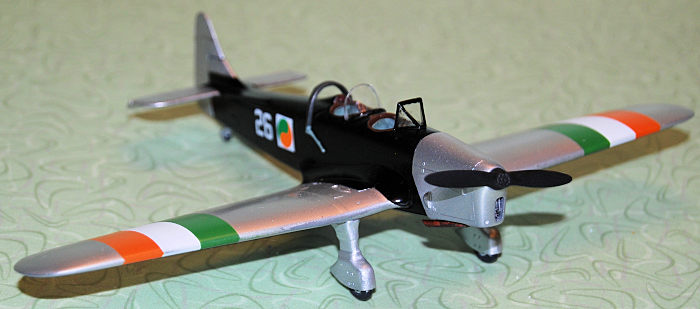
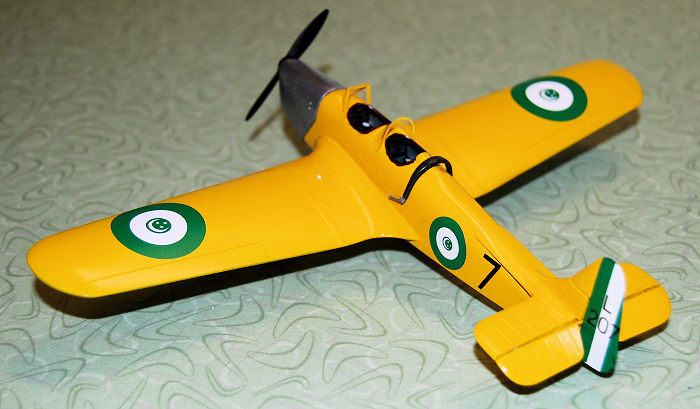
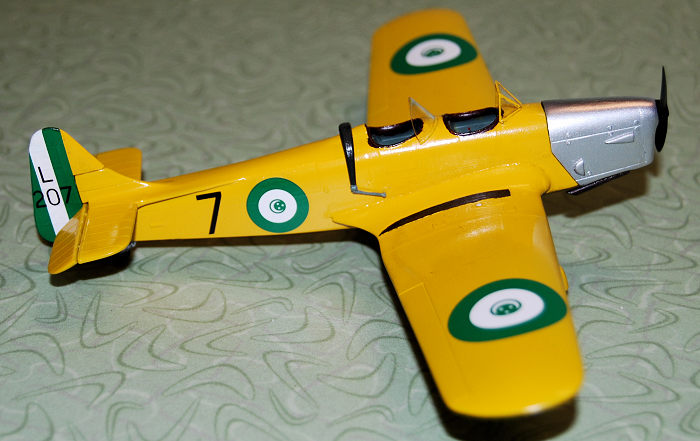
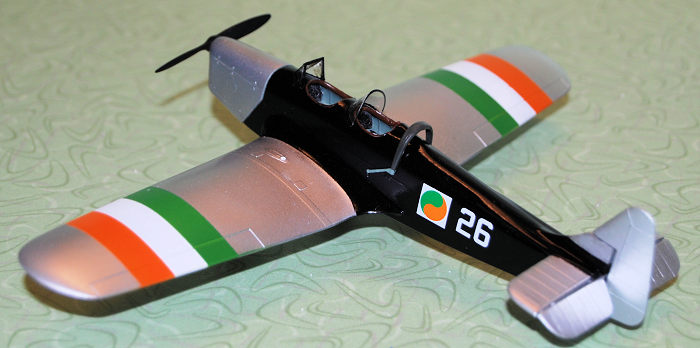
From the onset, I had decided that I would build both kits concurrently. One would wear the Egyptian markings, as I have always found these to be some of the most attractive roundels ever worn by any aircraft. I also had quite an urge to build an Irish Air Corps aircraft, having recently come by a set of 1/48 decals featuring markings for such a machine. Thus, I set about the build.
The first order of business was to spray the interior parts with Model Master R.A.F. Interior green. Light dry brushing of various components and surfaces was done with Testors Silver. The instrument panel is a combined injection molded, acetate, and photo-etch affair that produces a very nice effect when assembled. It is quite simple, though so is the real thing, in this case.
 Most of the photo etch will
be used in the cockpit and it was simple enough to apply. The only place that I
was disappointed in was the compass. To my eyes, I never got it to look quite
right. It is not all that bad, though I think that I would have preferred some
injection molded or resin bit for this.
Most of the photo etch will
be used in the cockpit and it was simple enough to apply. The only place that I
was disappointed in was the compass. To my eyes, I never got it to look quite
right. It is not all that bad, though I think that I would have preferred some
injection molded or resin bit for this.
Once the seats and other cockpit components were assembled the photo etch seatbelts were painted in Tamiya Wooden Deck Tan with the metal furniture highlighted in Testors Steel. Once dry, these were glued in place, and everything was given some general weathering by drybrushing and a light oil wash.
Having had some less than pleasant experiences with short run kits not wanting to fit together when I attempted to join the fuselage halves, I was wary of this here. However, to my pleasant surprise, everything fit together fairly well, with a minimum of trimming. Almost all that was needed was accomplished by some scraping with an X-Acto blade. There are no locator pins, though this did not cause any problems with the alignment during the build.
The fuselage halves were joined using Tenax and set aside while I worked on the wings and landing gear. The wings fit together perfectly, also using Tenax cement. The wheels were painted in Tamiya Rubber Black and the hubs in Testors Steel. The interior of the landing gear pants was painted in Testors Aluminum. Once all was dry, the gear was assembled using CA glue.
There was some sanding needed on the landing gear assemblies, mainly done with 400 grit paper followed by 0000 Steel wool. Once assembled and sanded they were glued in place with CA glue. This is the only place that I ran into an alignment issue. On one of the models, the placement of one of the landing gear is slightly off, doubtless owing at least in part to the lack of definitive placement points. Unfortunately, I did not catch it at the time and did not actually spot it until months later. In this case, it was on the Irish aircraft botching up an otherwise very nice build. In any case, this is something to be cautious of when building this kit.
 The
wings were cleaned up by some simple sanding. Then they were glued to the
fuselage. There are no slots and tabs or positive alignment. This is a
butt-join, again, though the positions are very clearly defined blank
outlines on the fuselage. This again was done with Tenax cement. There was some
minor filling and sanding needed to clean up the join, though nothing
significant.
The
wings were cleaned up by some simple sanding. Then they were glued to the
fuselage. There are no slots and tabs or positive alignment. This is a
butt-join, again, though the positions are very clearly defined blank
outlines on the fuselage. This again was done with Tenax cement. There was some
minor filling and sanding needed to clean up the join, though nothing
significant.
The horizontal stabilizers went on the same fashion. Take care here, as there is not a lot of mating area and it would be easy to get them misaligned. Mine went on without trouble and cleaned up with just a little sanding.
The cowl halves were now assembled without issue. While the cement was setting, the engine face was painted with Testors Steel and given an oil wash. While this was drying the propellers were cleaned up and painted in Testors flat black. The hubs were painted with Model Master Dark Anodonic Grey, which I recently found that I still had another bottle of.
Once the engine face was dry, it was glued inside the cowl face, and this was attached to the cowls with CA glue. A bit of sanding was required here, followed by polishing with a dryer sheet to remove scratches. The plastic in this kit is quite soft and can easily be scratched deeply. Take extra care in any areas that will wear a natural metal finish. With this done, it was time to paint.
| COLORS & MARKINGS |
I had a bottle of Model Master British Trainer Yellow, though this had dried enough to be useless. For the Egyptian aircraft, I mixed the color per some suggestions found on the internet, using Tamiya Gloss Yellow and a few drops of Tamiya Flat Red. This did seem to recreate the color to my liking.
All of the openings in both aircraft were sealed off with bits of damp paper towels, and the tires were masked off with Tamiya tape. I began with the Egyptian aircraft since it would wear the simplest paint scheme. It was given two coats of my roll your own R.A.F. Trainer Yellow, along with the rudder and elevators. Satisfied with the results, it was set aside while I went to work on the Irish aircraft.
Back when I built a 1/32 Revell Hawker Hurricane in Irish markings I had mixed up my own colors of orange and green for the underwing stripes. However, I could not begin to tell you what is in them today, other than there was orange and green involved and it was based on either Testors or Model Master. The paint is still good, however, and it was used to paint the stripes on the Irish bird.
 I
started by painting the white center stripe using Testors Gloss White. This was
masked off when dry and the outer stripes painted and masked accordingly. The
fuselage was then painted in Tamiya Gloss Black. While this was drying, the
cowls were then sprayed in Testors Aluminum after a small bit of damp paper
towel had been stuffed into the opening at the front to shield the engine face
from overspray. Once the black had dried for several hours, this too was masked
off, and the rest of the aircraft was shot in Testors Aluminum as well.
I
started by painting the white center stripe using Testors Gloss White. This was
masked off when dry and the outer stripes painted and masked accordingly. The
fuselage was then painted in Tamiya Gloss Black. While this was drying, the
cowls were then sprayed in Testors Aluminum after a small bit of damp paper
towel had been stuffed into the opening at the front to shield the engine face
from overspray. Once the black had dried for several hours, this too was masked
off, and the rest of the aircraft was shot in Testors Aluminum as well.
Once everything was dry, unplugged, and unmasked, the rudders and elevators were installed on both using CA glue. The cowls were added as well, also using CA. A little care must be taken here, as alignment can be a bit tricky since there is not any positive attachment point. If aligned properly, there should be slight overhang all the way around on the cowl. Both models were then shot with Future and set aside to dry.
For the Egyptian aircraft the kit decals were used, and these went on without any problems using only a small amount of Micro Sol. For the Irish aircraft the markings came from Max Decals sheet 7221. While this was a 1/72 sheet, it had an appropriately sized roundel and the correct numbers in the correct size, originally part of a set of markings for a Gloster Gladiator. These again presented no problems in application. The only other decals were the markings for the fuel tank caps on the upper wings, sourced from the kit decal sheet.
This was some of the simplest and easiest decal work that I had done in a while. Once they were cured, both models were shot in Future once more and set aside to dry for several hours.
| FINAL CONSTRUCTION |
There was now only a little left to do. The exhaust pipes were painted in Model Master Burnt Iron, then weathered with Testors Rust. These both went on with a simple drop of CA. The propellers were glued in place with CA glue as well as the tail wheel. The cockpit rim padding was painted with Testors Leather, though I think I need to touch this up in a few spots.
The windscreens were dunked in Future. Once dry, their framing was painted in their appropriate colors. They were then glued in place with CA glue applied with a toothpick. Then the wingwalk was painted in Testors Rubber.
The venturis were painted black and glued in place with CA glue. Then I tackled what would prove to be the most frustrating part of the build for me: the instrument flying hood.
 This
part is composed of four pieces, two halves of the hood itself and the swiveling
supports to raise and lower it. The two halves of the hood were glued up with CA
glue and required some minor sanding. This was painted in Model Master R.A.F.
Dark green. The supports were glued in place and painted in Testors Aluminum.
Then I tried to glue it on.
This
part is composed of four pieces, two halves of the hood itself and the swiveling
supports to raise and lower it. The two halves of the hood were glued up with CA
glue and required some minor sanding. This was painted in Model Master R.A.F.
Dark green. The supports were glued in place and painted in Testors Aluminum.
Then I tried to glue it on.
This proved frustrating on both models. It proved very difficult to find the right spot alignment wise and glue it in place with very carefully applied CA. I broke the hood apart while attempting this with one of them and had to take time to repair and repaint it.
Were I to do it again, I would have drilled out two small holes in the appropriate spot with a pinvise and slipped in a piece of music wire just long enough to barely protrude from either side to serve as an attachment point. It was done, though, and I now had two very eye-catching Miles Magisters in 1/48 scale.
| CONCLUSIONS |
This is effectively a short run kit, though, for the most part a very well molded one and easy to build. It would be an excellent kit for a modeler who wants to get their feet wet trying kits such as this. The fit is good throughout the kit, and there are very few problem areas. Again, the only spot where I experienced any real frustration was that rear cockpit hood.
I would recommend this kit to any modeler with a little experience who wants to try something new and a little different. There are so many interesting marking possibilities that I may yet build another. The kit is out of production now, so far as I know, though still available from model show vendors and on e-Bay. Hopefully it will continue to be for some time.
| REFERENCES |
https://en.wikipedia.org/wiki/Miles_Magister
https://www.scalemates.com/kits/flashback-klh8924-miles-magister--151112
https://www.classicwarbirds.co.uk/british-aircraft/miles-magister.php
24 April 2026
Copyright ModelingMadness.com. All rights reserved. No reproduction in part or in whole without express permission.
If you would like your product reviewed fairly and fairly quickly, please contact the editor or see other details in the Note to Contributors.