Airfix 1/72 Mosquito FB.VI
| KIT #: | 02001-9 |
| PRICE: | AUD$ 8.00 |
| DECALS: | Two options |
| REVIEWER: | George Oh |
| NOTES: | The original Airfix offering |
| HISTORY |
The De
Havilland Mosquito was conceived as an unarmed high-speed medium bomber built
mainly from light-weight balsa wood.
Initially dubbed ‘Freeman’s Folly’, it received other
nicknames like the ‘Timber Terror’, and the ‘Wooden Wonder’, but more often to
her crews, she was just a ‘Mossie’.
The bomber first carried 2 x standard, then later, 4 x
shortened 500lb bombs.
Later still, some received a bulged bomb bay so that
they could carry a 4000lb ‘cookie’.
The bomber was modified into photo-recon, cargo carrier
(including provision for a single passenger) and photo-recon variants.
When armed with 4 x 303” Browning machineguns and 4 x
20mm Hispano cannons, the Mossie became a night fighter or fighter-bomber with a
reduced bomb-load because the cannon breeches occupied the front half of the
bomb bay.
Other weapons were tried on (or in) a Mossie for use against
ships.
These included rockets and a 57mm cannon.
All the while, her two Merlin engines enabled the Mossie
to out-run and out-manoeuvre most of her enemies.
 My Model Club
President challenged us to scan our collections of references and completed
models to find a model that is featured in a book (novel, actually).
The objective was a club display to be called “By the
Book”.
So, the challenge was set, and the searching began.
I immediately knew that I could contribute several
models and books, but I also knew that I had a book for-which a unique,
never-modelled-before Mosquito would be required.
I’d always wanted to build this Mosquito, and this was
the perfect stimulus to do so.
My Model Club
President challenged us to scan our collections of references and completed
models to find a model that is featured in a book (novel, actually).
The objective was a club display to be called “By the
Book”.
So, the challenge was set, and the searching began.
I immediately knew that I could contribute several
models and books, but I also knew that I had a book for-which a unique,
never-modelled-before Mosquito would be required.
I’d always wanted to build this Mosquito, and this was
the perfect stimulus to do so.
The
book is “633 Squadron”,
in-which an RAF medium-bomber squadron is tasked with a special mission to
destroy a difficult target.
The squadron flew into the book equipped with Douglas
Boston bombers, but for their mission, they were re-equipped with special De
Havilland Mosquito bombers.
633 Squadron’s new Mossies
had their bomber-type clear nose bubble replaced by a solid nose, and were armed
with 2 x 303” machineguns & 2 x 20mm cannon, with all of the barrels projecting
forward out of the nose.
(See Chapter 12 in the book).
This makes sense because the whole bomb bay was needed
for their special 4000lb bombs, and bulged accordingly.
“633
Squadron” was made into a movie.
But the Mosquitoes from the movie of did not have the
cannons – just four machineguns.
Modellers, who want a Mosquito from the movie, will
simply build a post-war Mosquito bomber with a second intake under each spinner,
4 x machine guns in the painted-over clear nose, a bulged bomb bay and three
blisters on the canopy.
| THE KIT |
| CONSTRUCTION |
 a late stage
of the war.
Diagrams showed that the forward 1/3rd
was unobstructed barrel, with the remaining 2/3rds
being the receiver and gas-operating system.
So, I’ll put the barrels sticking-out of the nose by
733mm (10.2mm in 72-scale), and have the (notional) rest of the cannon fitting
between the nose and the bomb bay’s forward bulkhead.
Going solely on length, they would have fitted.
I’ll use the second-smallest brass tube that I can
muster.
a late stage
of the war.
Diagrams showed that the forward 1/3rd
was unobstructed barrel, with the remaining 2/3rds
being the receiver and gas-operating system.
So, I’ll put the barrels sticking-out of the nose by
733mm (10.2mm in 72-scale), and have the (notional) rest of the cannon fitting
between the nose and the bomb bay’s forward bulkhead.
Going solely on length, they would have fitted.
I’ll use the second-smallest brass tube that I can
muster.
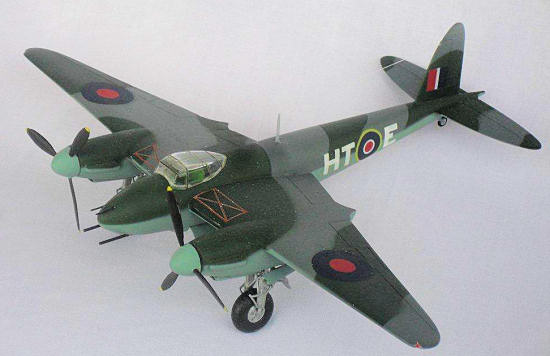
| COLORS & MARKINGS |
Virtually
all modern Mossie kits provide decals for the radiator cover warning stencils
inboard of the engines.
This kit doesn’t.
The cure was to paint the whole co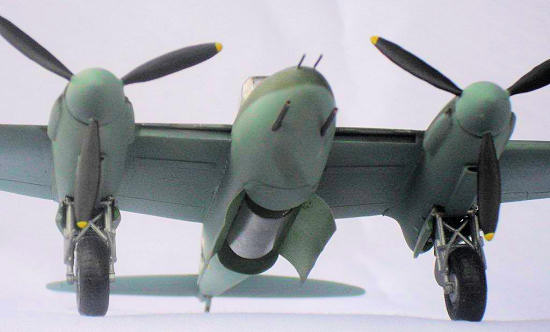 ver
red, apply narrow strips of tape between the raised detail, then to paint over
the red.
The book doesn’t specify the colour of the 633 Sqn Mossies, so I went
with the colour of the post-war/movie ones - dark green cam over grey, with a
light blue belly and spinners.
I used Tamiya XF13 J.A. green (yes, I can hear you
gasping and picking-up stones), XF20 medium grey and XF23 light blue.
ver
red, apply narrow strips of tape between the raised detail, then to paint over
the red.
The book doesn’t specify the colour of the 633 Sqn Mossies, so I went
with the colour of the post-war/movie ones - dark green cam over grey, with a
light blue belly and spinners.
I used Tamiya XF13 J.A. green (yes, I can hear you
gasping and picking-up stones), XF20 medium grey and XF23 light blue.
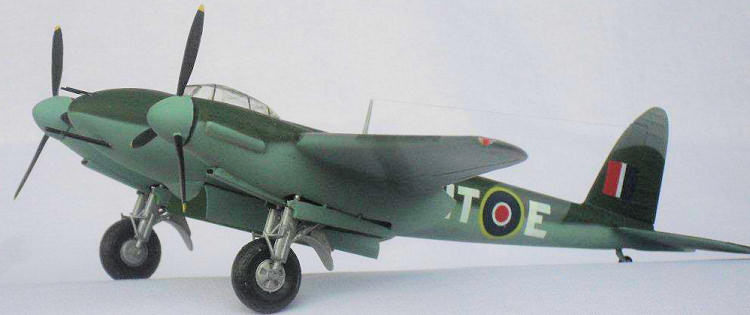
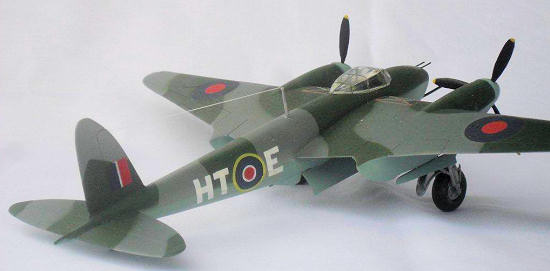
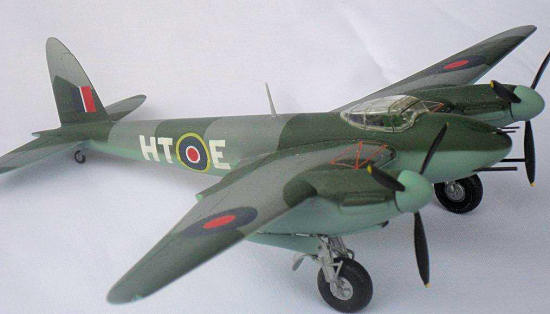
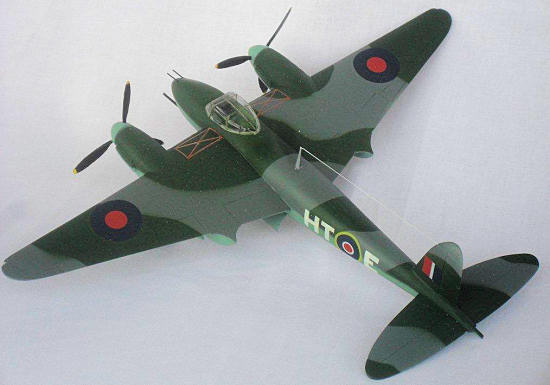
Now, the decals for this old kit were long gone, and I considered robbing a later Airfix Mosquito kit to get a set of national markings. But happily, I found that I had a set of generic RAF roundels for 72-scale Spitfires & Mosquitoes. I considered using the letters GE * E (633) for the squadron code and aircraft letter, but I couldn’t find suitable ones, and making the ‘G’s would have been difficult. For ease, I stayed with the movie aircraft’s Squadron code of code of HT. I would have preferred to use C – Gellibrand’s aircraft (the Australian - I’m an Aussie, myself) - but I resorted to E, because it was easier to make. They were made from 2mm-wide strips of white decal film. Now I reckon that they look too wide, but I’ll live with it. I sprayed her with Gunze H 20 clear flat, and my airbrush spat-out some white specks with the clear paint. Rats!
| FINAL CONSTRUCTION |
The foil bomb
doors were attached, and the ‘bomb’ shoehorned into the bay (it was a TIGHT
fit).
The donated Tamiya legs were brush-painted silver, fitted with the
donated Tamiya tyres and the assemblies were dry-fitted.
The legs were WAAAAAAY too long (are you sure this isn’t
a 76-scale model?) and too wide, but by severe pruning, I managed to get them in
and looking OK.
Don’t you agree?
And the wheels were too huge, but I used them anyway.
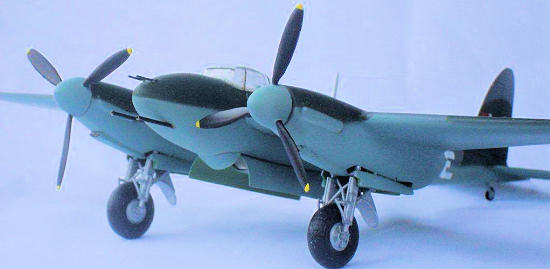
With brass tubes and wire, I added the propellers (so
that they could spin) and the MG & cannon barrels.
Finally add the antenna post and an aerial of EZ-Line
and I can declare another one finished.
| CONCLUSIONS |
I wonder
why De Havilland never tried protruding barrels on the Mossie?
Many other aircraft had them.
 While I used
an ancient and inaccurate kit, I still enjoyed the build.
True - better Mosquito kits are available (in 72-scale),
so I can only recommend that this old kit be given to your junior modellers for
modelling practice.
While I used
an ancient and inaccurate kit, I still enjoyed the build.
True - better Mosquito kits are available (in 72-scale),
so I can only recommend that this old kit be given to your junior modellers for
modelling practice.
I have no
doubt that there will be modellers who will declare that my Mossie
is totally wrong, because real Mossies never had this armament configuration,
and it does not look like the ones in the movie.
But the movie makers had to use whatever Mosquitoes they
could find.
See, when the movie was made, it was post-war, and
Mossies were
gone from the RAF inventory – so much so that the movie-makers could afford to
‘crash’ one, and take an axe to another (the same one?) before burning it, just
for the movie.
My
model of a “633
Squadron” Mosquito IS accurate because the book preceded
the movie.
Unfortunately, my 633 Sqn Mossie is probably doomed, because, in
the book, only two of the aircraft managed to limp home.
In the movie, none returned.
However, while you can shoot down the planes and kill
the crews, you can’t kill a Squadron.
I’m just happy because I have the only accurate
model of a 633 Squadron Mosquito that I know-of.
| REFERENCES |
Just
the kit instructions, the description in the book and the boxart.
July 2012
Thanks to If you would like your product reviewed fairly and fairly quickly, please contact the editor or see other details in the Note to Contributors.