Hasegawa 1/48 Spitfire IX
| KIT #: | 9079 |
| PRICE: | $24.98 MSRP when first released. More now. |
| DECALS: | Two options |
| REVIEWER: | Scott Lyle |
| NOTES: |
Aeroclub Models
#K839, Spitfire Mk.IX Fuselage Correction Kit |
| HISTORY |
It comes as no surprise that a fighter as successful as the Spitfire is
one of the most popular fighters to build in model form.
What did come as a surprise was the discovery that a reasonably accurate
Mark IX in 1/48 scale does not exist!
After reading the reviews and forums online about the existing Mk. IX
kits, the Hasegawa and 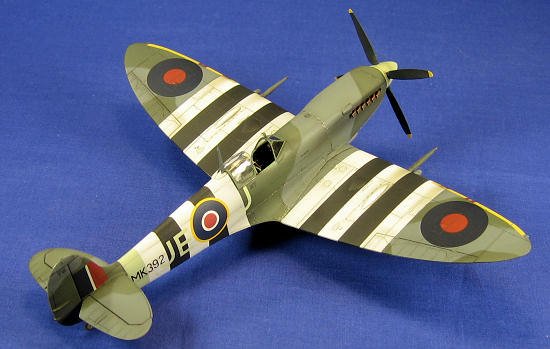 would seem to tilt the playing field in favor of the
Further reading online revealed that Aeroclub has come out with
replacement fuselage halves for the Hasegawa kit, scaled to the correct length,
made of injected molded plastic, and available for a reasonable price.
After that discovery, my course of action was clear.
I would build the Hasegawa kit with the Aeroclub replacement fuselage,
add some Eduard photo etch, and then add a replacement prop, exhausts, pilot’s
seat, and five-spoked wheels (the kit gives you the option for either four or
three-spoked wheels) from Ultracast.
And as usual, I would justify all of this expenditure by knowing that it
would be spread out over two to three months, and therefore actually wouldn’t be
too expensive at all.
And if you
can convince my wife of that, I’ll buy you a beer.
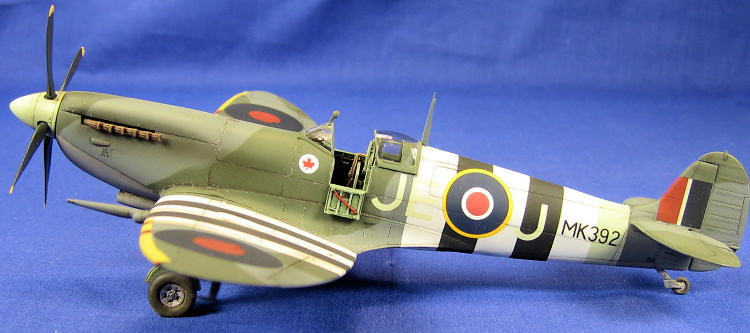
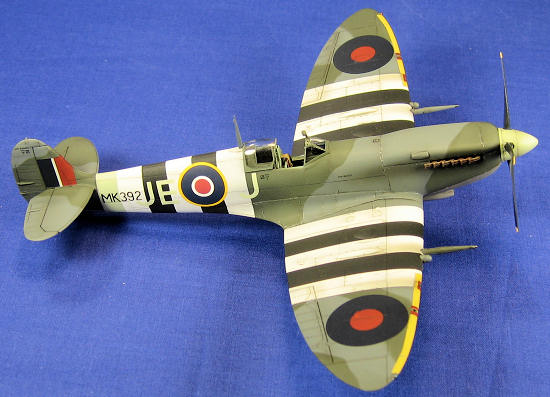
Continuing with my quest to build my own personal list of “the greatest fighters of all time as flown by the greatest aces of all time”, I chose to do Johnny Johnson’s Mk. IX Mk 392, the markings for which were furnished by the Colorado Decals sheet.
| THE KIT |
Please read the preview to see what comes in the box. Ed
| CONSTRUCTION |
Construction of the cockpit began by painting the floor, instrument
panel, and Aeroclub fuselage walls Testors Acrylic RAF Interior Green.
This was then washed with a raw umber oil wash and drybrushed with a
lightened mixture of the Testors RAF Interior Green.
I’ve become a fan of the Eduard Color Photo-Etch detail sets for my 1/48
aircraft models.
They are very
affordable and are worth the price just for the incredibly well-printed
instrument panels.
With the Eduard
photo etch panel glued to the
 Hasegawa part, I picked out the rest of the
cockpit details by hand.
The only
thing left was the pilot’s seat, and the resin Ultracast seat is beautifully
molded with very intricate detail on the seat harness.
I painted the seat Testors Leather, painted the padding on the back rest
a darker shade of brown, and then picked out the harness in beige and silver.
With the seat glued to its support structure, I glued the cockpit halves
together and set them aside to dry.
Hasegawa part, I picked out the rest of the
cockpit details by hand.
The only
thing left was the pilot’s seat, and the resin Ultracast seat is beautifully
molded with very intricate detail on the seat harness.
I painted the seat Testors Leather, painted the padding on the back rest
a darker shade of brown, and then picked out the harness in beige and silver.
With the seat glued to its support structure, I glued the cockpit halves
together and set them aside to dry.
While the Aeroclub replacement fuselage is a high quality molding that
solves the problem of the Hasegawa fuselage being too short, some modeling skill
is needed to assemble it.
The
fuselage seams required more putty, filling, and sanding than what I’ve become
used to with today’s Eduard, Tamiya, and Hasegawa kits (I’m spoiled, I know).
I’m not talking about horribly mismatched seams or anything like that,
but when one is mixing and matching parts from two different kits - which is
what the model had essentially become - one has to be prepared to put some work
into it.
After I had the fuselage seams smoothed to my liking, the wings were
next.
Hasegawa’s wings go together
perfectly, but test fitting them to the fuselage revealed a sizeable gap where
the upper wing surfaces met the fuselage’s wing roots.
This was solved by cheating – I cranked the wings upward to close up the
gap, held them in place with a long piece of Tamiya tape, and then glued the
you-know-what out of them.
So while
my Spitfire’s dihedral isn’t 100% accurate, my goodwill toward the model was
still intact!
Once the seams around the wing-fuselage join were finished to my liking,
the tail surfaces were next, and that’s where I discovered that the Aeroclub
tail was too thick.
Test
fitting Hasegawa’s rudder indicated that I should have sanded the interiors of
the tail parts of the fuselage halves down before they were glued together.
As I just learned, and what all experienced kit-bashers no doubt already
know – when kit-bashing, test fit everything twice
 before applying cement.
It was also at that point that the news about Tamiya releasing a brand
new 1/32 Spitfire Mk. IX broke, and my mind began wandering.
Knowing it’s only a matter of time before they release an all new 1/48
version of the kit, and knowing that it will most likely be beautiful and fix
all of the aforementioned problems – you can see what I was thinking.
Perhaps I should hold onto to the remainder of my resin items and decals
and wait for the future?
After some
debate I decided I’d come too far and that I’d be throwing away too much work.
I soldiered on.
before applying cement.
It was also at that point that the news about Tamiya releasing a brand
new 1/32 Spitfire Mk. IX broke, and my mind began wandering.
Knowing it’s only a matter of time before they release an all new 1/48
version of the kit, and knowing that it will most likely be beautiful and fix
all of the aforementioned problems – you can see what I was thinking.
Perhaps I should hold onto to the remainder of my resin items and decals
and wait for the future?
After some
debate I decided I’d come too far and that I’d be throwing away too much work.
I soldiered on.
Back to the tail.
To make
the issue palatable I sanded down the tail surfaces where they meet the rudder
as best I could, losing some surface detail in the process.
I rescribed the lost panel lines, and then attached the rudder.
The elevators were next, and their joint with the fuselage was fairly
smooth and only required a little bit of attention.
I attached the Hasegawa front windshield to the fuselage without a hitch,
but discovered that the rear fixed canopy section had to shortened by a good
1.5mm so that its leading edge would be flush with the step in the fuselage.
The Dremel tool took care of that issue, but unfortunately a sizeable
step on either side of the canopy section exists and there wasn’t much I could
do about it.
If there was a
definite release date from Tamiya for a 1/48 version…
With the airframe finished, I left off the prop, landing gear and any delicate parts, masked the canopy sections, and headed for the paint booth.
| COLORS & MARKINGS |
I sprayed a primer coat of Mr. Surfacer 1200 onto the aircraft and then
checked for any seams that needed to be touched up, which there were.
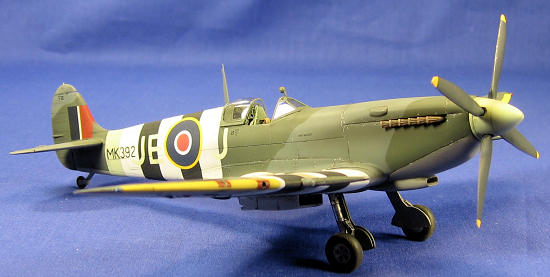
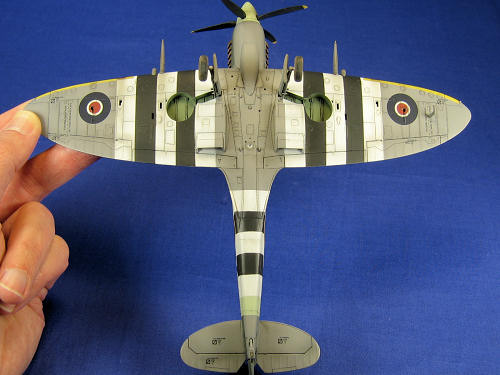
Johnson’s MK 392 had the fairly standard Dark Green and Ocean Gray upper
surfaces with Medium Sea Gray lower surfaces, but also had D-Day invasion
stripes, a Sky-colored fuselage band and spinner, and yellow stripes on the
leading edges of the wings.
With
all of that going on I knew I was in for a lot of masking and airbrushing.
My first step was to pre-shade all of the panel lines on the aircraft
with some Tamiya NATO Black.
Up
next were the D-Day stripes.
I
sprayed those areas Testors Acrylic White, and th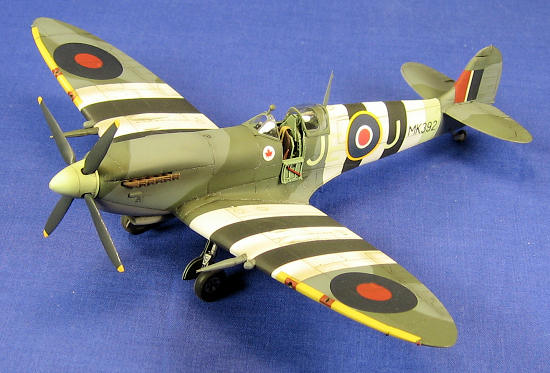 en masked off the white stripes
with the narrow Tamiya masking tape.
The narrow tape is exactly 10mm wide, which in my case happened to be a
perfect width for the stripes.
Not
having to go through the painstaking process of trimming the tape’s width -
priceless!
en masked off the white stripes
with the narrow Tamiya masking tape.
The narrow tape is exactly 10mm wide, which in my case happened to be a
perfect width for the stripes.
Not
having to go through the painstaking process of trimming the tape’s width -
priceless!
With the white stripes masked I sprayed Tamiya NATO Black for the black
stripes and then masked them.
The
Sky-colored spinner and band around the fuselage were airbrushed next using
Testors Acrylic Sky.
With that
masked, I next sprayed the lower fuselage with a 3:5 mixture of Tamiya XF-19 Sky
Gray and XF-54 Dark Sea Gray.
Once
that was masked the upper surfaces were airbrushed with a 1:2:2 mixture of
Tamiya XF-18 Medium Blue, XF-21 Sky, and XF-24 Dark Gray.
Both of these mixtures were found on the web for Medium Sea Gray and
Ocean Gray respectively.
The last camouflage color to be added was the Dark Green.
I used Silly Putty to mask the Ocean Gray and then airbrushed Testors
Acrylic Dark Green onto the model.
I removed the Silly Putty, and then used Tamiya tape to carefully mask the wings
for the yellow edge stripes.
Having
had “coverage” issues with airbrushing yellow in the past, I first sprayed a
light gray primer coat onto the areas, and then followed that with Testors
Acrylic Yellow.
Finally the model
was coated with Future in preparation for the decals.
I used as many of the kit’s decals as I could, and then sourced the
decals unique to Johnson’s Spitfire from the Colorado Decals sheet.
All of them worked fine with Walthers Solvaset, and once they were set I
airbrushed a coat of Future over the whole
 model again to seal them.
I then followed my usual weathering
procedure.
I applied a wash of
50/50 Lamp Black/Raw Umber oil paint to all of the recessed panel lines,
followed by a coat of Testors Lacquer Flat Finish over the whole model, and then
a very thin 50/50 mix of Tamiya Black/Red Brown sprayed over the panel lines,
exhaust areas, and behind the machine guns.
model again to seal them.
I then followed my usual weathering
procedure.
I applied a wash of
50/50 Lamp Black/Raw Umber oil paint to all of the recessed panel lines,
followed by a coat of Testors Lacquer Flat Finish over the whole model, and then
a very thin 50/50 mix of Tamiya Black/Red Brown sprayed over the panel lines,
exhaust areas, and behind the machine guns.
The Ultracast exhausts were drybrushed in different shades of Testors
Rust and Steel, the wheel wells were painted Testors RAF Interior Green, and the
landing gear were painted Testors Aluminum.
A wash of Black/Raw Umber oils added some grime to the landing gear and
the landing gear bays.
The next step was the often nerve-wracking step of removing the canopy
masking.
We’ve all experienced the
agony of “mask leakage”, where paint flows under the mask.
On a wing or fuselage it’s no big deal; on a clear canopy piece it’s no
fun at all.
Luckily the Eduard Mask
that I used performed perfectly.
Next I added some paint chips around the nose, cockpit, and wing roots
using a Silver Berol pencil.
My
final weathering step was to apply some dirt-colored pastels on the tires and
tail wheel to replicate some dust and dirt.
Finally I painted the wingtip lights, attached the prop and canopy, and the model was done.
| CONCLUSIONS |
 Building this model took longer than I anticipated, primarily because of
the fairly involved paint scheme that took many steps, and many nights.
I certainly recommend the model as it goes together just like any other
Hasegawa 1/48 offering, and if the fuselage issues bother you like they did me,
the Aeroclub corrected fuselage is fine to use as well.
But, as I’m writing this the new 1/32 Tamiya Spitfire Mk. IX is getting
rave reviews on various websites, and if I were a betting man I’d bet that a
1/48 version will be with us within a year or two.
So while there’s nothing stopping you from building the Hasegawa version
(especially if it’s already in your stash), one can’t help but wonder what
goodies will be included in the Tamiya version when it arrives!
Building this model took longer than I anticipated, primarily because of
the fairly involved paint scheme that took many steps, and many nights.
I certainly recommend the model as it goes together just like any other
Hasegawa 1/48 offering, and if the fuselage issues bother you like they did me,
the Aeroclub corrected fuselage is fine to use as well.
But, as I’m writing this the new 1/32 Tamiya Spitfire Mk. IX is getting
rave reviews on various websites, and if I were a betting man I’d bet that a
1/48 version will be with us within a year or two.
So while there’s nothing stopping you from building the Hasegawa version
(especially if it’s already in your stash), one can’t help but wonder what
goodies will be included in the Tamiya version when it arrives!
| REFERENCES |
-
Osprey Publications, Aircraft of the Aces #5,
“Late Mark Spitfire Aces
1942-45”
-
Specialty Press, Warbird Tech Series #35, “Merlin-Powered Spitfires”
- Squadron/Signal Publications, Aircraft in Action #39, “Spitfire in Action”
November 2009
Copyright ModelingMadness.com
If you would like your product reviewed fairly and quickly, please contact me or see other details in the Note to Contributors.