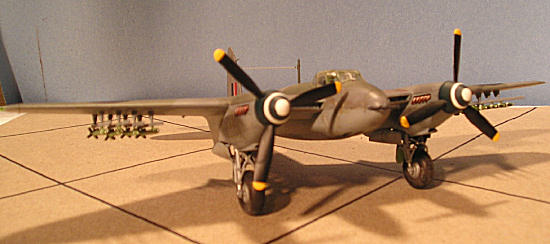
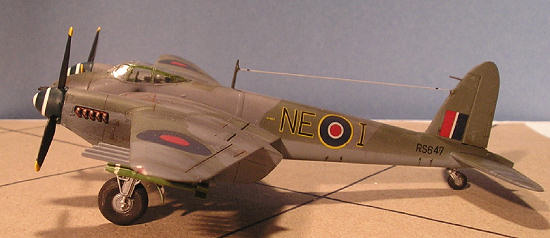
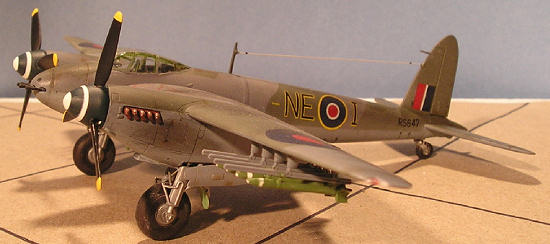
Tamiya 1/72 Mosquito NF II/FB VI
| KIT #: | 47 |
| PRICE: | $23.00 MSRP |
| DECALS: | See review |
| REVIEWER: | Peter L'Heureux |
| NOTES: |
| HISTORY |
Rarely does an aircraft design attain all of the goals required of it. The deHavilland Mosquito was one such aircraft. It was the brainchild of Geoffrey deHavilland, originally a designer for the Airco Corporation during World War I, designer of such important aircraft as the DH2, which helped to end the “Fokker Scourge” during 1916, and the DH4, license built in the United States.
During the
interwar years between the major world wars, the thinking in many military
circles was that a fast, unarmed bomber would be able to penetrate any defenses
put up against it. It was also during this period that such forward-thinking
luminaries such as Billy Mitchell, Jimmy Doolittle, and Giulio Douhet postulated
their theories that laid the foundations for the importance of air power.
During the early 1930s, however, while Great Britain looked
alarmingly at the military buildup occurring in Nazi Germany, bomber design in
England incorporated defensive armament, as fighter designs proved that they had
the power and speed to overtake bombers then in service. In the meantime,
deHavilland civil aircraft designs emphasized cleanliness of line, and were very
streamlined. Of note was that while many of the aircraft designers such as
Heinkel, Junkers, and Dornier in
 Germany, and Sterling, Avro, and
Armstrong-Whitworth in England were building their designs in duralumin,
deHavilland’s examples were made out of laminates of spruce and balsa. Examples
included the famous Comet racer, and the graceful commercial airliner of 1937,
the Albatross, powered by four Gipsy Twelve powerplants.
Germany, and Sterling, Avro, and
Armstrong-Whitworth in England were building their designs in duralumin,
deHavilland’s examples were made out of laminates of spruce and balsa. Examples
included the famous Comet racer, and the graceful commercial airliner of 1937,
the Albatross, powered by four Gipsy Twelve powerplants.
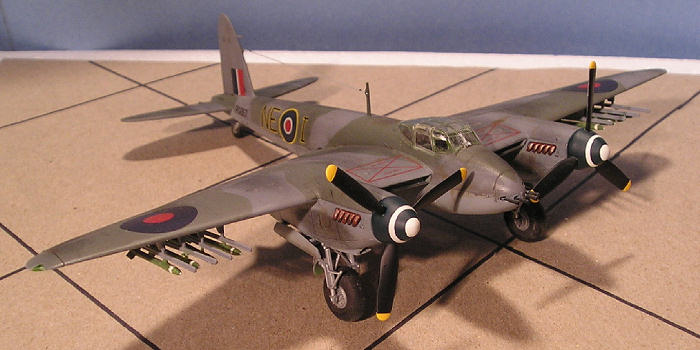
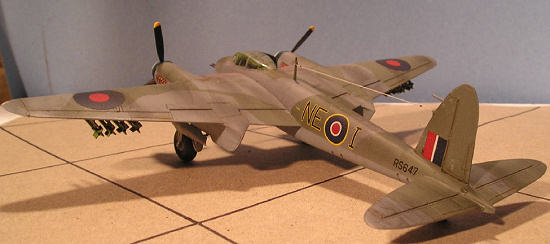
In 1938, the Gunter brothers completed work on the He119, built on the principle that a streamlined design incorporating speed could outrun current fighters. This met a stone wall of resistance in the RLM (Reichsluftfartministerium). This did not deter Geoffry de Havilland, however, and he pressed his arguments before the Air Ministry in Britain. He argued that his wooden laminate design, incorporating the latest engine technology in the form of the Rolls-Royce Merlin engines, could indeed outrun current fighter designs with sheer speed. With an ally in Air Marshall Sir Wilfrid Freeman, Air Member for R&D on the Air Council, and the fact that the RAF lacked a long-range reconnaissance aircraft, the de Havilland Company won their argument, despite Lord Beaverbrook’s arguments for fighters, fighters, and more fighters, since England’s back was against the wall engaging the Luftwaffe in the Battle of Britain. The prototype D.H. 98 flew for the first time from Hatfield on October 1, 1940. The production aircraft, built at Salisbury Hall, were divided into four purpose-built categories of photo-recon, bomber, night fighter, and fighter-bomber, and provided sterling service in their roles. Among the more famous missions that the Mosquito undertook were the Dutch Central Population Registry raid against the Gestapo on 11 April, 1944, and the Jena raid on 27 May 1943, in examples of low-level precision bombing. Also of note are the sorties flown against German iron ore transports and U-boats in the Kattgatt in 1944 and 1945. My model depicts a hypothetical (though fictitious) aircraft flown by the Banf Strike Fighter Wing, based in Scottland during late 1944 into 1945.
| THE KIT |
My Tamiya Mosquito kit came to me with four sprues of grey plastic, and one of
clear, all individually bagged. All parts were flash-free and crisply molded.
But, then again, this is Tamiya. The decal sheet included markings for three
aircraft, two fighter-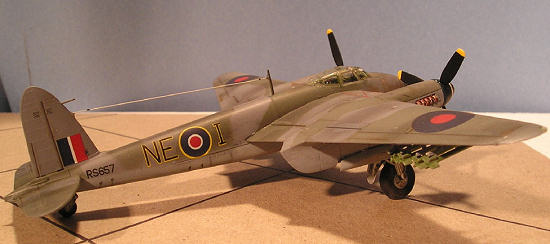 bomber Mk VIs, and one Mk II night fighter. This was kept
apart from the plastic sprues. The directions are printed on booklet-form
paper, and are clear and concise, consisting of exploded drawings and well-drawn
illustrations, and are easy to follow. Here, I would like to confess (collective
gasp from the reading audience!) that this is my very first Tamiya kit. I’d
also like to confess that this model took me five, yes five, years to complete,
working on it off and on. I guess I must hold the record for the longest
build! Many modelers would like to believe that with Tamiya aircraft kits, all
you have to do is open the box, add glue and paint, shake a bit, and out spits a
completed model. That’s a bit of an overstatement, as I did have a little
difficulty, but it was difficulty of my own making.
bomber Mk VIs, and one Mk II night fighter. This was kept
apart from the plastic sprues. The directions are printed on booklet-form
paper, and are clear and concise, consisting of exploded drawings and well-drawn
illustrations, and are easy to follow. Here, I would like to confess (collective
gasp from the reading audience!) that this is my very first Tamiya kit. I’d
also like to confess that this model took me five, yes five, years to complete,
working on it off and on. I guess I must hold the record for the longest
build! Many modelers would like to believe that with Tamiya aircraft kits, all
you have to do is open the box, add glue and paint, shake a bit, and out spits a
completed model. That’s a bit of an overstatement, as I did have a little
difficulty, but it was difficulty of my own making.
If you pay attention to the directions and employ good modeling technique, however, a great model, at least of this kit, can be had.
| CONSTRUCTION |
After washing all the sprues
in dishwashing liquid, rinsing, and allowing to air dry, I commenced
construction using the subassembly technique employed by da Boss. The main
landing gear section looked the most delicate of all, so I decided to get that
part of construction done and over with. Each of the parts, except the wheels
themselves, were painted in Testor’s Aluminum and allowed to dry before being
glued together with Zap CA. The splash guards were drilled for lightening
holes, after studying 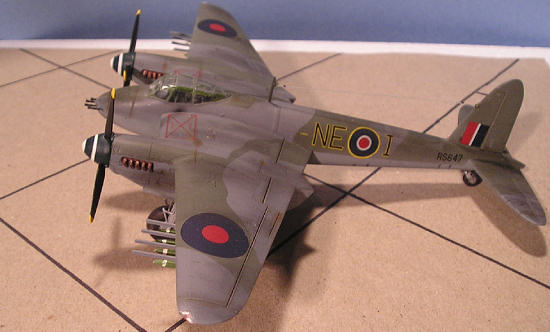 pictures of the real aircraft, with the undersides painted
in RAF Interior Green, along with the hydraulic fluid tanks. The retaining
straps were painted Aluminum. The directions allow you a choice between two
styles of wheel hubs. I chose the later style, but in the process of gluing
them to the wheels, I lost one, never to be found! Since one wheel had the hub
already glued on, I couldn’t remove it, out of fear I’d ruin the wheel, so I
took the earlier style for the other wheel. Oh, well. The hubs were also
painted aluminum. Keeping the hubs separate from the tires is a nice touch on
Tamiya’s part, as it insures that you will get a nice, crisp separation of color
between the hubs and the tires. The tires I painted with a mix of flat black
and Testor’s Rubber. Oleos were painted with Testor’s Gloss Silver. Once the
two main landing gear were completely assembled, they were carefully bagged and
set aside.
pictures of the real aircraft, with the undersides painted
in RAF Interior Green, along with the hydraulic fluid tanks. The retaining
straps were painted Aluminum. The directions allow you a choice between two
styles of wheel hubs. I chose the later style, but in the process of gluing
them to the wheels, I lost one, never to be found! Since one wheel had the hub
already glued on, I couldn’t remove it, out of fear I’d ruin the wheel, so I
took the earlier style for the other wheel. Oh, well. The hubs were also
painted aluminum. Keeping the hubs separate from the tires is a nice touch on
Tamiya’s part, as it insures that you will get a nice, crisp separation of color
between the hubs and the tires. The tires I painted with a mix of flat black
and Testor’s Rubber. Oleos were painted with Testor’s Gloss Silver. Once the
two main landing gear were completely assembled, they were carefully bagged and
set aside.
Attention was then focused on the main wings. The integral wheel wells for the lower halves of the main wings were painted with SnJ aluminizer, with the insides of the oil coolers sprayed with MM RAF Interior Green. After the paint was dry, upper and lower wing halves were mated. Fit was very precise, and required no filler. A swipe of an extra fine grit sanding stick took care of the wing seams.
Cockpit and interior were next. The interior was painted with RAF Interior
Green, drybrushed with a lightened shade of that color to bring out detail on
the fuselage side walls. A black wash was then applied to the side walls. I
cut out the decals for the instrument panel and seat belts, and used them
according to directions, applying MicroSet and SolvaSet to the instrument decal
to snuggle it down to the instrument panel. In retrospect (always 20-20 vision,
n’est-ce pas?), I should have applied a bead of white glue behind the seat belt
decals to give them more of a three dimensional look. I applied drops of
Crystal Clear to the individual dials of the instrument panel to give the
appearance of the glass covers. The instrument panel had been painted in very
 dark gray. All the cockpit parts were glued in place, along with the wing spars,
the two fuselage parts were mated using Ambroid cement. Again, fit was precise,
needing only a little gap filling CA here and there. From this point on, I
mainly followed the directions for assembly, painting individual parts such as
the props, prop bosses, tail wheel, and the .303 caliber quartet of machine
guns, before gluing them in place. I drilled out all the guns carefully, using
my hand-held pin vise. I glued the nose in place, minus the guns, with white
glue so as to include it while painting the airframe. It made things easier.
As far as the rockets went (I was going with the Banf Strike Fighter-Bomber
version), I cut them from their rails, and had glued the rails to the main
airframe, so that I could paint the rockets individually by hand. When it came
to gluing the rockets back on, though,….. oh what a pain! Alignment was a
chore, and they had a tendency to snap off under the slightest pressure. I
really had to be careful here. Next time, I’ll leave well enough alone and go
with masking the parts.
dark gray. All the cockpit parts were glued in place, along with the wing spars,
the two fuselage parts were mated using Ambroid cement. Again, fit was precise,
needing only a little gap filling CA here and there. From this point on, I
mainly followed the directions for assembly, painting individual parts such as
the props, prop bosses, tail wheel, and the .303 caliber quartet of machine
guns, before gluing them in place. I drilled out all the guns carefully, using
my hand-held pin vise. I glued the nose in place, minus the guns, with white
glue so as to include it while painting the airframe. It made things easier.
As far as the rockets went (I was going with the Banf Strike Fighter-Bomber
version), I cut them from their rails, and had glued the rails to the main
airframe, so that I could paint the rockets individually by hand. When it came
to gluing the rockets back on, though,….. oh what a pain! Alignment was a
chore, and they had a tendency to snap off under the slightest pressure. I
really had to be careful here. Next time, I’ll leave well enough alone and go
with masking the parts.
| COLORS & MARKINGS |
The major airframe was washed carefully in dishwashing liquid and rinsed to
remove oils and debris and allowed to dry. I
 filled up the wheel wells with
pieces of cut up makeup sponges, and gave the entire airframe, including the
rocket rails (minus the rockets, cut off for individual painting – strike
fighter option) a coat of primer. Once that was dry, I sprayed the bottom with
MM Medium Sea Gray, and allowed it to dry before masking. I sprayed the topside
with MM Dark Sea Gray, allowed to dry, then cut out camouflage masking patterns
using Tamiya tape. The final camo color was MM RAF Dark Green. After allowing
everything to dry over a period of two days, I removed the tape and was
pleasantly surprised to find no bleed-under. The airframe was sprayed with two
coats of Future, undiluted, and was then ready for decaling.
filled up the wheel wells with
pieces of cut up makeup sponges, and gave the entire airframe, including the
rocket rails (minus the rockets, cut off for individual painting – strike
fighter option) a coat of primer. Once that was dry, I sprayed the bottom with
MM Medium Sea Gray, and allowed it to dry before masking. I sprayed the topside
with MM Dark Sea Gray, allowed to dry, then cut out camouflage masking patterns
using Tamiya tape. The final camo color was MM RAF Dark Green. After allowing
everything to dry over a period of two days, I removed the tape and was
pleasantly surprised to find no bleed-under. The airframe was sprayed with two
coats of Future, undiluted, and was then ready for decaling.
Here, I decided to do a fictitious (but still in the realm of possibility) fighter-bomber with the Banf strike fighter wing by altering the decals to NE-I for Ike.
| FINAL CONSTRUCTION |
All the rest of the small parts were glued in at this juncture, including the rockets on their rails (a bit more difficult than I initially thought), the main landing gear, the tail wheel, the props, the .303s into the nose, and the radio masts. The landing lights were drilled and tiny drops of Tamiya clear red and green applied to the holes before they were glued to the main wings using Crystal Clear. The last window pane was glued to the canopy using the same glue. I used invisible thread for the antenna, CAd in place, and the model was complete.
| CONCLUSIONS |
 There is a good reason why Tamiya is consistently ranked among the top two model
manufacturers in the world, and that is because of attention paid to precise
engineering. They get it right with their aircraft models. This model makes
the modeler appear that he knows what he is doing, and it’s hard to screw this
one up, if one pays attention to directions. I must say it was a joy to build,
and I highly recommend it to all modelers. If you are a WW II aircraft fan, and
don’t have this bird in your arsenal, run, don’t walk, to your nearest hobby
store and snag one….. before they’re all gone! I’m definitely gonna build
another one, perhaps a bomber Mk IV. My thanks to da Boss for providing this
model for build-up and review.
There is a good reason why Tamiya is consistently ranked among the top two model
manufacturers in the world, and that is because of attention paid to precise
engineering. They get it right with their aircraft models. This model makes
the modeler appear that he knows what he is doing, and it’s hard to screw this
one up, if one pays attention to directions. I must say it was a joy to build,
and I highly recommend it to all modelers. If you are a WW II aircraft fan, and
don’t have this bird in your arsenal, run, don’t walk, to your nearest hobby
store and snag one….. before they’re all gone! I’m definitely gonna build
another one, perhaps a bomber Mk IV. My thanks to da Boss for providing this
model for build-up and review.
| REFERENCES |
1) Bowman, Martin. Mosquito Bomber/Fighter Units 1942-1945. Osprey Combat Aircraft #4. 1997, Osprey Publishing, Oxford, UK.
2) Sweetman, Bill. Mosquito, in The Great Book of World War II Airplanes. 1996, Zokeisha Publications, Ltd.
September 2006
Copyright ModelingMadness.com
If you would like your product reviewed fairly and fairly quickly, please contact the editor or see other details in the Note to Contributors.