Hobbycraft 1/48 Hurricane IIB "Russian Front"
Price: $12-15 US
Type: Injection Molded Plastic
Review and Photos by: John Lester
I know I'm opening myself up to ridicule here - but I like Hobbycraft kits. OK - they're not always accurate - can be wildly inaccurate in fact - but if your modeling tastes run to WW2 aircraft, they have a very extensive line with kits of subjects no one else makes. Add to that the unique markings and a decent price...
The 'Russian Front' Hurricane IIb is typical of their line. You get 51 grey and clear parts on three trees, including a number of extras - this kit looks identical to the Hobbycraft Hurricane IIC (more on that in a minute). Instructions contain seven steps with hand-drawn diagrams; there are two panels of painting guide, and decals for two aircraft (one Soviet and one Finn). My kit had zero flash and few molding flaws. Panel lines look like they were engraved with a plow, but don't look bad after a good primer and several color coats. Clear parts are very clear and look like crystal under a coat of Future. I had no fit problems at all, and used very little putty.
 I started
my research with the usual sources - the Squadron/Signal "Hurricane in Action"
booklet and rec.models.scale newsgroup. I quickly found that the aircraft
this model depicts is *not* a Hurricane IIb. It appears that Hobbycraft re-boxed
their IIC, added two parts (plugs for the wing cannon mounts) and decals
for the wing guns, and called it a IIb. The instructions tell one to sand
off the bulges on the gun bay access panels to complete the back date.
I started
my research with the usual sources - the Squadron/Signal "Hurricane in Action"
booklet and rec.models.scale newsgroup. I quickly found that the aircraft
this model depicts is *not* a Hurricane IIb. It appears that Hobbycraft re-boxed
their IIC, added two parts (plugs for the wing cannon mounts) and decals
for the wing guns, and called it a IIb. The instructions tell one to sand
off the bulges on the gun bay access panels to complete the back date.
The conversion from a IIC to IIb is relatively straightforward - but not quite as simple as sanding off a bulge. Almost all IIb 's carried 12 .303 Browning MGs plus wing racks just outboard of the landing gear for up to 500lb bombs (or extra fuel on a different pylon). The Squadron booklet has an excellent line drawing of the access panels on the wing. I filled in the existing panel lines with putty, sanded smooth, and scribed on the correct panels. I drilled out holes for twelve guns (6 per wing) using drawings and photos in the Squadron booklet as reference. I then carefully cut out spent shell ejection ports on the underside of the wings - Hobbycraft neglected to put any in. According to my references, many ex-RAF Hurricanes came to the Soviets with only 8 guns, and were soon converted to carry Soviet weapons (there's a good picture in the Osprey book on Soviet aces that shows one such conversion). After some hesitation, I decided to putty over the gun holes in the outboard wing areas, leaving a dimpled area that looks like someone put a piece of doped linen over the empty hole.
Assembling the cockpit was straightforward. Since Hobbycraft's one piece canopy is closed, I decided the kit's interior detail was good enough, and just added seatbelts. I used the belts from a True Details set for the Hawker Typhoon - if you cut the canopy open you can use photoetch bits for the instrument panel and some sidewall detail as well - not perfectly accurate, but very close. As far as I know, there are no interior sets dedicated to this kit, so you'll have to scratchbuild or get 'close enough' with something else.
Fuselage and wings together - now I hit a wall. Many Hurricanes supplied to the Soviets came with Volkes (tropical) filters ... some did not. There is no way to tell if the subject in the kit did, as the only photograph in existence shows the aircraft crashed in the snow with no underside details visible ( Red Stars, Geust/Keskinen, Stenman 1993 -- a great photographic reference on Soviet WW2 aircraft available through Articles of War at http://www.sonic.net/~bstone/articles/). In any event, Hobbycraft doesn't provide a tropical filter in this kit - fine if you build the Finnish version, but I wanted to do the Russian version. They also do not supply a bomb rack - just a set of 44-gal drop tanks with a different pylon molded on. What to do, what to do ....
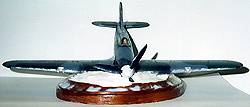
 Looking at
the picture in Red Stars I was suddenly hit by inspiration - why not do a
diorama with the plane crashed, just as in the picture. It appeared intact
(run out of fuel?) so I wouldn't have to mangle anything. Once that was decided,
construction was rapidly finished. The picture doesn't show a glare shield
behind the exhaust stack - an easy matter to scratchbuild if necessary, as
they were just flat sheets of metal. I left off the tail wheel and landing
light covers until painting was done, but did put the radio antenna on. I
also had to glue on a short antenna atop the rudder - there should be one
there but Hobbycraft neglected to mold it.
Looking at
the picture in Red Stars I was suddenly hit by inspiration - why not do a
diorama with the plane crashed, just as in the picture. It appeared intact
(run out of fuel?) so I wouldn't have to mangle anything. Once that was decided,
construction was rapidly finished. The picture doesn't show a glare shield
behind the exhaust stack - an easy matter to scratchbuild if necessary, as
they were just flat sheets of metal. I left off the tail wheel and landing
light covers until painting was done, but did put the radio antenna on. I
also had to glue on a short antenna atop the rudder - there should be one
there but Hobbycraft neglected to mold it.
Since most folks won't be doing this, I should add that True Details makes a bulged set of tires for the Hurricane, if you're into that sort of thing. Assuming you don't add a trop filter, the rest of the parts fit well and look accurate enough. You'll want to scribe through the edges of the 'door' at the rear of the radiator scoop - every picture I've ever seen shows that open. If you're building the gear down, the wheel wells are pretty basic. Get the Squadron/Signal 'Walkaround' book for reference material on spicing that up. If you're building it gear up, know that the gear doors will have to be cut apart and some pieces cut from sheet styrene to fill the gaps - certain pieces on the real thing folded out in different ways as the gear opened/retracted.
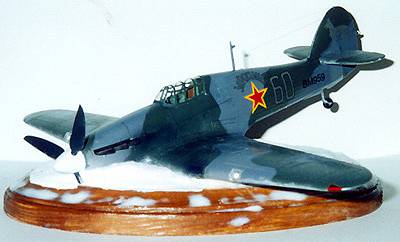
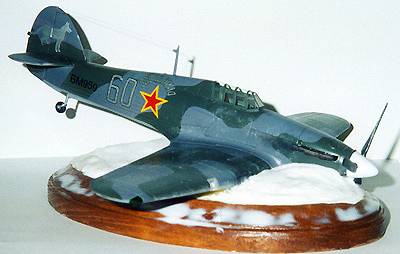
Painting was easy enough. I used all Testors Model Master paints: RAF Interior Grey Green for the interior; RAF Dark Green and RAF Ocean Grey for the upper surfaces, and RAF Medium Sea Grey for the undersides, per the instructions. The lower surfaces were sprayed first, then masked. I then sprayed the upper surface entirely grey. I cut masks for the camouflage pattern from frisket, then airbrushed the green pattern. I don't know whether this particular aircraft was delivered in RAF or Soviet markings so I guessed.
I repainted the areas on the upper surfaces where RAF roundels would have been with a brush. The result is a slightly darker circle that looks like it was overpainted later. Underneath, I tried something different. I applied a set of spare RAF markings, then overpainted them with Russian Underside Grey shot through a draftsman's circle template. The result looks exactly like a picture of a Soviet Hurricane in the Squadron In-Action booklet. (That aircraft was handed over to the Soviets by an RAF squadron that served in Murmansk, so they did arrive in RAF markings).
Decals were applied the usual way. I first sprayed on a fine coat of Future floor wax, straight from the bottle in three passes. The Hobbycraft decals are nicely opaque and settled right down with a dab of MicroSol. Numbers and patriotic slogans on the fuselage come as two parts - silver interior and black outlines, so you can't blame Hobbycraft if they end up off register. Note that the paint/decal guide shows red stars in six positions - but you only get four. Everything I've seen suggests stars were rarely carried on the upper wings, so I left them off and marked only fuselage and under wings. After everything had set, I gently washed the surface to remove any residues and finger oils, then sprayed an overcoat of 3 parts Dullcote/ 2 parts Glosscote appropriately thinned. I then weathered the model with drybrushed Aluminum and airbrushed aircraft Interior Black ( a dirty dark grey that looks more 'scale' than flat black).
 Now it was
time to crash the aircraft. The base was made from a wooden plaque, bought
for 50 cents from a craft store, sanded and stained. The 'snow' was laid
by pouring on plaster to get the correct contours. While it was still wet,
but after it had started to set, I laid piece of plastic across it and pushed
the model in to make a hollow for the aircraft to sit in. After the plaster
was fully set, I superglued the model in place. I then liberally applied
acrylic gloss medium (in my case Plaid Royal Finish Decoupage Finish, which
you can get in the craft section of any Wal-Mart), filling in all gaps around
the wings, and coating all the plaster. This gives the base a smooth surface,
and gives the snow something to stick to. Microballoons, a finely ground
foam used for R/C airplanes, was then sprinkled over the still wet gloss
medium.
Now it was
time to crash the aircraft. The base was made from a wooden plaque, bought
for 50 cents from a craft store, sanded and stained. The 'snow' was laid
by pouring on plaster to get the correct contours. While it was still wet,
but after it had started to set, I laid piece of plastic across it and pushed
the model in to make a hollow for the aircraft to sit in. After the plaster
was fully set, I superglued the model in place. I then liberally applied
acrylic gloss medium (in my case Plaid Royal Finish Decoupage Finish, which
you can get in the craft section of any Wal-Mart), filling in all gaps around
the wings, and coating all the plaster. This gives the base a smooth surface,
and gives the snow something to stick to. Microballoons, a finely ground
foam used for R/C airplanes, was then sprinkled over the still wet gloss
medium.
Microballoons give the best representation of powder snow in this scale; ice and snow that's melted and refrozen are better represented by sugar crystals. After all this had dried I added the finishing touches. The clear parts were dipped in Future. The canopy was affixed with thinned white glue and the framing 'painted' with decal strips. The lenses of the landing lights had been sanded off previously; I now slipped the heads of shirt pins, painted white, into holes drilled for the purpose, then affixed the clear light covers. Wingtip lights were painted silver, then overcoated with Tamiya Clear Red (left) and Clear Green (right). The radio aerial was made from 1-lb test Trilene fishing line.
Despite the problems, I'm pretty happy with this kit. The Hasegawa IIC is better all around, but it's more expensive too. Aeromaster makes at least three decal sheets for Hurricanes, so there's plenty of subjects available to build - so why not get a Hobbycraft kit, fix the problems you now know about, and add a nice looking model of a WW2 workhorse to your collection?
Many thanks to Charles Metz, Tom Cleaver, Matt Bittners, Dave Wadman, Bill Shuey, Mark Aldritch, and A.V. Suvoroff for their kind assistance.
Copyright ModelingMadness.com. All rights reserved. No reproduction in part or in whole without express permission.