Hobbycraft 1/48 Supermarine Seafire XV
|
KIT # |
HC 1584 |
|
PRICE: |
$13.98 MSRP |
|
DECALS: |
See review |
|
REVIEWER: |
Michael Leduc |
|
NOTES: |
Belcher decals |
|
HISTORY |
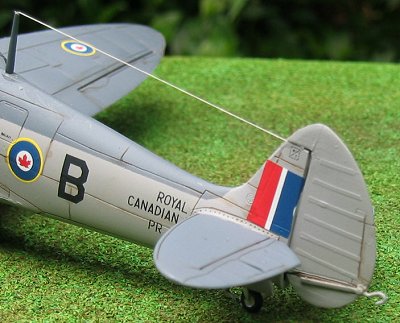
This history of the Spitfire in general is well covered ground, but the Seafire XV is a bit of an oddball so it merits some mention. It is essentially a navalized version of the first Griffon-engined Spitfire, the Mark XII, which was not really a new airframe designed around the engine, but rather cobbled together out of various elements of Merlin engined marks. The early Seafire XV with the A-frame arrester hook set-up proved to be very close in appearance to the Mk XII, albeit with folding wings, but a later development featured a larger rudder and a “stinger” style arrester hook. The Hobbycraft kit represents this later variant but falls down in this regard in certain important details, but I’ll address that point a bit later…
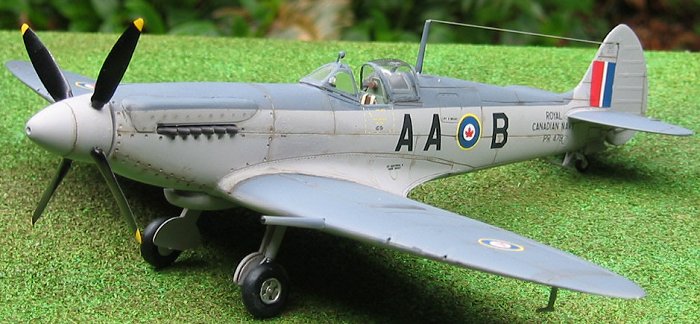
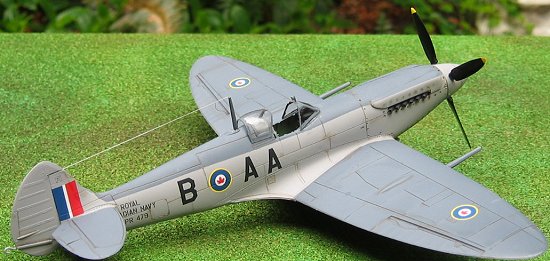
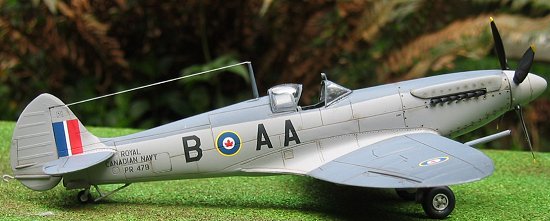 As for the aircraft I am modeling. Canada received 35 Seafires from Royal
Navy stock in 1946, in both A-frame and Stinger types—which makes things
somewhat confusing for modelers. My model is of a Royal Canadian Navy
Aircraft, Serial #PR479 AA*B, First Training Group based in Dartmouth Nova
Scotia.
As for the aircraft I am modeling. Canada received 35 Seafires from Royal
Navy stock in 1946, in both A-frame and Stinger types—which makes things
somewhat confusing for modelers. My model is of a Royal Canadian Navy
Aircraft, Serial #PR479 AA*B, First Training Group based in Dartmouth Nova
Scotia.
A couple of—ahem, words about Hobbycraft in general: I think they are a company both loved (?) and hated by modelers. I suggest that they are loved, (or at least sort of liked) because they are willing to commit to plastic some rather esoteric types such as I-16’s, early Bf 109’s, P-59’s, P-36’s, and the Seafire featured here. Though lately it seems they have been slowly making progress and making better kits, it was their early inattention to detail and lack of awareness to what level of quality modelers expect that makes many turn up their noses at any Hobbycraft offering. This is somewhat unfortunate I think because there are some gems buried in the manure. But what of the Seafire XV? Read on…
|
THE KIT |
This kit comes is a box
with a reasonable rendition of a Seafire in flight on the cover bordered by
white…why do I bring up the border? Well, when one encounters a Hobbycraft
kit on a shop shelf it is quite important to distinguish between an old
issue (box border in white or grey) and a new issue (box border in black),
that is if you have any intention of using the kit decals. I believe the
newer issue decals compare favorably to any others
 in
business, however the old ones are invariably out of register with garish
and inaccurate colors, and oh--they don’t adhere to the model worth a damn
either.
in
business, however the old ones are invariably out of register with garish
and inaccurate colors, and oh--they don’t adhere to the model worth a damn
either.
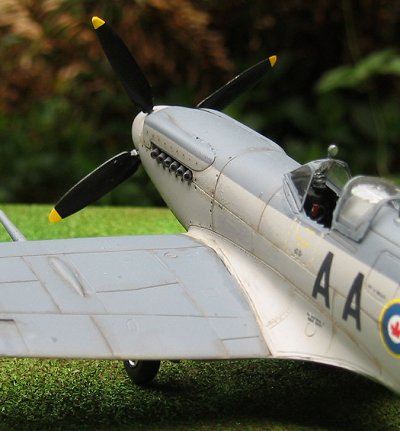
The kit itself is molded in a plastic that is workable enough, but trouble appears as soon as you lift the first fuselage half from out of the box. What you first surmise is that the scriber took off for lunch or a dental appointment and neglected to add any details to the front of the aircraft. Not a big deal here you think. The second thing is that the rudder is incorrect. If this were an early A-frame aircraft the rudder would be acceptable, as it is of the Mk VIII/Mk XII type, however the late-stinger XV’s had a larger rudder somewhat similar to what was on a Spitfire Mk XIV.
Digging deeper into the box you are struck not with an overall impression of terrible-ness, just of frustrating mediocrity. The canopy is misshapen and thick. The cockpit has very little detail and what detail there is clunky and out of proportion. The main gear legs seem to represent straight tubes with no features on them at all. The spinner and prop blades just seem somewhat weird. The roundels on the decal sheet are brilliant Royal Blue and Guards Red, and are of course, out of register. The illustrations on the instruction sheet are amateurish and out of proportion. Nothing here seems exciting and exudes any sort of quality—everything seems just barely adequate for the matter at hand. However it is what it is and one must press on.
|
CONSTRUCTION |
The first order of business was to do something about the lack of detail on the forward fuselage. I had picked up some Cooper details “Griffon Spitfire Rocker Covers”, (which are very nice items I should mention) and committed myself to using them. Using my Dremel tool I ground off the raised lumps that approximated for the kit’s rendition of rocker covers. I then scribed a missing panel line that represented the side engine cover and using a drill bit in a pin vise worked in the missing rivet detail. In hindsight it may have been a bit heavy but it was my fist time doing this, so better luck next time I guess. My next angle of attack was to tackle the rudder. I removed the old one with razor saw and cleaned up the join. I then stole a Mk XIV rudder from one on my Daco Spitfire Mk XIV upgrade kits and with one eye on my drawings attacked it with a sanding stick. I then bent a new arrester hook out of florist’s stem wire and glued it into place with super glue. My final touch was to take a thin strip of Evergreen strip, to represent the bulge of the hook within the lower rudder portion and glue it to place and scribe a little bit, so that there appeared to be so delineation between the upper and lower parts.
 As I mentioned earlier the cockpit was less than exciting, the instrument
had flat discs instead of instrument detail. The control column is about 33%
too large and the rudder pedals looked like medieval torture devices. That
said I decided I didn’t want to go whole hog on this kit and my big
compromise was to insert one of the excellent Spitfire seats from Ultracast.
Once painted up having this as a focal point improved things immensely.
As I mentioned earlier the cockpit was less than exciting, the instrument
had flat discs instead of instrument detail. The control column is about 33%
too large and the rudder pedals looked like medieval torture devices. That
said I decided I didn’t want to go whole hog on this kit and my big
compromise was to insert one of the excellent Spitfire seats from Ultracast.
Once painted up having this as a focal point improved things immensely.
One thing you can’t say about Hobbycraft kits, you can’t accuse them of being difficult to assemble. Once the cockpit was done the major parts of the airframe were glued together very quickly. One thing I will complain about here is the carburetor intake-- There is no intake. That is to say there is no hole where a hole should be, just a flat surface. I wasn’t feeling that ambitious so I left that as it was and moved on. However I did take the time to drill out the exhausts, so my upgrading attempts I’ll admit were spurious at best.
The spinner is something that has been criticized by other builders, while I agree it looks a little weird it is easy to make look acceptable. A bit of filler at the join of the two parts and some sanding at the back end gets the shape right, scribing a line around it about 3/5 of the way up from the base completes it. The propeller blades are not right, but I didn’t have any great ideas on what to do there.
With that the Seafire was ready for the paintshop…
|
COLORS AND MARKINGS |
 I
use acrylic paints and I’m generally not too picky. “Whoever has the color I
want” is my motto. I used Tamiya “Sky Grey” for the undersides and Polly
Scale “Extra Dark Sea Grey” for the upper surfaces. There is some debate
with regards to RCN aircraft in general as to the correct color for the
undersurfaces. Some say “Sky” as they have doubts they would have been
repainted when transferred from the Royal Navy. Others insist on “Medium Sea
Grey” saying Canada would use British paint stocks at least. I can say from
my point of view I painted a Sea Fury with Medium Sea Grey and find that it
looks too dark. I therefore am siding with the third point of view that
sides with “Sky Gray”.
I
use acrylic paints and I’m generally not too picky. “Whoever has the color I
want” is my motto. I used Tamiya “Sky Grey” for the undersides and Polly
Scale “Extra Dark Sea Grey” for the upper surfaces. There is some debate
with regards to RCN aircraft in general as to the correct color for the
undersurfaces. Some say “Sky” as they have doubts they would have been
repainted when transferred from the Royal Navy. Others insist on “Medium Sea
Grey” saying Canada would use British paint stocks at least. I can say from
my point of view I painted a Sea Fury with Medium Sea Grey and find that it
looks too dark. I therefore am siding with the third point of view that
sides with “Sky Gray”.
The Decals are from Belcher Bits from their “Royal Canadian Navy Fighters” Collection featuring Seafires, Fireflys and Sea Furys-- and I can say they may be some of the best decals I have used. The only thing I might criticize is that they do not differentiate between the two Seafire types and which decals should be used for which and there are no three-views, so their placement instructions are not as clear as one would like. That said they did respond very well to my preferred decal-setting solution Gunze Mr.Mark Softer and looked very nice when all was said and done.
|
FINAL CONSTRUCTION |
As
mentioned earlier, the one-piece canopy was useless so I ended up using a
Squadron vacu-form one intended for the Spitfire Mk XIV. The rear portion
did not fit so I did end up using this part of the kit’s canopy which I
carefully sawed off with my razor saw.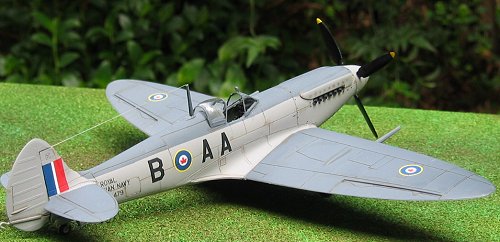
A big problem was with the landing gear legs, not only was there a distressing absence of any detail, but as I discovered when I had them fitted in they were far too long, giving the aircraft the appearance of being on stilts. I pulled them out of their sockets and chopped them down by about 1/8” and that seemed to make things a little better.
There was a similar problem for the cage guard for the tail wheel, again I had to cut the part down and wound up using a length of stem wire for the main part of the guard.
The final touch was the antenna mast and wire. As per usual I spent a good half hour with tweezers and elastic thread trying to get it to stick into the tiny drop of super glue. I’m glad to say it finally worked out.
|
CONCLUSIONS |
Well despite all of my complaints and criticisms I can honestly say I enjoyed making this model. I am also very happy to add another Canadian subject to the shelf. (honestly, what we Canucks are forced to work with!). While there were a lot of modifications I did, but there were probably a lot I should have done; ie prop blades, cockpit, undercarriage. In the end analysis I guess I didn’t really want the perfect model, just something cool I could admire for a while before forgetting it and moving on to the next project.
I know it is a popular thing to exhort manufacturers to take on a pet subject and it is mostly useless banter as the companies themselves no doubt have their own agendas. With that disclaimer I think it would be a very nice project for a smaller company like Classic Airframes or MPM/Special Hobby to tackle the complete Seafire XV/Seafire XVII line. (the Seafire XVII is the cut-down fuselage/bubble canopy version of the XV). Well I can dream can’t I?
In the meantime this kit is what we have. Is it bad? Definitely--yes. Is it absolutely terrible? Mmmm—Let’s say that crap is in the eye of the beholder . Consider this review as an invitation to finally let go those buried Hobbycraft fears and give one a crack for yourself. So what is next for me? Perhaps the Hobbycraft Vampire…
|
REFERENCES |
My main reference for this build was “The Supermarine Spitfire-Part II Griffon Powered- A Comprehensive Guide for the Modeller” by Robert Humphreys, SAM Publications.
Copyright ModelingMadness.com. All rights reserved. No reproduction in any form without express permission from the editor.
If you would like your product reviewed fairly and quickly, please contact the editor or see other details in the Note to Contributors.