Tamiya 1/48 Seafire III
|
KIT # |
61033 |
|
PRICE: |
£19.57 |
|
DECALS: |
Aeromaster 'Seafire pt 3' |
|
REVIEWER: |
Michael Leduc |
|
NOTES: |
Conversion using
Airwaves set #48065: My first resin conversion. |
|
HISTORY & BACKGROUND |
"Following on the success of the Hawker Sea Hurricane in carrier borne operations, the decision was taken to go ahead with a naval version of the Supermarine Spitfire. A Spitfire Vb, fitted in 1941 with an arrester hook beneath the fuselage, was flown onto the HMS Illustrious for compatibility trials. While the Spitfire’s narrow track landing gear made it more difficult to operate aboard carriers than the Hurricane, the concept was proved and work began on converting a number of existing Spitfires, the name Seafire being chosen for the modified aircraft…
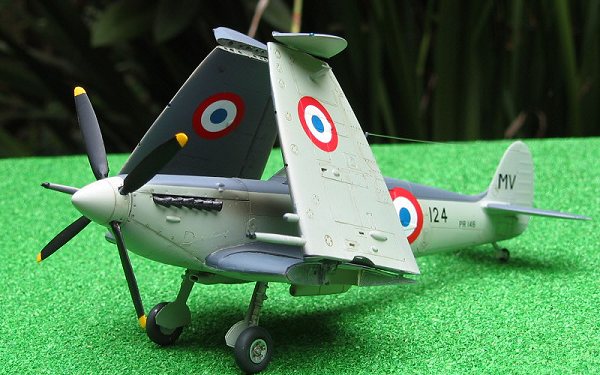
…the Seafire III introduced a manually folding wing, folding upwards from just inboard of the cannon, with the wingtips folding downwards. This enabled Seafires to be moved on carrier lifts, and made deck handling in general considerably easier. The Seafire III prototype was a converted IIC, and the new mark went into production in 1943, a total of 1220 being built between November 1943 and July 1945, 870 by Westland and 350 by Cunliffe-Owen."
-from British Aircraft of WW2 by David Mondey
 Having built several Spitfires of various marks in various scales, I firmly
decided I wanted something new and exciting and different. I had picked up the
Aeromaster sheet for Seafires at the local shop and was disappointed to find
that no-one actually made a kit of the Seafire III (though Airfix has recently
rectified this, wouldntchya know…). I poked around through my modeling
magazines and the Internet shops and found the Airwaves conversion at an unnamed
online modeling shop at the eye-popping price of $45. This somehow gave me the
incentive to hunt around even more. Realizing that Airwaves is a British outfit,
I went straight to the Hannant's website and found it here for a significant
discount. One thing to keep in mind is that at Hannant's, there is a minimum
order amount, so it is best to make a shopping trip out of it. Here, I
discovered that there are in fact two separate conversions available for the
Seafire III, one of which is a straight wing aircraft, the other features the
folded wing. Even though this was my first crack at a real conversion and I had
my apprehensions, my impulse was to take the great plunge and order the folded
wing set.
Having built several Spitfires of various marks in various scales, I firmly
decided I wanted something new and exciting and different. I had picked up the
Aeromaster sheet for Seafires at the local shop and was disappointed to find
that no-one actually made a kit of the Seafire III (though Airfix has recently
rectified this, wouldntchya know…). I poked around through my modeling
magazines and the Internet shops and found the Airwaves conversion at an unnamed
online modeling shop at the eye-popping price of $45. This somehow gave me the
incentive to hunt around even more. Realizing that Airwaves is a British outfit,
I went straight to the Hannant's website and found it here for a significant
discount. One thing to keep in mind is that at Hannant's, there is a minimum
order amount, so it is best to make a shopping trip out of it. Here, I
discovered that there are in fact two separate conversions available for the
Seafire III, one of which is a straight wing aircraft, the other features the
folded wing. Even though this was my first crack at a real conversion and I had
my apprehensions, my impulse was to take the great plunge and order the folded
wing set.
|
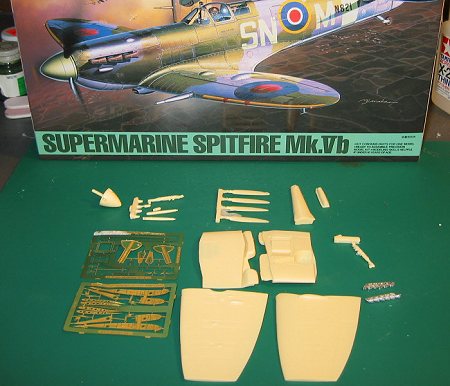
THE KIT |
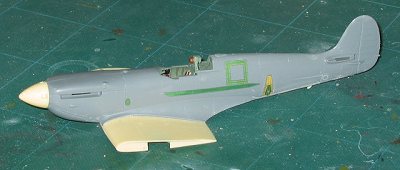
The Tamiya Spitfire Vb kit is overall perhaps one of the nicer kits I have seen. There are three nice decal options, none of which I would use naturally, but important just the same. The moldings are nice and crisp and there is no flash whatsoever. The clear parts are very good with both options for the pressurized and non-pressurized versions. The cockpit appeared to be much more detailed than the P-51 kit I recently built so I was happy. In my anticipation for building I cut some pieces off the trees and dry-fitted them and found that the fit was excellent—this is a good step to do on any kit. All of this boded well for a nice and easy conversion.
 In general I am an
“out-of-the-box” kind of a guy. The one area I do add to a kit it the seat by
putting in some sort of seatbelts. I figure that this is the area in the cockpit
that people do notice, so with this in mind I had invested in some seats
from Ultracast. I think these seats are just excellent and are a huge
improvement over the seat that comes with the kit. The seatbelts are raised and
easy to paint. With a nice oil wash all this raised detail looks great.
In general I am an
“out-of-the-box” kind of a guy. The one area I do add to a kit it the seat by
putting in some sort of seatbelts. I figure that this is the area in the cockpit
that people do notice, so with this in mind I had invested in some seats
from Ultracast. I think these seats are just excellent and are a huge
improvement over the seat that comes with the kit. The seatbelts are raised and
easy to paint. With a nice oil wash all this raised detail looks great.
When I opened up the package for the Airwaves conversion all I could say was “Oh, Groan! What have I gotten myself into?” The conversion is definitely extensive with a two frets of etched brass and a slew of resin bits, including wings and a new spinner and propeller. There are also some very nicely cast exhausts of white metal. One thing different that I wished they would have had was a separate tail hook piece rather than having it cast as integral with the fuselage insert, but that is a nit pick. It all looked very good but at same time very intimidating.
|
CONSTRUCTION |
 The first thing I started with the most nerve wracking--the cutting up of the
parts. I had to cut out the lover fuselage to accommodate the tail hook insert.
This seemed to go all right and I breathed a sigh of relief as the insert fit in
snugly. The next task was more plastic cutting as I needed to cut out and keep
the center section of the lower wing. This did not go quite as well as I decided
I would definitely need a bit of filler here to smooth over some gaps, no glitch
more than a half millimeter wide here though, so not too bad. Once the scary
parts were done I could pretty much build up the kit interior as per the
instructions and as you would expect from a Tamiya kit, everything went together
smoothly. Once the fuselage halves were glued together I super-glued in the tail
hook insert—no
The first thing I started with the most nerve wracking--the cutting up of the
parts. I had to cut out the lover fuselage to accommodate the tail hook insert.
This seemed to go all right and I breathed a sigh of relief as the insert fit in
snugly. The next task was more plastic cutting as I needed to cut out and keep
the center section of the lower wing. This did not go quite as well as I decided
I would definitely need a bit of filler here to smooth over some gaps, no glitch
more than a half millimeter wide here though, so not too bad. Once the scary
parts were done I could pretty much build up the kit interior as per the
instructions and as you would expect from a Tamiya kit, everything went together
smoothly. Once the fuselage halves were glued together I super-glued in the tail
hook insert—no 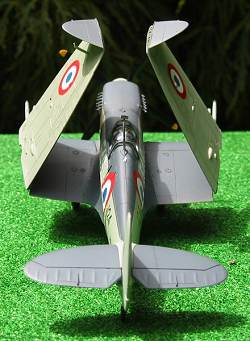 problems
here. Next were the resin inner wings—here’s where I screwed up a bit. I really
should have dry fit and ultimately taken a millimeter off the join line, but
instead I let fly with the glue and as a result ended up with a slight lip at
the wing root. I could blame the kit or the conversion, but ultimately the blame
must lie with me and my impatience.
problems
here. Next were the resin inner wings—here’s where I screwed up a bit. I really
should have dry fit and ultimately taken a millimeter off the join line, but
instead I let fly with the glue and as a result ended up with a slight lip at
the wing root. I could blame the kit or the conversion, but ultimately the blame
must lie with me and my impatience.
Once this fuselage was together it was time to glue on the various etched brass stiffening plates along the fuselage size—no problems here. Once this was done I thought I would tackle the outer wings and tips. The wing tips are taken straight from the kit. The tabs do have to be cut off and everything has to be sanded somewhat to fit with the etched brass. Now that I was into brass this was this part that I was actually the most frightened off. I was pleasantly surprised to find that I could actually manipulate this brass stuff…
One thing I soon discovered was how brittle this resin stuff is. I had just glued in the cannon barrel and the wingtip and was moving the wing back to the desk when it somehow slipped out my hand onto the concrete floor. The superglued wingtip held, but the resin cannon barrel snapped off and sailed off into regions unknown. I spent a good twenty minutes hunting for it cursing it and speculating that if it were Tamiya’s plastic instead of resin I wouldn’t be on my hands and knees sweeping away cobwebs. The barrel was located and glued back in place. At this point I had three major sub-assemblies and it was time to start to paint.
|
PAINTING & MARKINGS |
I paint with acrylics. This shouldn’t present too many problems in theory except that I can’t find all the colors I need in any one brand, so I use a hodgepodge:
Testors ModelMaster Acryl for the RAF Sky.
PollyScale – For the Extra Dark Sea Grey.
Tamiya “Semi-gloss Black” and “Yellow” for the prop blades.
AeroMaster “Tire Black” for the tires.
 In reality, each of these
paints uses a different thinner and subsequently has a different dry time. So
who should I blame because I masked off the RAF Sky much too early and
subsequently lifted up the paint off the cowl? Me, I guess--Me and that darned
impatience…Sooo…after some halfway successful touchup efforts with the
paintbrush I was now ready for decaling. The Sky and Sea Grey seemed to be more
of an eggshell texture that flat, so I didn’t bother with spraying a gloss
coat.
In reality, each of these
paints uses a different thinner and subsequently has a different dry time. So
who should I blame because I masked off the RAF Sky much too early and
subsequently lifted up the paint off the cowl? Me, I guess--Me and that darned
impatience…Sooo…after some halfway successful touchup efforts with the
paintbrush I was now ready for decaling. The Sky and Sea Grey seemed to be more
of an eggshell texture that flat, so I didn’t bother with spraying a gloss
coat.
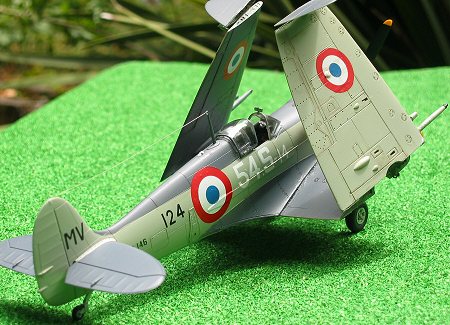
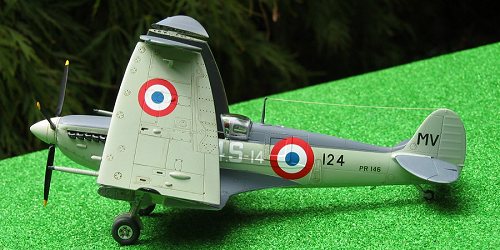
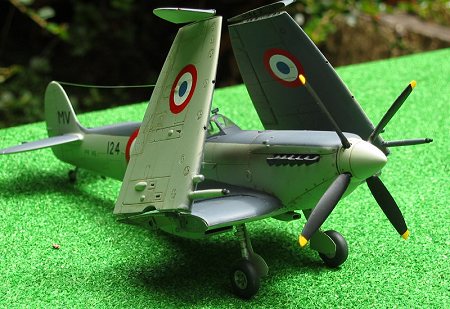
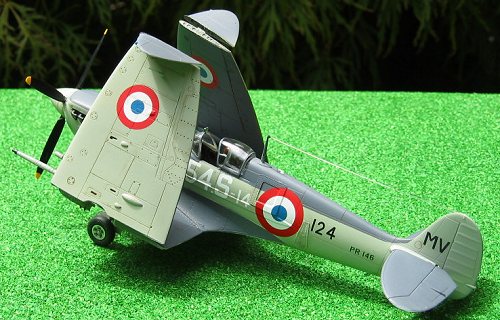
I had decided on doing PR146 of Escadrille 54, de l’Aeronautique Naval, Carrier ‘Arromanches’, Indochina, 1948—basically for no other reason that because I liked the look of those red French roundels. The decals were of great quality as I expected they would be and responded well to my Gunze Mr. Mark Softer.
Once the decals were set I gave the model a spray of Aeromaster flat. I then weathered the model with a thin wash of turpentine and oil paints, a mix of burnt umber and sienna.
The metal exhaust stacks were painted with Testors Metalizer “Burnt Iron” and glued in. Light exhaust staining was sprayed in with Tamiya “Smoke”
|
CONSTRUCTION CONTINUES |
 The tricky part of this whole kit turned out to be the attachment of the folded
part of the wings to the rest of the plane. I usually leave things like the
landing gear and aerials and such off until last because I don’t trust myself
not to bang them off while handling them. In this case the wings were the most
delicate part of the enterprise. So balancing everything precariously in my lap
I slathered some superglue onto the wing and glued in the etch brass hinge.
Superglue has this nasty habit of preferring to attach to skin rather than what
you want it to, so I took a couple attempts to get it all right. The last thing
I did was attach an aerial wire from stretched clear sprue and glue the rearview
mirror onto the windscreen. As you may be able to notice it is not perfectly
straight. I guess my question would be whether these were square on the real
thing and the pilots always looked straight back or if they preferred to have a
slight left or right canted view…
The tricky part of this whole kit turned out to be the attachment of the folded
part of the wings to the rest of the plane. I usually leave things like the
landing gear and aerials and such off until last because I don’t trust myself
not to bang them off while handling them. In this case the wings were the most
delicate part of the enterprise. So balancing everything precariously in my lap
I slathered some superglue onto the wing and glued in the etch brass hinge.
Superglue has this nasty habit of preferring to attach to skin rather than what
you want it to, so I took a couple attempts to get it all right. The last thing
I did was attach an aerial wire from stretched clear sprue and glue the rearview
mirror onto the windscreen. As you may be able to notice it is not perfectly
straight. I guess my question would be whether these were square on the real
thing and the pilots always looked straight back or if they preferred to have a
slight left or right canted view…
|
CONCLUSIONS |
Well quite frankly, I really loved this project. It both challenged my skills and fed my desire for something different. I feel I could have done a much better job with that all important ingredient, patience. I actually liked this so much I went back to Hannant's and ordered the Straight-wing version so I can build one of the other attractive options on the Aeromaster sheet.
In spite of its complexity I would recommend this conversion to anyone that has a few kits under their belt. It really wasn’t all that hard and all that is needed is confidence and as I’ve said throughout the article, patience.
Copyright ModelingMadness.com
If you would like your product reviewed fairly and fairly quickly, please contact the editor or see other details in the Note to Contributors.
Back to Reviews Page 2017