| KIT: | ICM 1/48 Spitfire IXe |
| KIT #: | 48068 |
| PRICE: | $21.00 CDN |
| DECALS: | Two options |
| REVIEWER: | Olivier Lacombe |
| NOTES: | Converted to Mk IXb |
| HISTORY |
The Spitfire. What can we say about this aircraft that hasn’t been said before? I suggest that you browse through the extensive reviews of this aircraft for historical notes.
 In 1969, a movie that would spawn the Warbirds restoration movement was
released. Its title was Battle of Britain. It featured a dozen
airworthy Spits, 3 Hurricanes, seventeen Hispano HA-1112 Buchóns and 32
Casa 2111 (licensed-built He 111). The cast included Michael Caine,
Robert Shaw, Edward Fox and Laurence Olivier. Locations included Duxford,
Hawkinge and other historic airfields. Most of the British fighters used
during filming are still airworthy today, and a few Buchóns still grace the
skies in the USA, United Kingdom and Belgium. Unfortunately, the last
flying Casa 2111 tragically crashed in 2003.
In 1969, a movie that would spawn the Warbirds restoration movement was
released. Its title was Battle of Britain. It featured a dozen
airworthy Spits, 3 Hurricanes, seventeen Hispano HA-1112 Buchóns and 32
Casa 2111 (licensed-built He 111). The cast included Michael Caine,
Robert Shaw, Edward Fox and Laurence Olivier. Locations included Duxford,
Hawkinge and other historic airfields. Most of the British fighters used
during filming are still airworthy today, and a few Buchóns still grace the
skies in the USA, United Kingdom and Belgium. Unfortunately, the last
flying Casa 2111 tragically crashed in 2003.
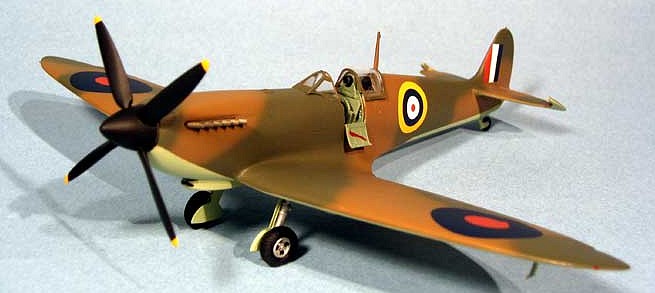
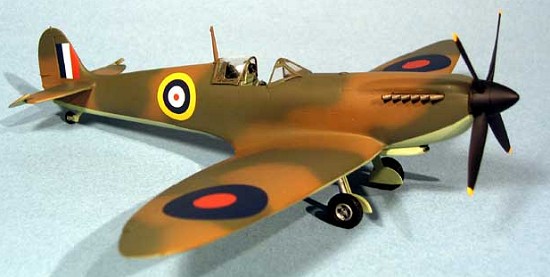
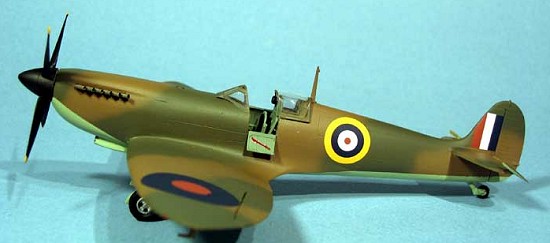
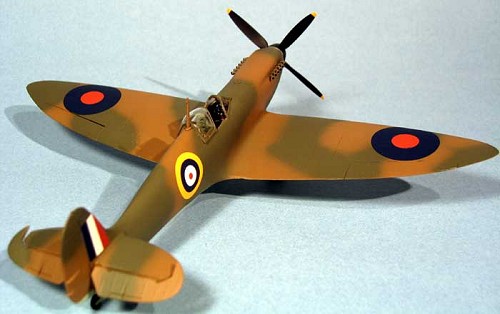
One of the Spits used in this movie was MH434, now owned by the Old Flying Machine Company at Duxford. This particular airframe is one of the most recognized Spit still flying today, having been the star of countless air shows and fly-ins, as well as an important screen presence. I decided that my Battle of Britain collection would include a Spit, so why not MH434?
| THE KIT |
 Before attacking the plastic, it was important to note the differences
between the Mk.IXb and the IXe, as well as the modifications made to MH434
for the purpose of filming. Firstly the ICM kit features the tall rudder
of late Spits, where as the IXb has the more common rounded one. A
replacement was found in a Hasegawa kit. Next, the wings bulges for the
armament are not the same. The IXb had the “b” wing and was thus armed
with two 20mm guns and 4 .303 machine guns, just like most of the Vs. As a
matter of fact, early IXs were modified Vs. I was helped by the fact that
for the movies, the wing bulges were replaced by flat panels to make the
wing look like the one of a Mk.I. I would simply have to sand the bulges
away. Next, the wheels were important. Spitfires sported many types of
wheels, and post-war Spits are no exceptions. Luckily for me, Ultracast
released the right kind of wheels as I was building this kit, so they were
obtained from them. They are of the block-thread, four holes variety.
Lastly, MH434 is powered by a Packard Merlin 266 instead of a Merlin 61, so
new exhausts had to be found. More on that later.
Before attacking the plastic, it was important to note the differences
between the Mk.IXb and the IXe, as well as the modifications made to MH434
for the purpose of filming. Firstly the ICM kit features the tall rudder
of late Spits, where as the IXb has the more common rounded one. A
replacement was found in a Hasegawa kit. Next, the wings bulges for the
armament are not the same. The IXb had the “b” wing and was thus armed
with two 20mm guns and 4 .303 machine guns, just like most of the Vs. As a
matter of fact, early IXs were modified Vs. I was helped by the fact that
for the movies, the wing bulges were replaced by flat panels to make the
wing look like the one of a Mk.I. I would simply have to sand the bulges
away. Next, the wheels were important. Spitfires sported many types of
wheels, and post-war Spits are no exceptions. Luckily for me, Ultracast
released the right kind of wheels as I was building this kit, so they were
obtained from them. They are of the block-thread, four holes variety.
Lastly, MH434 is powered by a Packard Merlin 266 instead of a Merlin 61, so
new exhausts had to be found. More on that later.
| CONSTRUCTION |
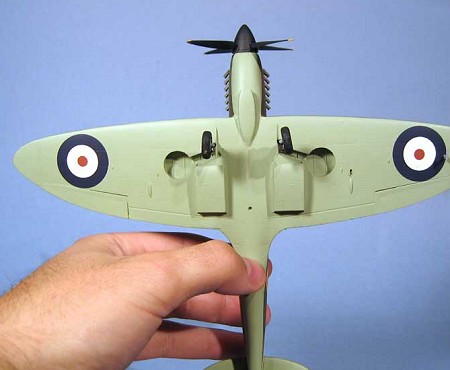
Construction really started with the cockpit, which was painted Model Master RAF Interior Green with a black instrument panels. I dry brushed the dials with aluminium paint to make the details stand out. The cockpit door was removed from the port fuselage and I also constructed a bare Merlin engine block to hold the exhaust and I glued the fire wall in the fuselage in an attempt to have more or less correctly positioned wing. Nothing good came out of it, so I removed the firewall, glued the engine mount where I could all the while setting the engine straight and I almost managed a good job.
 The above step was made with the wings taped together as I hadn’t sanded
the bulges yet. I used Tamiya’s two-part putty to fill the bumps from
behind and the big sanding stick was taken out of its lair to make short
work of the bulges. I also sanded away the canon stubs on the leading
edge, as during the filming, no Spit exhibited them. The wings were then
mated to the fuselage, but the fit wasn’t stellar. After a fair amount of
fiddling around with it, I managed to get them to sit as I wanted them to.
The canon panels were glued at this point and all the seams were dispatched
with Tamiya putty. I re-scribed a few panel lines that were molested
during this intensive sanding session.
The above step was made with the wings taped together as I hadn’t sanded
the bulges yet. I used Tamiya’s two-part putty to fill the bumps from
behind and the big sanding stick was taken out of its lair to make short
work of the bulges. I also sanded away the canon stubs on the leading
edge, as during the filming, no Spit exhibited them. The wings were then
mated to the fuselage, but the fit wasn’t stellar. After a fair amount of
fiddling around with it, I managed to get them to sit as I wanted them to.
The canon panels were glued at this point and all the seams were dispatched
with Tamiya putty. I re-scribed a few panel lines that were molested
during this intensive sanding session.
Before adding the stabs to the kit, I separated the elevators as I intended to replace them with Ultracast parts. They were then glued in place and the seams dispatched in the same way as above. I discarded the kit’s propeller and used yet another Ultracast product to replace it. I think that Ultracast parts really help to improve the look of the ICM kits and I heartily recommend them. I glued the radiators to the underside of the wing, and the fit is not stellar. Again, the remedy consists of putty and sanding.
The transparencies were masked and I glued on the windscreen and the little window behind the sliding hood prior to painting.
| COLORS & MARKINGS |
Painting
This wasn’t going to be your standard RAF scheme since the one used in the movie differs a bit from the standards. Using Battle of Britain Film the Photo Album, I cobbled up enough reference to replicate the pattern. The underside was first painted with Tamiya Sky, after which it was masked and the top camouflage was done with Gunze RAF Dark Earth and Dark Green, using the pictures in the book as a guide. The propeller was airbrushed Flat Black.
Construction continues
 Using Tom Cleaver’s many
reviews of the same kit as a guide, I modified the landing gear struts by
removing the oleo to shorten them. This make the Spit sit at the right
angle and height, otherwise it would look silly. I glued the resin
elevators in place, setting them in a lowered stance.
Using Tom Cleaver’s many
reviews of the same kit as a guide, I modified the landing gear struts by
removing the oleo to shorten them. This make the Spit sit at the right
angle and height, otherwise it would look silly. I glued the resin
elevators in place, setting them in a lowered stance.
The radio mast was added and the quest of the markings had me contact a friend in the United Kingdom who sent me Fantasy Printshop white RAF 24’’ letters. Before moving to the decal, I decided to make the prominent gun patches on the leading edges of the wings. I first started by cutting Tamiya masking tape to shape, and then painting it a flu-ish orange-red, but it really looked bad, so I ripped them off, masked the patches on the wings and painted them on. The result was no better! I had no choice but to sand the leading edges and redo the camo…
Decals
After a coat of Future, I applied Aeromaster roundels to the aircraft from their Spitfire and Hurricane early standard markings. They went on beautifully. I then applied the white letters, but they proved to be too thin, albeit of the right height. Oh well… Saddened, I searched for gun patches, but I couldn’t find any of the right size… But all was not lost. In the aforementioned book, there is a picture of the many Spits and Hurricanes sitting outside at Duxford without any buzz letters and serials, so my little story is that my kit represents MH434 before it got the gun patches…
| FINAL CONSTRUCTION |
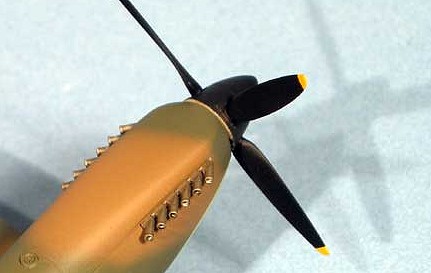 All that remained now were
the exhausts. When a Spitfire is equipped with a Packard 266, it usually
sport ejector-type exhausts in place of the more commonly seen fishtail
variant. As the 266 is also the P-51’s engine, I looked in a P-51 kit for
a spare set, but the exhausts on a Mustang is not the same as on a Spit.
Once again, Ultracast came to the rescue with resin exhausts meant for the
Hasegawa Spitfire. When I received them, a few swipes with a sanding stick
was all they needed to fit on the ICM kit. Using pictures I took of
Spitfire XVI SL721, I placed them at the correct angle, before clearing the
kit with Poly Scale Flat Coat.
All that remained now were
the exhausts. When a Spitfire is equipped with a Packard 266, it usually
sport ejector-type exhausts in place of the more commonly seen fishtail
variant. As the 266 is also the P-51’s engine, I looked in a P-51 kit for
a spare set, but the exhausts on a Mustang is not the same as on a Spit.
Once again, Ultracast came to the rescue with resin exhausts meant for the
Hasegawa Spitfire. When I received them, a few swipes with a sanding stick
was all they needed to fit on the ICM kit. Using pictures I took of
Spitfire XVI SL721, I placed them at the correct angle, before clearing the
kit with Poly Scale Flat Coat.
| CONCLUSIONS |
Another Spit on the shelf! I can’t say that I’ll ever have too many of these around since you have an almost unlimited choice of markings. And you can add to the challenge by making a post-war one!
November 2004
| REFERENCES |
RUDHALL, Robert J, Battle of Britain Film the Photo Album , Worcester, Ramrod Publications, 2001
If you would like your product reviewed fairly and quickly by a site that has over 250,000 visitors a month, please contact me or see other details in the Note to Contributors.