|
KIT: |
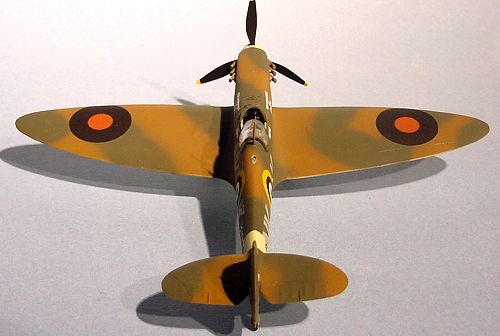
Revell 1/48 Spitfire II |
|
KIT # |
5239 |
|
PRICE: |
$13.99 |
|
DECALS: |
Two Aircraft |
|
REVIEWER: |
|
|
NOTES: |
|
BACKGROUND |
For a brief history on the Spitfire and a look in the box, please read the preview.
|
CONSTRUCTION |
Since there are not a lot of parts to this kit, construction was pretty easy and straightforward. I started out by painting the interior components (control column, seat, instrument panel, rear bulkhead), the interior walls and the radiator/oil cooler pits Model Master Interior Green. As always, I used a brush since my paint shop is far from my home and it’ll be a waste of time to drive down there every time I have to paint a part. Once everything was dry, I picked up details with Flat Black and Guards Red (emergency crowbar and brake lever). I did the necessary Interior Green touch ups and painted the seat Model Master Olive Drab and used the kit supplied decals for the seatbelts. The rudder pedals were painted aluminium while their rack received a coat of Interior Green. Everything was glued together and put into the fuselage, which was glued right after that. One thing sticks out (literally!) from the cockpit assembly: the stick. It seems to ride high for the pilot to grab, but once everything is in the fuselage, the proportions are about right. Also, you have to remember that this is an old kit.
After joining the two fuselage halves together, I noticed that the propeller shaft was offset and looked pretty shabby. I cut it away with cutters and sanded the front of the fuselage until it was flat. I would simply have to glue the propeller on without a shaft.
 I glued the radiator in the
bottom wing half, but I painted it Aluminium (small Testor jar) beforehand. I
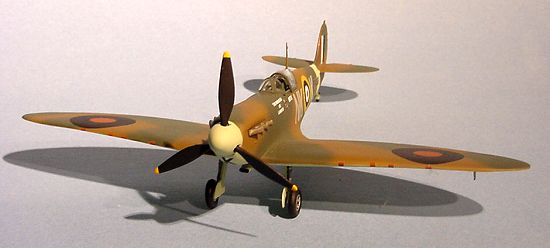
then glued the two halves together and had the shock of my life (well, kinda!)
The resulting shape looked really strange to me, crooked with a strange camber,
but after looking at some three-view drawings, I was convinced enough that the
shape of the wing (especially when viewed from the front) was right. Before
joining them to the fuselage, I applied Tamiya Putty to the seams and made them
disappear. Only then did I glue the wing to the rest of the aircraft.
I glued the radiator in the
bottom wing half, but I painted it Aluminium (small Testor jar) beforehand. I
then glued the two halves together and had the shock of my life (well, kinda!)
The resulting shape looked really strange to me, crooked with a strange camber,
but after looking at some three-view drawings, I was convinced enough that the
shape of the wing (especially when viewed from the front) was right. Before
joining them to the fuselage, I applied Tamiya Putty to the seams and made them
disappear. Only then did I glue the wing to the rest of the aircraft.
Since prominent seams prevailed, I again departed on a quest to rid my model of their evil presence, but instead of using my trusty Putty, I gave a shot of Mr.Surfacer 500. The results were less than satisfactory. I had read in FSM and in the forum that you could wipe it onto the seam, let it dry a bit ad then wipe it away with a cotton swab dipped in isopropyl alcohol. It worked not. I thus wet sanded it and applied Tamiya Putty to all the seams, including the ones on the leading edges. Everything was wet sanded and primed with Testor Combat Grey (small jar) until I was satisfied with it. Then the two stabilisers were glued in place and I sanded the top seams smooth using the same technique as above. I never sand the seams under them, since I usually look at my models from above. I don’t know what I did wrong, but the right one is canted slightly upwards. No big deal for me, but for the record, either a tractor rammed it or a flak burst bent it, and they only re-skinned the surface, the aircraft being badly needed.
 The model was more or less
ready to paint, but I still had to separate the gear doors from the sprue and
clean them up. Once that was done, I hand painted the propeller with Model
Master Flat Black and installed it on the back plate before gluing the spinner.
Once again, large gaps prevailed and were sanded away. I believe that my box
has a warped prop, since the three blades do look different from one another,
but I managed to make it less apparent (more on that later). Lastly, I glued
the carburettor intake below the engine.
The model was more or less
ready to paint, but I still had to separate the gear doors from the sprue and
clean them up. Once that was done, I hand painted the propeller with Model
Master Flat Black and installed it on the back plate before gluing the spinner.
Once again, large gaps prevailed and were sanded away. I believe that my box
has a warped prop, since the three blades do look different from one another,
but I managed to make it less apparent (more on that later). Lastly, I glued
the carburettor intake below the engine.
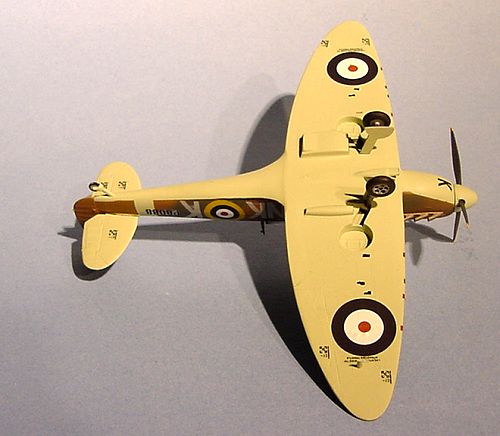
Unsure of what colour the wheel wells and the inside of the gear doors should be, I watched Battle of Britain until I was convinced that they were painted Sky. This also concurred to my references. I masked the cockpit and the wheel wells with masking tape and used paper tissue to block the radiator intake/exhaust.
|
PAINT |
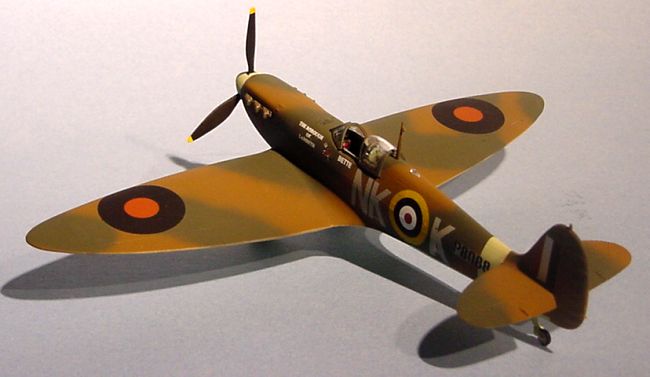
 I used Model Master ANA 610
Sky for the underside, the fuselage band and the spinner. I then masked the
band and the belly with Tamiya masking tape since the camouflage calls for a
sharp demarcation between the top and the bottom. For the fuselage and the top
of the wings, I again used Model Master paints, namely Dark Earth and Dark
Green. I applied both of them the same day, free-handing the camouflage
pattern.
I used Model Master ANA 610
Sky for the underside, the fuselage band and the spinner. I then masked the
band and the belly with Tamiya masking tape since the camouflage calls for a
sharp demarcation between the top and the bottom. For the fuselage and the top
of the wings, I again used Model Master paints, namely Dark Earth and Dark
Green. I applied both of them the same day, free-handing the camouflage
pattern.
|
CONSTRUCTION CONTINUES |
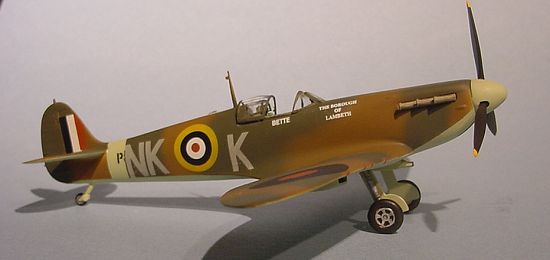
I unmasked everything and I painted the wheels and the landing gear struts Testor Aluminium, then I gave the tires a shot of Flat Black, along with the wheel spokes. The exhaust were painted Model Master Jet Exhaust, again for that brand new look and the pitot tube received a coat of Sky with Chrome Silver detailing before I glued it under the wing. I detailed the tail wheel with Flat Black and the aircraft was ready for decaling, but before shooting it with Future, I glued the propeller in place, but before doing so, I masked the tip and gave them a shot with Model Master Insignia Yellow..
|
DECALS |
 After the Future had
dried, I started to cut away decals and applying Micro Set on the surface when I
knocked the bottle over and spilled the precious liquid all over the sheet. Not
knowing what would happen with the decals, I quickly applied every one of them
who had been in contact with the solution. Surprisingly, I did a fairly good
job even if I was rushing along. After the decals were dry, I over coated the
aircraft with Testor Dull Coat and glued the canopy open.
(In my preview, I thought that even if it was in three pieces, it had to be
glued closed, but the fit is so atrocious, that it’s better to leave it fully
opened.)
After the Future had
dried, I started to cut away decals and applying Micro Set on the surface when I
knocked the bottle over and spilled the precious liquid all over the sheet. Not
knowing what would happen with the decals, I quickly applied every one of them
who had been in contact with the solution. Surprisingly, I did a fairly good
job even if I was rushing along. After the decals were dry, I over coated the
aircraft with Testor Dull Coat and glued the canopy open.
(In my preview, I thought that even if it was in three pieces, it had to be
glued closed, but the fit is so atrocious, that it’s better to leave it fully
opened.)
|
CONCLUSIONS |
This is one nice kit. Easy to build, it is within the reach of any modeller (and every purse!), and the new decal sheet makes it even more attractive. There are a few sheets for early Spits out there along with detail sets, so a real winner can be made out of it!
May 2002
If you would like your product reviewed fairly and quickly by a site that has well over 100,000 visitors a month, please contact me or see other details in the Note to Contributors.