Grand Phoenix 1/48 Firefly I
| KIT #: | ? |
| PRICE: | $ |
| DECALS: | Three options |
| REVIEWER: | Olivier Lacombe |
| NOTES: | Short run with resin and P.E. parts |
| HISTORY |
Conceived as a replacement for the Sea Gladiator, the Fulmar and the Skua, the Firefly was a carrier-borne strike fighter. One of its first feat of arms was to escort Barracudas on their way to attack the German battleship Tirpitz. It also served in the Pacific, attacking Japanese oil refineries at Palembang, Sumatra and throughout the theater. They were the first British aircraft to overfly Tokyo. It was also used by various countries, including Canada, the Netherlands, India, Denmark and Ethiopia. There is a Mark I on display in Ottawa, although it is not restored.
| THE KIT |
The
Firefly I is the first kit issued by Grand Phoenix, which is owned by Eagle
Strike (the decal manufacturer). The injection molded parts are made in
Eastern Europe (I'd say MPM) and the excellent resin details are made by
Aires. Upon inspection of the parts, the first thing you notice is how
rough the texture is, but that's nothing some sanding paper won't cure. The
styrene parts comprise the wings, undercarriage, fuselage and the tail
feathers, along with the propeller. Resin parts include the interior, the
radi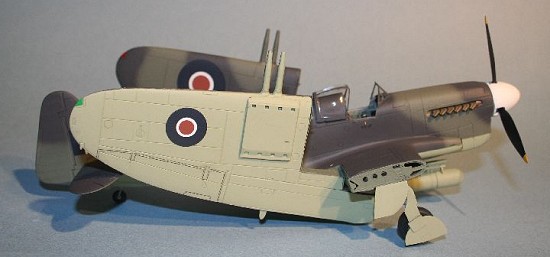 ator and the
exhausts, and a photo-etched metal fret is included with additional details
for the cockpit and the exterior. The transparencies are injection moulded,
something I prefer over vac-formed parts.
ator and the
exhausts, and a photo-etched metal fret is included with additional details
for the cockpit and the exterior. The transparencies are injection moulded,
something I prefer over vac-formed parts.
The decals are superb, being from Eagle Strike. The marking options include one 1771 Sqn. plane from HMS Implacable in the Pacific Ocean in 1945, a 1772 Sqn. plane based in Australia in 1945 and a 1770 Sqn. Firefly aboard HMS Indefatigable in 1945. All three aircraft wear Pacific roundels and a Extra Dark Sea Gray/Dark Slate Gray/Sky camouflage.
As building a short run kit is not enough troubles for me, I decided to get a wing fold set from Airwaves in order to display the model with folded wings. The set consists of a number of nice etched parts, which are folded and glued over the wings of the kit, which you have to cut up accordingly before hand. I must thank Geoff Barker for getting me this set.
The plane will be finished using Belcher Bits decals, as I want a RCN aircraft. More on that later.
| CONSTRUCTION |
 I
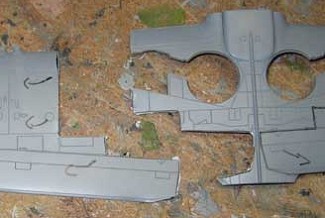
I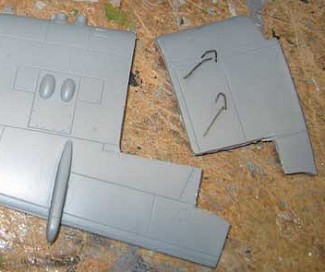 started by outlining the cuts to be made on the wings following Airwaves'
instructions, and the cuts were made using my X-Acto, a Squadron scribing
tool and a pair of scissors. Care has to be taken around the lower wing
part, especially where the flaps meet the fuselage. The area is narrow, so
you need to watch your step if you don't want the part to snap.
started by outlining the cuts to be made on the wings following Airwaves'
instructions, and the cuts were made using my X-Acto, a Squadron scribing
tool and a pair of scissors. Care has to be taken around the lower wing
part, especially where the flaps meet the fuselage. The area is narrow, so
you need to watch your step if you don't want the part to snap.
I cleaned the outer wing parts, but I didn't touch on the inner ones. I'll wait for when the center section to be glued on the fuselage since some shimming will have to be done.
 The
resin parts were cleaned from their moudling stubs. This operation
generates a lot of dust that is potentially toxic, so I used a paint mask
and safety glasses. I also glued the wheel wells in place, it was a tad
tricky to do, but I focused on getting the landing gear legs attachment
points symmetrical.
The
resin parts were cleaned from their moudling stubs. This operation
generates a lot of dust that is potentially toxic, so I used a paint mask
and safety glasses. I also glued the wheel wells in place, it was a tad
tricky to do, but I focused on getting the landing gear legs attachment
points symmetrical.
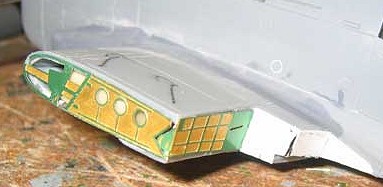
The
interior took me a great while to d o, because it combines photo-etched
parts and resin. I don't mind using resin, but bending the small metal
parts can be a pain in the neck. All the parts were painted Model Master
RAF Interior Green and I detailed them with Flat Black and Aluminium. The
seats were painted Model Master Italian Brown with black paddings. I
painted the belts Model Master DunkelGelb and managed to glue them in
place. I tried to bend the PE rudder pedals, but I gave up on it.
o, because it combines photo-etched
parts and resin. I don't mind using resin, but bending the small metal
parts can be a pain in the neck. All the parts were painted Model Master
RAF Interior Green and I detailed them with Flat Black and Aluminium. The
seats were painted Model Master Italian Brown with black paddings. I
painted the belts Model Master DunkelGelb and managed to glue them in
place. I tried to bend the PE rudder pedals, but I gave up on it.
Before glued the interior bits to the fuselage, I thinned the concerned
area of a few microns of styrene using an air grinder tool. I didn't
encounter any problems, the job was very much a drop fit. The exhausts and
the radiator are also a drop fit, just
 glue them to a fuselage halve using cyano glue and you are set. I used Ambroid Pro-Weld to bond the two
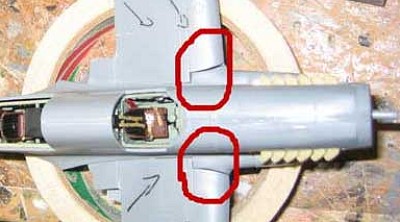
fuselage halves together. The wings received the same treatment and I had
to trim a bit of the bottom of the wing's center section to make it fit on
the fuselage. There are some seams at the roots which will require some
kind of shims, but the rest of the fit is spot on.
The arrestor hook panel also fits without much fuss.All
the seams were cleaned and dispatched with Tamiya Putty, it took only one
or two applications. Nothing nasty here.
glue them to a fuselage halve using cyano glue and you are set. I used Ambroid Pro-Weld to bond the two
fuselage halves together. The wings received the same treatment and I had
to trim a bit of the bottom of the wing's center section to make it fit on
the fuselage. There are some seams at the roots which will require some
kind of shims, but the rest of the fit is spot on.
The arrestor hook panel also fits without much fuss.All
the seams were cleaned and dispatched with Tamiya Putty, it took only one
or two applications. Nothing nasty here.
 Looking at photographs of the real deal, I noticed that the RCN aircrafts
were in fact Firefly FR.1s, which meant they had a radar and underwing
rocket racks. The racks were easily made with spare Tamiya Beaufighter
parts. I found an online review of the kit and used it as a pattern. The
radar was another story. The kit had the radar itself, but no rack, which
is provided as a resin piece in the FR.1 kit. I tried to obtain one from
someone else, but nothing turned up. By luck, I had a SAMI magazine which
featured a FR.1 build, and it included good shots of the rack. I took up
the measurements, and by comparing the radar's dimensions in the picture
with the part I had on hands, I was able to make one in 1/48. Not bad as a
first true scratchbuild.
Looking at photographs of the real deal, I noticed that the RCN aircrafts
were in fact Firefly FR.1s, which meant they had a radar and underwing
rocket racks. The racks were easily made with spare Tamiya Beaufighter
parts. I found an online review of the kit and used it as a pattern. The
radar was another story. The kit had the radar itself, but no rack, which
is provided as a resin piece in the FR.1 kit. I tried to obtain one from
someone else, but nothing turned up. By luck, I had a SAMI magazine which
featured a FR.1 build, and it included good shots of the rack. I took up
the measurements, and by comparing the radar's dimensions in the picture
with the part I had on hands, I was able to make one in 1/48. Not bad as a
first true scratchbuild.
The shackles are modified 1/48 250lbs US bomb fins from an Accurate Miniature kit. With the radar now behind me, it was time to separate the men from the boys, namely with the fitting of the wingfold PE parts.
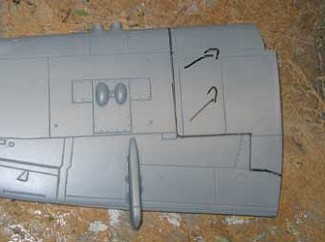
 The
parts are wonderfully executed, so I was expecting a rather drop fit. I
learned the hard way that one should never trust beautiful parts to behave
beautifully. I sanded all the edges on the wings, where the parts were due
to fit, and attempted to glue the parts in one piece, as you have to fold a
few. Failure greeted me. After 3 or 4 attempts at getting those pesky
things to stay on the plastic, I had the idea of cutting them at the fold
and fitting them as separate parts. It worked! I proceeded to do the same
with the rest, also trimming them when they were found to be too big for
their spot. I used cyano glue and accelerator bought at an auto-part to
make them stick.
The
parts are wonderfully executed, so I was expecting a rather drop fit. I
learned the hard way that one should never trust beautiful parts to behave
beautifully. I sanded all the edges on the wings, where the parts were due
to fit, and attempted to glue the parts in one piece, as you have to fold a
few. Failure greeted me. After 3 or 4 attempts at getting those pesky
things to stay on the plastic, I had the idea of cutting them at the fold
and fitting them as separate parts. It worked! I proceeded to do the same
with the rest, also trimming them when they were found to be too big for
their spot. I used cyano glue and accelerator bought at an auto-part to
make them stick.
 I
then turned my attention to the fuselage and the wing's center section. I
tried to glue the parts as one there too, but met the same lousy results. I
also noticed that some of the parts wouldn't fit where they were supposed
too, being too narrow for the spot. I put the kit aside for over a month,
before having a brilliant idea. I trimmed and glued stock plastic sheet
over the trouble spots unto which I would then glue the PE parts. Even
though it wouldn't be super elegant, the folded wings would hide part of
it. I went to work and I finally managed to do it.
I
then turned my attention to the fuselage and the wing's center section. I
tried to glue the parts as one there too, but met the same lousy results. I
also noticed that some of the parts wouldn't fit where they were supposed
too, being too narrow for the spot. I put the kit aside for over a month,
before having a brilliant idea. I trimmed and glued stock plastic sheet
over the trouble spots unto which I would then glue the PE parts. Even
though it wouldn't be super elegant, the folded wings would hide part of
it. I went to work and I finally managed to do it.
The only low point of those parts, is that they are really fragile, it doesn't take a lot of abuse before they start falling off, especially the big flap well roof on the underside of the fuselage. I'll have to move real carefully while I mask and paint the plane.
 I
also masked the transparencies and glued the propeller together, using a
Monogram 1/48 Mosquito spinner instead of the kit's. The shape is much
better. As there was a slight gap around the base of it, I used a small
styrene rod to match the width of the back plate with the spinner's.
I
also masked the transparencies and glued the propeller together, using a
Monogram 1/48 Mosquito spinner instead of the kit's. The shape is much
better. As there was a slight gap around the base of it, I used a small
styrene rod to match the width of the back plate with the spinner's.
Once the propeller was ready and the transparencies glued on (the rear canopy fits very badly, I had to clamp it in place, and even with brute force, I'm still stuck with a lousy edge...), I moved the airplane in the paint shop.
| COLORS & MARKINGS |
 The
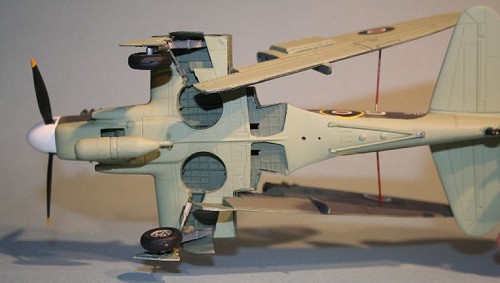
underside of the wings and fuselage were painted with Tamiya Sky, the
correct shade when you need the wartime colour. The Gunze equivalent is
actually the correct post war tint! Anyhow, the spinner was also primed in
the same colour, following which it was painted with Tamiya Flat White.
The
underside of the wings and fuselage were painted with Tamiya Sky, the
correct shade when you need the wartime colour. The Gunze equivalent is
actually the correct post war tint! Anyhow, the spinner was also primed in
the same colour, following which it was painted with Tamiya Flat White.
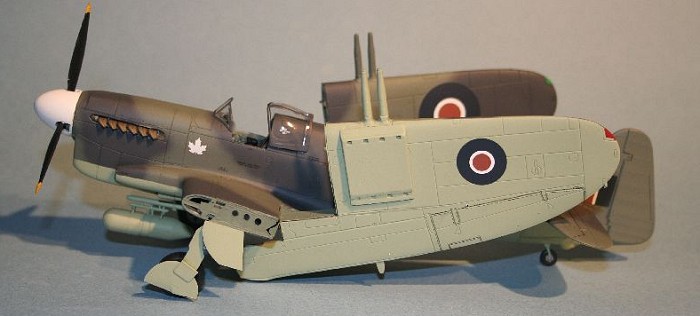
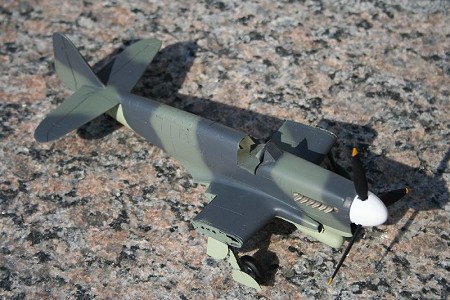
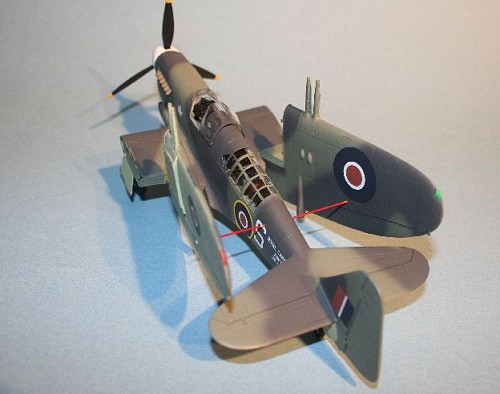
The camouflage was made up of Tamiya RLM Grey XF-22, which was a stand in for Dark Slate Grey, and Gunze Extra Dark Sea Grey H333. The results are very formidable, as you can see! Prior to that, the undersides were masked with Tamiya masking tape, the rounded pattern near the stabilizer was achieved with 3M masking tape.
Once everything was nice and dry, I brushed in Model Master RAF Interior Green on the photo-etched parts and the wheel wells.
| CONSTRUCTION CONTINUES |
I bought some gel cyano glue, and this came as a blessing, since I was really loosing patience over the PE parts. With the gel glue, it's a nice and quick operation to put them back on. The landing gear legs were painted Aluminium, as were the wheels. The legs were glued with cyano glue, and it took quite a while to line them up symmetrically.
 I
had to repair the arrestor hook, since it suffered from being a short shot,
which means that not even plastic was injected in the mould. The repair
took no time, being a matter of simply fitting a lenght of plastic rod to
complete the assembly. The exhaust were painted Model Master Jet Exhaust,
the perfect colour to replicate brand new stacks. Last but not least, the
propeller was installed, but not after the blades were painted Flat Black
with Insignia Yellow tips.
I
had to repair the arrestor hook, since it suffered from being a short shot,
which means that not even plastic was injected in the mould. The repair
took no time, being a matter of simply fitting a lenght of plastic rod to
complete the assembly. The exhaust were painted Model Master Jet Exhaust,
the perfect colour to replicate brand new stacks. Last but not least, the
propeller was installed, but not after the blades were painted Flat Black
with Insignia Yellow tips.
The tricky part quickly arrived : fitting the gear doors. Using photographs off the Web and the SAMI article, I was able to put them on in a satisfying fashion. In fact, the job was complicated by the close proximity of the PE parts from the wingfold set. If you build the kit straight from the box, you will not have much trouble had that stage. Once the doors were firmly set, I glued the radar on, and the aircraft when straight to the paint shop to have a coat of Future applied.
Decals
The Belcher Bits decals went on beautifully, save for one thing : the fuselage roundels were a tad oversize, so I had to round them on the fuselage's underside. Apart from that, they reacted prompty to Micro-Sol and showed no silvering.
I applied a coat of Poly Scal Flat to the model, I thinned the mix with alcohol, and to my surprise, it went on more beautifully than ever. Note to myself : do that again the next time.
| FINAL CONSTRUCTION |
Now came the tricky part, fixing the wings to the airplane. I had prepared a brass rod that I had handbrushed in red to support the wing panels. Using crazy glue, I was able to hang the wings on, but not after a few tries which made me curse those PE parts again. I doubt that I'll ever use photo-etch again, but you can never say never.
I quickly proceeded to take pictures of the finished animal before anything broke off. Here she is, in all her glory.
| CONCLUSIONS |
 What a journey. This Firefly was the most involved build of my career,
combining a major conversion and a some scratchbuilding. But the end
results is well worth it! The kit by itself is not terribly difficult to
build, with no real sour spots, save for the rear canopy, but with careful
alignment before the fuselage halves are closed, it can be made to fit. The
Airwaves conversion is superbly done, but it can lead to very frustrating
moments. There must be a way to secure photo-etch to plastic without them
leaving the model at will.
What a journey. This Firefly was the most involved build of my career,
combining a major conversion and a some scratchbuilding. But the end
results is well worth it! The kit by itself is not terribly difficult to
build, with no real sour spots, save for the rear canopy, but with careful
alignment before the fuselage halves are closed, it can be made to fit. The
Airwaves conversion is superbly done, but it can lead to very frustrating
moments. There must be a way to secure photo-etch to plastic without them
leaving the model at will.
Let's hope that a plastic Firefly V will soon be available in 1/48 (there's a horribly expensive one in resin) so that my RCN collection be more complete!
October 2005
| REFERENCES |
FOSTER, J.A., Sea Wings, Methuen, Agincourt, 1986.
CUDEN, Frank, "Firefly Season" in Scale Aviation Modeler International, Volume 9, Issue 10, pp. 954-962, 2003.
If you would like your product reviewed fairly and quickly, please contact me or see other details in the Note to Contributors.