Revell 1/32 Spitfire II
|
KIT # |
5516 |
|
PRICE: |
$28.50 MSRP |
|
DECALS: |
Two aircraft |
|
REVIEWER: |
|
|
NOTES: |
Eduard harness, Eagle Strike decals used. |
|
HISTORY |
 aptivated the emotions of the free world and went on to become one
of the premier fighter aircraft of the entire war. Pressed into combat
during desperate times, the Spitfire embodied the feisty spirit of a
besieged nation through its graceful lines, high speed, excellent
maneuverability, and relatively heavy armament. First flown in 1936, the
Spitfire entered service in 1938. The Mark Ia was equipped with eight .303
inch Browning machine guns, and was powered by a Rolls Royce Merlin II
engine of 1175 HP. The Mark IIa, which began delivery in June 1940,
received a more powerful Merlin XII engine and incorporated standard armor
plating.
aptivated the emotions of the free world and went on to become one
of the premier fighter aircraft of the entire war. Pressed into combat
during desperate times, the Spitfire embodied the feisty spirit of a
besieged nation through its graceful lines, high speed, excellent
maneuverability, and relatively heavy armament. First flown in 1936, the
Spitfire entered service in 1938. The Mark Ia was equipped with eight .303
inch Browning machine guns, and was powered by a Rolls Royce Merlin II
engine of 1175 HP. The Mark IIa, which began delivery in June 1940,
received a more powerful Merlin XII engine and incorporated standard armor
plating.Fighting against the onslaught of attacking German fighters and bombers, the Spitfires flew multiple missions each day, pushing both the pilots and their aircraft to the extreme limits of endurance. After nearly half a year of furious combat, the German high command backed down and redirected its attention to other areas of the world, giving the United Kingdom a chance to catch its collective breath. The entire nation owed a great debt to the RAF, and the Spitfire continued to be steadily refined through upgrades to engine and armament. Never lost were the delightful flying characteristics and elegant lines that made this one of the most beautiful aircraft ever created.
|
THE KIT |
Scott Van Aken’s excellent preview of this kit can be viewed here.
An interesting collaboration between Hasegawa and Revell-Monogram,
this kit combines the fuselage and detail pieces of the older but still good
Hasegawa Mk Vb kit with a newly tooled wing and spinner. Molded in medium
gray plastic, the first thing that one notices upon inspection of the pieces
is that the new wing sections have engraved panel lines and detail, while
the older fuselage sections have raised panel lines. The logical choice is
to sand off the raised line and rescribe, which
 fortunately isn’t that
difficult to do on this simple kit. The cockpit interior pieces are quite
nicely detailed and will satisfy most modelers, although various details are
specific to a Mark V Spitfire and not quite correct for the earlier models.
This applies to the antenna mast as well. The clear pieces are adequately
thin and transparent, with two different windscreens provided to depict the
different configurations for the armored glass. The new wing pieces look
great, although the modeler will need to drill out the shell ejector slots
as they are molded only as depressions in the lower surface.
fortunately isn’t that
difficult to do on this simple kit. The cockpit interior pieces are quite
nicely detailed and will satisfy most modelers, although various details are
specific to a Mark V Spitfire and not quite correct for the earlier models.
This applies to the antenna mast as well. The clear pieces are adequately
thin and transparent, with two different windscreens provided to depict the
different configurations for the armored glass. The new wing pieces look
great, although the modeler will need to drill out the shell ejector slots
as they are molded only as depressions in the lower surface.
Decals are for two aircraft finished in the standard camouflage scheme of the time, Dark Earth and Dark Green over Sky. The aircraft markings on the decal sheet are printed as Sky, rather than the correct Medium Sea Grey. The red used in the roundels is more of a brick color than the standard dull red. A number of stencils are provided, and the sheet looks to be of high quality. I did however experience a number of problems with the decals, as can be seen below in the painting and decal section.
|
CONSTRUCTION |
Believe it or not, I didn’t start in the cockpit on this one. I first tackled the task of rescribing all the panel lines on the fuselage. I’ve never been all that thrilled with any of the scribers on the market, usually reverting to the old trick of using the backside of a clipped X-acto blade. I’d thought I’d try another classic technique and chucked a medium sewing needle in a pin vise and used that to do the scribing. Using Dymo label tape as my guide, I was able to scratch in new panel lines without messing things up too badly. I liked the control I had with the needle and will probably continue to use this method in the future. A light sanding removed the furrowed edges of the newly engraved lines. It took a little effort, but I think it was worth it.
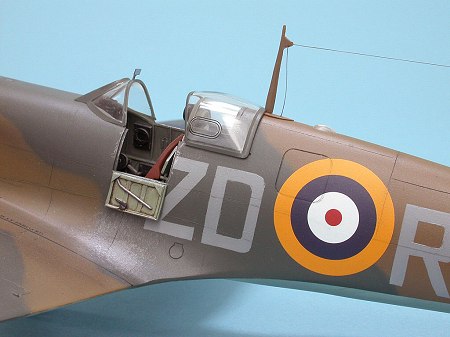
 The cockpit was painted in Interior Grey-Green, with a Panzer
Red-Brown seat to simulate the Bakelight material used to save weight. The
instrument panel and various boxes on the sides were painted flat black and
drybrushed with light gray and silver to bring out the detail. Watch for
some of Revell’s recommended color call-outs, as they would have you paint
the two oxygen tanks as if they were fire extinguishers! The correct color
is silver, not gloss red. I picked out the instrument calibrations with a
white colored pencil and added a drop of Future to simulate the glass dial
covering. A Sutton harness was obtained from an Eduard photo-etched set,
painted off-white, and glued to the seat. Note that the attachment point
for the shoulder belts was way back in the top rear of the fuselage, so I
added an extension strap made of paper and glued it from the rear of the
seat to the bottom of the bulkhead aft of the rear windows.
The cockpit was painted in Interior Grey-Green, with a Panzer
Red-Brown seat to simulate the Bakelight material used to save weight. The
instrument panel and various boxes on the sides were painted flat black and
drybrushed with light gray and silver to bring out the detail. Watch for
some of Revell’s recommended color call-outs, as they would have you paint
the two oxygen tanks as if they were fire extinguishers! The correct color
is silver, not gloss red. I picked out the instrument calibrations with a
white colored pencil and added a drop of Future to simulate the glass dial
covering. A Sutton harness was obtained from an Eduard photo-etched set,
painted off-white, and glued to the seat. Note that the attachment point
for the shoulder belts was way back in the top rear of the fuselage, so I
added an extension strap made of paper and glued it from the rear of the
seat to the bottom of the bulkhead aft of the rear windows.
 The fuselage was glued together and the seams were filled with CA
glue. The fuel filler cap in front of the windscreen is depicted as a
featureless depression, so I cut out a thin piece of sheet styrene and
sanded it to a circular shape and placed it there. I opened up the shell
ejector ports on the bottom wing and glued the top halves on. The proper
wing tips were added, but I found that these were noticeably thinner than
the wing they were attached to. I had to sand the outer parts of the wings
to make for a nice seamless transition. I did a dry-fit test of how the
wings would mate with the fuselage assembly. As it is, the thickness of the
wings is less than anticipated by the wing root on the fuselage. To fix
this, I put a small piece of extra sprue to act as a spreader bar in each
wing, which slightly raised the overall thickness. As I glued the wings on,
I had to pay close attention to dihedral, because the bottom wing has
essentially none. By pulling each wing up with a long piece of masking tape
that was stretched from one tip to the other, I was able to get the proper
dihedral. I glued this wings in this position and let them dry over night.
The next day I filled the wing-to-fuselage seams with CA glue. Despite all
the pulling and tugging and engineering, there still were fairly significant
seams to be filled.
The fuselage was glued together and the seams were filled with CA
glue. The fuel filler cap in front of the windscreen is depicted as a
featureless depression, so I cut out a thin piece of sheet styrene and
sanded it to a circular shape and placed it there. I opened up the shell
ejector ports on the bottom wing and glued the top halves on. The proper
wing tips were added, but I found that these were noticeably thinner than
the wing they were attached to. I had to sand the outer parts of the wings
to make for a nice seamless transition. I did a dry-fit test of how the
wings would mate with the fuselage assembly. As it is, the thickness of the
wings is less than anticipated by the wing root on the fuselage. To fix
this, I put a small piece of extra sprue to act as a spreader bar in each
wing, which slightly raised the overall thickness. As I glued the wings on,
I had to pay close attention to dihedral, because the bottom wing has
essentially none. By pulling each wing up with a long piece of masking tape
that was stretched from one tip to the other, I was able to get the proper
dihedral. I glued this wings in this position and let them dry over night.
The next day I filled the wing-to-fuselage seams with CA glue. Despite all
the pulling and tugging and engineering, there still were fairly significant
seams to be filled.
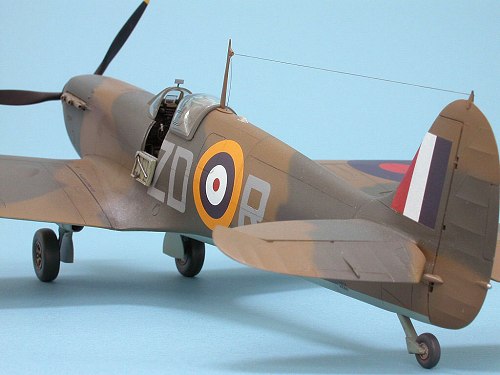
Somewhere in the construction phase of this project I managed to lose the cockpit door panel. I scratch-built a new one from sheet styrene and bits of wire which looked better anyway, including a three dimensional crowbar.
 I inserted a piece of clear amber rod to simulate the identification
light under the belly of the aircraft. As mentioned previously, the antenna
mast is reflective of a Mark V Spitfire, lacking the prominent triangular
insulator. I fashioned a new mast from sheet styrene and attached it to the
model with a pin made of brass rod. I also carefully drilled holes in the
mast to accept the aerial wires. The kit’s Mark V roots also leave the
modeler without an attachment point for the wire on top of the tail
section. I put a small piece of brass wire here and glued two tiny
rectangles of sheet styrene on either side for strength and the proper
appearance.
I inserted a piece of clear amber rod to simulate the identification
light under the belly of the aircraft. As mentioned previously, the antenna
mast is reflective of a Mark V Spitfire, lacking the prominent triangular
insulator. I fashioned a new mast from sheet styrene and attached it to the
model with a pin made of brass rod. I also carefully drilled holes in the
mast to accept the aerial wires. The kit’s Mark V roots also leave the
modeler without an attachment point for the wire on top of the tail
section. I put a small piece of brass wire here and glued two tiny
rectangles of sheet styrene on either side for strength and the proper
appearance.
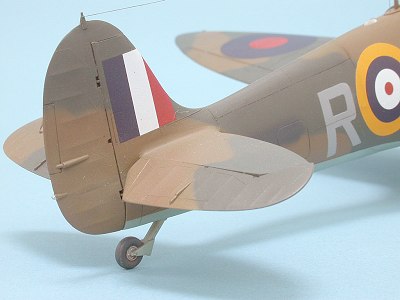
Most Spitfires at rest have elevators in a dive position, reflecting the fact that the control stick was pushed forward as an aid to cockpit entry and exit. I cut the elevators off the horizontal stabilizers and re-positioned them. I checked all my seams and make the necessary corrections before washing the model to remove all the sanding dust and headed out to the paint barn.
|
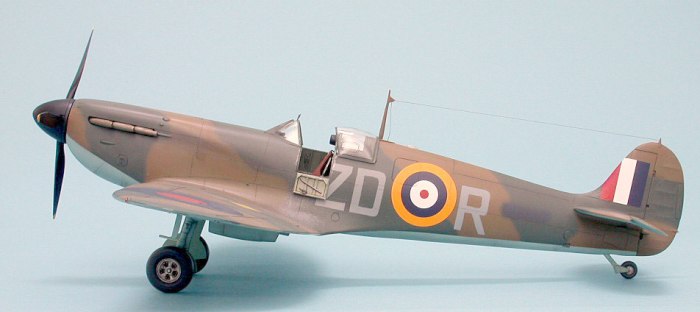
CAMOUFLAGE & MARKINGS |
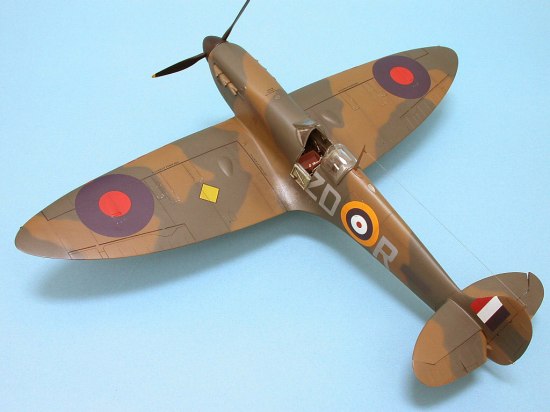
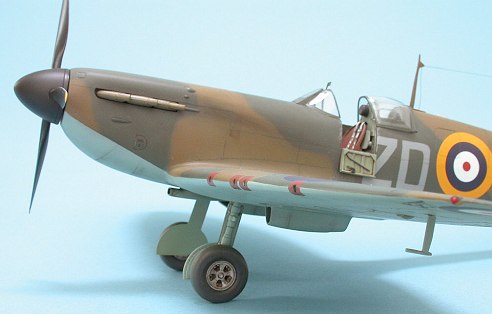 I’ve been continuing my experiments with pre-shading by first spraying
every panel line with dark gray, then spraying the camouflage colors on the
interior of each panel, letting only a slight overspray fall on the panel
line itself. This worked out pretty well on the light underside, but the
top colors, being so dark, diminished the effect to the point of near
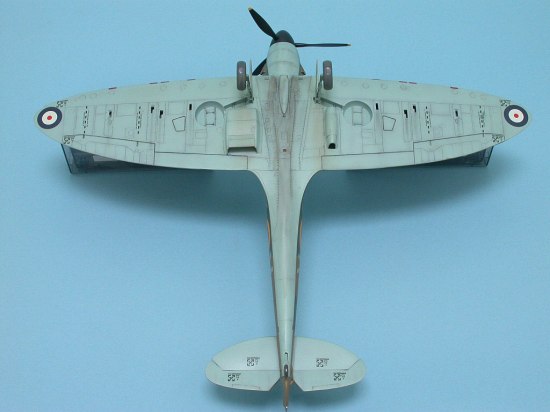
invisibility. Oh well. The underside was painted in a custom mix of
Testor’s Acryl Duck Egg Blue and a bunch of other colors that brought it
close to FS15325. This is based on research done by Paul Lucas from
preserved pieces of actual 222 squadron aircraft. It’s a neat color,
something that one doesn’t see very often on a warplane. I masked off the
underside and sprayed Polly Scale Dark Earth on the topside. The disruptive
camouflage pattern B was marked off with a pencil and sprayed with Testor’s
Acryl RAF Dark Green. I attempted to get the smallest amount of overspray
that I possibly could, as photographs of a number of early Spitfires show a
slightly soft demarcation between the two colors.
I’ve been continuing my experiments with pre-shading by first spraying
every panel line with dark gray, then spraying the camouflage colors on the
interior of each panel, letting only a slight overspray fall on the panel
line itself. This worked out pretty well on the light underside, but the
top colors, being so dark, diminished the effect to the point of near
invisibility. Oh well. The underside was painted in a custom mix of
Testor’s Acryl Duck Egg Blue and a bunch of other colors that brought it
close to FS15325. This is based on research done by Paul Lucas from
preserved pieces of actual 222 squadron aircraft. It’s a neat color,
something that one doesn’t see very often on a warplane. I masked off the
underside and sprayed Polly Scale Dark Earth on the topside. The disruptive
camouflage pattern B was marked off with a pencil and sprayed with Testor’s
Acryl RAF Dark Green. I attempted to get the smallest amount of overspray
that I possibly could, as photographs of a number of early Spitfires show a
slightly soft demarcation between the two colors.
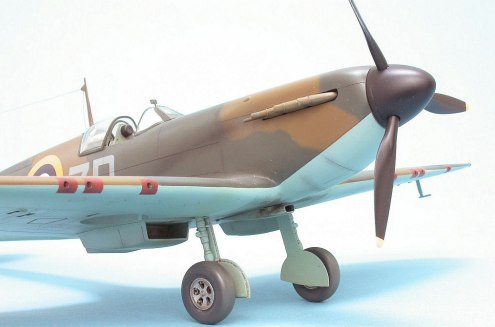
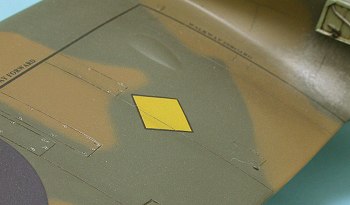 The British were very worried about the use of poison gas, so early
aircraft had a patch of special paint applied to the wing that would change
color to indicate if such substances were encountered. I painted the
diamond-shaped area on the port wing using Testor’s Acryl Chromate Yellow.
After letting the paint cure for a couple of days, I sprayed several coats
of Future floor polish to give a gloss surface for the decals to adhere to.
The British were very worried about the use of poison gas, so early
aircraft had a patch of special paint applied to the wing that would change
color to indicate if such substances were encountered. I painted the
diamond-shaped area on the port wing using Testor’s Acryl Chromate Yellow.
After letting the paint cure for a couple of days, I sprayed several coats
of Future floor polish to give a gloss surface for the decals to adhere to.
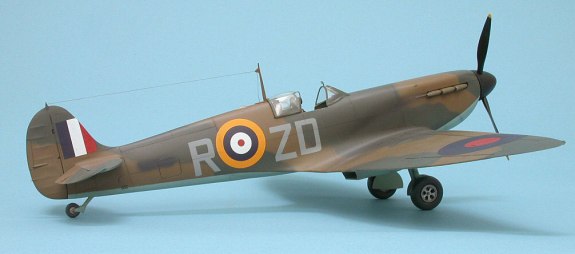
As previously mentioned, the kit decals look quite nice on the sheet. But as I put the upper wing roundels on, I slightly tore the edge of one of the large markings. As they dried, I applied Micro Set to help the decals conform. This did not agree with the decal at all, melting visible holes in the top layer of the emulsion. It also didn’t help very much in getting the decals to mold to the surface details. The last straw was encountered when I tried to apply the long wing walk stripes and had them disintegrate in my hand. That was it for me. I put the model away for week after ordering a new set of decals directly from Eagle Strike. Although this set was designed for Eagle Squadron Mark Vbs, I was able to use the roundels and fin flashes. But I first had to get the kit decals off and had a heck of time. They simply would not come up using the strongest tape I have. I finally resorted to using Polly Scale Easy Lift off, which of course removed the paint as well. I sanded down the area and repainted the offending sections.
 Ready for the Eagle Strike decals, I applied them with no problems as
they reacted very well with the usual Micro Scale setting solutions. The underwing roundels came from an old Fujimi Spitfire kit sheet. That still
left me with a task of coming up with some aircraft code letters. I went
back to the kit decals and slathered them with Micro Superfilm. This sealed
them and prevented any further problems with disintegration. I then cut out
the letters very carefully and sprayed them with the proper Medium Sea Grey
color. These were applied to the side of the fuselage, with a little
painting needed to touch up some ragged edges. Not the easiest way to get
code letters, but it worked for me. I also used the Superfilm on the
remaining stripes and wrestled them onto the model, with a few stripes
coming from a railroad sheet to replace the ones I messed up earlier. I
also used to kit decals for the linen patches over each of the gun ports.
As I handled the model, the thin decals eventually broke open over the hole,
so I now have a model of plane that has returned from a mission where its
guns were fired.
Ready for the Eagle Strike decals, I applied them with no problems as
they reacted very well with the usual Micro Scale setting solutions. The underwing roundels came from an old Fujimi Spitfire kit sheet. That still
left me with a task of coming up with some aircraft code letters. I went
back to the kit decals and slathered them with Micro Superfilm. This sealed
them and prevented any further problems with disintegration. I then cut out
the letters very carefully and sprayed them with the proper Medium Sea Grey
color. These were applied to the side of the fuselage, with a little
painting needed to touch up some ragged edges. Not the easiest way to get
code letters, but it worked for me. I also used the Superfilm on the
remaining stripes and wrestled them onto the model, with a few stripes
coming from a railroad sheet to replace the ones I messed up earlier. I
also used to kit decals for the linen patches over each of the gun ports.
As I handled the model, the thin decals eventually broke open over the hole,
so I now have a model of plane that has returned from a mission where its
guns were fired.
Finally past the decal stage, I sealed the model with a coat of Future in preparation of weathering. I applied a wash of Burnt Umber and Payne’s gray artist’s oils thinned with Turpenoid to all the panel lines. Various shades of gray pastels were used to dirty up the underside. Early Merlin engines had a tendency to leak oil, turning the belly area into a mucky mess fairly quickly. Subtle staining was added to the engine exhaust and shell ejector chute areas, and a subtle drybrush of silver was applied to the high-wear areas of the wing root. I wanted my model to look used but not weather-beaten, as August was still fairly early in the Battle of Britain. Since these airplanes were waxed in the attempt to eek ever possible MPH out the airframe, I sealed the weathering with a coat of Testor’s Acryl semi-gloss clear, which gave a nice satin finish.
Small detail painting was done to the spinner (Night), the prop blades, the wheels, and the engine exhaust stacks. The canopy was masked with drafting tape and painted after polishing with Novus Plastic Polish #2. No more Future on canopies for me – this Novus stuff is great! It makes the canopy crystal clear and avoids all the fussiness of the Future dipping process.
|
FINAL CONSTRUCTION |
 I glued on the landing gear and assembled the propeller. Navigation
lights were simulated with a drop of red or green paint. The canopy pieces
were glued on and the seams filled with white glue and sprayed with the
surrounding camouflage color to blend in. I glued the aerial wires into
their pre-drilled holes in the mast. I gave some thought to putting IFF
wires that ran from the leading edge of the horizontal stabilizers to the
side of the fuselage, but my understanding is that these were used on only
selected aircraft. I popped on the spinner and glued on the cockpit access
door to complete the project, which clocked in at just under 60 hours of
work.
I glued on the landing gear and assembled the propeller. Navigation
lights were simulated with a drop of red or green paint. The canopy pieces
were glued on and the seams filled with white glue and sprayed with the
surrounding camouflage color to blend in. I glued the aerial wires into
their pre-drilled holes in the mast. I gave some thought to putting IFF
wires that ran from the leading edge of the horizontal stabilizers to the
side of the fuselage, but my understanding is that these were used on only
selected aircraft. I popped on the spinner and glued on the cockpit access
door to complete the project, which clocked in at just under 60 hours of
work.
|
CONCLUSIONS |
Thanks to Les Piper, Dave Gibson, and Dave Wadman for their invaluable assistance while building this model.
|
REFERENCES |
Lucas, Paul: Camouflage and Markings No.2: The Battle for Britain - RAF May December 1940, Scale Aircraft Monographs
Humphreys, Robert: The Supermarine Spitfire, a Comprehensive Guide for the Modeller, Part 1 – Merlin-Powered
Piper, Les: E-mail conversations about Spitfire details
Gibson, Dave: E-mail conversations about Spitfire details
Wadman, Dave: E-mail conversations about Spitfire details
May 2003
Copyright ModelingMadness.com. No reproduction in any form without express permission from the editor.
If you would like your product reviewed fairly and fairly quickly, please contact the editor or see other details in the Note to Contributors.