|
KIT: |
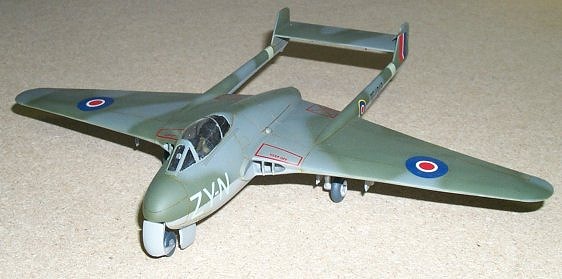
Hobbycraft 1/48 Vampire F.1 |
|
KIT # |
? |
|
PRICE: |
AUD $22.95 |
|
DECALS: |
See review |
|
REVIEWER: |
|
|
NOTES: |
Inaccuracies abound |

|
HISTORY |
The hundredth of Captain Geoffrey de Havilland’s designs this extremely successful jet fighter was effective, timely, cheap to operate and sold to more air forces that any other British aircraft. Design began in May 1942 to specification E.6/41 for a fighter with a pressurised cockpit and armament of 4 20mm cannons, to be powered by the new Halford H.1 turbojet then being developed by de Havilland engines. This engine later became known as the Goblin.
The design called for a twin boom configuration, in order to minimise aerodynamic losses caused by the use of one engine. The tail was mounted on two slender booms with a high tailplane. Construction of the nacelle was of typical Mosquito like wood/sandwich like construction. But the mid mounted wing was light alloy stressed skin and housed the extremely short main gears that retract hydraulically outwards.
 The prototype, LZ548/G
nicknamed “Spider Crab”, was test flown by Geoffrey de Havilland Jnr at
Hatfield in September 20 1943 and clocked an impressive 530mph, the first
time 500mph had been exceeded outside of Germany. Subsequent trials were
remarkably trouble free.
On May 1944 de Havilland received an order for 120 Mk1’s (or F.1), Production was sub contracted out to English Electric at Preston and 247 Squadron received the first delivery in April 1945. A total of 173 Mk1 (F.1)’s were delivered to the RAF, 4 to Switzerland and 70 more to Sweden.
Several Mk1’s were converted to Sea Vampire XX’s and trailed aboard HMS Ocean on December 3 1945. This led to an order of 30 production F.20’s with larger flaps and arrestor hooks.
The Vampire subsequently underwent many changes, the last single seat Vampire for the RAF being the F.9. The Vampire was also produced in a twin seat night fighter and trainer versions.
Preamble
As a young kid, I remember well the big twin boomed silver and yellow fighter mounted on a pole outside a tall building somewhere in the centre of Perth. (That particular beast has been wonderfully restored and placed into the WA Aviation Museum). I had no idea it was a de Havilland Vampire, it just looked wonderfully different with its twin tail and stumpy fuselage. Maybe one day a nice person could tell me where in Perth that building and street was.
 Now Vampire kits in quarter scale
are very thin on the ground, well actually, there is very little around
in the form of any scale kit for the Vampire. Airfix and Heller are the
main offering for a Vampire in 1:72 scale.
During the early 90’s the modelling world was abuzz with the news that Hobbycraft were to release a series of different variants of the Vampire. Amongst RAF modellers, this was eagerly anticipated, as no kits prior to this announcement were available. At the same time Aeroclub from England were planning to release a vac form/multimedia kit, but decided to delay their plans until after Hobbycraft had released the new kits. However the Hobbycraft production of the Vampire had serious issues, chief among them were the overall thinness of the tail booms and the overall “sit “ of the finished model, attracting significant criticism by model magazine reviewers. Aeroclub then released its own version, which is an accurate but expensive alternative.
Now I never knew all this at the time, being blissfully ignorant of the flaws, so I ploughed ahead with the kit until I discovered too late, these flaws and more.
|
THE KIT |
Revealed once opening the typical Hobbycraft box are two light grey plastic sprues, one clear sprue, an excellent decal sheet and Hobbycraft’s typical sparse on-detail instruction sheet. On the whole, all parts are clean and flash free, with fine, nicely defined engraved panel lines. It is a pity that the cockpit canopy was one piece as I had purchased the Eduard etched brass aftermarket set for the kit and all the extra work that was going to go into the cockpit would not be seen.
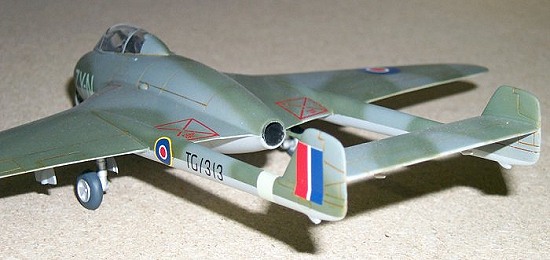
The first clues to the problems to come were apparent here, with the tail booms appearing a bit too skinny in area and the forward fuselage a bit too stumpy. Read on….
My one gripe, as usual, is that the clear parts are not bagged separately, so protecting them from scratches and the like. It would be no more expensive to do and would save extra work for us all!
Decals were sharp, dense and in register and I decided to use them, breaking away from my usual practice of assigning Hobbycraft Decals to the spares box.
|
CONSTRUCTION |
Construction (as always) started in the cockpit. The Eduard aftermarket set offers a complete replacement of all the cockpit items in etched brass. I elected to give the “office” a complete makeover using the provided items in the set. The instrument panel in particular is a fine item complete with acetate film to represent the instrument dials on the panel. The standard interior finish for the Vampire was black, for this I used Citadel Chaos Black, dry brushed with Aeromaster Neutral Grey to give a used look and to pick out the dials of the instrument panel. Various knobs and levers were picked out in different colours to add some authenticity and colour to the otherwise plain cockpit interior. The Eduard parts fitted perfectly and the result was most pleasing, which, as mentioned earlier, was a pity as next to nothing can be seen with the one piece canopy in place.
 A quick dry fit ensured the
completed cockpit tub fitted well so it was then cemented into place
along with the jet exhaust and the fuselage sides joined together. The
fuselage only needed minor amounts of filler, which were then cleaned up
with wet and dry used wet to remove any seam lines.
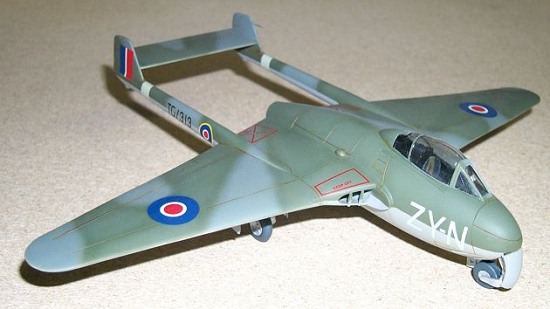
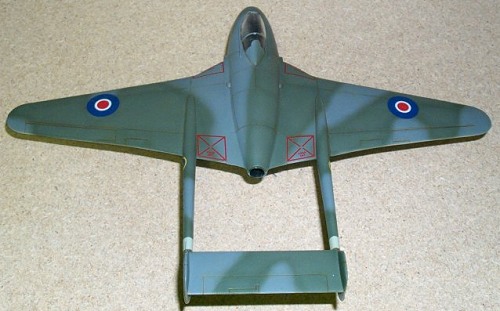
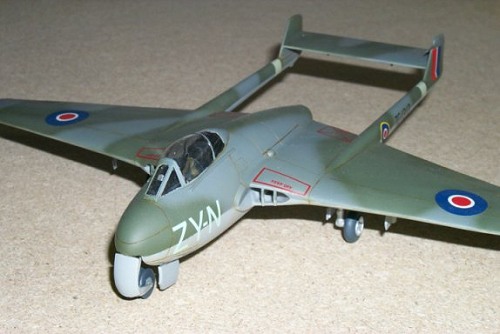
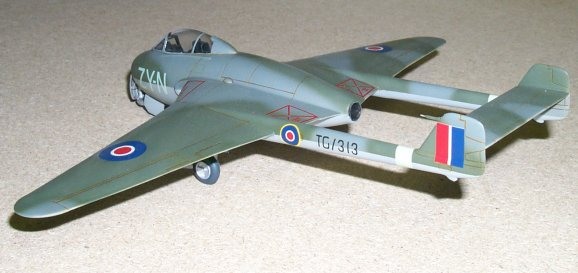
This is where the first glaring error hit me square between the eyes, I only found out much later why this horrendous inaccuracy occurred. Upon dry fitting the assembled wings, it was immediately apparent that the attached wings has an anhedral as apposed to a dihedral shape. That is, the wings sloped downwards to the wing tip as apposed to having a slight angle up. It seemed that the wings were going into the wrong side of the fuselage.
What to do?
After much gnashing of teeth, I attached the wings as is, as placing them at the correct dihedral would have resulted in large gaps in the wing roots and resultant issues with the twin tail boom assembly. Even swapping to opposite sides would not have solved the situation. Sorry, but I was not interested in correcting this problem!
At a later date I found out the real reason for the wing problem. Max from JB Wholesalers told me at a club meet that Hobbycraft’s die makers had stuffed up the wing dies, placing the wheel wells on the top wing halves!! Now that is certainly an example of shocking Quality Assurance for you.
In the end the wings attached very well, with small amounts of filler required, smoothed over with the nail polish remover dipped ear bud. This is a fantastic way to fill gaps in areas such as wing roots or hard to access areas. I apply the filler as normal, leave it to cure for 5 minutes and then run an ear bud dipped in nail polish remover (make sure the remover is of the acetone type) along the filler. The moist ear bud softens and smooths the filler into place perfectly, removing any excess in the process. Once dry the whole process can be repeated if required.
 Whilst the wings were drying, I
added the etched brass extras to the undercarriage oleo legs and bay
doors. The instructions show the attached wheel fork of the nose wheel to
be attached at 90 degrees to the oleo leg. Do not do this otherwise your
Vampire will have a nose down “tired” stance!! Consult your references,
unlike me (I just wanted it built at this stage), as they show the wheel
fork at an angle of around 45 degrees. By attaching the wheel fork
correctly, the “sit” of the Vampire will be nose up in keeping with the
1:1 original.
The twin tail booms attach well to the wings, with only a small amount of filler required to eliminate the join line. Care must be taken to ensure the horizontal tail between each boom has the proper alignment, both vertically and horizontally. I attached the twin booms first and attached the horizontal centre tail whilst the booms could still be adjusted. The whole assembly was then tweaked to achieve proper placement and alignment.
The jet intakes at each wing root had the vertical supports added and tidied up and the masked canopy was added. Any minor gaps where the canopy met the fuselage were attended to by using white glue; any excess glue was wiped away by a moistened finger.
Painting time had arrived and not before time, at this stage I was not a happy modeller!
|
CAMOUFLAGE & MARKINGS |
I started by painting all the wheel wells, undercarriage doors and undercarriage legs with Tamiya AS-12 Natural Metal, Once dry, a wash of Tamiya Smoke was applied to dirty up the Natural Metal with highpoints dry brushed Humbrol Flat Aluminium. A flat coat was then applied to give the metal a worn, weathered look.
Only one Decal option is provided, a rather generic looking Dark Green/Dark Sea Grey over Medium Sea Grey Vampire in operation just after the end of World War II. The decals were thin, dense and in register and were good enough to be used rather than being tossed aside.
I used moist tissue to stuff the pre-painted wheel wells. This is a great way to mask cockpits, wheel wells and the like. The moist tissues can be shaped using a toothpick whilst in place and once dry create an almost perfect mask. To remove the tissues after painting is complete, just use an eyedropper to remoisten and remove with a pair of tweezers. Any over spray can be then corrected.
 First step was to paint the
interior framing on the canopy, for this I used Citadel Chaos Black
followed by the application of Tamiya Sky Blue for the bands on each tail
boom. Once this had dried the sky blue bands were then masked out and the
underside was airbrushed Aeromaster Medium Sea Grey. A couple of drops of
white were added to the grey and I carefully shaded the interior of each
panel to give a faded effect to the paintwork. It is important not to
overdo this step, as a real patchwork effect might result, subtlety is
the key here. The upper surface disruptive camouflage soon followed using
Aeromaster Dark Green and Dark Sea Grey, each respective colour having
the same lightening applied to panel centres.
Once all the paint had cured, I applied several coats of Johnsons Future with a wide flat brush, kept especially for this purpose, to seal everything in and preparing the surface for the application of the decals.
Applying the decals was straightforward and they settled wonderfully onto the model with no silvering at all. I used Aeromaster Sol II decal solvent to help bed them all down with no adverse reactions. Once the decals had dried, the fuselage was washed very carefully with a damp cloth to remove any glue and solvent residue and the decals where then sealed in with yet another coat of Future.
My favourite part of building a model kit would have to be weathering and I was hoping that this was going to offset the accuracy disappointments. I used a raw umber/burnt sienna oil wash to enhance the recessed panel lines. This looks absolutely atrocious until the excess is wiped away with a cotton bud moistened in white spirits. The Future protects the paintwork and decals from any damage by the washing procedure.
Once again the model was put aside to cure and finally sprayed with Aeromaster Flat Clear, to give an all over flat finish.
The undercarriage, etched brass pitot and tail balance horns were added without any problems so my Vampire wannabe was completed.
|
CONCLUSIONS |
I now have a Vampire with a very tired stance, completely droopy wings and skinny tail booms. There is also a FB-5 in the stash awaiting glory in the light of day, but that may well be sometime well into the future.
I am not a “Rivet Counter” by any means, but even though this resembles a Vampire, it certainly is way too inaccurate for me, and I am a modeller who believes that; “If a model looks like the real thing, then that’s enough for me”.
The kit certainly builds well but I can only recommend the kit to those who are willing and able to correct the glaring inaccuracies or really want a quick build Vampire on their display shelf, otherwise save hard or use a credit card and go out and get the Aeroclub mixed media kit. I believe they are available in both 1:48 and 1:72.
To any kit manufacturer out there, give us a new tool 1:48 Vampire…please…..
|
REFERENCES |
If you would like your product reviewed fairly and quickly by a site that has over 200,000 visitors a month, please contact me or see other details in the Note to Contributors.