Hasegawa 1/48 Hurricane IIB trop
| KIT #: | 09066 |
| PRICE: | Around €25 in 2005 |
| DECALS: | Two options |
| REVIEWER: | Spiros Pendedekas |
| NOTES: |
| HISTORY |
Essentially a Mk.IIB fitted with Vokes and Rolls-Royce engine dust filters and
including a desert survival kit, the Mk.IIB Trop was one of the Hurricane
variants that took part in the WWII Western Desert campaign, commonly referred
to as Desert War (11 June 1940 – 4 February 1943).
The involvement of the Hurricane in the Desert War can be traced as far back as
mid-1939, with a Mk I undertaking tropical trials in Sudan. Following Italy's
entry into the war in June 1940, a number of Hurricanes were hastily
tropicalized and ferried through France and Malta by air to 80 Squadron in
Egypt, replacing Gladiator biplanes. The type’s first kill at the desert theater
took place in the Mediterranean on 19 June 1940, when F/O P.G. Wykeham-Barnes
reported shooting down two Fiat CR.42 Falcos.
Hurricanes served with several British Commonwealth squadrons in the Desert Air
Force. With losses starting to be heavy over North Africa after the arrival of
Bf 109E and F variants, let alone the superlative Macchi C.202 Folgore, the type
was progressively replaced in the air superiority role from June 1941 by
Tomahawks/Kittyhawks.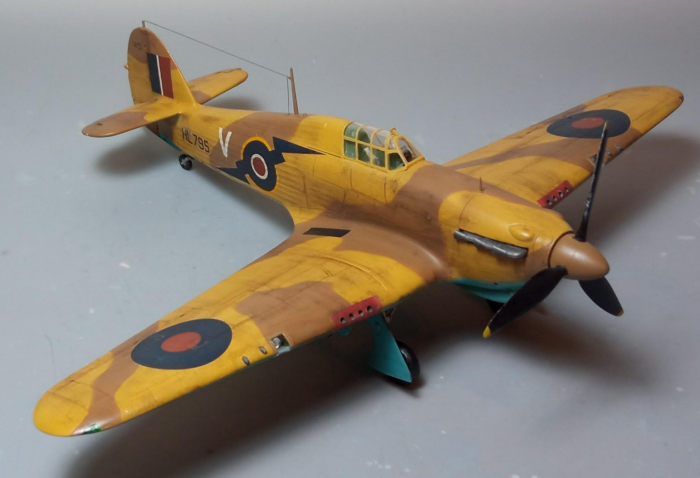
However, the plane’s ruggedness (and maneuverability), combined with the
impressive armament of four 20 mm cannons and a 500 lb bomb load, made it an
ideal fighter-bomber platform. Known as the "Hurribomber", it excelled in the
ground attack and support role.
No. 274 Squadron RAF existed briefly in 1918 and 1919 as a patrol and bomber
squadron, then reformed at Amriya in Egypt in the aftermath of the defeat of
France and the entry of Italy into the Second World War. At first it was
equipped with a mix of Hurricanes and Gladiators, together with two Morane 406
fighters and two Potez 63-11 reconnaissance aircraft used by the French Flight,
coming from No.80 Squadron. This situation soon changed, as the French left in
September 1940 and the Gladiators in October, leaving the squadron fully
equipped with the Hurricane.
In December the squadron began to fly fighter sweeps over the Western Desert,
and continued to perform this role as the army advanced and retreated across the
Libyan Desert. In May 1942 the Hurricanes were modified to carry bombs, and the
squadron took on a fighter-bomber role. It took part in the battle of El Alamein
and the advance across Libya as a fighter bomber unit, but after the fall of
Tunisia was allocated to defensive duties.
The squadron received its first Spitfires in April 1943, and had completed
conversion to the new aircraft in September, by which time it was based on
Cyprus.
| THE KIT |
 This is the 1999 Mk.IIB version of the quarter scale Hurricane series
that Hasegawa has been treating us from as early as 1997. Though now classics,
superseded by newer offerings, the Hasegawa Hurricanes are by all means very
fine kits that can easily hold their own today. For a more in-depth look at the
specific edition’s contents, please visit the preview found
at the MM archives.
This is the 1999 Mk.IIB version of the quarter scale Hurricane series
that Hasegawa has been treating us from as early as 1997. Though now classics,
superseded by newer offerings, the Hasegawa Hurricanes are by all means very
fine kits that can easily hold their own today. For a more in-depth look at the
specific edition’s contents, please visit the preview found
at the MM archives.
| CONSTRUCTION |
I started by assembling the cockpit, which is very comprehensive even
by today’s standards, with the distinctive tubular frame and the rest of the
stuff typically found in there very nicely represented. Basic cockpit color was
Hu78 cockpit green. The instrument panel, side consoles, stick grip, the
gunsight body and the floor itself were painted black, whereas the nicely molded
map case was painted “leather”. The instrument faces were highlighted by silver
dry brushing and some red knobs were “pinned” with red paint and a very fine
brush. Finally, seat belts were added from masking tape. Regarding the
instrument panel itself, I attempted to use the very nicely printed decal, but,
to my dismay, it disintegrated upon my slightest attempt to affix it onto the
panel, a bad sign of things to come…
 Since Hasegawa has provided the fuselage nose section separately, in order to
cater for different versions, if the nose is assembled and then attached to the
fuselage, there will be a risk of mismatch, an issue pointed out by other
modelers. Following their advice, I attached each nose half at each fuselage
half, paying attention to obtain a smooth joint and only then I joined the
fuselage halves (the cockpit being trapped in between), with the result being
good.
Since Hasegawa has provided the fuselage nose section separately, in order to
cater for different versions, if the nose is assembled and then attached to the
fuselage, there will be a risk of mismatch, an issue pointed out by other
modelers. Following their advice, I attached each nose half at each fuselage
half, paying attention to obtain a smooth joint and only then I joined the
fuselage halves (the cockpit being trapped in between), with the result being
good.
Moving to the wings, I attached the top wing halves to the lower 1-piece one,
with the nicely molded landing gear bay trapped in. The lower central part was
then attached, with the complete wing glued to the fuselage, followed by the
2-piece Vokes tropical filter. The two bomb pylons were attached at this time,
as well. While fit at the wing roots was good, some gaps arose around the filter
area, possibly due to operator error.
I decided to separate the elevators from the tail planes, for more dynamic
looks. For this, I carefully and patiently ran the back side of my hobby knife
through the hinge lines, until the parts became separated, then smooth-sanded
the cut areas. The horizontal stabilizers were finally attached to the fuselage.
The nice looking radiator faces were glued, followed by the 2-piece radiator
housing with the two distinctive inner supporting struts inserted and glued with
some tweaking. The radiator faces were painted black, then heavily dry brushed
with silver, whereas the rest of the radiator innards were painted steel. The
wing guns leading edge fairings and wing tip lights were attached at this time,
as well.
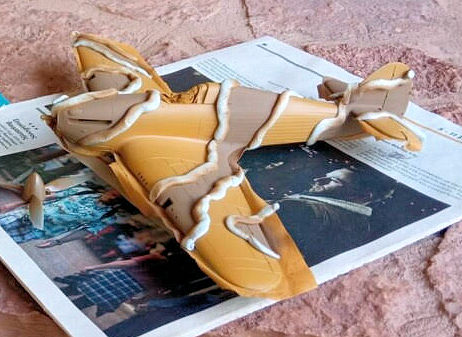
With the basic model assembled, I first treated the more intense gaps with
liquefied styrene, then gave the whole model a normal putty application where
needed (actually not that much, since, apart from the filter area, overall fit
was quite good). After a sanding session, I blanked the cockpit with wet tissue,
masked the wingtip lights with Maskol and took the desert bird to the paint
shop!
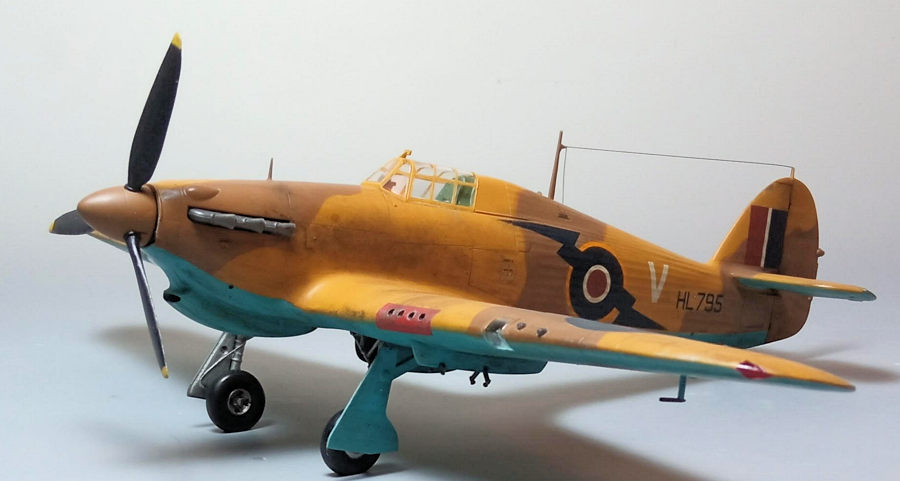
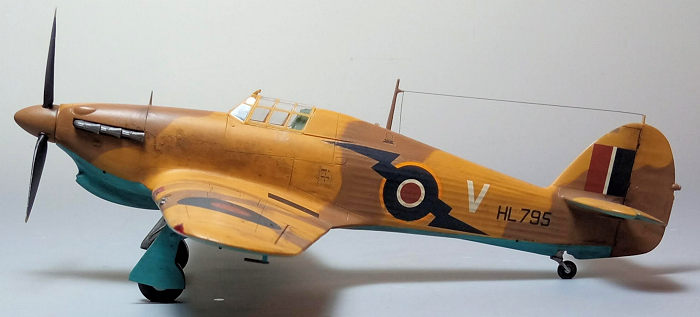
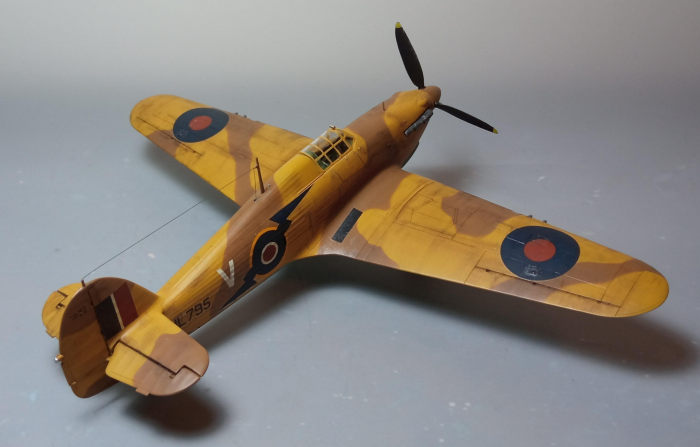
| COLORS & MARKINGS |
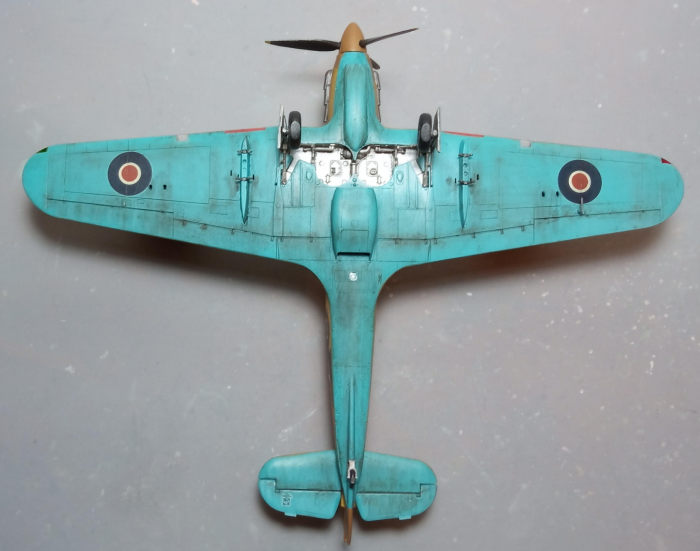
I first gave all undersides, including gear doors, a coat of Hu89 Middle Blue,
then masked it off and continued by giving all topsides a coat of Hu63 Sand.
Regarding the brown application, since the camo lines observed from seasonal
pics were relatively (not totally) tight, I decided not to freehand the brown,
but, rather, use strings of Tak and spray at more or less right angles near the
Tak. With the demarcation lines looking to a good degree like what I aimed for,
I proceeded to masking and painting the leading edge red portions of the two
quadruple gun exits. A coat of Future prepared the bird for decaling.
 I used the kit decals, in order to represent HL795 bird, belonging to 274
squadron and carrying the non-standard blue lightning decoration at the fuselage
roundels. Though almost 30 years old, the decals seemed in usable condition and
were easily removed from their backing paper, however, they proved quite
intolerant to repositioning or any other means of handling once applied. Though
I tried to be as careful as possible, I could not avoid mishaps, with some of
the decals tearing off. After sealing them (or, better, what had been left of
them) with a coat of Future, I resorted to touching up all the affected areas
with like colors.
I used the kit decals, in order to represent HL795 bird, belonging to 274
squadron and carrying the non-standard blue lightning decoration at the fuselage
roundels. Though almost 30 years old, the decals seemed in usable condition and
were easily removed from their backing paper, however, they proved quite
intolerant to repositioning or any other means of handling once applied. Though
I tried to be as careful as possible, I could not avoid mishaps, with some of
the decals tearing off. After sealing them (or, better, what had been left of
them) with a coat of Future, I resorted to touching up all the affected areas
with like colors.
As a side note, regarding the shades chosen, I mostly went for what looked more
close to reality from the stock of paints I had available, so no color accuracy
is claimed, maybe not even close (blue might be too bright, the middle stone too
yellow and the brown towards the light side).
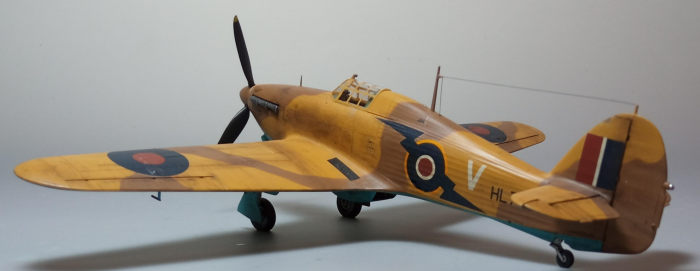
| FINAL CONSTRUCTION |
I attached the landing gear legs, each being a 3-piece affair (together with
their retracting mechanism), followed by the gear doors. The main wheels were
tad filed to look weighted and attached, together with the rear one. As observed
in net available pics, the quite prominent brakes' pneumatic lines are
distinctively curve-routed and attached at the door innards, so I decided to
replicate them by accordingly routing fine stretched sprue. All landing gear
parts were painted Testors Steel, tires and the non metallic brake line sections
were painted black, whereas oleos were highlighted with my fine tip silver pen.
The exhausts, the pylons’ sway braces and the four outboard guns were painted
Testors Burnt Metal and attached. The nice looking prop had its spinner
attached, with a polycap trapped in. The spinner was painted with the same camo
brown, whereas the blades were painted black with yellow tips. The fuselage area
aft of the spinner was also painted black, with the nice molded-on details dry
brushed with silver, however, upon affixing the prop, this area is totally
invisible.
 It was then weathering time, for which I did not restrain myself, since those
birds would operate at an intense rate in the harsh desert conditions. I started
by applying a black wash, which brought out nicely all engraved details and, in
the case of the landing gear parts and bays, added an oily look. I continued by
applying dark brown/black dry pastels at all areas where dirt, grim or even
engine staining might be found. Silver dry brushing was applied at areas where
the paint would rub away, such as the blade leading edges and the wing roots,
where personnel might walk or leave/drop their tools. A matt coat gave the bird
its final finish.
It was then weathering time, for which I did not restrain myself, since those
birds would operate at an intense rate in the harsh desert conditions. I started
by applying a black wash, which brought out nicely all engraved details and, in
the case of the landing gear parts and bays, added an oily look. I continued by
applying dark brown/black dry pastels at all areas where dirt, grim or even
engine staining might be found. Silver dry brushing was applied at areas where
the paint would rub away, such as the blade leading edges and the wing roots,
where personnel might walk or leave/drop their tools. A matt coat gave the bird
its final finish.
The one piece canopy had its frames hand painted and attached. Fit was quite
good, with the tiny gaps treated with white glue. The wing mounted landing
lights lenses were painted chrome and attached, followed by their transparent
covers, which had their frames also hand painted. The landing lights housing
innards were painted Hu78.
I attached the front mast and the external bead sight. The fin located mast that
had typically been vaporized at early stages, courtesy of Yours Truly less than
delicate sanding practices, was fabricated from a piece of stretched sprue and
attached in position. For the aerial wire, thin stretched sprue was run from one
mast to another, with a smaller piece entering the fuselage via a hole that I
micro-drilled just aft of the main mast.
Red and green clear paint was used to replicate the wing tip lights. The top
beacon transparency was affixed with Clearfix, before calling the charming
desert bird done!
| CONCLUSIONS |
 Though getting elderly and definitely superseded by newer offerings (the
superlative Airfix offering instantly pops up), this is still a very good kit of
the iconic Hurricane. Molding is crisp, panel lines are finely recessed, fabric
representation is realistic, detail at all areas is very good and transparencies
are nice and clear (though an open canopy option would be much desirable).
Though getting elderly and definitely superseded by newer offerings (the
superlative Airfix offering instantly pops up), this is still a very good kit of
the iconic Hurricane. Molding is crisp, panel lines are finely recessed, fabric
representation is realistic, detail at all areas is very good and transparencies
are nice and clear (though an open canopy option would be much desirable).
The build itself is uncomplicated, with fit being generally very good, becoming
more challenging around the radiator area, nothing an average modeler cannot
handle. Instructions are typically excellent and decals, though in my case had
aged badly are generally very well printed (with the white being “white” and not
“ivory” at the latest kit reboxes).
Still highly regarded as very noteworthy by the majority of modelers, the now
classic Hasegawa Hurricane is a kit worth building with a nice result
guaranteed.
Happy modeling!
3 April 2023
Copyright ModelingMadness.com. All rights reserved. No reproduction in part or in whole without express permission.
If you would like your product reviewed fairly and fairly quickly, please contact the editor or see other details in the Note to Contributors.