Revell 1/32 Hurricane IIC
| KIT #: | 4667 |
| PRICE: | €25 |
| DECALS: | Two options |
| REVIEWER: | Spiros Pendedekas |
| NOTES: |
| HISTORY |
The Hurricane originated from discussions between RAF officials and aircraft designer Sir Sydney Camm about a proposed monoplane derivative of the Hawker Fury biplane in the early 1930s. Despite an institutional preference for biplanes and lack of interest from the Air Ministry, Hawker refined their monoplane proposal, incorporating several innovations which became critical to wartime fighter aircraft, including retractable landing gear and the more powerful Rolls-Royce Merlin engine.
It went into production for the Air Ministry In June 1936 and entered squadron service in December 1937. Its manufacture and maintenance was eased by using conventional construction methods so that squadrons could perform many major repairs without external support. The Hurricane was rapidly procured prior to the outbreak of the Second World War in September 1939, when the RAF had 18 Hurricane-equipped squadrons in service. The aircraft was relied on to defend against German aircraft operated by the Luftwaffe, including dogfighting with Messerschmitt Bf 109s in multiple theaters of action.
 Overshadowed
in the public consciousness by the Supermarine Spitfire's role during the Battle
of Britain in 1940, the Hurricane nevertheless inflicted 60 percent of the
losses sustained by the Luftwaffe in the engagement, and fought in all the major
theaters of the Second World War.
Overshadowed
in the public consciousness by the Supermarine Spitfire's role during the Battle
of Britain in 1940, the Hurricane nevertheless inflicted 60 percent of the
losses sustained by the Luftwaffe in the engagement, and fought in all the major
theaters of the Second World War.
The Hurricane, apart from a fighter, was developed through several versions: bomber-interceptors, fighter-bombers, and ground support aircraft. Versions designed for the Royal Navy known as the Sea Hurricane had modifications enabling operation from ships. Some were converted as catapult-launched convoy escorts. By the end of production in July 1944, 14,487 Hurricanes had been completed in Britain and Canada, with others built in Belgium and Yugoslavia.
A Hurricane Mk I undertook tropical trials in Sudan in mid-1939, with a number of them hastily tropicalized following Italy's entry into the war in June 1940. These aircraft were initially ferried through France and Malta by air to 80 Squadron in Egypt, replacing Gladiator biplanes.
Hurricanes served with several British Commonwealth squadrons in the Desert Air Force. They suffered heavy losses over North Africa after the arrival of Bf 109E and F-variants and were progressively replaced in the air superiority role from June 1941 by Curtiss Tomahawks/Kittyhawks. However, fighter-bomber variants ("Hurribombers") retained an edge in the ground attack role, due to their impressive armament of four 20 mm (0.79 in) cannon and a 500 lb (230 kg) bomb load.
| THE KIT |
Revell first issued this
kit in 1969, as the MK I version, which was regularly reboxed till 1980. Then,
in 1986, the kit was somehow retooled, in order to represent the cannon armed MK
IIC and had been reboxed another three times. My kit was the 1998 Mk IIC
version.
The kit came in the standard medium sized Monogram-style top opening box,
featuring an attractive box art of a tropicalized IIC, flying over the desert.
Upon opening the box, I was greeted with 50 dark gray styrene parts arranged in
4 sprues bagged together.
Molding is definitely old school, with raised external detailing and very
pronounced riveting. The fabric rendition though, a quite prominent feature of
the Hurricane, looks nicely rendered! Both the standard and the desert air scoop
are provided.
 As expected
from a 1969 kit, cockpit detailing is sparse and very generic. There’s only a
control stick, with the rest of (whatever) detailing molded onto the side
panels. The seat bottom and top are already molded onto the floor and rear
bulkhead respectively. The raised detail of the instrument panel is soft and
uninspiring, with Revell providing an equally uninspiring decal. A detailed but
stiff looking pilot is also provided: might be a good idea to add him in the
cockpit, in order to blank the latter's sparseness. The landing gear is also
simplistic with the wheel bays barely exhibiting some inner busyness. Finally
while the radiator front looks ok, its aft inner area is totally empty.
As expected
from a 1969 kit, cockpit detailing is sparse and very generic. There’s only a
control stick, with the rest of (whatever) detailing molded onto the side
panels. The seat bottom and top are already molded onto the floor and rear
bulkhead respectively. The raised detail of the instrument panel is soft and
uninspiring, with Revell providing an equally uninspiring decal. A detailed but
stiff looking pilot is also provided: might be a good idea to add him in the
cockpit, in order to blank the latter's sparseness. The landing gear is also
simplistic with the wheel bays barely exhibiting some inner busyness. Finally
while the radiator front looks ok, its aft inner area is totally empty.
Apart from the not too pointy (for an IIC) prop hub, one of the kit areas that
has been criticized for not being accurate is the wing panels around the
cannons' area. It is pretty obvious that Revell retooled the original MK I wing
mold to represent the cannon armed MK IIC. Whereas the cannon bases, the
distinctive bulges and the shell dispensing holes are represented, Revell did
not remove the triangular-shape paneling which was only correct for the MK I.
Clear parts are relatively well done, but, sadly, my main canopy was found split
in two, possibly due to spending too much time rattling in the box without any
means of protection.
Instructions are the typical Monogram style ones, provided as an 8-page booklet
with a small history at the front and the construction spread in 6 clear steps.
Not only color callouts are provided, but also quite a few Jim Roeder’s Detail &
Scale photos – a nice touch, especially for the past heritage of the kit, where
modelers could not enjoy the benefits of the net.
Two RAF schemes are provided, the box art desert scheme, representing a
Hurricane of 73 squadron and a night fighter scheme of a machine belonging to 87
Squadron, based in Charmy Down, both schemes as stood in 1942. Decals
looked well printed and, though old, apart from signs of yellowness at their
carrier film, they seemed to be usable (but more on that later...).
| CONSTRUCTION |
I started by putting together the ultra-simplistic 4-piece cockpit, which was subsequently trapped between the fuselage halves. Basic cockpit color was Hu78 Cockpit Green with black instrument panel and (minimal) details molded onto the side panels. The kit supplied instrument panel decal was applied, but its looks were average. I decided not to trap the rear wheel between the fuselage halves, it being prone to breaking, but attach it at later stages.
Continuing construction,
I assembled the 3-piece wing and 2-piece tail planes and attached them to the
fuselage. Fit was average, requiring quite some clamping and copious amounts of
liquefied styrene as the primer filling agent. The kit provides a very
simplistic engine that can be exhibited, should you wish to leave the top cover
unglued. I decided to permanently attach it and not install the engine at all.
Please bear in mind that If you decide (like I did), to attach the exhausts at
later stages, they are molded with the top of the engine, meaning that this part
should be trimmed down in order to be able to be inserted through the fuselage
openings. Of course, the other option would be to assemble the engine with the
exhausts and attach it beforehand.
 The 2-piece
desert filter was assembled and attached in position. The 3-piece radiator was
also assembled. Whereas its front face is acceptable, its aft area is totally
void of anything. To improve the looks (even in a fictitious way), I used the
leftover engine mounting plate, which featured a scoop like protrusion: I
drilled out this protrusion, added a piece of fine mesh. After some trimming, I
attached that part at the position where the radiator aft section would be,
followed by attachment of the complete radiator assembly to the undersides. All
radiator innards were painted steel, with the net result, though not accurate
upon close inspection, looking busy from a distance.
The 2-piece
desert filter was assembled and attached in position. The 3-piece radiator was
also assembled. Whereas its front face is acceptable, its aft area is totally
void of anything. To improve the looks (even in a fictitious way), I used the
leftover engine mounting plate, which featured a scoop like protrusion: I
drilled out this protrusion, added a piece of fine mesh. After some trimming, I
attached that part at the position where the radiator aft section would be,
followed by attachment of the complete radiator assembly to the undersides. All
radiator innards were painted steel, with the net result, though not accurate
upon close inspection, looking busy from a distance.
It was at this time that I decided I could not live with the incorrect (for my
version) wing paneling at the canons area, so I sanded down all the wrong panel
lines and rivets. As a result, the surfaces of the subject areas became void of
any detail, but I was too lazy to rescribe any and decided to leave them “as
is”.
After a final filling and sanding session, I decided to "tone down" the too pronounced surface detail by sanding it with 1000 grit sandpaper, in order to become more subtle, and took the Hurricane to the paint shop!
| COLORS & MARKINGS |
 I first
applied a coat of Hu89 Middle Blue at all undersides, including gear doors,
which revealed a couple of areas needing (re)filling and sanding. Once this took
place, another repetitive coat of the same blue took place. After masking all
undersides, I gave all topsides a coat of Hu225 Middle Stone. Then it was
decision time: while instructions call for hard top demarcation lines (which was
the norm in many RAF camos of the era), by viewing net available seasonal pics,
I came to the conclusion that, in many cases, Desert War Hurricanes featured
soft demarcation lines between the two top colors. I thus took the decision to
freehand the top brown, for which I used Hu29 Dark Earth, with my airbrush at
“fine” settings. A coat of Future prepared this bird for decaling.
I first
applied a coat of Hu89 Middle Blue at all undersides, including gear doors,
which revealed a couple of areas needing (re)filling and sanding. Once this took
place, another repetitive coat of the same blue took place. After masking all
undersides, I gave all topsides a coat of Hu225 Middle Stone. Then it was
decision time: while instructions call for hard top demarcation lines (which was
the norm in many RAF camos of the era), by viewing net available seasonal pics,
I came to the conclusion that, in many cases, Desert War Hurricanes featured
soft demarcation lines between the two top colors. I thus took the decision to
freehand the top brown, for which I used Hu29 Dark Earth, with my airbrush at
“fine” settings. A coat of Future prepared this bird for decaling.
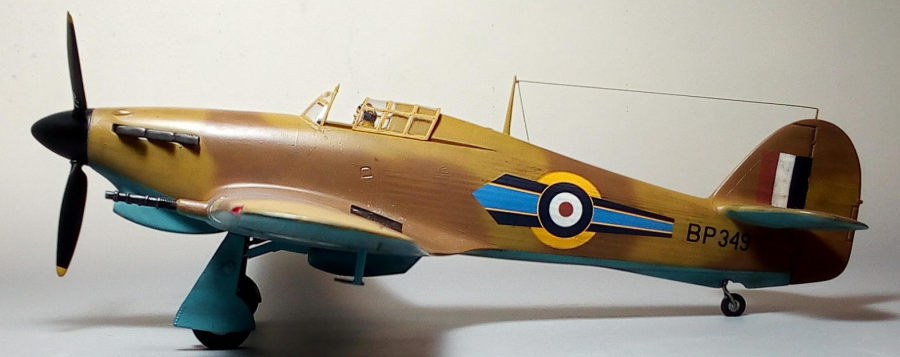
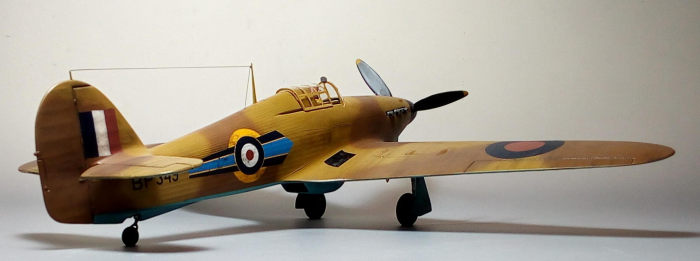
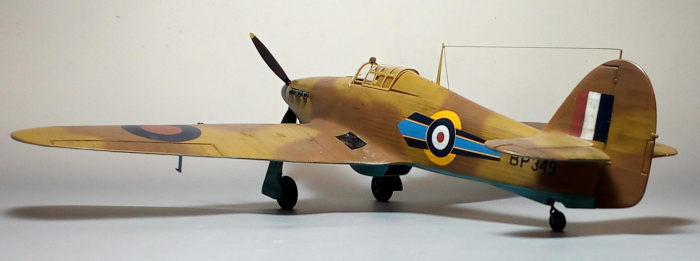
I used the kit decals, in order to depict 73 Squadron’s #BP 349, as it stood in
Western Desert in 1942. This bird carried nice non-standard arrow-like
decorations at the fuselage sides. Though decals looked to be usable, and,
indeed, the first ones behaved well, some of the following started shattering
upon dipping them in the water. I did my best to keep them in one piece and
mostly succeeded, apart from one fin flash, which disintegrated. Digging in my
decal dungeon revealed some more or less suitable replacements, which I used.
Problems with the decals were not over, though, since a lot of air bubbles appeared in an irregular fashion. Only solution was to pinch the bubbles with my hobby knife and flood them with decal softener, something that finally more or less worked. A coat of Future sealed the decals.
| MORE BUILDING |
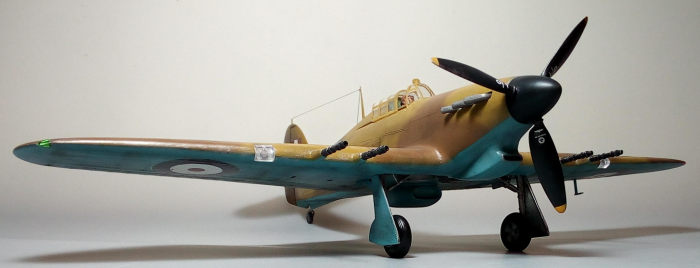
The gear bays featured
minimal and very shallow internal detailing, so I decided to beef them up by
adding pieces of stretched sprue onto the inner top wall, to represent
reinforcing ribs. Some kind of “tank” is located between the bays, partly
protruding outwards: to replicate it, I joined the noses of two 1/48 Maverick
missiles, filed down the resulting “tank” longitudinally and attached it in the
middle of the bay. Some pinches with my microdrills gave the “tank” a more
realistic, riveted look.
The simplified main gear legs received brake lines from stretched sprue and had
their wheel mounting plates drilled circumferentially, to look like bolted drum
brakes. The main wheels were assembled and all three wheels were filed to look
weighted. All landing gear parts were then attached, including doors.
Two distinctive
retraction “linkages” which are present at the real plane were totally absent in
the kit: to kind of cater, I attached two leftover linkages from my spares, with
the result, of course, having nothing to do with reality whatsoever, but, at
least looking busier. All landing gear parts were painted steel and then heavily
black-washed. Tires were painted black and oleos were highlighted with my fine
chrome silver pen.
The exhausts were next: I first shaved down the supporting engine top cover, in
order to be able to slide them into position. Then, I filled their undersides,
which were empty, presumably due to molding limitations, and continued by
drilling out each exhaust tube. The complete exhaust was painted Testors burned
metal with flat black tube innards and attached in position.
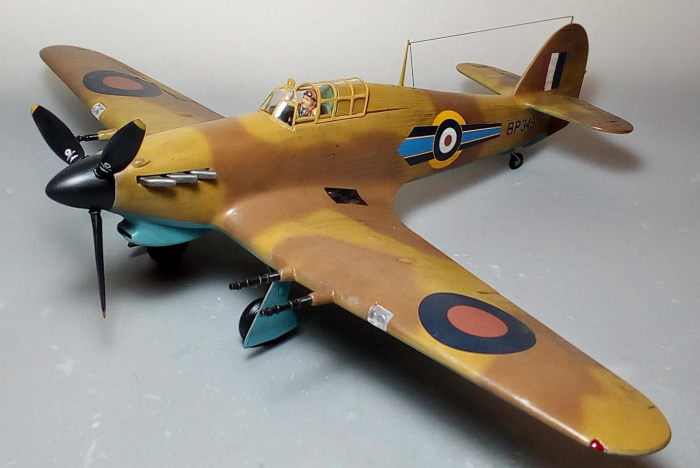
The propeller had its
spinner plate attached, filled, sanded smooth and painted black with yellow
tips. After having its decal blade tags affixed, it was dry brushed with silver,
more heavily at the leading edges, to represent wear from the desert sand and
attached in position.Then the distinctive cannons were carefully cleaned, had
their openings drilled out and attached in position as well. They were painted
black and dry brushed with silver.
I decided to add the stiff but busy looking kit-supplied pilot, in order to
blank the cockpit emptiness, the only concern being that he was dressed in a
“winter” flying suit. After some research, I concluded that similar outfits were
also observed occasionally in the desert, so I went with him. His basic suit was
painted a (RAF uniform) blue shade, with light blue shirt, black tie, boots,
earphones and goggles, leather helmet and gloves, off-white seat belts with
khaki secondary straps, “flesh” face (lightly black-washed) and yellow life
vest. After his goggle lenses were accentuated with my fine chrome silver pen,
he was subsequently attached into the cockpit.
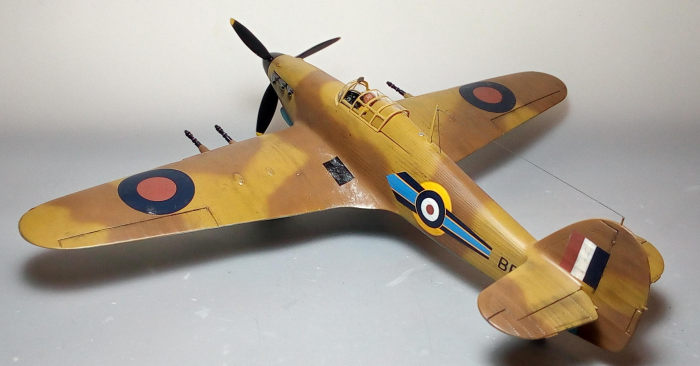
Since these planes were usually beaten due to the harsh desert conditions,
weathering was generously applied. This included black wash onto every recessed
detail (mainly moving surfaces hinges and engine area) faired towards the
direction of the airflow, dings with silver dry brushing at every place the sand
might blast off, or the personnel might rub onto, and finally dark brown/black
pastels in order to simulate engine stain, dirt and grim which would at places
accumulate. A final satin-towards-matt coat sealed everything.
 The
transparencies had their well defined frames hand painted and attached. The
windscreen fit presented some gaps that were faired with white glue (which dries
transparent and takes the surrounding shade, meaning no touching up is necessary
- Tom Cleaver’s hint). As stated above, the canopy was found cracked and glued:
it was affixed at a semi-open position, in order for the crack to be less
noticeable…
The
transparencies had their well defined frames hand painted and attached. The
windscreen fit presented some gaps that were faired with white glue (which dries
transparent and takes the surrounding shade, meaning no touching up is necessary
- Tom Cleaver’s hint). As stated above, the canopy was found cracked and glued:
it was affixed at a semi-open position, in order for the crack to be less
noticeable…
The wing landing lights housings were painted steel. The kit provided no lenses,
so I attached two leftover styrene discs that I painted chrome silver. Their
lights' transparent covers were subsequently attached with Clearfix, as were
attached the wing tip lights, which were painted clear red and green
respectively.
The front antenna mast was cleaned and attached, whereas the fin top mini mast
was fabricated from stretched sprue, to replace the (sanded off during
construction) kit supplied one. Fine stretched sprue was run between the two, to
replicate the antenna wire, with a smaller section running from the front mast
immediately aft, into the fuselage.
It was then time to call this oldie of a kit done!
| CONCLUSIONS |
If you want the best
1/32 Hurricane, you should look no further than the Fly offerings, which are
“modern”, look superb and build superb, as Tom Cleaver has demonstrated. Pacific
Coast Models have also offered great kits of the MkI version in this scale
(again, you may check Tom Cleaver’s reviews in Modelingmadness archives).
Furthermore, Revell itself has announced a new tool Mk IIB to arrive sometime in
2022!
This classic Revell offering is by all means a dinosaur of a kit. While general
shape is good, there are some accuracy issues, mainly regarding the not too
pointy nose and the wrong for this version paneling around the cannon areas.
External details are raised and heavy, full of rivets, which was the norm back
in the 70s. Rest of the details are on the simplistic side, especially regarding
the “key” areas of cockpit and landing gear. Fit is average (at places
challenging) and decals were barely usable, due to their age.
A good number of really nice aftermarket stuff seems to exist, addressing
many of the kit oversimplifications and inaccuracies. The kit is buildable, but
definitely requires some effort to achieve an acceptable result, so it is not
suitable for the novice modeler.
This kit seems not too easy to find nowadays, but the few ones I spotted by netting were offered at relatively low prices. Something to consider is that the MK I kit versions that were issued till 1980 are accurate regarding the prop hub and wing panels, but, interestingly, the MK I version that was “reissued” in 2009 is reported to NOT be the original, correct mold, but a clone of the Mk IIC "retooled" mold, deeming it incorrect!
Anyways, if you can get
our hands on such a kit, have a few kits under your belt and fancy building it,
by all means do! Even out of the box, a good looking big scale Hurricane will
emerge, maybe not the most accurate, but still imposing. And for sure you are
going to have a great time building it, as yours truly did.
Happy modeling!
9 August 2022
Copyright ModelingMadness.com. All rights reserved. No reproduction in part or in whole without express permission.
If you would like your product reviewed fairly and fairly quickly, please contact the editor or see other details in the Note to Contributors.