|
KIT: |
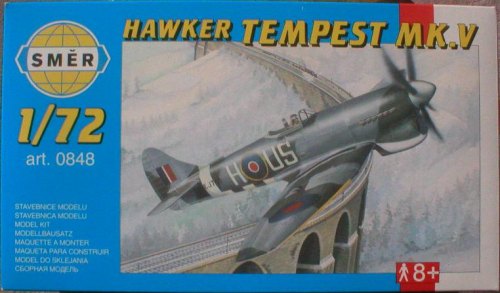
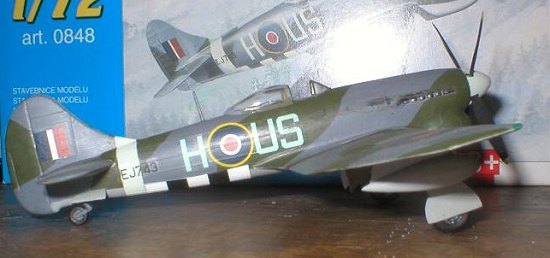
Smer/Heller 1/72 Tempest V |
|
KIT # |
0848 |
|
PRICE: |
£2.00 |
|
DECALS: |
2 options |
|
REVIEWER: |
|
|
NOTES: |
|
HISTORY |
The Hawker Tempest was the
evolution of Hawker’s earlier Typhoon, itself an evolution of the
Hurricane. The Typhoon suffered from some severe aerodynamic problems
(compressibility) at high speeds due to it’s thick wing, as well as
suffering from other gremlins. The Tempest was a refined Typhoon with a
completely re-designed wing of near elliptical plan form and of much
thinner profile, improving the high-speed handling characteristics, and
giving the aircraft a higher performance overall. The only problem with
the thinner wing was that it had a lower fuel capacity, so the forward
fuselage was extended to make room for an extra fuel tank between the
cockpit and t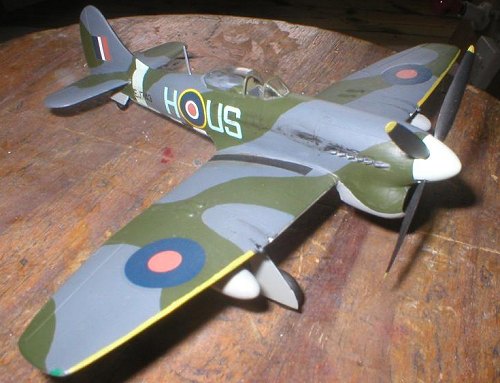 he
engine firewall, thus restoring the fuel capacity to the same level as in
the Typhoon. This meant increasing the area of the tailfin to compensate
for the extra mass up front, resulting in the leading edge extension
which gave the Tempest’s tailfin it’s characteristic profile.
he
engine firewall, thus restoring the fuel capacity to the same level as in
the Typhoon. This meant increasing the area of the tailfin to compensate
for the extra mass up front, resulting in the leading edge extension
which gave the Tempest’s tailfin it’s characteristic profile.
Although originally intended to be powered by the new Bristol Centaurus radial, this engine was unavailable in quantity and Hawker decided to put this version, the Mk.II, on hold whilst putting the aircraft into production as the Mk.V with the Napier Sabre 24 cylinder inline engine, as on the earlier Typhoon.
The Tempest Mk.V entered RAF service in the early summer of 1944, and it was to play a key part in the remaining months of the war, performing such roles as fighter, fighter- bomber & V1 interceptor. It was the fastest prop-driven fighter in RAF service at the time, particularly at low level, and found it’s niche intercepting low-level ‘tip and run’ raiders, V1 ‘Doodlebugs’ and the aircraft also successfully engaged German jets on a number of occasions. The last RAF examples served as Target Tugs and were retired in the 1950’s.
|
THE KIT |
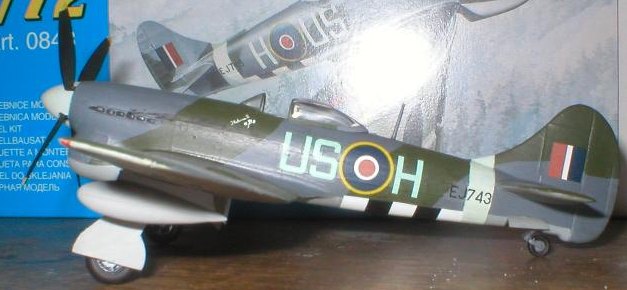
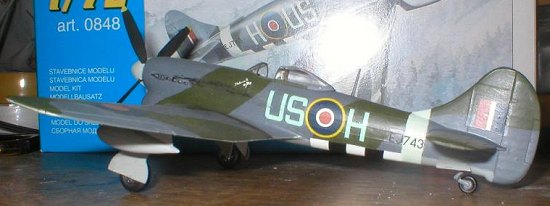
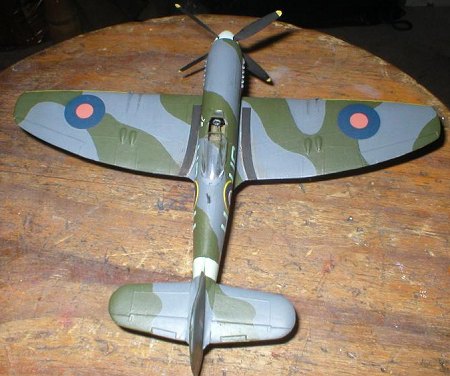
This kit was first released by Heller way back in the 1970’s, and in many ways it shows! The kit is moulded in light grey plastic, with five clear parts-windscreen, canopy, gunsight and underwing landing lamps. Panel lines are raised as you would expect on a model of this age, but thankfully quite subtle, perhaps a reflection of the mould’s age than anything else! Despite it’s age, the kit appears to be accurate in overall size and shape. My kit was the standard one, but it is now also available with etched metal detail parts, which would be useful in many respects (more on that later). Two decal options are provided, Roland Beamont’s JN751 ‘R-B’ and EJ743 ‘US-H’ of 56 Sqn flown by Flt.Sgt McKennaugh in 1944.
|
CONSTRUCTION |
Cockpit:
 Well, what is there to say?! The
cockpit consists of four parts- seat, control column, backplate and the
cockpit floor. An instrument panel of sorts is provided, although it is
not of the best detail or fit, although it’s very difficult to see in the
finished kit anyway. Needless to say, it looks a little bare! My original
intention was to pose the aircraft on a stand in a flying pose with
canopy shut, and so I didn’t care too much about cockpit detail at the
time. The cockpit floor, seat and control column were painted with
Humbrol 53 Gun Metal whilst the instrument panel was painted 33 Matt
Black and the rest of the interior 155 Olive Drab.
Well, what is there to say?! The
cockpit consists of four parts- seat, control column, backplate and the
cockpit floor. An instrument panel of sorts is provided, although it is
not of the best detail or fit, although it’s very difficult to see in the
finished kit anyway. Needless to say, it looks a little bare! My original
intention was to pose the aircraft on a stand in a flying pose with
canopy shut, and so I didn’t care too much about cockpit detail at the
time. The cockpit floor, seat and control column were painted with
Humbrol 53 Gun Metal whilst the instrument panel was painted 33 Matt
Black and the rest of the interior 155 Olive Drab.
Fuselage & Wings:
One of the key features of the
Sabre-powered Tempests and Typhoons was the enormous housing for the
radiator under the nose. The radiator in the kit is built up from two
pieces and is surprisingly well detailed, and looks superb when painted
up in Gun Metal. This is a bit difficult to position correctly because
there are no extrusions on the inside face of the fuselage to guide you,
but after a bit of dry-fitting you can get the position right for
yourself. The cockpit can go in when the fuselage
 halves go together
as the instructions suggest, but it will also drop in from underneath
when the fuselage is together, as I discovered.
halves go together
as the instructions suggest, but it will also drop in from underneath
when the fuselage is together, as I discovered.
The fuselage halves match basically, but the join has various gaps and ridges that need scraping, sanding and filling. If you build the model with undercarriage down, it might also be an idea to cut out the radiator exit flap at the back of the radiator housing so that it can be replaced with a piece of plasticard and posed in the open position later. At the time, I was still aiming to build the model in a flying pose, so didn’t give it much thought.
The wings are built up in three main parts, a one-piece lower surface and the two upper surfaces. Having inserted the clear landing lamps, the wing is glued together with some care- there are no pins or sockets so the whole thing has to be judged by eye.
The join between wing and fuselage is not the most comfortable fit. A bit of filing here and there and a bit of pressure whilst the glue (Revell Contacta) dried soon sorted that out, and with a bit of sanding the join with the underfuselage was blended in perfectly. Not so the wing roots! The gap in the left wing root was soon sorted by inserting glue into the joint, but the one on the right was far more substantial and had to be filled with Revell’s Plasto filler. This is a surprisingly awkward place to sand, and some care had to be taken when smoothing the joint so as not to damage the fuselage sides.
Each tailplane is moulded in one piece and it’s simply a matter of removing them from the sprue and gluing them in place. The fit is snug with no need for filler.
Undercarriage:
This was the bit of the kit I
hadn’t planned to use, however I was a bit pushed for time and patience
and decided it was too much trouble to make a stand for the model. The
undercarriage bays are moulded into the undersurface of the wings, and
have exaggerated detail. This is difficult to remedy because of the bays’
recessed position, so I decided to leave it as it was.
 One of the sockets
for the undercarriage legs was not well moulded, and I managed to damage
it in my attempt to drill the required hole in it. This caused a slight
problem when fitting the leg, but the undamaged socket was an excellent
fit, so as long as everything is moulded properly, it should be fine on
other kits.The bays were painted Matt Olive, although some later research
shows they should probably have been silver. Legs were painted With
Humbrol 33 Matt Black and acrylic Silver.
One of the sockets
for the undercarriage legs was not well moulded, and I managed to damage
it in my attempt to drill the required hole in it. This caused a slight
problem when fitting the leg, but the undamaged socket was an excellent
fit, so as long as everything is moulded properly, it should be fine on
other kits.The bays were painted Matt Olive, although some later research
shows they should probably have been silver. Legs were painted With
Humbrol 33 Matt Black and acrylic Silver.
My only complaint about the undercarriage is how flimsy it is. The model wobbled as though it were sitting on a jelly, and it needs the undercarriage doors to give the legs re-enforcement. This is where the metal parts of the newer kit will be useful to strengthen the legs. The tailwheel and oleo come as one nicely moulded piece, and this goes on with no fuss. Mainwheel and tailwheel bay doors are best left off until final detailing.
|
CAMOUFLAGE & MARKINGS |
I decided to finish the model as
EJ743 ‘US-H’ of 56Sqn. The paintjob for both options is identical. I used
Humbrol 27 Matt Sea Grey and Revell 68 Dark Green for the topsurfaces and
Humbrol 64 Matt Light Grey for the undersurfaces. Wing leading edges and
propeller tips were painted with Humbrol 24 Trainer Yellow, whilst the
spinner and rear fuselage band were 23
 Matt Duck Egg Green. Exhausts are
Gun Metal. I am one of what seems to be a dwindling number or modellers
who doesn’t own an airbrush, so everything you see is hand-painted.
Matt Duck Egg Green. Exhausts are
Gun Metal. I am one of what seems to be a dwindling number or modellers
who doesn’t own an airbrush, so everything you see is hand-painted.
I then applied a coat of Humbrol 135 Satin and applied the decals. The decals are nicely printed and have good register. The only problem was that the red centre to the underwing roundels was slightly off-centre, but I can live with it. The decal invasion stripes are a little too wide so it’s necessary to trim two or three millimetres off each edge so that the stripes wont go too far up the fuselage sides.
With decals done, I applied some of the final details such as the canopy, pitot probe etc. I then gave the whole model a coat of Humbrol 49 Matt Clear, and then another coat of Satin.
Exhaust stains and other weathering were applied in artist’s acrylics and watercolours, along with the wing tip navigation lights.
|
CONCLUSIONS |
Ok, so this is NOT the best-moulded or most detailed kit on the market, but it is good value for money and what you get is a good representation of the Hawker Tempest for less than half the price of the Academy kit, and that kit still has one or two faults.
Overall, I enjoyed this kit very much, largely because I didn’t pay much for it and so didn’t take it too seriously. All in all I’m happy with it.
If you decide to build a more serious model of the Tempest, then it might be a good idea to buy the Academy kit AND the SMER kit, and combine the best features of both. The propeller and the wheels of the SMER kit look to be more accurate than those on the Academy model.
|
REFERENCES |
Flypast magazine, May 2002
British Warplanes of World War Two by Aerospace Publishing
British Aircraft of World War II by David Mondey
If you would like your product reviewed fairly and quickly by a site that has over 200,000 visitors a month, please contact me or see other details in the Note to Contributors.