|
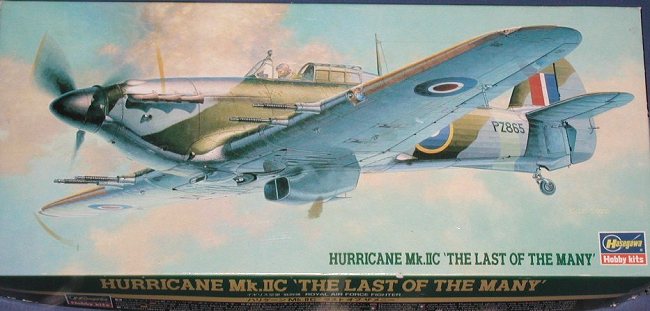
KIT: |
|
|
KIT # |
AP 39 |
|
PRICE: |
$13.98 |
|
DECALS: |
Two aircraft |
|
REVIEW & |
David Geldmacher |
|
NOTES: |
Converted to PR Mk.II |
|
HISTORY |
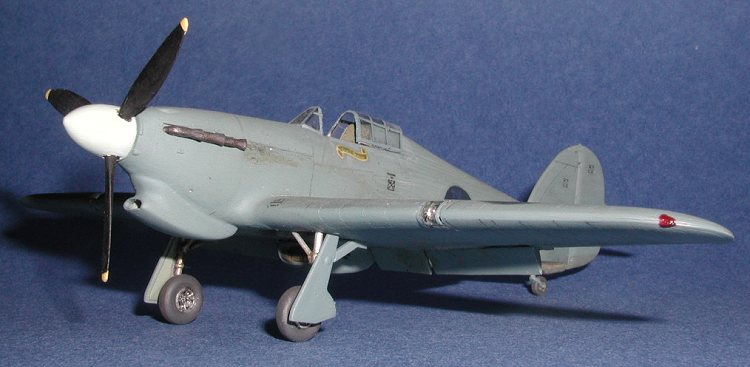
By the end of 1940, the progressive improvements in fighter capability spelled the end for the Hurricane as a day fighter over Europe. As the Mk.II, fitted with 4 20mm cannons, the Hurricane remained a potent night fighter and ground attack aircraft. The Mark IIc was the most produced model of Hurricane with 4,711 built. The kit markings represent the last British-built Hurricane, which was retained by Hawker for test and publicity purposes.
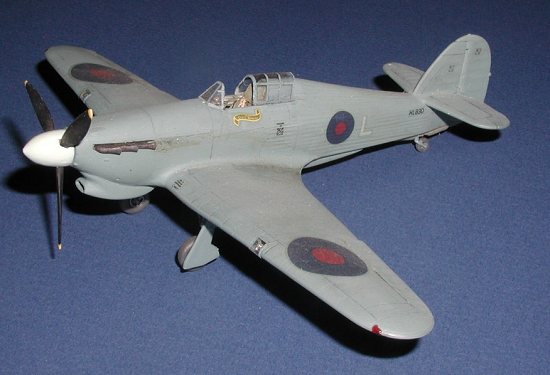
In other theatres where fighter opposition was less intense, the Hurricane retained its usefulness in the air-to-air role later in the war. Given the demand for Spitfires over the Home Front, many units in North Africa and Asia had to make do with Hurricanes. This was even truer for reconnaissance operations than it was for fighters, since there were not enough of the photo-reconnaissance (PR) Spitfires to meet demands over Europe, much less other theaters. Local modifications in Africa and Asia thus created PR Hurricanes from both Mk.I and Mk.II variants to provide a fast, high altitude recce platform. This model depicts a Hurricane PR.IIc of 208 Sqn. in Palestine in 1942.
|
THE KIT |
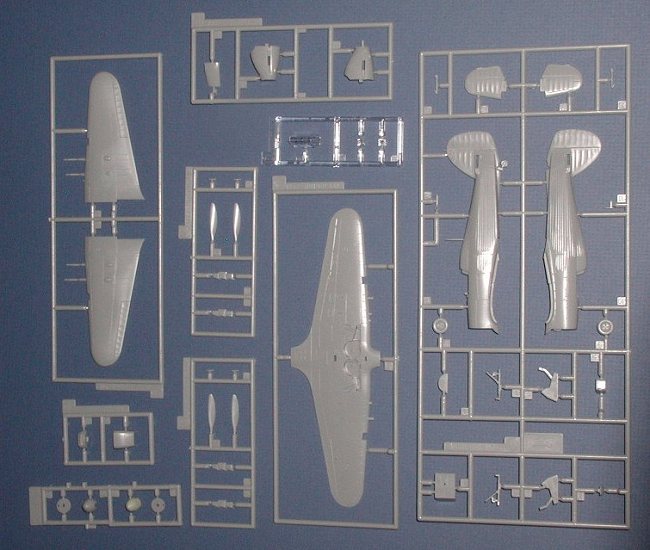
Crisply molded in the standard Hasegawa gray plastic, the kit is broken up in modular fashion to allow construction of different variants. This makes for 8 sprue frames, plus one clear sprue and the nylon propeller bushings. As is typical, parts unneeded for the packaged version are shaded out in the pictorial instructions. Most finished models will end up using about 41 of the 48 parts.
The aft fuselage framing has been criticized as being too heavy handed, and based on photographs of Hurricanes in service I would have to agree. The wings and forward fuselage have fine, crisply executed engraved panel lines, which, along with overall outline, appear acceptably accurate in comparison to two different sets of (probably independent) scale drawings.
 Parts breakdown is mildly unconventional for a single-engined
aircraft. The forward fuselage/cowling is molded in vertical upper halves and a
separate ventral panel that can be swapped for the tropical versions’ deep
chin filter, which is not included in this boxing (more on this later). The
cowling is separate from the vertically split main fuselage. In contrast, the
lower half of the wing is molded as a single piece. All control surfaces are
molded in neutral position and the flaps are closed.
Parts breakdown is mildly unconventional for a single-engined
aircraft. The forward fuselage/cowling is molded in vertical upper halves and a
separate ventral panel that can be swapped for the tropical versions’ deep
chin filter, which is not included in this boxing (more on this later). The
cowling is separate from the vertically split main fuselage. In contrast, the
lower half of the wing is molded as a single piece. All control surfaces are
molded in neutral position and the flaps are closed.
Interior detailing is minimal with a seat, stick, full floor and after wall of the cockpit. A decal is supplied for the instrument panel. No belts are provided for the seat. There is no pilot figure included. The canopy and windscreen are molded as a single piece, with moderately heavy framing. The tail wheel is molded integrally with the port fuselage half, which seems a recipe for disaster. (Well, it more than seems like that, I broke it off several times). The Mk.I and Mk.II night fighter boxings of this kit include separate tail wheels to replace the molded-on version. The prop is molded with separate blades and two spinner options. There is (correctly) a backing plate for the spinner, which traps the nylon O-ring to allow a repositionable/removable prop.
|
CONSTRUCTION |
I decided to have some fun with the construction of this kit, and loaded it up with all sorts of aftermarket goodies. I did this mostly to build some skills with multimedia detailing methods. My construction was therefore decidedly NOT straightforward, but based on my experience I can say that the kit will fall together in a most agreeable way if you decide to build it out of the box.
 Step one in the instructions is to build up the simplistic
cockpit. I chose instead to use the Kendall Hurricane Mk. I (yeah I, know, but I
couldn’t pick out the differences between a Mk.I and a Mk.II interior in
1/72). The resin was very nice, with side panels and more accurate floor
moldings, but all of this was too wide, requiring narrowing of the floor and
thinning of the side panels until they were nearly sanded through. The Kendall
seat has molded-in belts. I painted the interior with PollyScale British
interior Grey-Green, followed by a dark gray-brown wash, and lightened
Grey-Green dry-brushing. Seat colors are sometime problematic in RAF WW2
aircraft as they switched to Bakelite (brown) seat liners, but I went with
Grey-Green on this A/C.
Step one in the instructions is to build up the simplistic
cockpit. I chose instead to use the Kendall Hurricane Mk. I (yeah I, know, but I
couldn’t pick out the differences between a Mk.I and a Mk.II interior in
1/72). The resin was very nice, with side panels and more accurate floor
moldings, but all of this was too wide, requiring narrowing of the floor and
thinning of the side panels until they were nearly sanded through. The Kendall
seat has molded-in belts. I painted the interior with PollyScale British
interior Grey-Green, followed by a dark gray-brown wash, and lightened
Grey-Green dry-brushing. Seat colors are sometime problematic in RAF WW2
aircraft as they switched to Bakelite (brown) seat liners, but I went with
Grey-Green on this A/C.
The Kendall set comes with control surfaces and flaps to pose these parts off of neutral position. All the control surfaces have right-angles in the joints with the flying surfaces, so they were removed from the kit parts with repeated passes of a knife blade, rather than my preferred razor saw. Both my cuts and the Kendall parts required trimming and shaping to ensure a good fit.
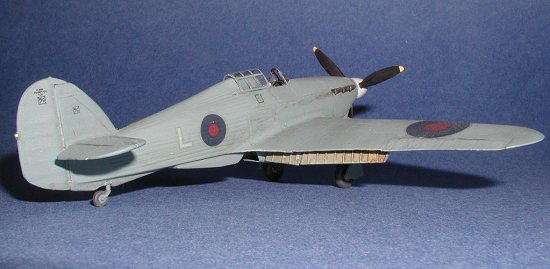
If all of this wasn’t punishment enough, my next masochistic act was to saw off the wheel wells molded into the lower wing half, and substitute the etched brass wheel wells from the Eduard Hurricane set (72-207). This one piece shell was folded and fitted in place with some difficulty, which included thinning the innser surface of the wing. It then required careful cutting and shaping of the upper wing halves to allow them to fit properly. While the kit wheel wells are nothing to write home about, I do not recommend this substitution, since, in addition to the fit problems with the Eduard piece, it also removes any sort of positive mounting for the main gear legs. I did add piping and lines based on photographic references.
 It was now time to close up the fuselage. After appropriate
narrowing of the cockpit floor, this went well. The nose assembly was mated up
to the fuselage with a minimum of fuss and filler. Then the wings went on.
Squaring these up with the brass wheel wells inside took some fiddling with the
fuselage to wing mating surfaces, but the high quality fit of the basic kit was
a genuine help in getting all together. I used several photographic references
to hollow out the landing light bays in the leading edges of the wing, and
framed them with strip and stretched sprue.
It was now time to close up the fuselage. After appropriate
narrowing of the cockpit floor, this went well. The nose assembly was mated up
to the fuselage with a minimum of fuss and filler. Then the wings went on.
Squaring these up with the brass wheel wells inside took some fiddling with the
fuselage to wing mating surfaces, but the high quality fit of the basic kit was
a genuine help in getting all together. I used several photographic references
to hollow out the landing light bays in the leading edges of the wing, and
framed them with strip and stretched sprue.
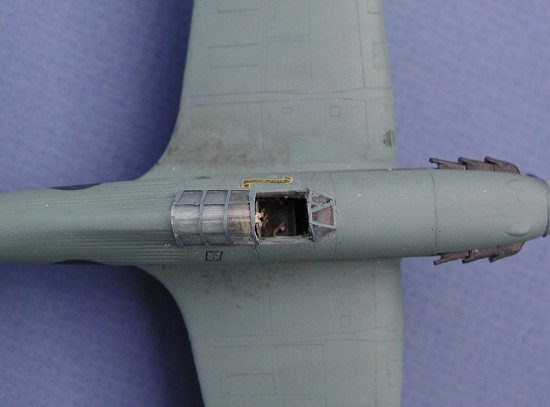
The aircraft I wanted to depict had the deep Vokes tropical filter for its carburetor intake, but the kit I chose did not – and at the time I was not aware that Hasegawa had released a version with one. I pirated a tropical intake from a spare SMER/Heller kit and faired this into the Hasegawa chin. The fit was not perfect by any means, but I was able to make it work. I also applied the white metal Delta Bits camera pannier with CA at this time. I used white glue to seal the fine gap between the metal part and the fuselage.
I built up the interior framing of the flap well with fine styrene strip, then attached the Kendall flaps and control surfaces with slight offsets. I dry-fit the windscreen and determined that I would be able to get an adequate joint after painting. The landing gear were also deferred until final assembly.
|
PAINT & MARKINGS |
I airbrushed Humbrol PRU Blue for the overall finish after plugging the cockpit with tissue. Humbrol sprays beautifully with a very smooth finish when using their brand thinner. I’ve had less success mixing it with other thinners.
I brush painted the wheel wells and flap wells with the same Polly Scale Grey Green as the interior. It may have been more accurate to leave them in PRU blue, but I like the way the slight color contrast broke up the otherwise monochrome scheme. The landing light bays was also brushed in grey-green.
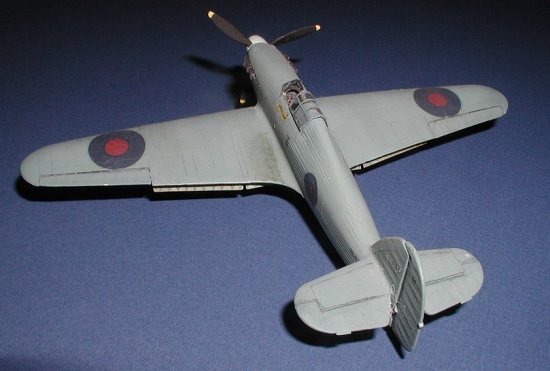
I used Testor’s Glosscote as a base coat for the decals. The markings come from Almark sheet #A36 "P.R. Markings – Europe" and depict HL830, of A/C "L" of 208 Sqn, RAF based at El Bassa, Palestine, 1943. This aircraft had a presentation banner from the "Fiji Civil Service II" in green and gold under the port canopy rail. I could not uncover a photograph of this aircraft to confirm the accuracy of the decal instructions. I have my doubts about Sky as the spinner color, but it looks good, so I’ll keep it. The decals worked well with Microsol and Microset. When dry, they were sealed with Dullcote.
 I built up the prop to the accompaniment of some choice
profanities, and chose a somewhat different approach to painting the assembly. I
first sprayed the whole prop and back spinner plate yellow. I then attached the
spinner dome and carefully sanded the joint with the back plate. I masked the
blades and sprayed the spinner with Humbrol Sky followed by some Future mixed
with Polly Scale flat finish to get a semigloss effect. Finally, I masked the
prop tips and seamless spinner and shot the blades with flat black. This method
allows me to eliminate the spinner seam, while maintaining my preference of
adding darker colors over lighter ones.
I built up the prop to the accompaniment of some choice
profanities, and chose a somewhat different approach to painting the assembly. I
first sprayed the whole prop and back spinner plate yellow. I then attached the
spinner dome and carefully sanded the joint with the back plate. I masked the
blades and sprayed the spinner with Humbrol Sky followed by some Future mixed
with Polly Scale flat finish to get a semigloss effect. Finally, I masked the
prop tips and seamless spinner and shot the blades with flat black. This method
allows me to eliminate the spinner seam, while maintaining my preference of
adding darker colors over lighter ones.
The windscreen was a good fit with Testor’s canopy cement after separating it from the hood with a razor saw. The hood was then filled with modeling clay and used to smash form a new canopy for display in the open position. Framing for both was done with painted decal strips. New landing light cover was also smash formed, and glued in place over an MV products lens. Extra canopy framing decal strips were used to square up the joints with the new cover. Main gear legs and wheels were painted flat aluminum, the tires were brushed with PollyScale Grimy Black. The main gear doors are PRU blue on the outersurface and grey-green on the interior. The gear assemblies were secured with gap-filling CA. The gear, wheel wells, and flap wells were given an oily black wash. Final weathering was with dusty tan pastels on the undersurface, and brownish-black streaming back from the exhausts and in the pilot boarding area of the wing.
|
CONCLUSIONS |
I had a lot of fun putting this minor conversion and superdetailing exercise together. My principal criticisms of the kit are the too deep fuselage ribbing, the one piece canopy/windscreen, the separate cowling, and the prop. The first two are easily handled and the latter two are indeed modeling challenges in an otherwise fairly straightforward kit. Would I build one again? Absolutely.
If you would like your product reviewed fairly and fairly quickly, please contact the editor or see other details in the Note to Contributors.