
Airfix 1/48 Mosquito FB.VI
| KIT #: | 71001 |
| PRICE: | |
| DECALS: | Three options |
| REVIEWER: | Stephen Young |
| NOTES: |
Aviaeology AOD48005 RCAF Mosquitos, Canadians in Fighter Command #1 Aviaeology Airframe Stencil/Data series Mosquito (part 1) All Marks AOD48505 Squadron True Details resin cockpit #48532 |
| HISTORY |
The famous and iconic de Havilland DH.98 Mosquito, a British twin-engine shoulder-winged multi-role combat aircraft, introduced during the Second World War, was unusual in that its frame was constructed almost entirely of wood. It was nicknamed The Wooden Wonder, or "Mossie" by its crews. Originally conceived as an unarmed fast bomber, the Mosquito's use evolved during the war into many roles, including low to medium-altitude daytime tactical bomber, high-altitude night bomber, pathfinder, day or night fighter, fighter-bomber, intruder, maritime strike aircraft.
The FB Mk VI, which first flew on 1 June 1942, was powered by two, single-stage two-speed, 1,460 hp (1,090 kW) Merlin 21s or 1,635 hp (1,219 kW) Merlin 25s, and introduced a re-stressed and reinforced "basic" wing structure capable of carrying single 250-or-500-pound (110 or 230 kg) bombs on racks housed in streamlined fairings under each wing, or up to eight RP-3 25lb armor piercing or 60 lb semi-armor piercing unguided rockets. In addition fuel lines were added to the wings to enable single 50 imp gal (230 l) or 100 imp gal (450 l) drop tanks to be carried under each wing. The usual fixed armament was four 20 mm Hispano Mk.II cannon and four .303 (7.7 mm) Browning machine guns, while two 250-or-500-pound (110 or 230 kg) bombs could be carried in the bomb bay.
 Unlike the F Mk II, the
ventral bay doors were split into two pairs, with the forward pair being used to
access the cannon, while the rear pair acted as bomb bay doors. The maximum fuel
load was 719.5 imperial gallons (3,271 l) distributed between 453 imperial
gallons (2,060 l) internal fuel tanks, plus two overload tanks, each of 66.5
imperial gallons (302 l) capacity, which could be fitted in the bomb bay, and
two 100 imperial gallons (450 l) drop tanks. All-out level speed is often given
as 368 mph (592 km/. The most numerous of all Mosquito variants, 2,298 FB Mk VIs
were built, nearly one-third of total Mosquito production.
Unlike the F Mk II, the
ventral bay doors were split into two pairs, with the forward pair being used to
access the cannon, while the rear pair acted as bomb bay doors. The maximum fuel
load was 719.5 imperial gallons (3,271 l) distributed between 453 imperial
gallons (2,060 l) internal fuel tanks, plus two overload tanks, each of 66.5
imperial gallons (302 l) capacity, which could be fitted in the bomb bay, and
two 100 imperial gallons (450 l) drop tanks. All-out level speed is often given
as 368 mph (592 km/. The most numerous of all Mosquito variants, 2,298 FB Mk VIs
were built, nearly one-third of total Mosquito production.
Flown aggressively in the night intruder role and RAF Coastal Command Strike Wings the Mosquito gained fame and notoriety for precision although often costly strikes against the enemy.
Robert Allen “Bob” Kipp, RCAF SL – Distinguished Service Order and Distinguished Flying Cross was born in Kamloops, British Columbai, October 12, 1919 and enlisted in Vancouver 27, June 1940. Arriving in the United Kingdom on 17, March, 1943 he was made Flight Leader 25 March1943. Assigned to No 418 Squadron 2 November 1943 to 29 June 1944 he was promoted to Squadron Leader 25 February 1944. A fourteen and one half victory ace the DSO and DFC were presented to S/L Kipp at Buckingham Palace 13 July, 1945. Tragically, he was killed in the crash of a Vampire, 25 July 1949, while practicing aerobatics as Commanding officer of N. 410 Squadron.
| THE KIT |
Initially released in 1977
as kit number 6100-7, Airfix’s 1/48th scale Mosquito Mk VI has appeared in
several other re-issues with only box changes and then starting in 2003 with
version changes including a night fighter NF30, bomber Mk VI/photo recon PR XVI
and most recently in 2014 as a PR VI in a D-Day 70th Anniversary boxing all with
relatively minor changes in parts and different decals. The initial issue was
molded in gray plastic and the box top art showing a Royal Canadian Air Force
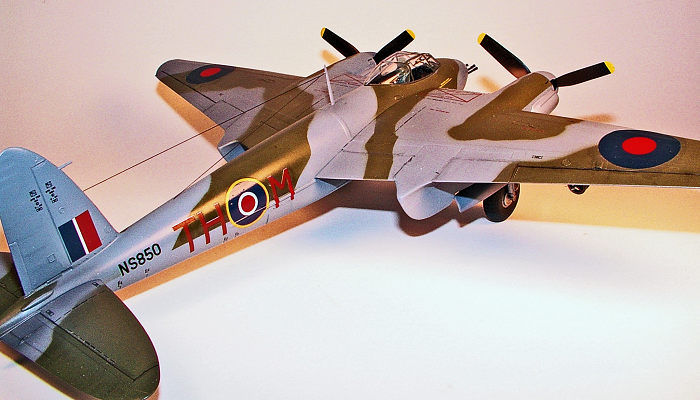
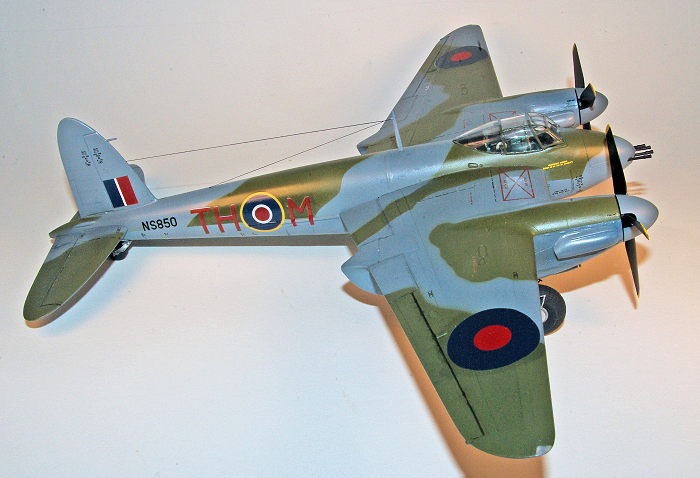
Mosquito FB VI o 418 “City of Edmonton” Squadron, NS850, “Black Rufe” flown by
Squadron Leader Robert Allen "Bob" Kipp and Flight Officer Peter Huletsky, based
at Holmsey South circa mid 1944. Included kit decals provide basic markings for
NS850 “Black Rufe” in the standard RAF Dark Green and Medium Sea Gray camouflage
and HR405 in two tone gray camouflage. Optional parts are provided to equip the
model with either exposed or shrouded exhaust and wing bomb racks or rocket
launching rails with 60 pound 3 inch rockets. “Black Rufe” was equipped with the
shrouded exhaust and bomb racks and not the rocket rails. The kit provided
decals have minimal stenciling provided and significantly the “Black Rufe”
markings including the German aircraft victory markings are incorrect with each
victory marking represented by a balkenkreuz. In actuality, the markings were
small swastikas as confirmed by contemp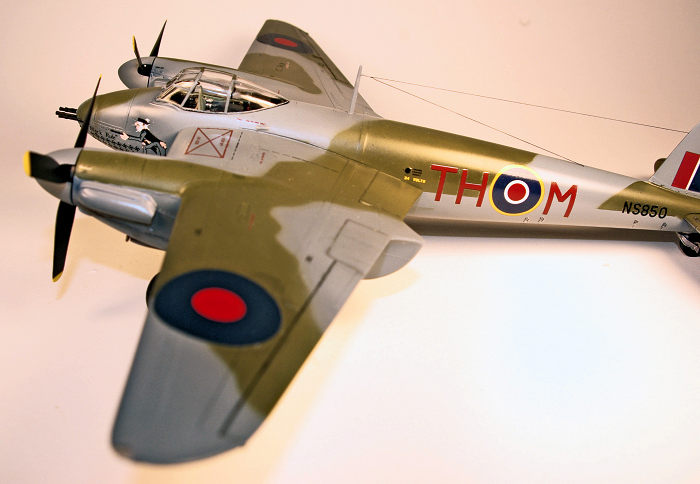 orary photographs of the aircraft. This
change was doubtless required by the legal and marketing realities in Europe.
Having previously built the venerable Monogram Mosquito first issued in 1966 the
Airfix version has better detail including a more complete cockpit with
instrumentation although it is not near current manufacturing standards in
detail or precision. Other changes include the later Mosquito version wing tip
lights, more detailed landing gear including fine spring loaded door guides and
accurate tail wheel plus the later paddle bladed propellers. The relatively
sparse panel line detail is raised with engraved control surface lines.
Reinforcing ply on the wing and fuselage surfaces is represented but greater
than scale thickness. The Tamiya 1/48th Mosquito FB VI drawing on twenty years
of model manufacturing advances, is far superior in detail, refinement and
engineering and in my opinion worth the extra cost if one is trying to decide
which one to purchase if a state of the art kit is desired. Since the Aviaeology
decal sheet provides serial and nose art markings to three aircraft including
“Black Rufe" I decided to use that instead of the original kit decals of very
suspect quality due to their age. Aviaeology is a Canadian company specializing
in Canadian Air Force aircraft markings and first issued the RCAF Mosquitoes,
Canadians in Fighter Command #1 in 2015 as set AOD48005 with markings for three
aircraft flown by fighter aces including the American flying for the RAF, Ft.
LT. James F. “Lou" Luma. They subsequently reissued the set with improved and
very detailed documentation as set AODD005m version 2. The revised set added
markings for a fourth aircraft in addition to the original three. Aviaeology’s
Mosquito stencil set is excellent, extremely complete, and highly recommended.
orary photographs of the aircraft. This
change was doubtless required by the legal and marketing realities in Europe.
Having previously built the venerable Monogram Mosquito first issued in 1966 the
Airfix version has better detail including a more complete cockpit with
instrumentation although it is not near current manufacturing standards in
detail or precision. Other changes include the later Mosquito version wing tip
lights, more detailed landing gear including fine spring loaded door guides and
accurate tail wheel plus the later paddle bladed propellers. The relatively
sparse panel line detail is raised with engraved control surface lines.
Reinforcing ply on the wing and fuselage surfaces is represented but greater
than scale thickness. The Tamiya 1/48th Mosquito FB VI drawing on twenty years
of model manufacturing advances, is far superior in detail, refinement and
engineering and in my opinion worth the extra cost if one is trying to decide
which one to purchase if a state of the art kit is desired. Since the Aviaeology
decal sheet provides serial and nose art markings to three aircraft including
“Black Rufe" I decided to use that instead of the original kit decals of very
suspect quality due to their age. Aviaeology is a Canadian company specializing
in Canadian Air Force aircraft markings and first issued the RCAF Mosquitoes,
Canadians in Fighter Command #1 in 2015 as set AOD48005 with markings for three
aircraft flown by fighter aces including the American flying for the RAF, Ft.
LT. James F. “Lou" Luma. They subsequently reissued the set with improved and
very detailed documentation as set AODD005m version 2. The revised set added
markings for a fourth aircraft in addition to the original three. Aviaeology’s
Mosquito stencil set is excellent, extremely complete, and highly recommended.
| CONSTRUCTION |
I enjoy building older model kits and each
often represents a look back at the state of the kit manufacturing art when
originally released. My goal was a relatively quick build to further develop
building and finishing techniques. This kit also provided a first time
installation of a full resin cockpit in place of the kit parts, along with the
chance to try minor technical experiments along the way in construction and
finishing. The Airfix style instructions are simple diagrams with part numbers
and color call outs from the supplied generic color legend. Oddly, many parts
that are exact duplicates are given individual part numbers and can add
confusion to the assembly. The construction sequence calls for assembly of the
cockpit part followed by installation into and closure of the fuselag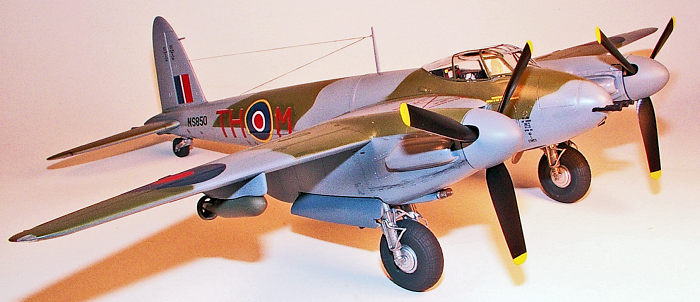 e. This is
followed by assembly of the main landing gear and installation into each of the
two engine nacelles followed by incorporation of each nacelle into each wing
half then joining the wings to the assembled fuselage. I expected this sequence
to lead to problems of alignment as well as the risk of breakage of the
relatively complex landing gear not to mention adding complexity to masking for
painting. To avoid that landing gear parts were not assembled as instructed and
instead the nacelles and the nacelle bulkhead was assembled and then set aside
for the later wing assembly. The resin cockpit was painted then any molded in
cockpit detail on the fuselage halves was removed and the cockpit fitted. This
turned out to be a learning experience requiring a healthy dose of patience as a
significant amount of work is needed to remove the resin pour blocks and thin
the flooring to fit within the fuselage. A jeweler’s saw and CMK razor saw are
essential tools for this. It was a exercise in trial and error fitting and
refitting and the end result was good but not perfect. In retrospect it would be
better to fit the resin parts first then paint. Adequate fitting required
repeated test fitting and minute trimming and sanding of the parts until
everything was aligned in place with the fuselage halves held together by tape
and rubber bands. Once adequate (it was not perfect) fit was achieved the port
side wall and main floor section was glued into place on the port fuselage half
with the starboard sidewall and fuselage half held in alignment with rubber
bands. After the cement cured for 48 hours the starboard sidewall was glued in
place against the fuselage half. Strenuous clamping and rubber banding was
needed to hold the alignment when the fuselage was closed up. I decided to omit
the resin entry door and leave the kit door intact installing the starboard
resin sidewall around it. In addition the cannon port section is a separate
lower fuselage part and due to the extra thickness of the resin cockpit floor a
significant amount of fitting was needed as well as subsequent seam filling and
sanding. Although the resin instructions call for cyanoacrylate glue to be used
for attachment of the larger components I used 5 minute epoxy which allowed more
work time. The tail wheel assembly must be installed when the fuselage halves
are joined. For the cockpit resin sidewall and floor Testors Model Master enamel
British Interior Green was used with detail painting using assorted Vallejo
acrylics. The instrument panel and consoles have molded relief instruments so
the visible surface was airbrushed with Rustoleum spray can gloss white enamel
decanted from the can and after the paint was dry the panels were brush coated
with Future. After at least 24 hours of drying time Testors MM Flat black was
then airbrushed over the dried Future. After allowing to dry over night the
dials and switches were picked out by wiping away the black paint from the
raised relief details using a enamel thinner dry brush technique. Vallejo
Acrylic Red and Bright Yellow was applied to a couple of instruments and knobs
guided by reference photos for added visual color. Weathering was done using a
wash of 1:1 water to Future plus a small amount of plain vodka added to reduce
surface tension plus Tamiya Acrylic Black X-1 followed by light dry brushing
with Test
e. This is
followed by assembly of the main landing gear and installation into each of the
two engine nacelles followed by incorporation of each nacelle into each wing
half then joining the wings to the assembled fuselage. I expected this sequence
to lead to problems of alignment as well as the risk of breakage of the
relatively complex landing gear not to mention adding complexity to masking for
painting. To avoid that landing gear parts were not assembled as instructed and
instead the nacelles and the nacelle bulkhead was assembled and then set aside
for the later wing assembly. The resin cockpit was painted then any molded in
cockpit detail on the fuselage halves was removed and the cockpit fitted. This
turned out to be a learning experience requiring a healthy dose of patience as a
significant amount of work is needed to remove the resin pour blocks and thin
the flooring to fit within the fuselage. A jeweler’s saw and CMK razor saw are
essential tools for this. It was a exercise in trial and error fitting and
refitting and the end result was good but not perfect. In retrospect it would be
better to fit the resin parts first then paint. Adequate fitting required
repeated test fitting and minute trimming and sanding of the parts until
everything was aligned in place with the fuselage halves held together by tape
and rubber bands. Once adequate (it was not perfect) fit was achieved the port
side wall and main floor section was glued into place on the port fuselage half
with the starboard sidewall and fuselage half held in alignment with rubber
bands. After the cement cured for 48 hours the starboard sidewall was glued in
place against the fuselage half. Strenuous clamping and rubber banding was
needed to hold the alignment when the fuselage was closed up. I decided to omit
the resin entry door and leave the kit door intact installing the starboard
resin sidewall around it. In addition the cannon port section is a separate
lower fuselage part and due to the extra thickness of the resin cockpit floor a
significant amount of fitting was needed as well as subsequent seam filling and
sanding. Although the resin instructions call for cyanoacrylate glue to be used
for attachment of the larger components I used 5 minute epoxy which allowed more
work time. The tail wheel assembly must be installed when the fuselage halves
are joined. For the cockpit resin sidewall and floor Testors Model Master enamel
British Interior Green was used with detail painting using assorted Vallejo
acrylics. The instrument panel and consoles have molded relief instruments so
the visible surface was airbrushed with Rustoleum spray can gloss white enamel
decanted from the can and after the paint was dry the panels were brush coated
with Future. After at least 24 hours of drying time Testors MM Flat black was
then airbrushed over the dried Future. After allowing to dry over night the
dials and switches were picked out by wiping away the black paint from the
raised relief details using a enamel thinner dry brush technique. Vallejo
Acrylic Red and Bright Yellow was applied to a couple of instruments and knobs
guided by reference photos for added visual color. Weathering was done using a
wash of 1:1 water to Future plus a small amount of plain vodka added to reduce
surface tension plus Tamiya Acrylic Black X-1 followed by light dry brushing
with Test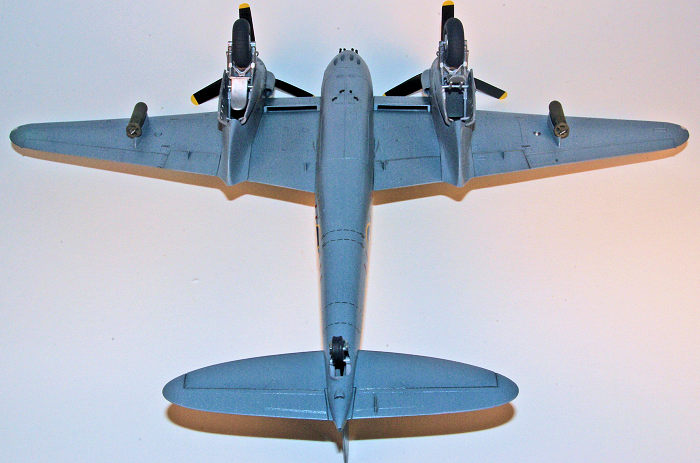 ors chrome silver enamel over wear areas. The resin seat has nice
detail and looks good when painted. Moving on to joining the fuselage halves
care must be taken to align the surfaces; I glued a small section at a time
using Tamiya Extra Thin cement has become my favored solvent type plastic
cement. This cement is very fast acting and evaporates very rapidly dissolving
and fusing the styrene with very little surface crazing. I apply it to a joint
about ½ to ¾ inch at a time using the included brush. Meticulous alignment of
the mating surfaces is the key to reducing the need for joint filling and seam
work with putty and is well worth the time and effort. On other models that have
alignment issues it is helpful to cement small 3 to 5 mm 0.020 sheet styrene
tabs that are trimmed or shaved carefully to force the correct alignment. Once
these three large assemblies were completed it was time to do the seam work
although relatively little was needed on the fuselage except in the area of the
cannon plate. I used Bondo Auto body putty heavily thinned with lacquer thinner
and some Testors Liquid Cement to the consistency of a heavy cream and applied
sparingly and if necessary in multiple applications with contour sanding using a
Squadron fine sanding stick between layers. Vallejo Acrylic putty is also very
good and easier to use since it can be worked or wiped away with a water
moistened cotton tipped or similar applicator before it cures. After finish
sanding of the final application with a super fine sanding stick, Mr. Surfacer
500 is hand painted over the putty to act as a sealer and primer. Once the Mr.
Surfacer is dry light polish sanding is done and the resulting surface accepts
finish coats of paint in a manner indistinguishable from the plastic. After
wiping down the model with a microfiber cloth wet with isopropyl alcohol to
remove oil and residue the, landing gear openings and cockpit were masked off in
preparation for painting. As a separate step all clear parts were carefully
trimmed of flash and the sprue gates removed using a microsaw or sprue cutter
followed by careful trimming with a sharp #15 scalpel blade before being dipped
in Future and allowed to dry for at least two weeks.
ors chrome silver enamel over wear areas. The resin seat has nice
detail and looks good when painted. Moving on to joining the fuselage halves
care must be taken to align the surfaces; I glued a small section at a time
using Tamiya Extra Thin cement has become my favored solvent type plastic
cement. This cement is very fast acting and evaporates very rapidly dissolving
and fusing the styrene with very little surface crazing. I apply it to a joint
about ½ to ¾ inch at a time using the included brush. Meticulous alignment of
the mating surfaces is the key to reducing the need for joint filling and seam
work with putty and is well worth the time and effort. On other models that have
alignment issues it is helpful to cement small 3 to 5 mm 0.020 sheet styrene
tabs that are trimmed or shaved carefully to force the correct alignment. Once
these three large assemblies were completed it was time to do the seam work
although relatively little was needed on the fuselage except in the area of the
cannon plate. I used Bondo Auto body putty heavily thinned with lacquer thinner
and some Testors Liquid Cement to the consistency of a heavy cream and applied
sparingly and if necessary in multiple applications with contour sanding using a
Squadron fine sanding stick between layers. Vallejo Acrylic putty is also very
good and easier to use since it can be worked or wiped away with a water
moistened cotton tipped or similar applicator before it cures. After finish
sanding of the final application with a super fine sanding stick, Mr. Surfacer
500 is hand painted over the putty to act as a sealer and primer. Once the Mr.
Surfacer is dry light polish sanding is done and the resulting surface accepts
finish coats of paint in a manner indistinguishable from the plastic. After
wiping down the model with a microfiber cloth wet with isopropyl alcohol to
remove oil and residue the, landing gear openings and cockpit were masked off in
preparation for painting. As a separate step all clear parts were carefully
trimmed of flash and the sprue gates removed using a microsaw or sprue cutter
followed by careful trimming with a sharp #15 scalpel blade before being dipped
in Future and allowed to dry for at least two weeks.
The nose cap fit well but the machine gun part required reinforcement with a piece of sheet styrene to strengthen the attachment. As it is care must be exercised to avoid breaking these fragile, protruding parts during normal construction handling, and of course, this happened requiring repair. Each wing half was then assembled and the fit is not perfect requiring filler due to narrow gaps between the lower wing sections and the engine nacelles. On this section Vallejo Acrylic putty was used; to enhance adhesion the plastic in the area that needed putty was etched with the Tamiya Extra Thin cement. After application the excess is easily worked with a water moistened cotton applicator or similar tool. Prior to installing the wing sections the radiator sections need to be painted and the clear plastic landing light lens located on the wing undersurface needs to be installed. A decision also needs to be made if the bomb racks or rocket launchers are to be installed since the shallow pilot holes are on the inside surface of the wing and they will need to be opened. The wing tip light covers are supplied as separate clear parts but did not fit well so clear sheet polystyrene from a CD case was glued in place with Tamiya Extra Thin cement and filed and sanded to shape then polished with automotive lens polish. Next was joining each wing to the fuselage and this stage demonstrates problematic engineering due to a press fit of the base of each wing half into a cutout recess in each fuselage half. Without care it is easy to end up with wing misalignment and some trimming of the recess and adjacent wing surface was needed to obtain a secure fit. Once this was achieved the wings were glued in place using a combination of 5 minute epoxy and Tamiya Extra Thin cement; the self aligning feature is not precise so care must be taken to get symmetrical alignment. The horizontal stabilizer was then installed. After painting, decal application, and clear coating, weathering, and final matt clear coat application final assembly included installation of the relatively complex landing gear, bombs, antenna mast and wires from fine black EZ line.
| COLORS & MARKINGS |
 Since this model was going to be painted with a
both enamel and acrylic paints a primer coat was needed for the acrylic to
insure adequate adhesion when masked. After the model surface was carefully
wiped with a lint free cloth wet with isopropyl alcohol to remove surface oils
and removal of all fibers with a tack cloth, the model was airbrushed with
Rustoleum gloss black enamel for the primer coat. This is the same product
available at Home Depot and most hardware stores in a large aerosol can.
Compared to most dedicated hobby paints it is very inexpensive per volume. I
decant this from the can into a jar and airbrush this usually with minimal
thinning with toluene using a Badger Anthem 155 airbrush at about 15 psi. (Note
for safety purposes my workshop includes a 100 cubic foot per minute outside
venting spray booth and a 3M respirator with organic filters and nitrile gloves
are always used when airbrushing enamel or lacquer paints). The finish is very
glossy and in my experience gives good coverage. I allowed several days for this
coating to dry before applying the Humbrol Matt gray #27 enamel mixed with 50%
Rustoleum white and a small amount of Testors Dark Sea Blue to approximate RAF
Medium Sea Gray over the entire model. The next step was masking the upper
surface camouflage pattern. This was done by enlarging the excellent camouflage
pattern diagram from the Tamiya 1/48th scale Mosquito FB VI kit to1/48th scale
then cutting out the pattern from a copy printed on paper. The pattern was then
tacked on to the model surface using evenly spaced small balls of Blue Tack.
This raises the mask about 1 mm above the model surface and when the paint is
airbrushed provides a “soft” separation line. My old stock Polyscale acrylic RAF
Dark Green was then airbrushed. This is long out of production as the entire
Polyscale line was purchased by Testors about 10 or 11 years ago and supplanted
by the MM Acryl line of paints. However, it behaves chemically the same as the
MM Acryl line, that is to say problematically, when airbrushed and requires at a
minimum the addition of a flow retarder and a surface tension reducing agent to
be acceptable in my experience. I tried to vary the density of the paint
application to allow the black undercoat to achieve variation in the finish
around the model although I find this very difficult with MM acryl paint. After
this was allowed to dry for several days the days the masking was removed and
the model was then given two coats of Future airbrushed thinned 25% with ethyl
alcohol 40%/water 60% using a Badger 250 single action external mix airbrush
using the medium tip. The model was now ready for decals.
Since this model was going to be painted with a
both enamel and acrylic paints a primer coat was needed for the acrylic to
insure adequate adhesion when masked. After the model surface was carefully
wiped with a lint free cloth wet with isopropyl alcohol to remove surface oils
and removal of all fibers with a tack cloth, the model was airbrushed with
Rustoleum gloss black enamel for the primer coat. This is the same product
available at Home Depot and most hardware stores in a large aerosol can.
Compared to most dedicated hobby paints it is very inexpensive per volume. I
decant this from the can into a jar and airbrush this usually with minimal
thinning with toluene using a Badger Anthem 155 airbrush at about 15 psi. (Note
for safety purposes my workshop includes a 100 cubic foot per minute outside
venting spray booth and a 3M respirator with organic filters and nitrile gloves
are always used when airbrushing enamel or lacquer paints). The finish is very
glossy and in my experience gives good coverage. I allowed several days for this
coating to dry before applying the Humbrol Matt gray #27 enamel mixed with 50%
Rustoleum white and a small amount of Testors Dark Sea Blue to approximate RAF
Medium Sea Gray over the entire model. The next step was masking the upper
surface camouflage pattern. This was done by enlarging the excellent camouflage
pattern diagram from the Tamiya 1/48th scale Mosquito FB VI kit to1/48th scale
then cutting out the pattern from a copy printed on paper. The pattern was then
tacked on to the model surface using evenly spaced small balls of Blue Tack.
This raises the mask about 1 mm above the model surface and when the paint is
airbrushed provides a “soft” separation line. My old stock Polyscale acrylic RAF
Dark Green was then airbrushed. This is long out of production as the entire
Polyscale line was purchased by Testors about 10 or 11 years ago and supplanted
by the MM Acryl line of paints. However, it behaves chemically the same as the
MM Acryl line, that is to say problematically, when airbrushed and requires at a
minimum the addition of a flow retarder and a surface tension reducing agent to
be acceptable in my experience. I tried to vary the density of the paint
application to allow the black undercoat to achieve variation in the finish
around the model although I find this very difficult with MM acryl paint. After
this was allowed to dry for several days the days the masking was removed and
the model was then given two coats of Future airbrushed thinned 25% with ethyl
alcohol 40%/water 60% using a Badger 250 single action external mix airbrush
using the medium tip. The model was now ready for decals.
The Aviaeology decal set nominally provides
markings for three RCAF Mosquitos all with non-risque nose art (apparently only
American aircraft displayed a proliferation of often risque female pin-up style
nose art). Unfortunately there are only enough national insignia to do one
aircraft so if one wants to model a second aircraft using the nose art and
serials from the sheet the national insignia will need to be sourced else where.
This seems to be a fairly common practice among the decal publishers and in my
opinion is a unfortunate product decision. In addition my particular sheet is
printed in Canada by Aviaeology and although color fidelity looked good, the
decals are relatively thick and do not conform well to sharp contours despite
multiple applications of Microscale Microsol and Walther’s Solvaset in the area
of the right fuselage lateral conduit. In this area the decals needed to be
glued down with Testors clear plastic cement and additional red decal patching
to get a marginally acceptable result. In addition the carrier film covers the
entire decal sheet although Aviaeology has changed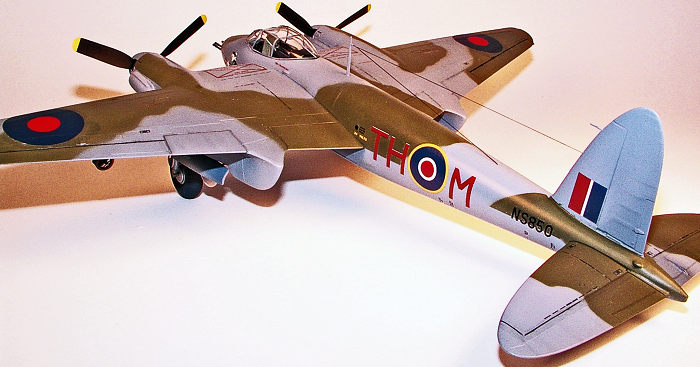 this on subsequent releases.
Their stencil set is a newer release and very complete and the decals are
thinner and behave perfectly. After several days of drying for the decals the
entire model was airbrushed with another coat of thinned Future to seal the
decals followed by an application of Tamiya Black Panel Line wash to the control
surface engraved lines and some light panel line weathering. Once completed the
entire model received a coat of Testors Dullcote thinned 50% with lacquer
thinner to which a small amount of Tamiya Buff was added to flatten out the
colors and provide a matt finish. The complex landing gear parts were installed
as were remaining small parts including the antenna and wires made using black
E-Z line fine. The original kit canopy framed using clear decal film painted
with a coat of gloss black enamel followed after drying by a coat of either
Polyscale Medium Sea Blue or the custom mixed Humbrol 27 gray enamel. The canopy
was then installed using Testors Clear Parts Cement.
this on subsequent releases.
Their stencil set is a newer release and very complete and the decals are
thinner and behave perfectly. After several days of drying for the decals the
entire model was airbrushed with another coat of thinned Future to seal the
decals followed by an application of Tamiya Black Panel Line wash to the control
surface engraved lines and some light panel line weathering. Once completed the
entire model received a coat of Testors Dullcote thinned 50% with lacquer
thinner to which a small amount of Tamiya Buff was added to flatten out the
colors and provide a matt finish. The complex landing gear parts were installed
as were remaining small parts including the antenna and wires made using black
E-Z line fine. The original kit canopy framed using clear decal film painted
with a coat of gloss black enamel followed after drying by a coat of either
Polyscale Medium Sea Blue or the custom mixed Humbrol 27 gray enamel. The canopy
was then installed using Testors Clear Parts Cement.
| CONCLUSIONS |
The De Havilland Mosquito was one of the great iconic aircraft produced by Great Britain and is justifiably famous for the dangerous and often costly missions flown by its brave crews. The Airfix version is very dated against the more recent 1998 Tamiya issue lacking the detail and refinement in engineering but it provides improvement over the Monogram kit albeit with an increase in complexity of assembly. If you want the best detailed and engineered 1/48th scale Mosquito then the Tamiya kit is the current clear leader. This build represented a good opportunity to add to my knowledge base regarding the Mosquito and refine building techniques in preparation for the Tamiya Mosquito. In my opinion it is not a true beginner’s kit due to its engineering and build sequence; the Monogram kit built as the bomber version (no plastic surgery would be required) would fit that scenario much better due to simpler assembly and engineering. There are a few published reviews of the Airfix kit demonstrating incredibly skilled upgraded model builds with aftermarket parts but none that provide detailed construction information. Toward that end perhaps this article will be helpful to modelers who have this venerable kit and may be motivated to build it.
| REFERENCES |
DH.98 Mosquito in Action, Ron Mackay, Squadron/Signal Publications, 2017
Mosquito, A Pictorial History of the DH98, Philip Birtles, Janes Publications, 1980
Web site: https://acesofww2.com
15 March 2019
Copyright ModelingMadness.com
If you would like your product reviewed fairly and fairly quickly, please contact the editor or see other details in the Note to Contributors.
Back to the Main Page Back to the Review Index Page Back to the Previews Index Page