
| KIT #: | 4746 |
| PRICE: | $30.00 'used' |
| DECALS: | options |
| REVIEWER: | John Summerford |
| NOTES: | Eagle Cals 168 and resin conversion parts from Aries and Warbirds Productions |
| HISTORY |
Courtesy of Wikipedia
“The FB Mk VI, which first flew on 1 June 1942, was
powered by two, single-stage two-speed, 1,460 hp (1,090 kW) Merlin 21s or 1,635
hp (1,219 kW) Merlin 25s, and introduced a re-stressed and reinforced "basic"
wing structure capable of carrying single 250-or-500-pound (110 or 230 kg) bombs
on racks housed in streamlined fairings under each wing, or up to eight RP-3
25lb or 60 lb. rockets. In addition fuel lines were added to the wings to enable
single 50 imp gal (230 l) or 100 imp gal (450 l) drop tanks to be carri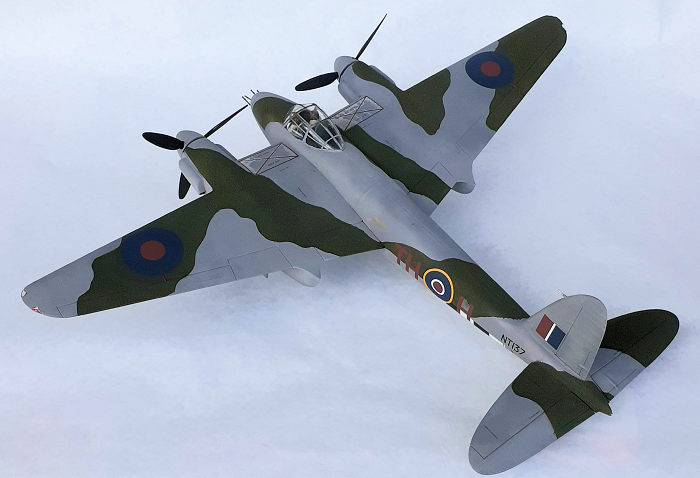 ed under
each wing. The usual fixed armament was four 20 mm Hispano Mk. II cannon and
four .303 (7.7 mm) Browning machine guns, while two 250-or-500-pound (110 or 230
kg) bombs could be carried in the bomb bay.
ed under
each wing. The usual fixed armament was four 20 mm Hispano Mk. II cannon and
four .303 (7.7 mm) Browning machine guns, while two 250-or-500-pound (110 or 230
kg) bombs could be carried in the bomb bay.
“Unlike the F Mk II, the ventral bay doors were split into two pairs, with the forward pair being used to access the cannon, while the rear pair acted as bomb bay doors.[175] The maximum fuel load was 719.5 imperial gallons (3,271 l) distributed between 453 imperial gallons (2,060 l) internal fuel tanks, plus two overload tanks, each of 66.5 imperial gallons (302 l) capacity, which could be fitted in the bomb bay, and two 100 imperial gallons (450 l) drop tanks.[174] All-out level speed is often given as 368 mph (592 km/h), although this speed applies to aircraft fitted with saxophone exhausts. The test aircraft (HJ679) fitted with stub exhausts was found to be performing below expectations. It was returned to de Havilland at Hatfield where it was serviced. Its top speed was then tested and found to be 384 mph (618 km/h), in line with expectations.[176] 2,298 FB Mk VIs were built, nearly one-third of Mosquito production. Two were converted to TR.33 carrier-borne, maritime strike prototypes.
“The FB Mk VI proved capable of holding its own against fighter aircraft, in addition to strike/bombing roles. For example, on 15 January 1945 Mosquito FB Mk VIs of 143 Squadron were engaged by 30 Focke-Wulf Fw 190s from Jagdgeschwader 5: the Mosquitos sank an armed trawler and two merchant ships, but five Mosquitos were lost (two reportedly to flak), while shooting down five Fw 190s.”
| THE KIT |
 Inside a top opening cardboard box are two bags of
light gray styrene and clear sprues. Sprue gates are prominent and some flash is
present. Cockpit detail is timid outlines of the components. There is no bomb
bay detail and the doors are molded closed. Two figures fill the seats. Total
parts count is 82. Instruction are on a two-fold sheet and comprises 10 steps.
Eight decals are on a 5 “ by 5” sheet and appear to have good density.
Inside a top opening cardboard box are two bags of
light gray styrene and clear sprues. Sprue gates are prominent and some flash is
present. Cockpit detail is timid outlines of the components. There is no bomb
bay detail and the doors are molded closed. Two figures fill the seats. Total
parts count is 82. Instruction are on a two-fold sheet and comprises 10 steps.
Eight decals are on a 5 “ by 5” sheet and appear to have good density.
I bought this kit because it included the resin parts, so I figured it was worth the price. I did buy the decals just before starting this project.
| CONSTRUCTION |
 As is typical, the work starts in the cockpit. I opted
to use the figures to hide the sparse detail. I spent more time painting them
than on anything else in this area. The next step is to assemble the tail wheel
and step three calls for trapping the cockpit, radio gear and tail wheel in the
fuselage halves.
As is typical, the work starts in the cockpit. I opted
to use the figures to hide the sparse detail. I spent more time painting them
than on anything else in this area. The next step is to assemble the tail wheel
and step three calls for trapping the cockpit, radio gear and tail wheel in the
fuselage halves.
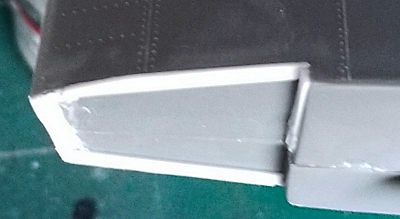
A diagram showing where to cut the fuselage for the resin nose were not in the box, so I taped the halves together and did my best to draw cut lines on the plastic, making sure to leave material to file away. A saw blade in the rotary tool made quick work of the rough cut. Several passes with a rough grit sanding pad straightened the cut and test fitting revealed that I could have done better. The vertical cut on the bottom is too far aft and the horizontal cuts too high.
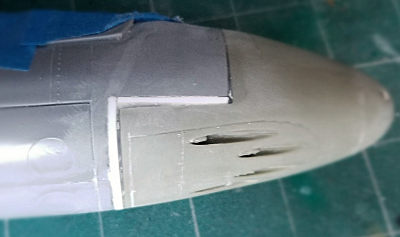 I installed the cockpit and tail wheel and glued the
fuselage together. Another test fit reveled a lot of interference with the
detail forward of the instrument panel and the nose plug. Most of the detail was
ground off and the plug hollowed out about 3/8th inch. Shims were glued into the
largest of the gaps and cyano glue used to attach the plug and fill the seam.
After sanding with progressively finer grit sticks and paper, I got to a
seamless nose. (EagleCals indicate a hatch on the right side of the nose, but
that detail is not present.)
I installed the cockpit and tail wheel and glued the
fuselage together. Another test fit reveled a lot of interference with the
detail forward of the instrument panel and the nose plug. Most of the detail was
ground off and the plug hollowed out about 3/8th inch. Shims were glued into the
largest of the gaps and cyano glue used to attach the plug and fill the seam.
After sanding with progressively finer grit sticks and paper, I got to a
seamless nose. (EagleCals indicate a hatch on the right side of the nose, but
that detail is not present.)
I still had to deal with the fuselage seam and sink marks from the locator pins. One of the nice things about building a Mosquito is that, due to its plywood construction, there are very few panel line details to worry about.
I followed the instructions in the next step (number
4) and assembled the wings and glued them to the fuselage. Shims were needed
near the leading edge. I skipped step 5 where the main gear is attached to
 the
wings. I didn’t want to risk knocking them off so I went to step 9 and glued on
the tail surfaces then doubled back to steps 6 and 7 to assemble the one engine
in the kit for installation in the left nacelle and build up both nacelles. I
had fit issues with the turbo charger portion of the engine interfering with
structure inside the nacelle, so I ground out the material that caused the
problem.
the
wings. I didn’t want to risk knocking them off so I went to step 9 and glued on
the tail surfaces then doubled back to steps 6 and 7 to assemble the one engine
in the kit for installation in the left nacelle and build up both nacelles. I
had fit issues with the turbo charger portion of the engine interfering with
structure inside the nacelle, so I ground out the material that caused the
problem.
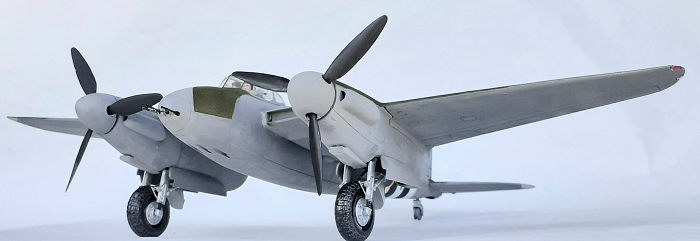
Step 8 calls for slipping the nacelles over the gear to mate them to the wing. Distrusting what I was seeing in the diagram, I checked to see if the gear could be installed after the nacelles were in place, and it turns out the plastic is molded in such a way that it doesn’t work like that. Still, with some trepidation, I followed the instructions and found that it worked fairly well. I did have some fit issues with nacelles and some putty and sanding was needed.
The final step, number 10, calls for adding exhaust shrouds and access panel on the left nacelle plus the prop spinners, canopy and gear doors. I skipped the props and doors in favor of gluing in place the masked canopy and get ready for painting.
| COLORS & MARKINGS |
Plastic wrap was taped over the landing gear and foam
stuffed into the gear wells. The entire model was sprayed with rattle can gray
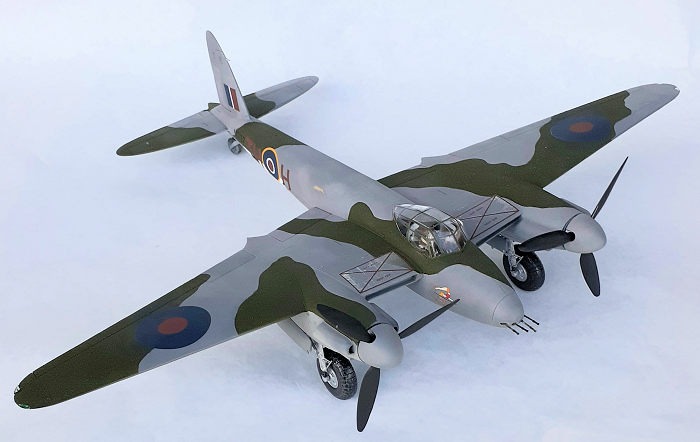 primer with an over coat of white primer on the invasion stripe area followed by
the stripes being masked and sprayed on. The stripes were masked over, and
again, the entire model was sprayed, this time with medium sea gray.
primer with an over coat of white primer on the invasion stripe area followed by
the stripes being masked and sprayed on. The stripes were masked over, and
again, the entire model was sprayed, this time with medium sea gray.
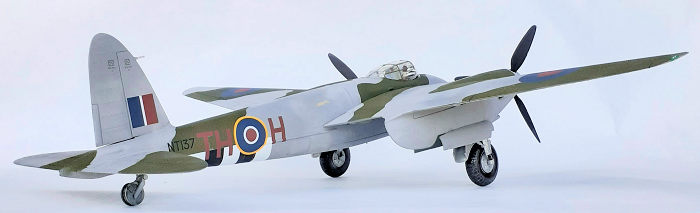
Masks were laid down for the dark green color that was sprayed on. All the paints have a flat finish, so clear gloss was sprayed over the locations for decals. Unfortunately, I didn’t apply enough for some decals and ended up with a bit of silvering.
The decals came from the EagleCals sheet #168 and they’re very good. They’re also very shiny, so a couple of coats of clear flat was applied over them.
After unmasking the wheels, the main gear doors were glued into place. The model was turned over and unmasking the canopy revealed a botched job of gluing and masking. (#&^%$**, CRAP! *###@^%$#, etc.!) Nothing for it now.
The last bits to glue on were the guns in the nose and props plus their spinners.
| CONCLUSIONS |
Once the wings and tail were installed, the model was taking up a lot of room. I managed to break the molded in pitot tube on the fin within five minutes of installation. It’s not a complicated build, so it doesn’t take a big investment in time. Even with the modification, I spent less than 20 hours here. A copyright dated 1990 is molded on a flap, (it was sanded off) and the kit shows its age. If you must have a 32nd scale Mosquito, this kit can fill that need.
September 2020 Copyright
ModelingMadness.com If you would like your product reviewed fairly and fairly quickly, please
contact the editor
or see other details in the
Note to
Contributors.
Back to the Main Page
Back to the Review
Index Page
Back to the Previews Index Page