| KIT #: | PA 129/5478 |
| PRICE: | $ |
| DECALS: | Yes |
| REVIEWER: | Nicolai Plesberg |
| NOTES: | Short run with photo etch and resin parts |
| HISTORY |
The De Havilland Aircraft Co. planned the
DH.98 design (later to be known as the Mosquito) in October 1938 as a high-speed
day bomber capable of outrunning contemporary monoplane fighters and thus the
need for defensive weaponry considered unnecessary. It also made extended use of
wood in its construction, so the hard strain on Britain’s light alloy supplies
could be eased. Even so the Air Ministry didn’t feel there was a need of such an
aeroplane. In fact they suggested that the De Havilland plant at Hatfield should
instead produce wings for existing heavy bombers, which were considered more
important at that time. However, after a few months of war, in January 1940, as
the breed of bombers in RAF Bomber Command had shown to be obsolete, with the
possible exception of the Vickers Wellington, the green light was given to go
ahead with the
 DH.98 project. The prototype flew on 25 November 1940 and from it
stemmed a breed of 7781 aircraft split on diversified roles as bomber, night
fighter, photoreconnaissance, fighter-bomber and other more specialized roles.
DH.98 project. The prototype flew on 25 November 1940 and from it
stemmed a breed of 7781 aircraft split on diversified roles as bomber, night
fighter, photoreconnaissance, fighter-bomber and other more specialized roles.
The first operational variant available in quantity was the NF Mk. II, which entered service in December 1941. It differed in a number of respects from the bomber variant. It had an armament of four 20mm Hispano cannon which was accommodated in the forward part of the bomb bay together with their ammunition drums. Four .303 Browning machineguns were installed in the nose instead of a bomb sight and bombardier. The windscreen was flat contra the normal “angled” type used on the bomber version. It was also equipped with the AI Mk. IV radar set and was powered by either Merlin 21 or 23 single-stage engines. 467 was built all in all of this variant.
The FB.VI was the most built variant of the Mosquito with 2584 airframes coming off the production lines in Britain, Canada and Australia – almost one third of the total numbers produced. First flown in June 1942 it entered service later the same year. It had basically the same fixed armament as the NF.II, but furthermore could carry two 250lb bombs in the rear bomb bay as well as on racks under the wings. Later after the wings were reinforced, 500 pounders were carried as well. Drop tanks, mines, depth charges and unguided rocket projectiles could also be carried.
 Later Mosquito variants used two-stage
Merlins with paddle blade props to press for further increasing performance and
the bomber variants had their bomb bay doors bulged, so ever increasing bomb
loads could be carried. Night fighters became more and more efficient as in the
field of developing radar sets took gigantic leaps forward during the course of
the war. From the B Mk. XVI / PR Mk. 32 the Merlins (in between laying fighter
variants excluded) became left hand / right hand rotating in order to eliminate
the effect of propeller torque and to eliminate the need for trimming; something
that had been pioneered by the Lockheed P-38 Lightning, but (apparently) had
been overlooked by other manufacturers of twin engine aircraft! The Mosquito
remained in production until 1950 when the last dual-control T.IIIs came off the
line. It remained in service well into the 1950s until the wooden construction
began to tell the doom of the end of the service life of “the wooden wonder”, as
the Mosquito had been known as.
Later Mosquito variants used two-stage
Merlins with paddle blade props to press for further increasing performance and
the bomber variants had their bomb bay doors bulged, so ever increasing bomb
loads could be carried. Night fighters became more and more efficient as in the
field of developing radar sets took gigantic leaps forward during the course of
the war. From the B Mk. XVI / PR Mk. 32 the Merlins (in between laying fighter
variants excluded) became left hand / right hand rotating in order to eliminate
the effect of propeller torque and to eliminate the need for trimming; something
that had been pioneered by the Lockheed P-38 Lightning, but (apparently) had
been overlooked by other manufacturers of twin engine aircraft! The Mosquito
remained in production until 1950 when the last dual-control T.IIIs came off the
line. It remained in service well into the 1950s until the wooden construction
began to tell the doom of the end of the service life of “the wooden wonder”, as
the Mosquito had been known as.
| THE KIT |
This is one of Monograms classic kits in an original 1965 boxing I bought second-hand some years ago. However, the main problem with it, was, that the instruction sheet was in fact missing! All the plastic parts and the decals were there, but not the instructions. Damned! I tried to search the web for any information regarding this, but the only result was the decal placement guide, someone had uploaded to a website. Well that was a little bit of the way, but not good enough. Reluctantly I came to the conclusion that a second kit had to be obtained, if I ever should get the kit built. Furthermore the kit had been out of production for ages so it was a second hand job anyway! Finally I had some luck at www.modelsforsale.com in the UK, which had a 1992 release still wrapped in foil!
When the kit arrived, I could call off the
anxiety as the instructions were present, so the day was definitely saved! The
kit looked the same as the older release, but the date marking in the left upper
wing was different; it stated “© 1965 Monogram Models Inc.” in the old release,
but “© 1966 Monogram Models Inc. All rights
 reserved”, which could indicate some
tooling modifications had been done. And in fact I seem to recall at a certain
point when building the “old” 1965 tooling that there were some fit problems
with the engine nacelles, which weren’t present in the modified 1966 tooling!
There may also have been other slight modifications, but none really pops to my
mind when I am writing this review, as it is a couple of years ago I finished
the models.
reserved”, which could indicate some
tooling modifications had been done. And in fact I seem to recall at a certain
point when building the “old” 1965 tooling that there were some fit problems
with the engine nacelles, which weren’t present in the modified 1966 tooling!
There may also have been other slight modifications, but none really pops to my
mind when I am writing this review, as it is a couple of years ago I finished
the models.
Anyway, just a few words of the plastic itself. Molded in medium grey plastic comprising the main parts of the kit, while black plastic has been used to mold the finer detail parts, such as the interior, gears, props, antennas plus the variety of the armament of bombs and rockets (drop tanks are also present, but they’re molded in grey plastic). There are of course also the clear parts tree with some reasonable usable parts, but in case of the bomber variant, which has bulges molded on the canopy sides and due to tooling limitations, it is split in two parts, which will leave a pretty visible seam right down the middle of it, so if the aftermarket can supply an alternative, it would be a bonus.
The instructions are easily understood and with coloring of the interior parts as construction moves along. When it comes to the painting of the model it comes with the typical Monogram trademark of calling out the paints with FS 595 numbers. For US aircraft types it works fine, but for others, such as this British aircraft, is a bit misleading in my opinion. Therefore I will later come with a few remarks on how to get the beast painted the right colors and not just rely on some approximations that may or may not be fitting.
| CONSTRUCTION |
Construction started by removing fuselages, wings and interior bits from the sprues and cleaning them up so painting could commence. As the fuselage halves are molded with the bomber nose in place it is necessary to remove these, as I had decided to build two fighter variants. There is a heavy trenched line on the inner side so it should be reasonably easy, at least for the moderate experienced modeler, to cut the nose section away. Also do remember to cut away the front part of the floor if a fighter variant is chosen; otherwise it will interfere with the fighter nosepiece (part 61) – I actually tried at first to avoid it, but I discovered there would be a gap of about 1,5 millimetres if that section of the floor is not removed! First though, the seats plus the control columns were glued to the floors. In this case I used the fighter control stick, as the bomber version uses one with a wheel (both types are included in the kit) – just make sure of that before commencing construction – I bet some guys out there will roll off your head if you build a bomber with a fighter stick or vice versa! Anyway as every other British aircraft the interior color for the cockpit is British Interior Grey Green (surprise); in this case Humbrol 78 is the exact color to use for that and which with utmost certainty needs a couple of coats to be perfect covering.
 While all the above unfolded, I also began
tackling the main landing gears. You see the kit’s engineering dictates that the
completed gears need to be inserted into the nacelles on the lower wing parts
before the wings can be assembled, so gear parts were detached from the sprues
and cleaned up. I once read a review (can’t remember where) which stated that
one of the goofs that Monogram did with this kit is actually the gear because if
one should stick to total accuracy the gear that is in this kit isn’t really
suitable for the variants that Monogram chose, but more like from a Sea Mosquito
Mk.33 with oleos instead of rubber compressions (the kit ones depict oleos
alright). I think there was also an issue with the mudguards, but don’t remember
any details on that – I bet someone out there now will sing “go Tamiya”!! I’ll
stick with the kit gears though. I also successfully removed the main gear doors
from the nacelles to which they’re molded and, after cleaning the edges, gluing
the hinge pieces on them.
While all the above unfolded, I also began
tackling the main landing gears. You see the kit’s engineering dictates that the
completed gears need to be inserted into the nacelles on the lower wing parts
before the wings can be assembled, so gear parts were detached from the sprues
and cleaned up. I once read a review (can’t remember where) which stated that
one of the goofs that Monogram did with this kit is actually the gear because if
one should stick to total accuracy the gear that is in this kit isn’t really
suitable for the variants that Monogram chose, but more like from a Sea Mosquito
Mk.33 with oleos instead of rubber compressions (the kit ones depict oleos
alright). I think there was also an issue with the mudguards, but don’t remember
any details on that – I bet someone out there now will sing “go Tamiya”!! I’ll
stick with the kit gears though. I also successfully removed the main gear doors
from the nacelles to which they’re molded and, after cleaning the edges, gluing
the hinge pieces on them.
After some more painting of gears, wheel hubs, gear bays and some details in the cockpit area, which respectively went silver, silver, interior grey green and black (radio boxes behind the crew stations, instrument panel among other smaller details) and the tire edges along the hubs was marked with tire black (Vallejo 862). After setting, I glued the instrument panels to the floors, then floors and the radio shelves plus the tail gears glued to the right fuselage halves, securing alignment by taping together with the left halves and the main wheels were also glued together at this stage.
When dry the fuselages and main gears were
glued together; remembering to sand the seams on main wheels and trap those
between the gear legs are mandatory here! The nose machinegun blast tubes were
glued to the nose sections and those were then glued to the fuselages – on the
NF.II the hole for the nose radar antenna had of course been opened! As gears
had set the rest of the tires were painted tire black. When fuselages had dried
completely through, the seams were handled as usual with the obligatory filler /
sanding. They actually
 took quite an effort to finish – several sessions were in
fact required to get the job done properly. The nose sections were also
reinforced with some glue filling from the glue bottle, as the fit between the
fuselages and fighter nose pieces weren’t the best (not Tamiya standard!).
took quite an effort to finish – several sessions were in
fact required to get the job done properly. The nose sections were also
reinforced with some glue filling from the glue bottle, as the fit between the
fuselages and fighter nose pieces weren’t the best (not Tamiya standard!).
The horizontal tail planes were next; pretty easy – just gluing two pieces together and repeating that step another three times! The spinner plates or more correctly the rear part of the spinners were cleaned as were the propellers before they were joined. Then I spent some quality time opening up the various holes for antennas / external armament on the two variants; some of them were oddly enough rectangular and not round as normally could have been expected – go on figure what mood I was in, when I finally had opened the last rectangular hole!
Finally I could paint some more; the gear bays plus the inner side of doors were given some interior grey green. Spinners were glued together with the propeller assemblies; the ones for the night fighter variant were painted flat black all over, while the other two only had the blades painted black. The spinners went Medium Sea Grey and I was lucky enough to rely on that one coat was sufficient. Finally the tips of the prop blades were marked with yellow to finish off those units. Some touch up of the main gears plus painting the inner sides of landing light lenses were done next, just before those items were attached to their respective locations in the lower wing pieces. When set the wings were glued together. Some caution was required as one of the lower left wing sections was in fact pretty badly warped. However, by using thicker viscosity glue from a tube, instead of the bottled liquid glue I normally use, and some pretty hefty adhesive tape pieces plus some clamps were enough to get that wing to stay properly together, while the glue set hard.
When the wings had set hard, the clamps and tape pieces were removed and I inspected the seams. I thought to myself it would be a good idea to gluefill the wing seams because of slight gaps here and there, so that was accomplished with my liquid glue bottle; especially the trailing edges needed attention from the liquid glue. When dry the seams were sanded with a light hand and the process repeated where necessary. As I also had finally got the fuselage seams finished, I began to adapt the horizontal tail planes; i.e. make sure the fit was ok, which means sanding off material until they’d snap in place without any obstacles or sit incorrectly, before they were glued in place. Some puttying / sanding was necessary to blend them in properly, but nothing new in that.
 The shrouded exhausts were attached next;
they also required a little attention after they had been glued in place and
it’s better to handle such issues before the wings are glued in place – for the
sake of easy access to the trouble zones! Actually one more thing had to be done
before the wings really could be glued in place, because some of the end surface
should be painted interior grey green, as they actually constitutes the cockpit
side walls and it would indeed be much easier to paint those surfaces prior
attaching the wings to the fuselage! It would be a bear to do it the other way
around! Anyway after painting the issued surfaces the wings were attached to the
fuselages using the thicker flowing (and slower drying) tube glue while securing
the wings with bands of adhesive tape including the obligatory one-piece from
wingtip to wingtip securing the dihedral angle on both wings.
The shrouded exhausts were attached next;
they also required a little attention after they had been glued in place and
it’s better to handle such issues before the wings are glued in place – for the
sake of easy access to the trouble zones! Actually one more thing had to be done
before the wings really could be glued in place, because some of the end surface
should be painted interior grey green, as they actually constitutes the cockpit
side walls and it would indeed be much easier to paint those surfaces prior
attaching the wings to the fuselage! It would be a bear to do it the other way
around! Anyway after painting the issued surfaces the wings were attached to the
fuselages using the thicker flowing (and slower drying) tube glue while securing
the wings with bands of adhesive tape including the obligatory one-piece from
wingtip to wingtip securing the dihedral angle on both wings.
After a couple of days the tape was removed and I found myself touching up a bit with green and black paint as well as securing the wing / fuselage seams with the liquid glue bottle – by far the easiest tool for that job! In fact an extra gluefilling session was necessary before I could start sanding the seams and using some more liquid glue as real filler is of really no use here – perhaps except if you use Mr. Surfacer or similar products! A couple of sessions were needed before I painted the last in the cockpit – namely the instrument panel shroud which went flat black. Then the two canopies were cleaned and glued in place with clear gloss varnish. Some gaps were dealt with too, but I finally managed to get a smooth clean fit of the canopies and after cleaning the airframes it was painting time.
| COLORS & MARKINGS |
When about to paint an aeroplane it’s also
about getting an authentic paint scheme on the next masterpiece of yours, or
else it may look inevitably as just another “what if” model. So to get that
“authentic” look one must have an extensive selection of paints that matches the
chosen subjects. In any case it would be a good idea to actually know something
about the coloring of the real subjects one are modeling instead of blindly
trusting the kit manufacturer, who may have got or not got the coloring right.
So in this case Monogram reverts to FS595 color codes for the main coloring,
which in this case is totally off, because they only really works for US
manufactured aircraft! For the wise modeler, however, it shouldn’t pose any
problem, since the research
 before commencing a kit should provide enough
information to determine whether ones paint selection is up for the job or not –
at least that’s what I’ve experienced over the years!
before commencing a kit should provide enough
information to determine whether ones paint selection is up for the job or not –
at least that’s what I’ve experienced over the years!
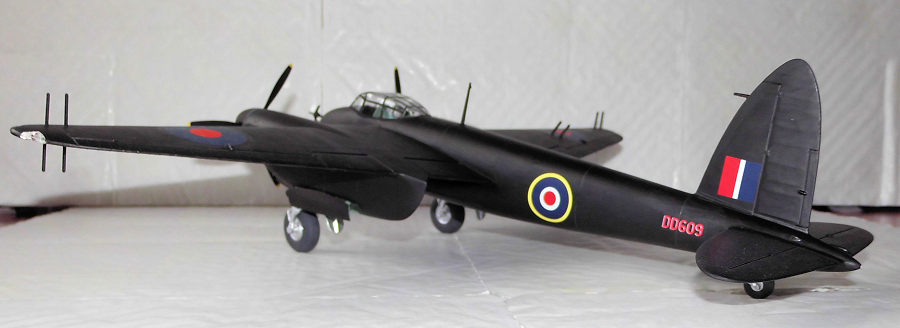
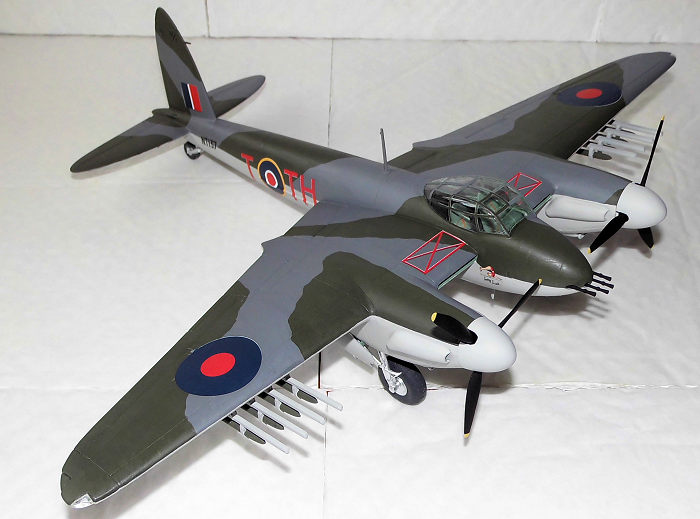
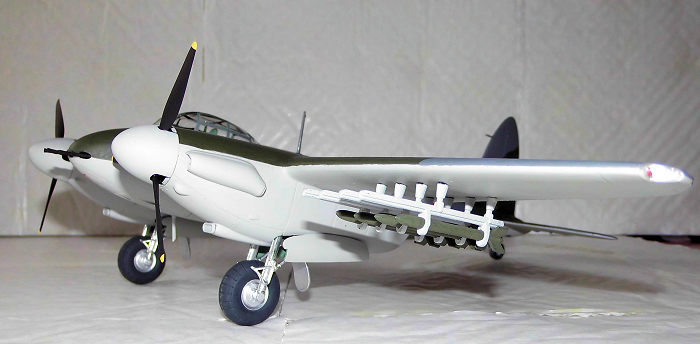
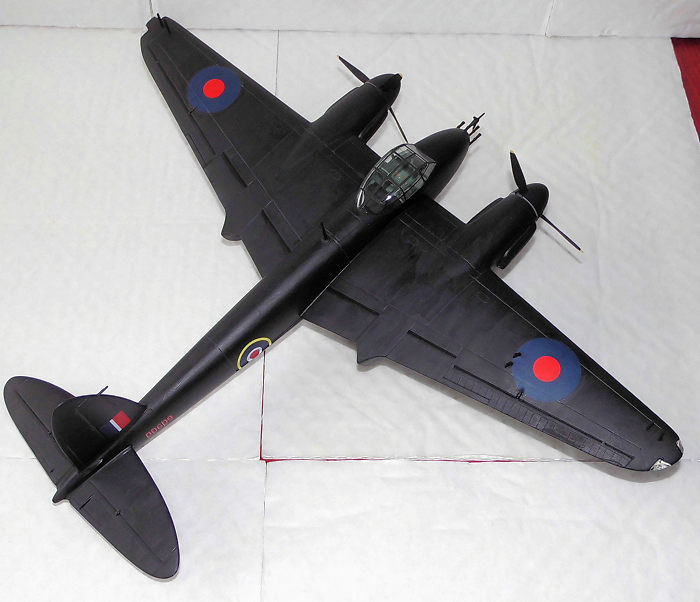
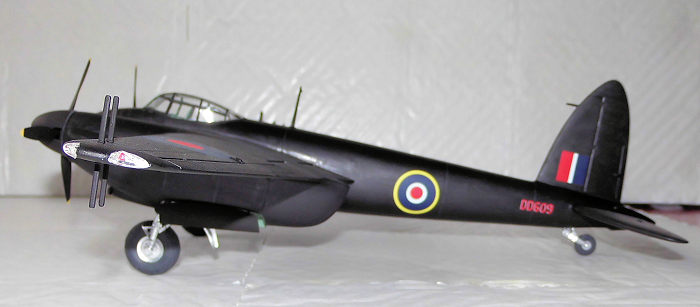
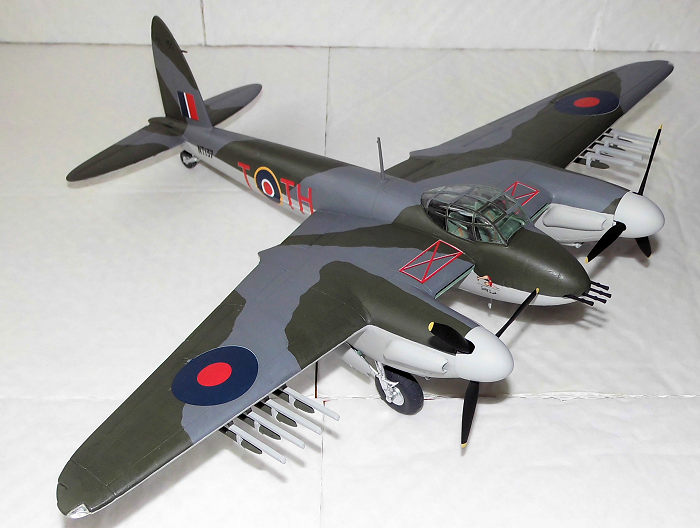
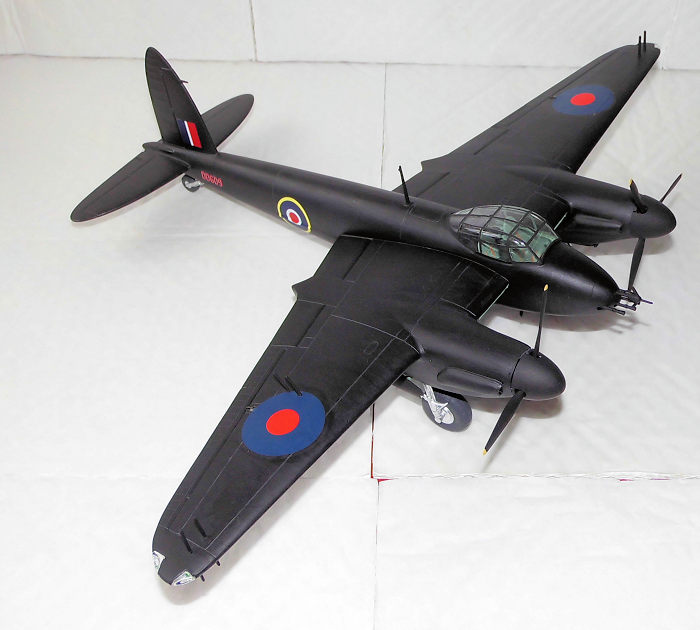
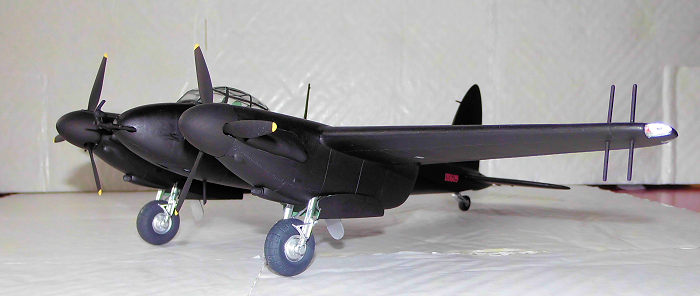
The first order of business was to paint the canopy framing plus the tabs of the horizontal tail planes, which still were in unpainted grey plastic and therefore highly visible in a tail gear bay otherwise painted interior grey green. So the interior grey green color was once again utilized to clear out that issue! Some Vallejo flat black was used to color the outer side of the gear doors on the NF.II. The remaining outer surfaces on the night fighter went gloss black all over in two coats to save a working session, namely the gloss coat for the decals! The FB.VI went Medium Sea Grey –Humbrol HB.6 on all under surfaces including the outer side of gear doors for that variant. Two coats as always are necessary to get a perfect covering. When dry masking tape was applied appropriately and the edges along the tape painted with RAF Ocean Grey – Humbrol HB.3; masking tape was removed immediately after the last brushstroke and taking a bigger brush in use to paint the remaining side / upper surfaces Ocean Grey. By using this method I reduce the time the masking tape has to sit while the paint dries. It also has the benefit, since I have to change to a bigger brush, the small one I used for the “edging” can be cleaned properly before continue painting with the larger brush and thus extending brush life considerably. The third color used for the FB.VI was the RAF Dark Green – Humbrol HB.1 in the disruptive camouflage pattern on all side / upper surfaces. This was painted on in one coat and freehand as the covering seemed ok as such. A touch up session also became necessary but this wasn’t unexpected so I proceeded until I could finish my FB.VI off with a gloss coat – all the paints used for this one is dead flat so glossing is needed if the decals are going to sit along!
For the NF.II, the original kit decal sheet had several issues – it had yellowed over the years and there were register issues with especially the national markings, so I looked into my stash of kits and found some suitable fin flashes and fuselage roundels in a 1/48 scale Fairey Firefly kit (I’m not going to make the British version of that anyway!) and, as they were printed by Cartograf, there where no issues at all! The wing roundels I took from the kit sheet as my stash offered no similar ones in either size or type! They behaved ok, but took a while to get loose from the base paper. The serial numbers came from the second Mosquito kit sheet as they offered the very same serial number for the NF.II variant and it was nicer printed!
 Conversely, for the FB.VI,
I used the kit sheet and they performed well, but it was easy to see that
it was not Cartograf printing quality! Slight register issues, but not as bad as
the other kit sheet had been! Upon completing decaling the few antennas were
added and painted their respective colors.
Conversely, for the FB.VI,
I used the kit sheet and they performed well, but it was easy to see that
it was not Cartograf printing quality! Slight register issues, but not as bad as
the other kit sheet had been! Upon completing decaling the few antennas were
added and painted their respective colors.
When decals had dried and had been cleaned for surplus residue they were given a gloss coat to eliminate eventual silvering (although not much anyway) before applying the final flat coat. During that session I ran out of Humbrol Matt Cote, but I had an extra bottle which was utilized immediately. However, upon drying completely there was a nuance difference. You see I ran out, after I had given the whole surface on the FB.VI and fuselage and tail section on the NF.II and only lacking the wings on the NF.II , when I took the new Matt Cote in service; only to find out that the “new” Matt Cote had really dried dead flat while the “old” one was somewhere between flat and satin! After some consideration, I decided to give the fuselage / tail section on the NF.II one more coat – and now it had the same dead flatness as the wings!
| FINAL CONSTRUCTION |
The last bits consisted of antennas,
especially the NF.II with all its radar antennas which were attached then
painted flat black – and luckily for me t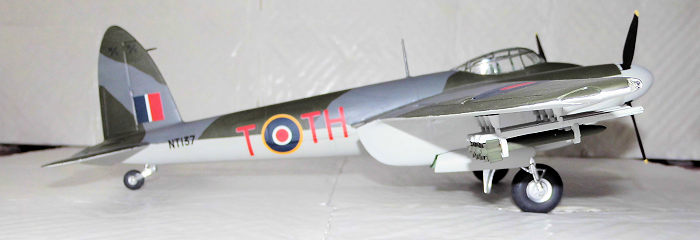 he flat back paint matched the flat
black surface pretty well so no special treatments here! The last challenge were
the navigational lights, which Monogram rather haplessly had molded as bulbs; a
pretty good idea if it was not for the fact that they aligned up pretty badly
(discovered when the wings were glued together) and not to mention the glass
covers which didn’t fit at all well; at least not without shims! If I had
focused on them a little earlier the result might have been very different but
there you go! I just did the best in that situation and “shimmed” the glasses
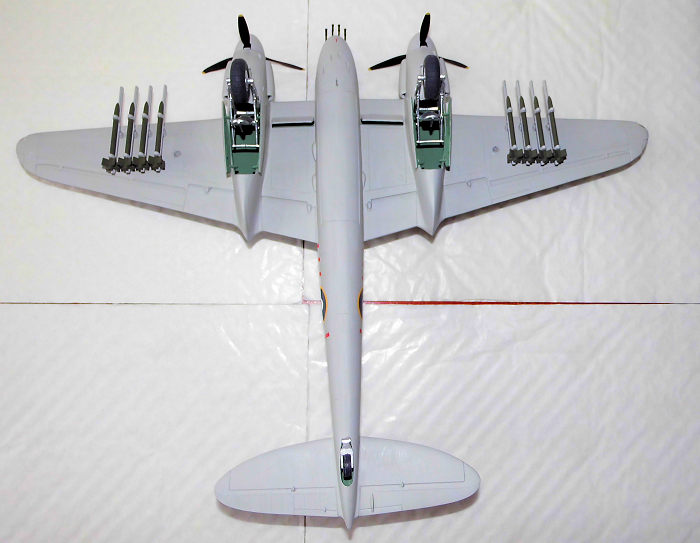
in, did a little painting and stuck them on with clear gloss. The rockets and
racks for the FB.VI were painted and attached under the wings; the last thing
painted were the blast tubes of the nose machineguns on both variants – took a
little finesse as none of the surroundings should be touched with the black
paint and the very last thing was to attach the propeller assemblies to the
engine nacelles and my two Monogram Mosquitoes were finished.
he flat back paint matched the flat
black surface pretty well so no special treatments here! The last challenge were
the navigational lights, which Monogram rather haplessly had molded as bulbs; a
pretty good idea if it was not for the fact that they aligned up pretty badly
(discovered when the wings were glued together) and not to mention the glass
covers which didn’t fit at all well; at least not without shims! If I had
focused on them a little earlier the result might have been very different but
there you go! I just did the best in that situation and “shimmed” the glasses
in, did a little painting and stuck them on with clear gloss. The rockets and
racks for the FB.VI were painted and attached under the wings; the last thing
painted were the blast tubes of the nose machineguns on both variants – took a
little finesse as none of the surroundings should be touched with the black
paint and the very last thing was to attach the propeller assemblies to the
engine nacelles and my two Monogram Mosquitoes were finished.
| CONCLUSIONS |
This may be an old kit, but once you get past those oldie oddities such kits inevitably has to offer they do represent one of the better breed of those oldies anyway. They build pretty easy although it would be a good idea to have some experience as the engineering is in such a way that novice builders may have a tough time in figuring out the shift from bomber to fighter or handle the fuselage / wing assembly in a proper way. I am sure many will prefer the breed of newer kits, but I found them satisfying enough so if I come across another kit well…maybe it’s bomber time!!
| REFERENCES |
The Illustrated Encyclopedia of Combat Aircraft of World War II By Bill Gunston Tiger Books International PLC, London 1990 ISBN 1-85501-096-8
Aircraft of World War II By Chris Chant Friedman/Fairfax Publishers © 1999 Amber Books Ltd. ISBN 1-58663-303-1
Jane’s fighting aircraft of World War Two 1946/47 Special edition © 1989 Bracken Books ISBN 1 85170 199 0
30 September 2019
Copyright ModelingMadness.com
If you would like your product reviewed fairly and fairly quickly, please contact the editor or see other details in the Note to Contributors.
Back to the Main Page Back to the Review Index Page Back to the Previews Index Page